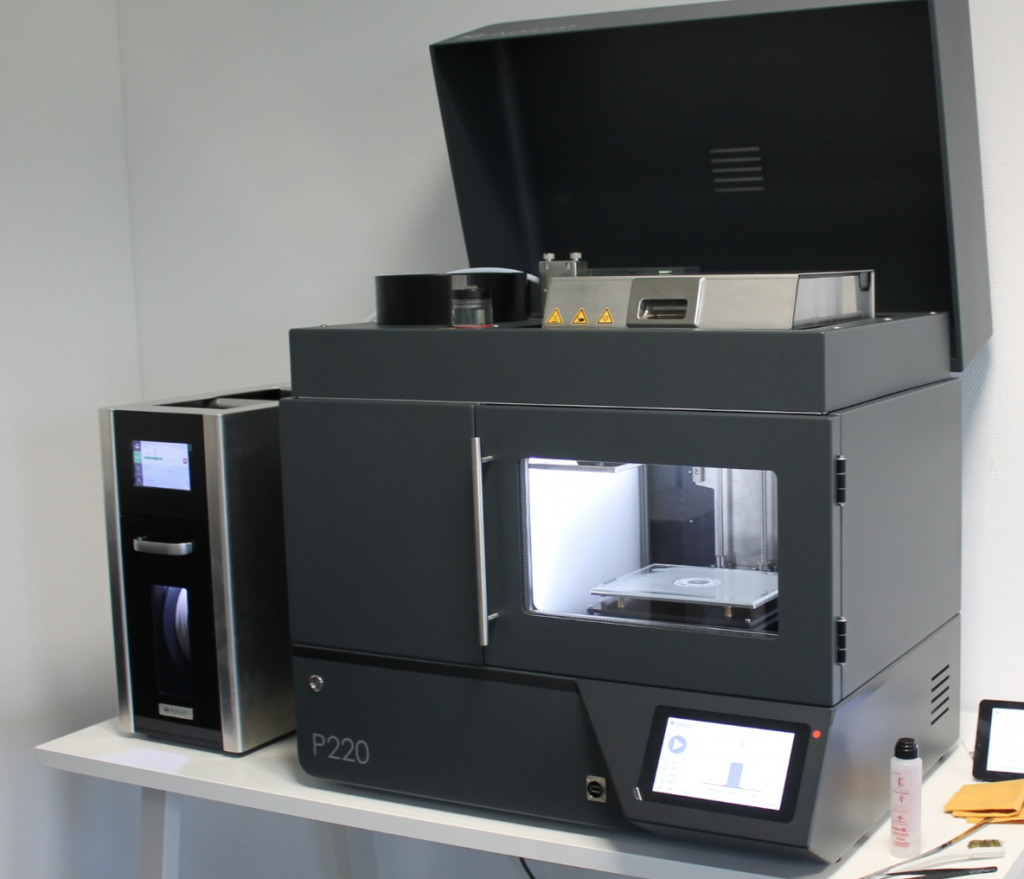
The Apium P220 is an industrial 3D printer recommended for use with high performance polymers including PEEK, carbon fiber reinforced PEEK, POM-C, PVDF, and PEI 9085. A functional, robust and highly resistant part output, the system has been a forerunner for Germany’s Apium Additive Technologies GmbH since the beginning of 2017.
In a visit to Heidelberger Druckmaschinen AG, Apium’s production partner, 3D Printing Industry engineers assessed the abilities of this compact industrial 3D printer, identifying the company’s expertise working with high-temperature polymers.
Apium P220 setup and training
On purchase of an Apium P220 3D printer, customers are offered the choice of two levels of training to gain familiarity with the system, and 3D printing with PEEK/other high performance polymers. In Basic Training, the customer follows a one day course with the Apium team, and Advanced Training spans two days. Given the opportunity to compare the two options our engineering team recommends Advanced Training, with Basic Training perhaps better serving PEEK specialists or teams already in possession of a high performance polymer 3D printer.
A large portion of Apium’s training focuses on design for additive manufacturing (DfAM) specifically when using such high end materials. It also addresses the challenges in 3D printing these demanding polymers. Slicer training is conducted in Simplify3D.
For post training – the Apium P220 is supported by a clear instruction manual, complete with a list of FAQs, maintenance recommendations and common troubleshooting.
As the P220 was already setup on our arrival at the production facility, we were instead given a demo of the machine’s setup. Customers are guided through the whole process on the 3D printer’s screen. Each step is explained clearly and easy to follow. WiFi setup using a serial number worked seamlessly. Material selection and the loading process was also easy to understand.
Bed leveling on the P220 is, at present, a semi-automated process. With 3 registered positions, users can manually adjust the height of the bed using 3 knobs, guided again by the 3D printer’s screen and relevant points in the user manual. The company recommends that the customer repeat this process two – three times to achieve the optimal positioning. Understandably, this takes a significant amount of time but it is a small expense when preparing to work with such challenging materials.
First impressions
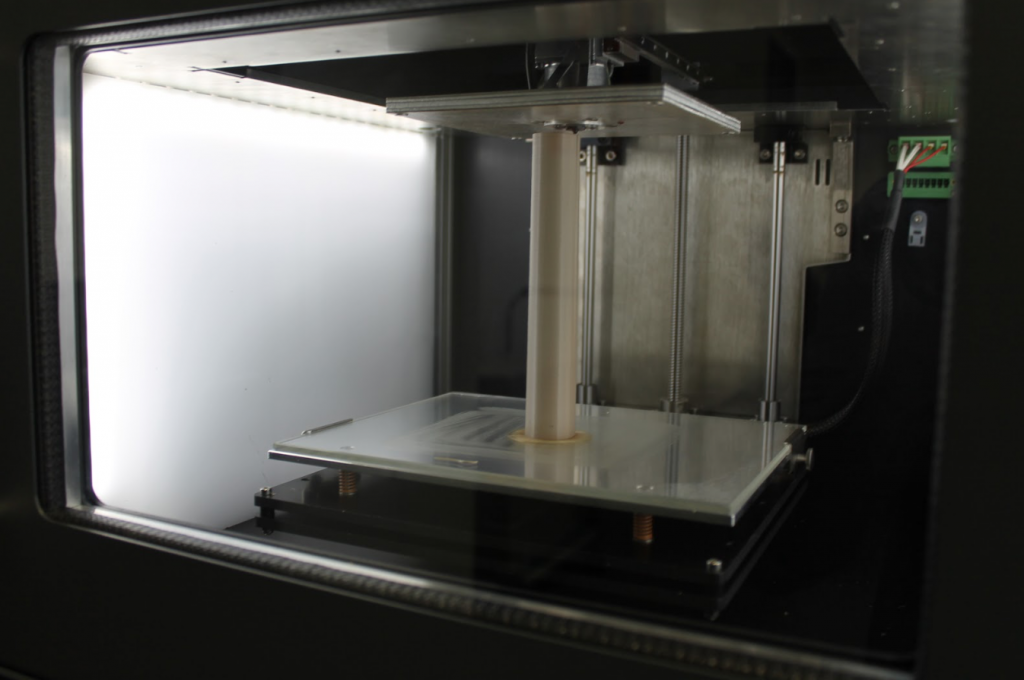
The built plate on the Apium P220 is supported by an industrial grade threaded rod and two linear guides, and the X Y axis is sturdy. Both features are designed for precision. The sturdiness of the system is also remarkable considering the added weight on the hot end from the machine’s integrated adaptive heating system. We assume that the weight is partly compensated by the bowden-style extrusion system.
When active, the 3D printer is very quiet and has minimal vibrations. The build chamber is well insulated, including glass on the door, which is very good for safety.
Though slicer training in conducted in Simplify3D, customers are free to use their preferred slicing software to prepare prints. Typically, the system uses .stl and .gcode file inputs fed either via USB or using a web based application. In addition to Wi-Fi control the Apium P220 can be connected using WLAN and Ethernet. The connection process for this is very straightforward.
3D printing PEEK on the Apium P220
The print volume of the Apium P220 is 205 x 155 x 148 mm. To verify the bounds of the bed, the first test was 3D printed four small squares in each corner of the bed, and a cylinder 148 mm tall. Each of these parts were completed to our satisfaction, and showed that the system is adept at 3D printing simple, geometric parts.
Increasing the complexity, the second object the team chose to print was a 3D printer torture test. A 100 x 100 mm square, the torture test is printed without support. Once cooled, and still attached to the build plate, we observed a slight warping in the four corners of the part. This is unsurprising as PEEK is renowned for warping.
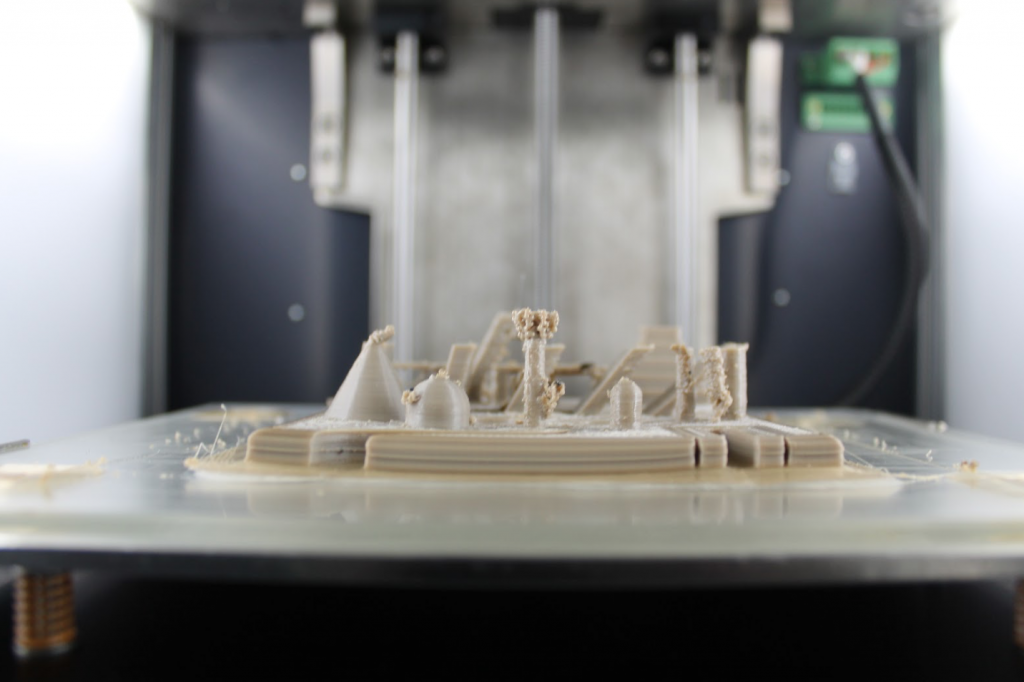
Unfortunately, the central “tree” used on desktop of FDM 3D printers as a demo of the “hairy” effect broke during this test, and its branches contaminated the rest of the print. It is worth noting here that this test artifact, and subsequent parts tried by the engineers were designed specifically for FFF testing of commodity materials like ABS and PLA rather than this grade of polymer. PEEK 3D printing especially, has different requirements for successful 3D prints.
Many of the smallest features of this plate were also beyond the accuracy of 3D printed PEEK so allowances were made for certain failures, such as the 2 mm cylinder and the top of a pyramid. Objects that did fall within the P220’s range for PEEK 3D printing, i.e. the gradually toppling pillars at the center of the plate and the stacked pyramid (pictured bottom left in the photo below) 3D printed very well.

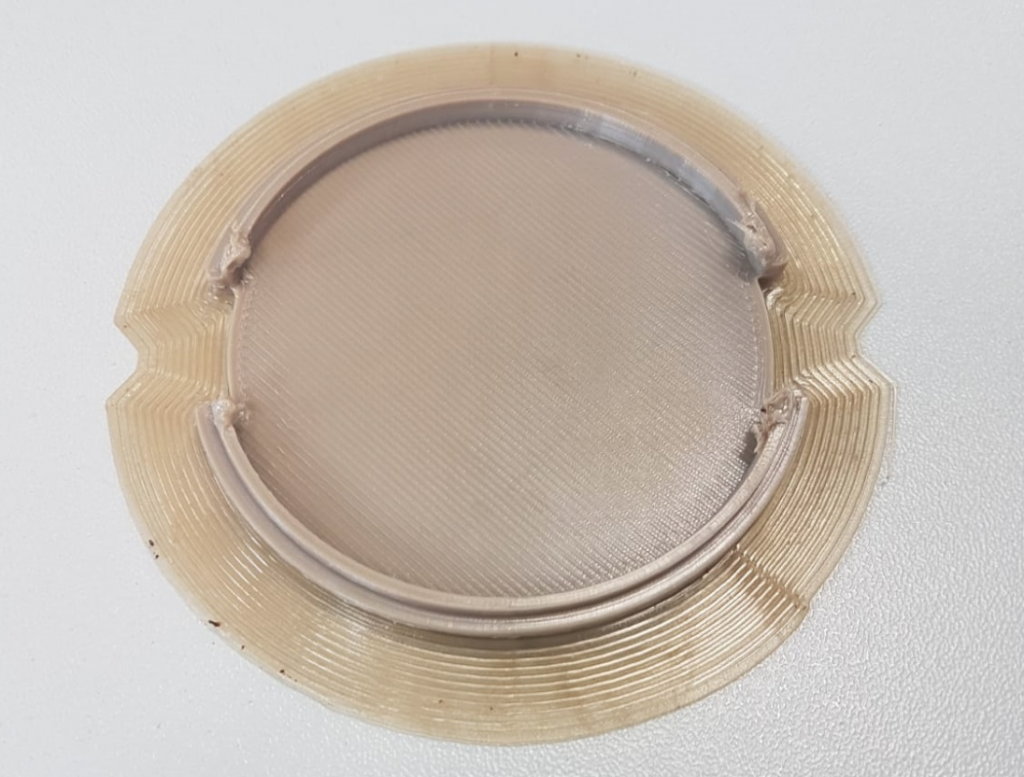
When removed from the bed we also found that the brim of the test square was very well printed. The half sphere, pyramid, and river are precisely printed and the hinge of the part moves as required, again demonstrating very good geometrical accuracy.
Adequate support structures, as detailed in Apium’s Advanced Training, would have resolved the issue this test print had with bridging and warping.
Further confirming the need for part optimization, and proving just how challenging it is to 3D print using PEEK, the micro features of a sample of small gears we tested on the 3D printer also failed. Bigger functional gears, around 5 cm in diameter, were completed perfectly.
Using the Direct Print setting on the Apium P220, a feature used only for simple 3D prints, the team also succeeded in 3D printing a replacement lens cap for a camera. The software sliced the part in less than 10 seconds and the .gcode was created and saved in the printer’s memory. For the chosen part, Direct Print worked very well, and is a welcome feature when in need of a quick, simple object.
After multiple PEEK 3D prints at 480°C, the structure of our test parts remained sturdy with no sign of weakness.
Adaptive heating system on the Apium P220
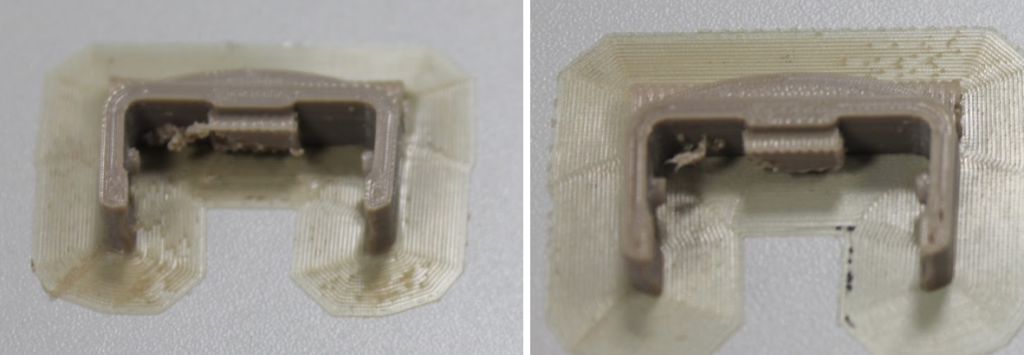
One of the most important features of the Apium P220 is its adaptive heating system, installed specifically to help with the temperature balance needed to work with high performance polymers. Visually, the difference between a part 3D printed using the system, and one made with the system disabled, is subtle. However, on closer inspection, there is a definite difference in layer adhesion throughout two otherwise identical parts.
In Part 1, a PEEK component 3D printed using the adaptive heating system, support structures are more difficult to remove, highlighting a higher adhesion rate.
In one final test, we also checked the ease of switching filaments on the Apium P220. For this purpose, the nozzle must be changed so as not to contaminate the polymers. Changing the nozzle is simple and took just over two minutes to complete using a tool boxed with the 3D printer.
Both insertion and removal of the filament is automated by the system. We changed the filament from PEEK to PEI and the extruder pushed the filament through the new nozzle. After this, the only thing to do was to verify the humidity during extrusion, which can be seen with the apparition of bubbles.
Engineer’s summary of the Apium P220
The Apium P220 is easy to set up and easy to use, which is helpful considering the materials used are so difficult to work with. The Advanced Training offered by the company came in especially handy concerning these challenges, and we would recommend this option for any potential customers. Throughout our tests, the 3D printer performed consistently at a high temperature of 480°C. It has a strong and robust construction guaranteeing the longevity of the system.
In addition, on our visit with Apium, we were presented with information on the company’s end-user experience. From sales through the several years of use, the company promises to provide a high level of customer support which is encouraging to the prospective buyer.
The 3D printer’s patent pending intelligent thermal moderator, control software and advanced extruder verify it as a high performing professional 3D printer capable of working with PEEK, carbon fiber reinforced PEEK, PEI, POM-C, and PVDF. It’s compact size would also make it at home in any engineering workshop, and features like the Direct Print setting are useful.
Based on our experience, we can confidently say that the Apium P220 delivers its main claims, and we are assured of the 3D printer’s capabilities.
For all the latest 3D printing news and reviews subscribe to the 3D Printing Industry newsletter, follow us on Twitter and like us on Facebook.
Seeking jobs in engineering? Make your profile on 3D Printing Jobs, or advertise to find experts in your area.
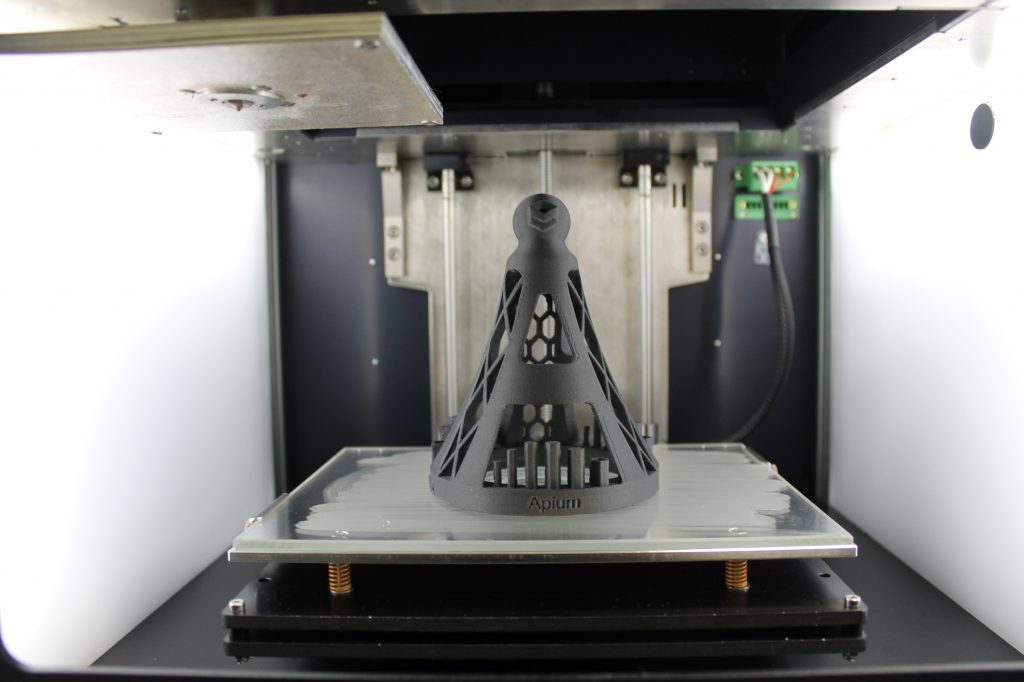
Featured image shows the Apium’s 3D printed test object on the P220 high performance polymer 3D printer. Photo by 3D Printing Industry