
Chinese 3D printer manufacturer AnkerMake, owned by electronics device company Anker Innovations, was founded back in 2020. The company launched its first 3D printer, the AnkerMake M5, in 2022.
In this article we review the M5C, the latest addition to AnkerMake’s desktop FDM 3D printer portfolio. According to AnkerMake, the M5C combines affordability and ease of use with high-speed, high-quality 3D printing.
Priced at just $399, the M5C is targeted towards users of all levels, and is ideal for newcomers to the industry. Indeed, AnkerMake’s new 3D printer is advertised as allowing users to “make more with less effort.”
Key features of the AnkerMAke M5C
With 500 mm/s maximum 3D printing speed and 5000 mm/s² acceleration, the M5C also boasts a 35 mm3/s maximum flow. As such, AnkerMake claims that users can quickly and easily 3D print parts, without compromising on quality.
The M5C is advertised as enabling 50µm resolution when 3D printing in the dedicated “Precision Mode.” The M5C also offers “Fast” and “Normal” 3D printing profiles.
The 3D printer has also been designed with a 5 kg base and reduced center of gravity, ensuring lower than 0.08 mm vibration amplitude during high-speed 3D printing.
The M5C offers wide-ranging material compatibility, allowing users to 3D print in PLA+, TPU, ABS, PETG, PA, PETG-CF, and PA-CF. This is thanks to the 3D printer’s stainless steel hotend and 300℃ maximum nozzle temperature, which also offers diameter options of 0.2 mm and 0.4 mm.
Ease of use is bolstered by the M5C’s 7 x 7 auto bed leveling feature. Here, the 3D printer examines a total of 49 points on the build plate, calculating a virtual height map to ensure a good first layer at the start of each 3D print.
Easy assembly in under 10 minutes
The AnkerMake M5C is designed with ease of use in mind, and is optimized for entry level users. As such, the unboxing and assembly process for this 3D printer is especially straightforward.
Users need only to attach the gantry to the base and tighten a few screws to assemble the M5C. Our team had our model out of the box and assembled in less than 10 minutes. The fact that the 3D print head is already mounted onto the gantry plays a key role in keeping the setup process so easy.
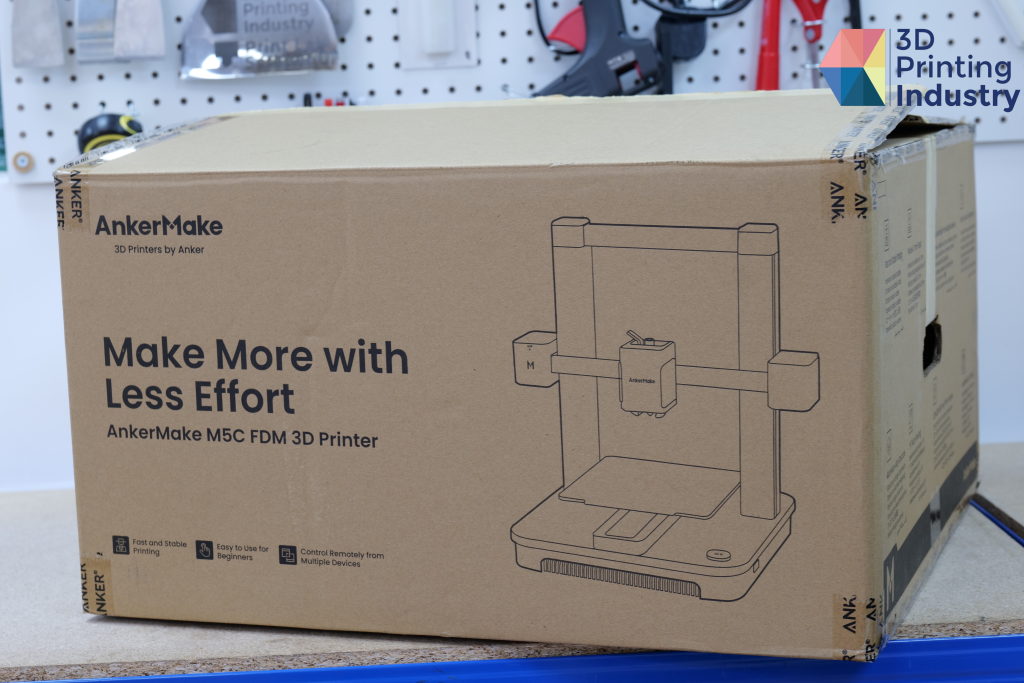
The M5C came very well packaged, shipped in a cardboard box with a generous amount of well cut foam panels. This ensured that our M5C arrived in pristine condition, free from damage or any missing parts.
The 3D printer comes with a maintenance and accessories kit, a physical manual, and an extra set of nozzles. The package also contains tools needed for setup and 3D printer maintenance.

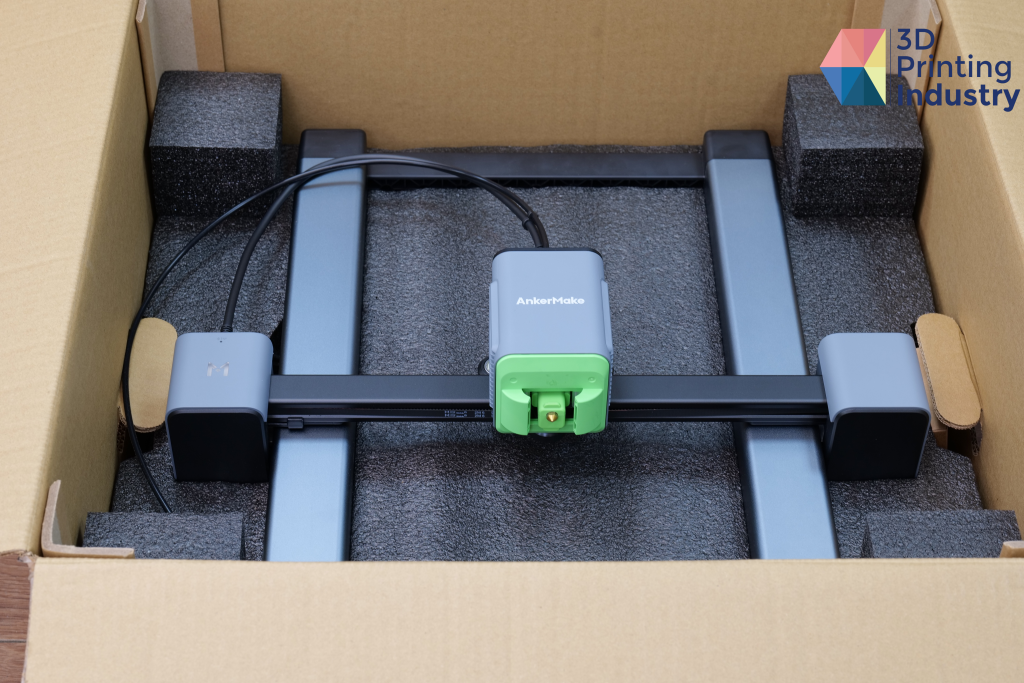
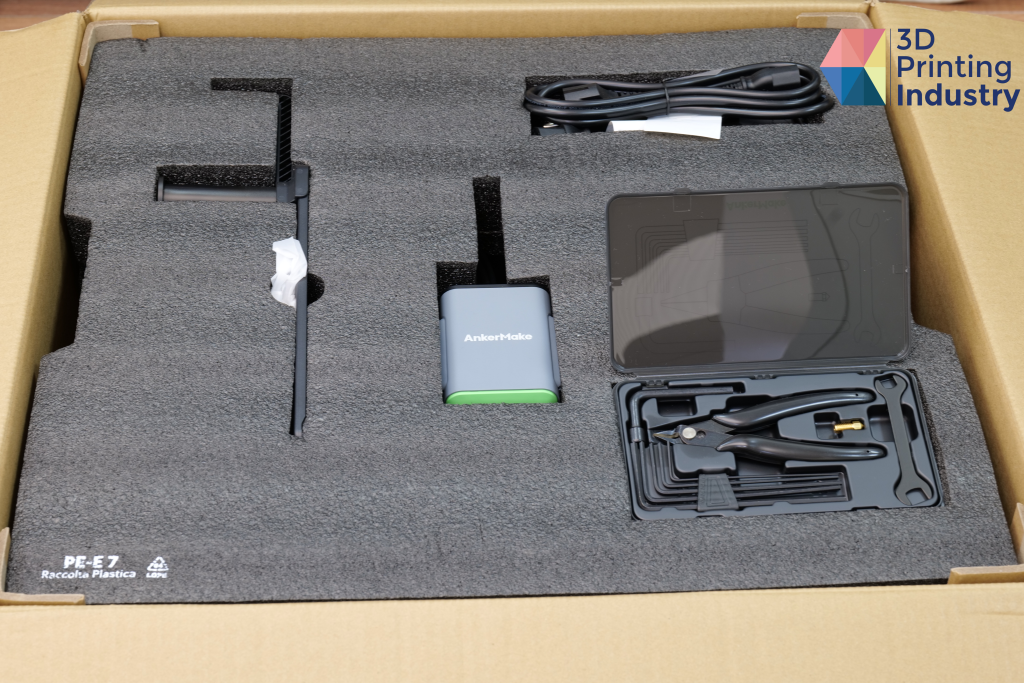
3D Printer Packaging and Unboxing. Photos by 3D Printing Industry.
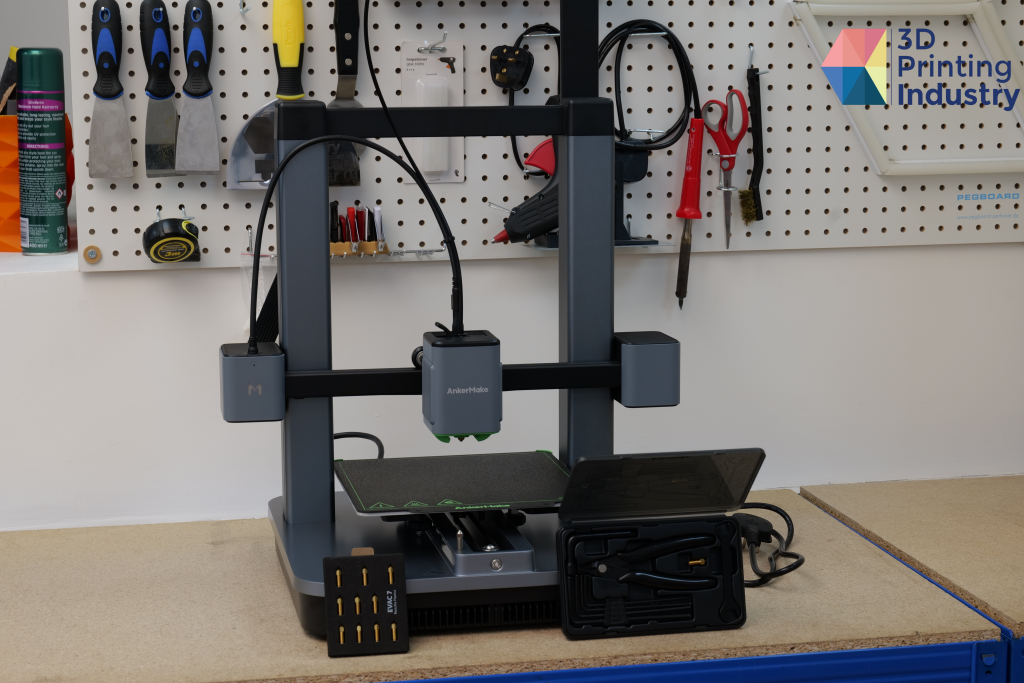
A sleek and compact design
AnkerMake’s new 3D printer sports a sleek open design. The M5C’s all-aluminum enclosure covers components such as the motors, sensors, and other vital movement mechanisms, giving the 3D printer a clean and minimalist look.
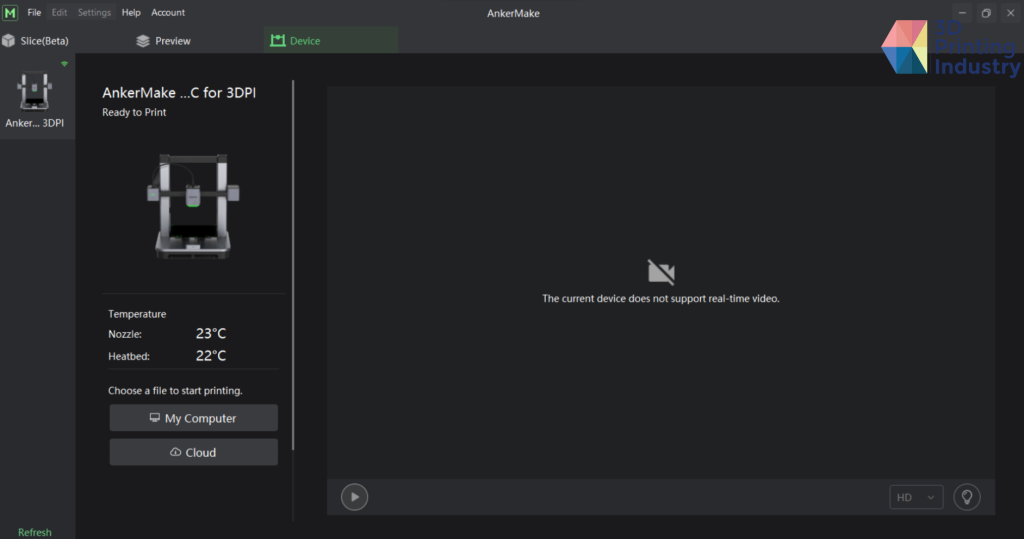
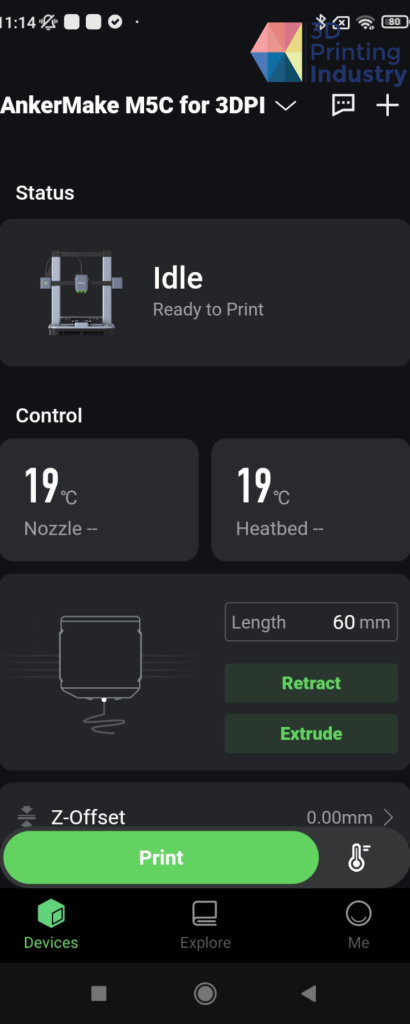
Indeed, this minimalism is reinforced by the lack of a digital interface. Instead, the M5C body includes a single button for pausing and resuming 3D print jobs. All other 3D printing operations are controlled via the Ankermake app and AnkerMake Slicer.
An especially compact 3D printer, the M5C measures just 355 x 355 x 480 mm and possesses a total build volume of 220 x 220 x 250 mm. This sizing makes the 3D printer ideal for desktop users pursuing prototyping, DIY, and model-making applications.
Another small yet practical feature is the fact that the spool holder is placed at the top of the 3D printer, rather than at the side. This results in less tension during 3D printing, ensuring a more consistent material flow and minimizing the chance that the filament will snap.
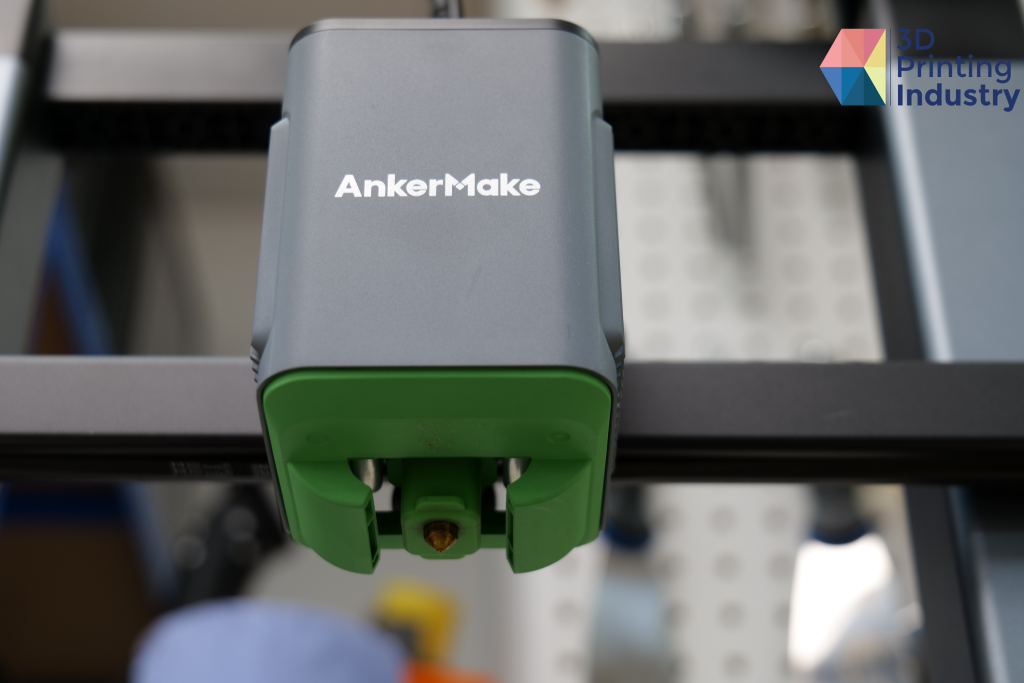
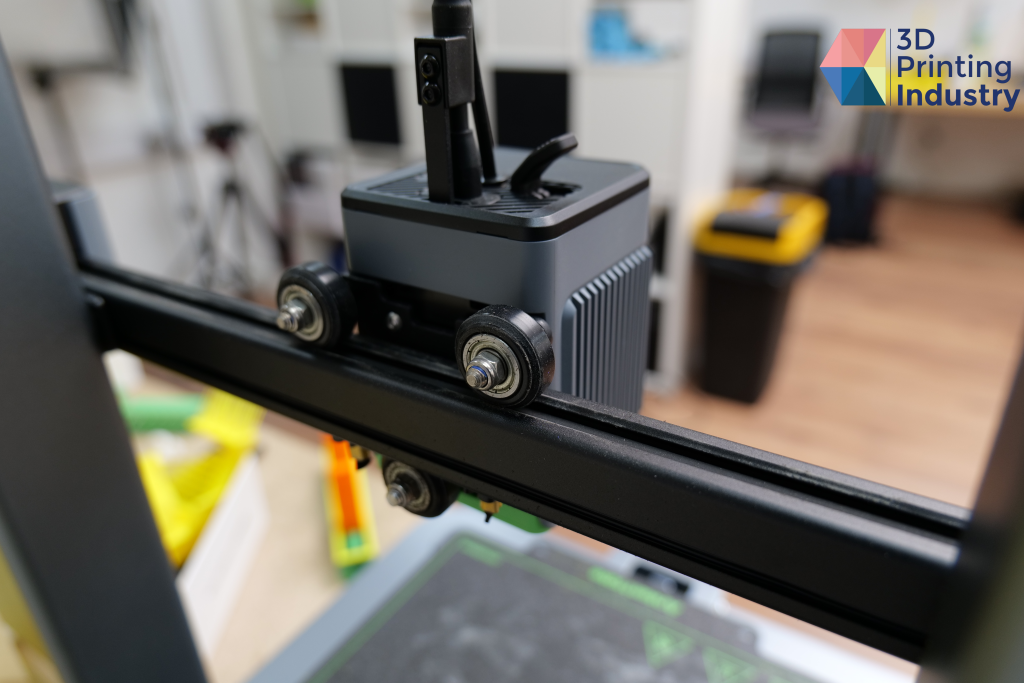
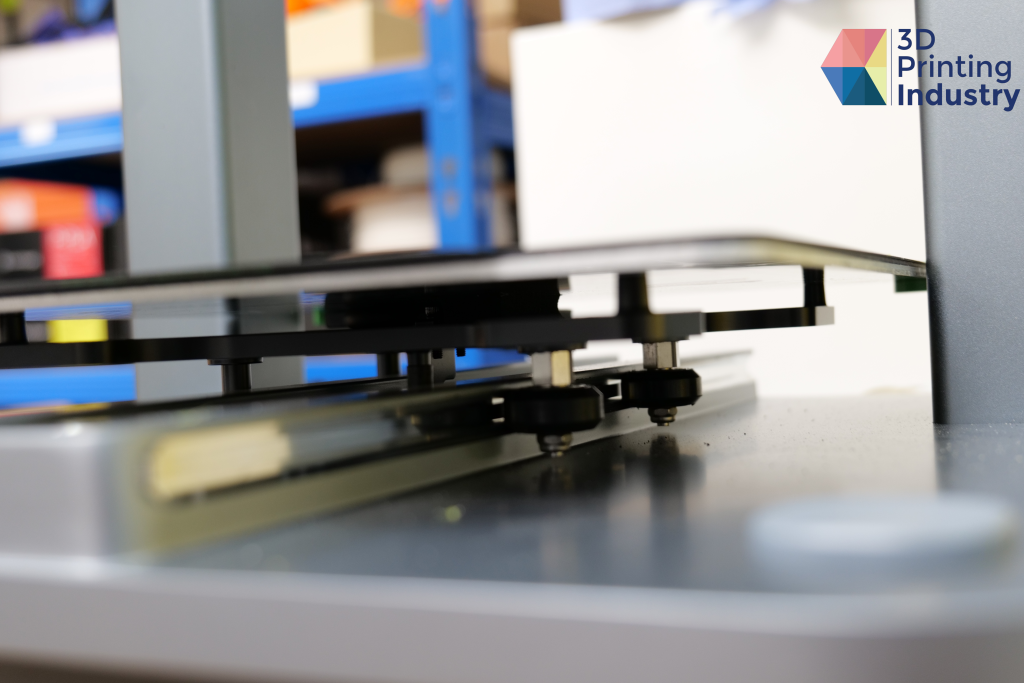
The M5C with accessories, and close-ups of the 3D print print head and motion system. Photos by 3D Printing Industry.
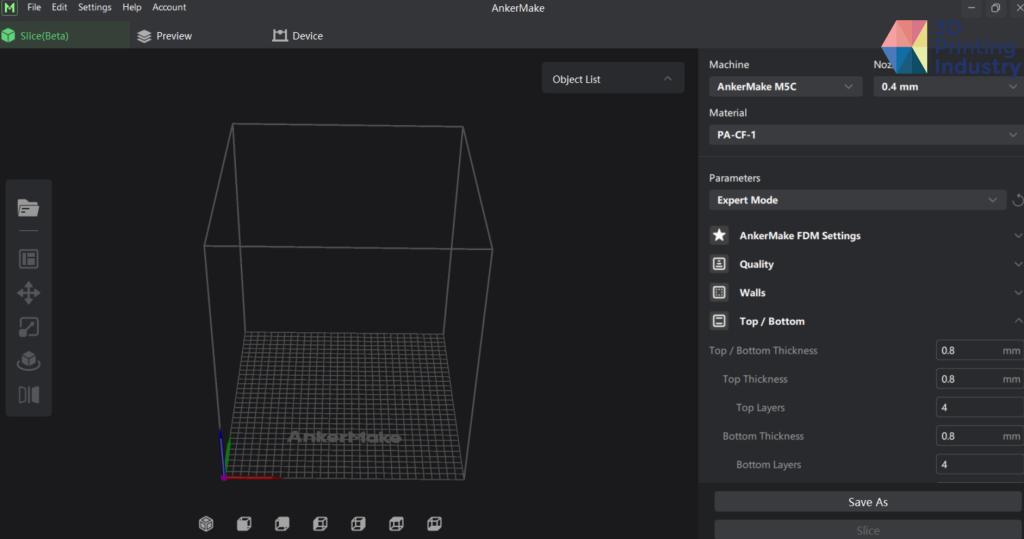
AnkerMake Slicer
The M5C comes with its own slicing software, called AnkerMake Slicer. This software is the only slicer that can directly control the M5C’s 3D printing process. AnkerMake also provides a mobile app, which can also be used to control 3D print jobs on the M5C. The app also includes a range of preset models ready for immediate 3D printing.
Overall, we found the AnkerMake Slicer and app to be fairly proficient. Our team was able to achieve good results with the provided slicer and material profiles, without needing to make any major adjustments. The overall design UI of the slicer was intuitive and easy to navigate, making it well suited to the entry-level target market of the M5C.
The M5C is, of course, compatible with gcode, meaning that users can use third-party slicers to slice and export their 3D print files. However, as AnkerMake Slicer is the only software to have direct network integration with the M5C, externally sliced 3D prints can only be uploaded via a USB-C stick. Users must then use the AnkerMake mobile app to start the 3D printing process.
AnkerMake Slicer and mobile app interfaces. Images by 3D Printing Industry.
Benchmarking test
We began our testing with a test file 3D benchy, which was downloaded from the AnkerMake app. We 3D printed two different benchy’s in AnkerMake PLA+ filament, using both the M5C’s fast and normal modes. These models 3D printed in 17 minutes 40 seconds and 47 minutes, respectively.
As expected, the normal speed benchy 3D printed with the better surface finish of the two, with fewer imperfections. This benchy had no defects around the frames or bridge areas, highlighting the M5C’s good cooling capabilities. The fast print, however, did not offer enough time for cooling, resulting in some issues on the underside of the roof.
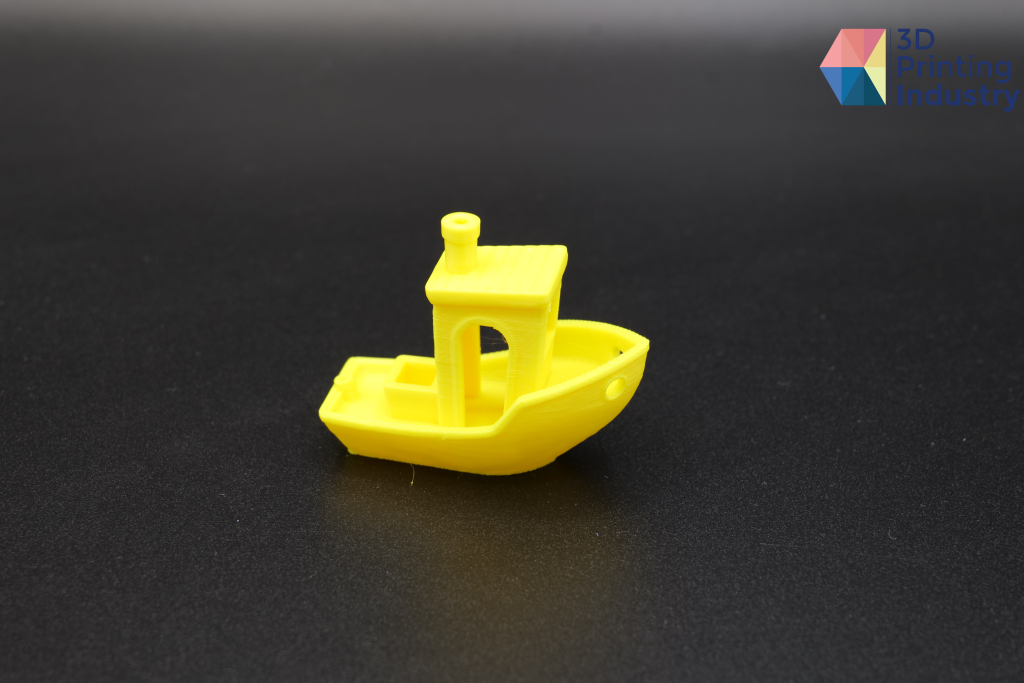
3D printed benchy tests. Photos by 3D Printing Industry.
We next conducted a circular trajectory test to evaluate the M5C’s ability to 3D print parts with circular sections. Our testing found a proportional difference in the dimensions between the X and Y axis. The X axis is closer to the target dimensions, and its deviation was fairly consistent. This was not the case for the Y axis.
The standard deviation of the Y-axis was also higher than that of the X-axis. This suggests an issue with the M5C’s motion system. This could be solved by editing the XYZ-steps, or by scaling the model in the slicer. However, M5C firmware configuration is currently inaccessible, meaning that XYZ-steps cannot be changed.
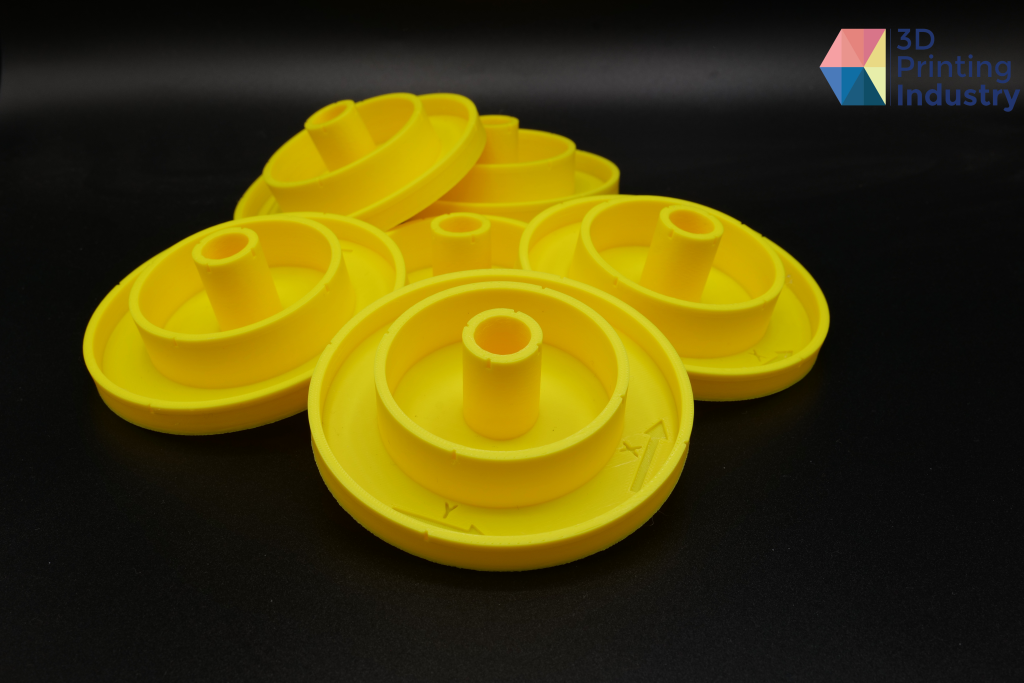

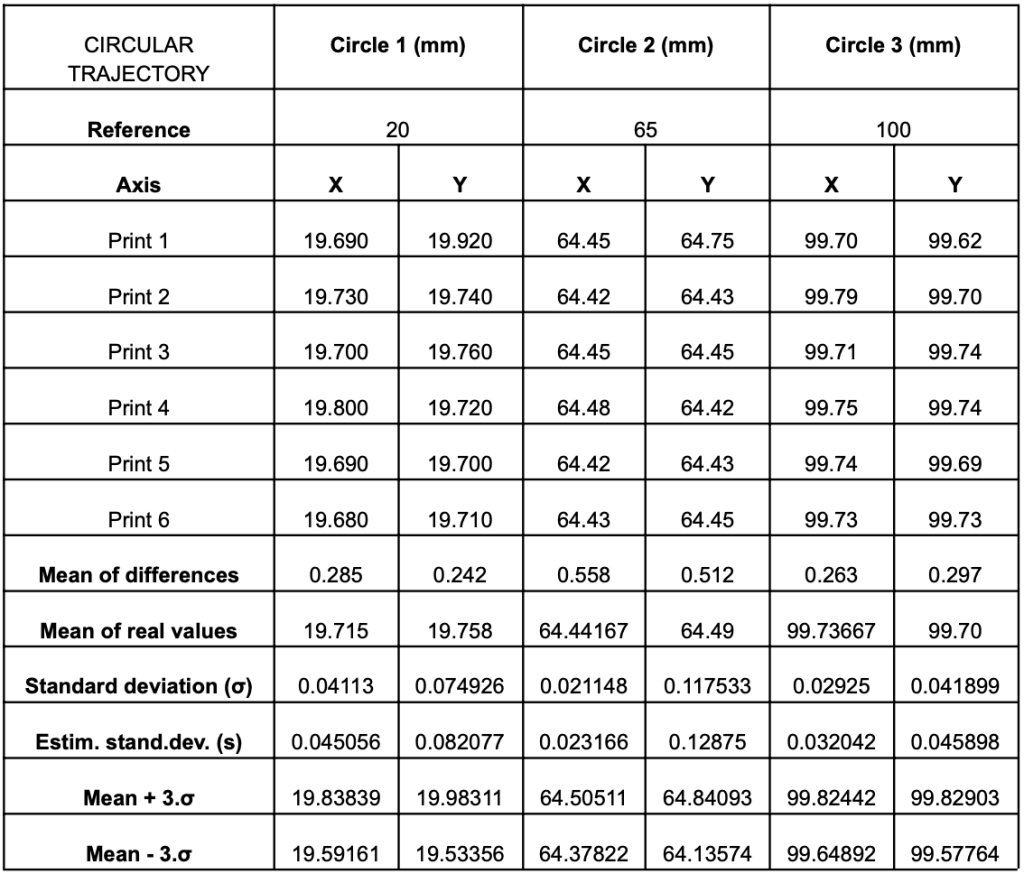
Circular trajectory 3D prints and measurement results. Photo and data by 3D Printing Industry.
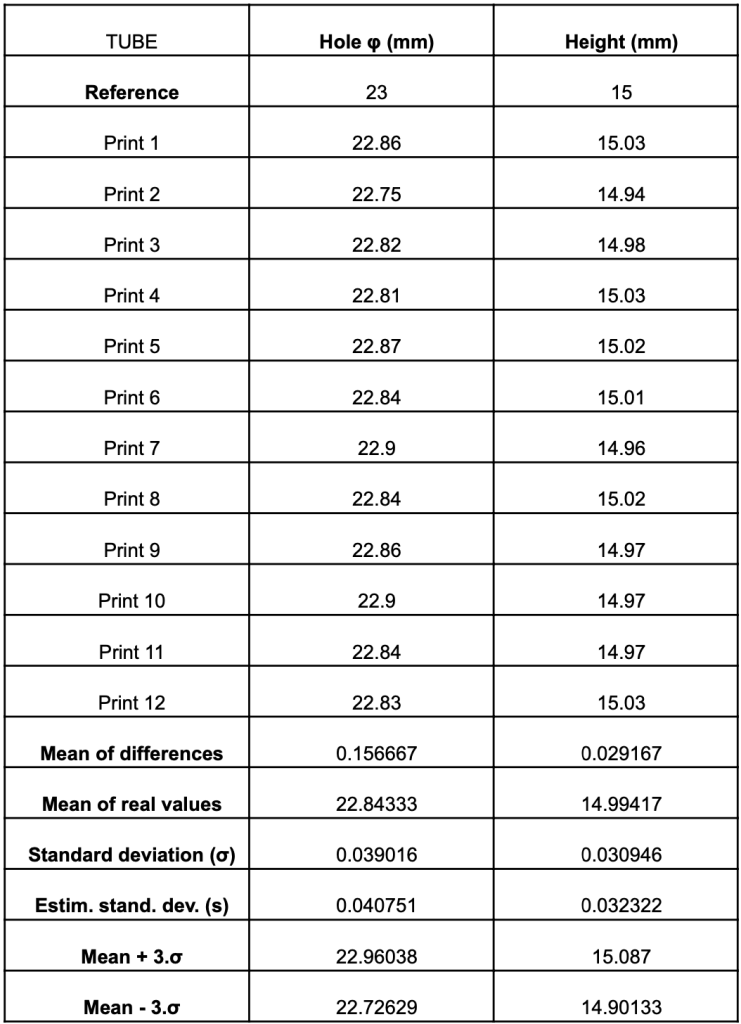
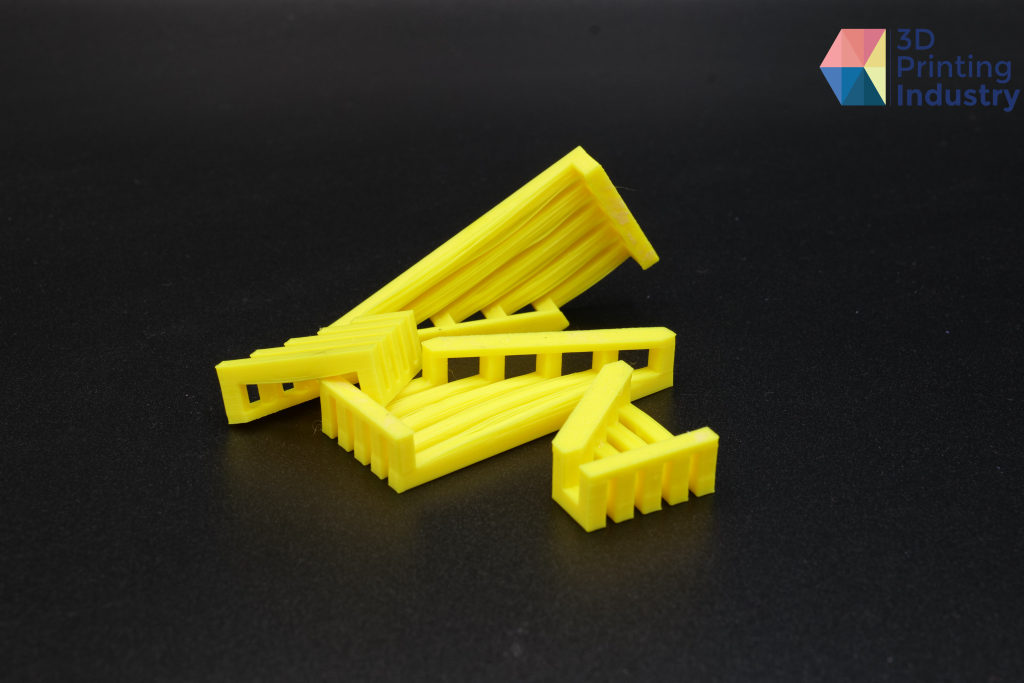
The repeatability of the M5C was also assessed. Here, three different parts (squares, hexagons, and tubes) were 3D printed in batches of 12 each. These parts were then measured, and then compared against the target dimensions. To pass this test, the average deviation should be under 0.1 mm, whilst the standard deviation should be under 0.05 mm.
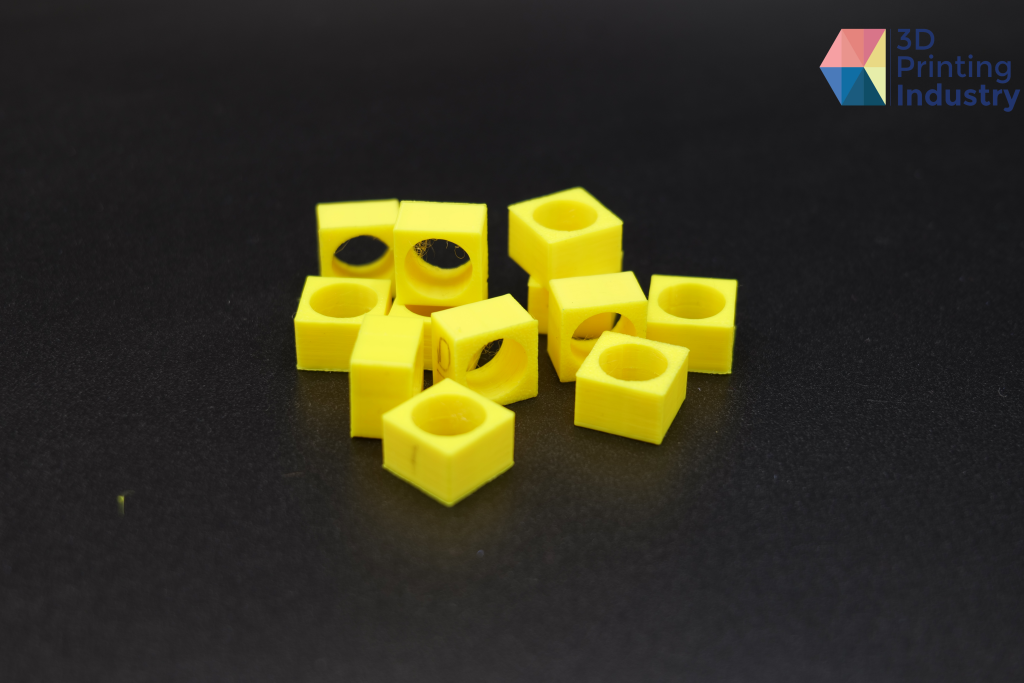
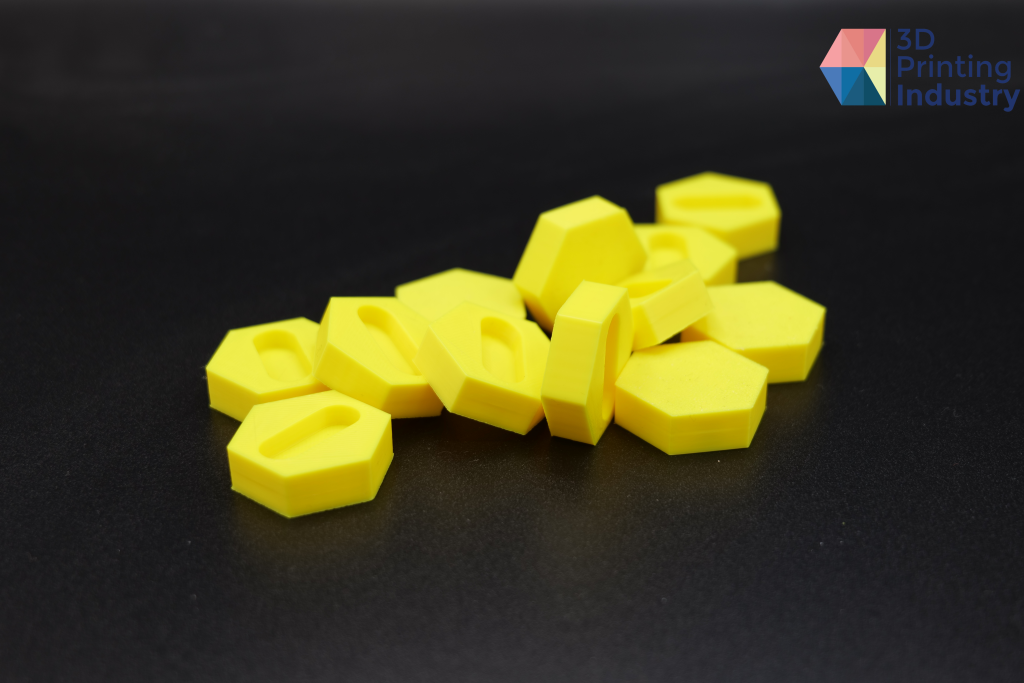
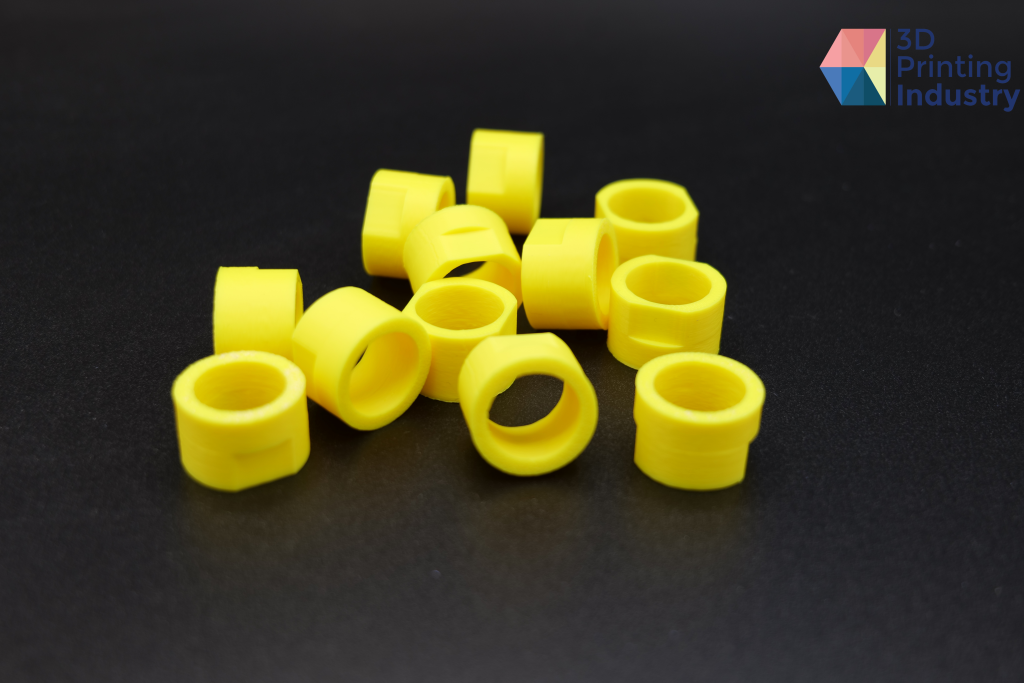
Repeatability test 3D prints. Photos by 3D Printing Industry.
Overall, all three tests performed quite well in relation to the X and Y dimensions, with the average deviations being within the desired range of under 0.1 mm and standard deviations being below 0.05 mm. However, discrepancies were found when printing diagonally for the hexagon parts. As with circular trajectory, this again suggests an issue with the motion system or the XYZ-steps.
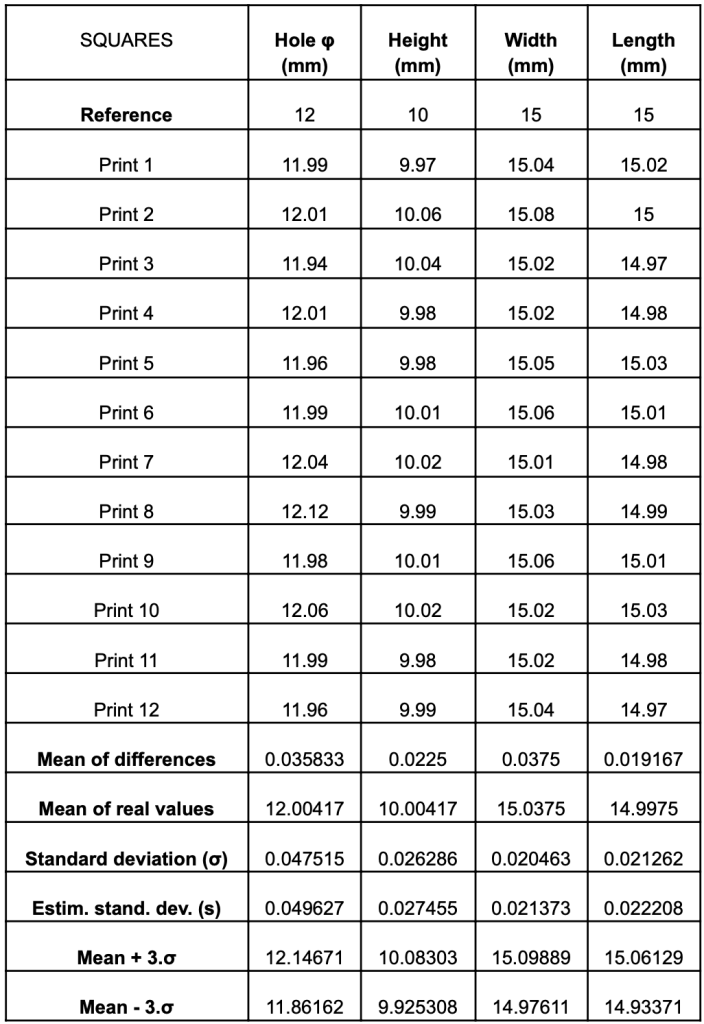
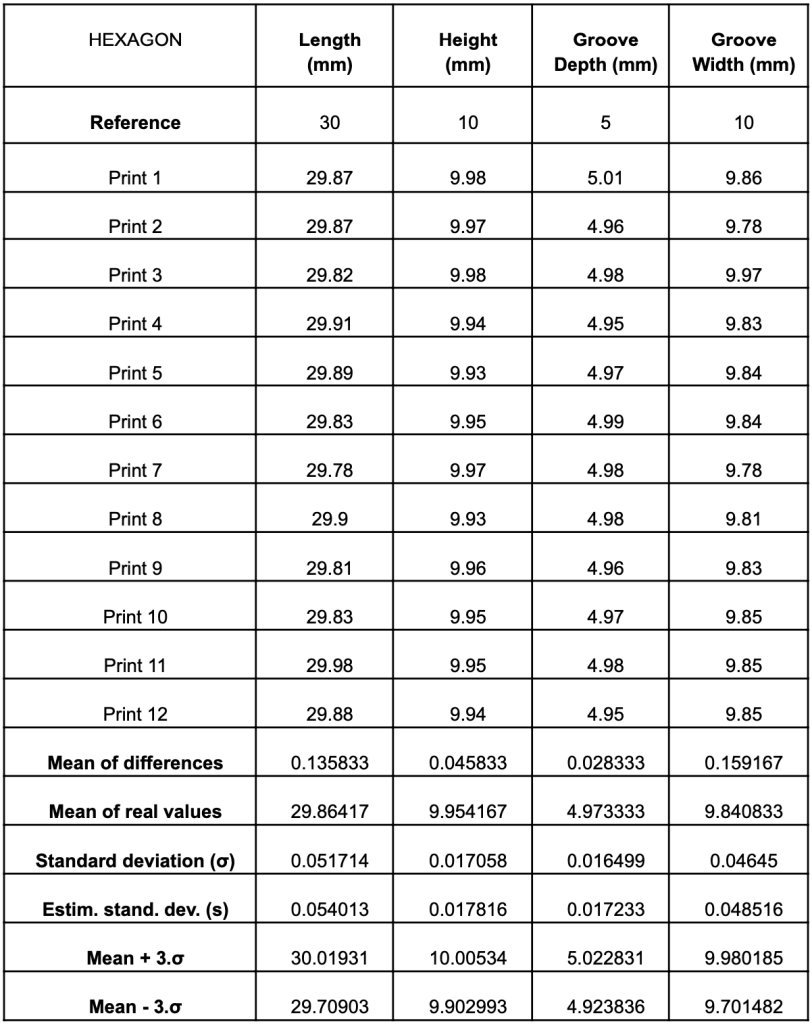
Repeatability test results. Data by 3D Printing Industry.
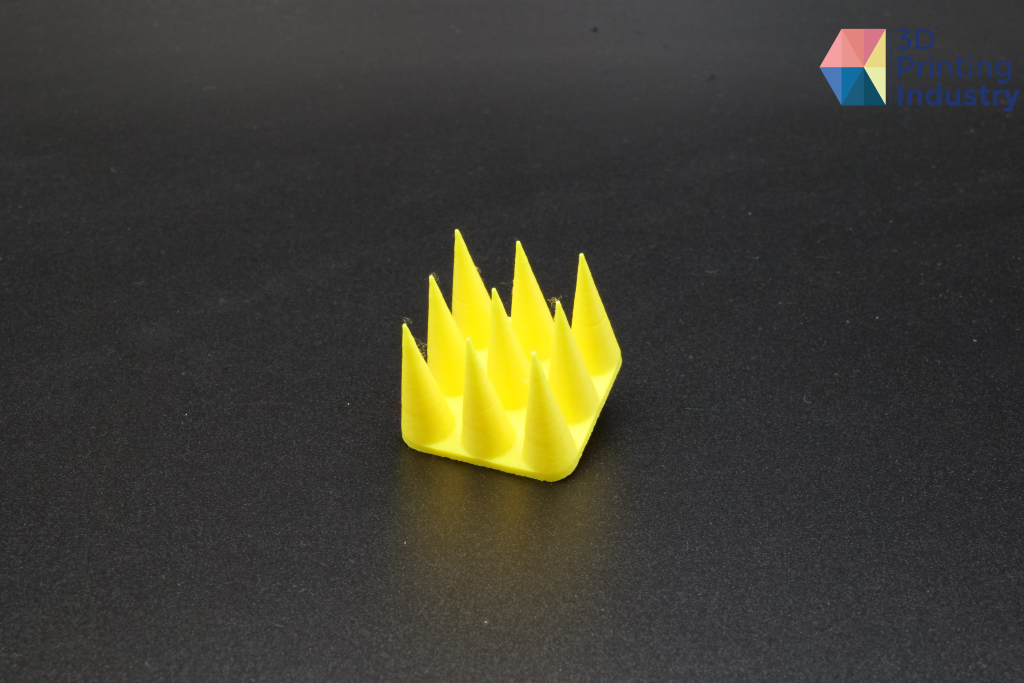
We next conducted a bridging test, designed to assess the M5C’s ability to 3D print without support. This is a good test to evaluate the cooling of the 3D printer, with better cooling generally resulting in a better bridge. The small bridge lengths start at 5mm and reach 25 mm in increments of 5 mm. The large bridge starts at 20 mm and reaches 60 mm in increments of 10mm.
All bridges were successfully 3D printed, with especially good results up to the 20 mm length bridge. Following this length, the bridges showed progressively more drooping. As most FDM 3D printers produce these defects after 15 mm, the M5C achieved above-average results on this test. It is especially impressive that these results were achieved at 3D printing speeds of 250 mm/s.
Bridging test. Photos by 3D Printing Industry.
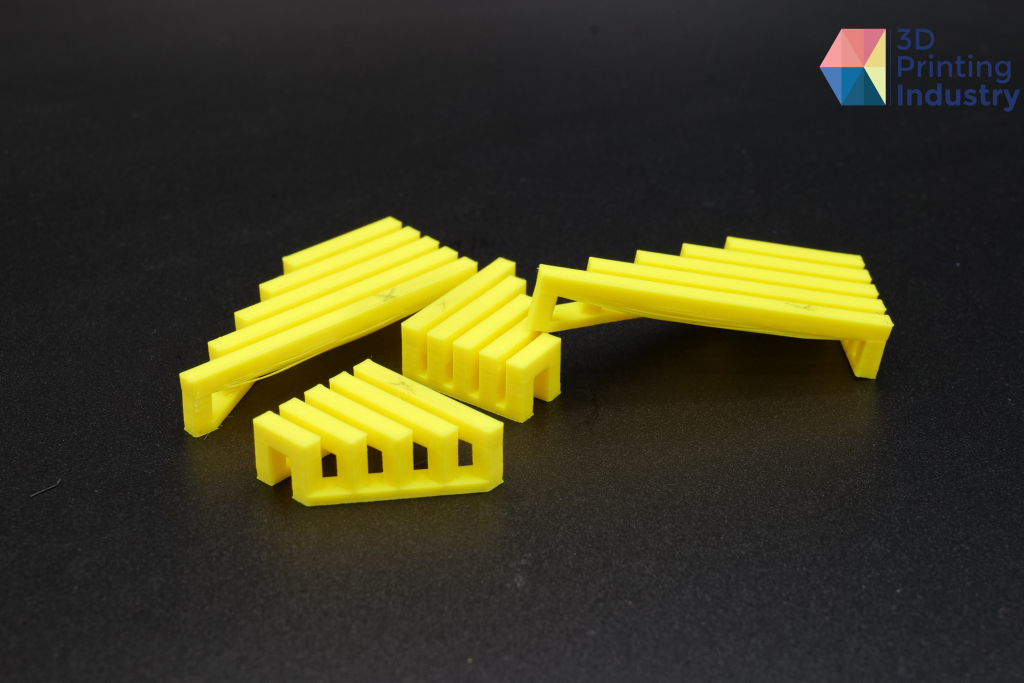
Tower and width tests were also conducted to determine the maximum 3D printing dimensions of the M5C. The tower part achieved dimensions of 45.1 x 45 x 249.5 mm, virtually reaching the maximum build height of the 3D printer (250 mm). The M5C also achieved good consistency in terms of surface quality, with no difference from top to bottom.
The width test part came in at 219.4 x 220 mm, with no warping or defects around the corners. As such, it is clear that the M5C can successfully 3D print close to its maximum horizontal dimensions.
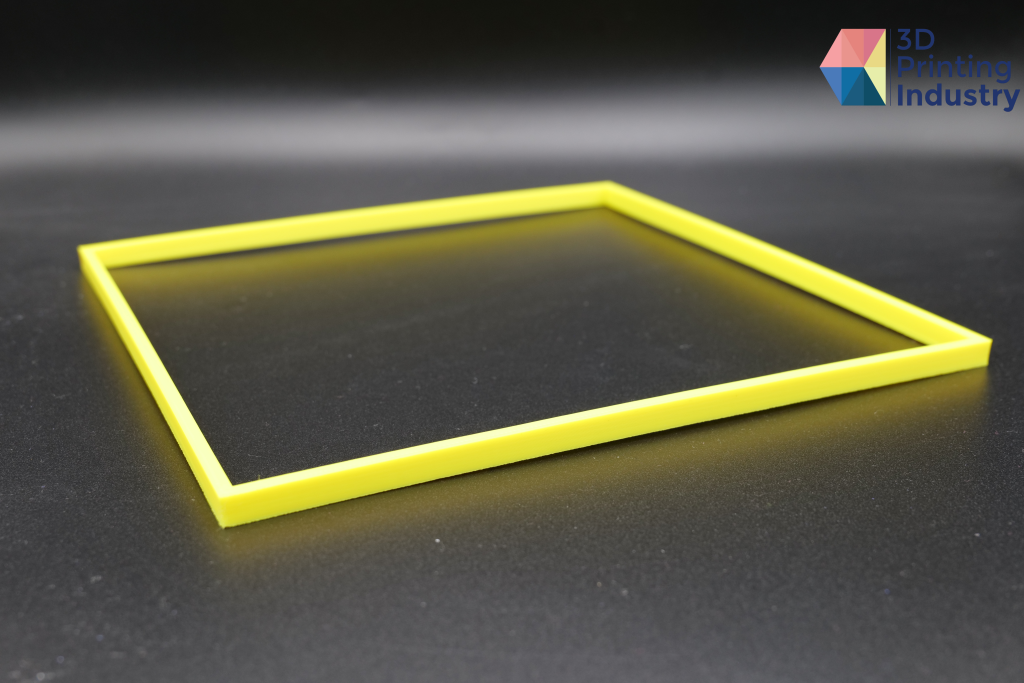
Tower and width tests. Photos by 3D Printing Industry.
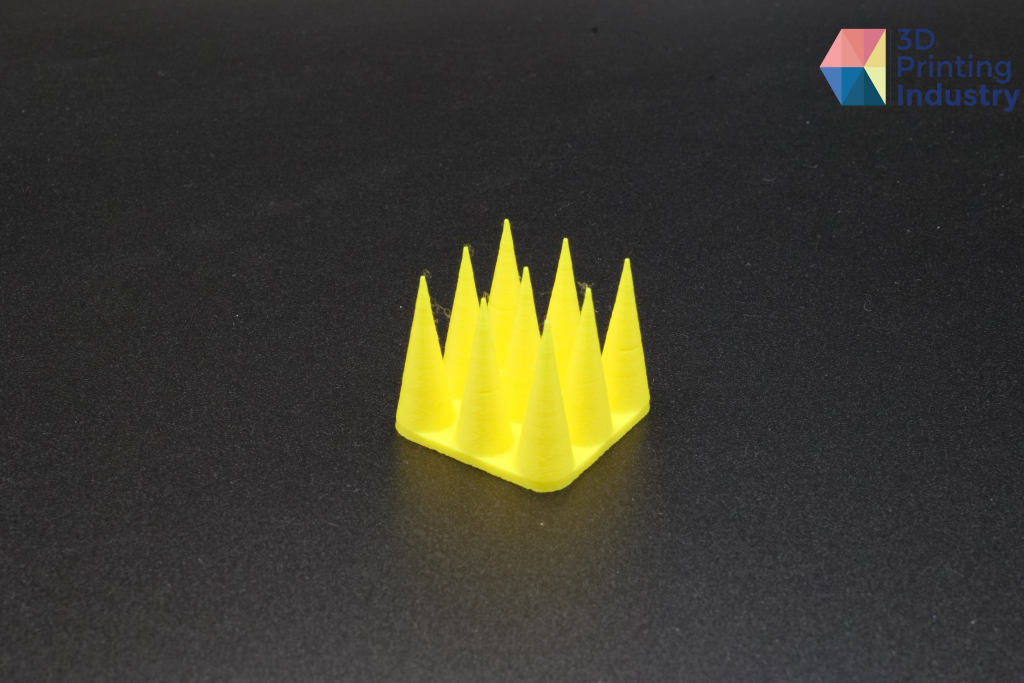
An overhang test was also conducted to determine the 3D printer’s maximum printable overhang angle without supports. The test pieces consist of 6 overhangs each, increasing in increments of five degrees from 40° to 65°.
Overhangs under 55° 3D printed quite well, however the 60° and 65° overhangs failed with noticeable gaps between layers. As the parts were printed at the standard 250 mm/s speed, we view these results as very good. Slower speeds would allow for more cooling, improving the overhangs.
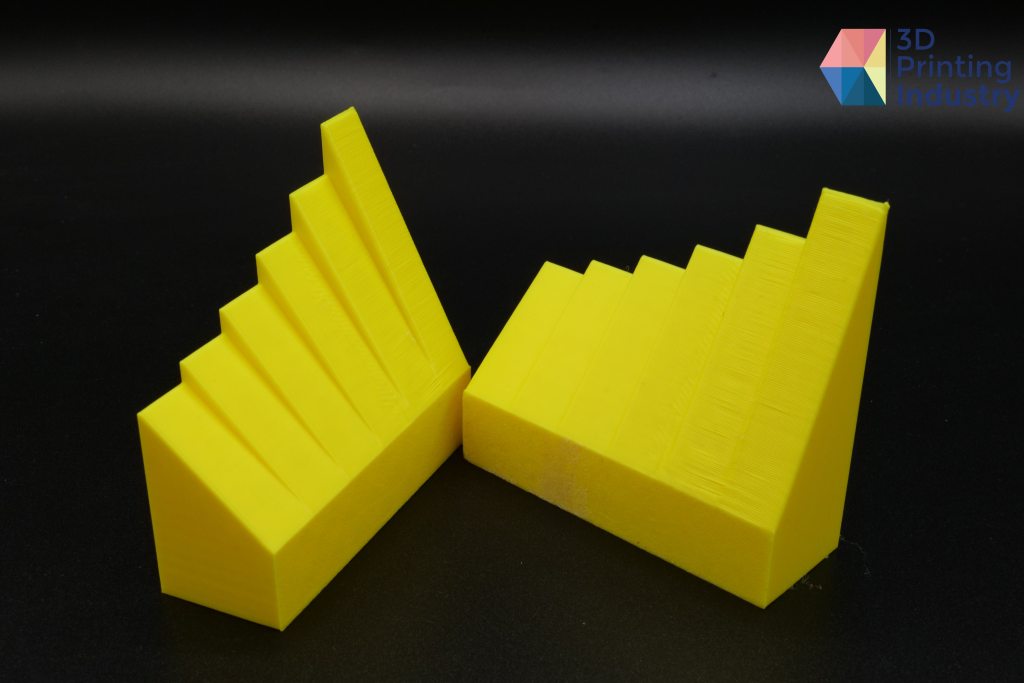
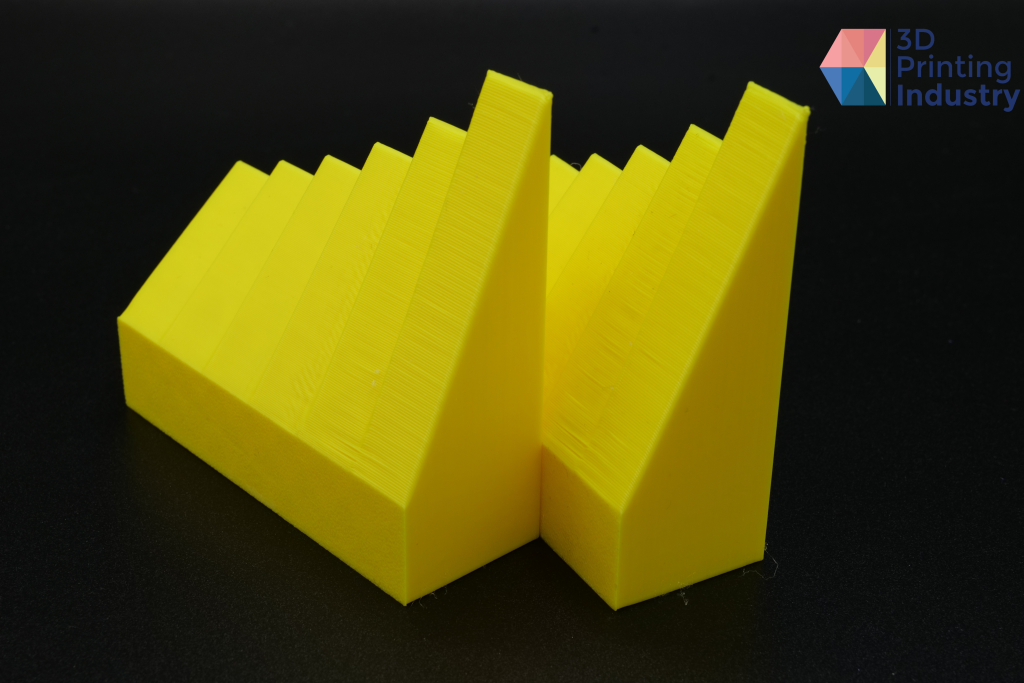
Overhang tests. Photos by 3D Printing Industry.
We next conducted a retraction test, the results of which were quite impressive. There was no stringing or artifacts present, apart from some wisping at the top. This is due to the M5C hot nozzle temperatures and the direct drive mechanism, which enable more control over filament extrusion.
We also conducted our in-house 3D Printing Industry (3DPI) benchmarking test, which includes a variety of different tests in one model. 3D printed in PLA+. This test was repeated three times using the M5C’s normal, precision and fast profiles. The M5C performed well here, except within the accuracy test.
The main differences between these three 3D prints related to overhang capability, and the ability to 3D print with good negative precision. Surprisingly, the fast profile achieved the best negative precision result, capable of 3D printing a 0.15 mm negative precision, compared to 0.2 mm achieved by the other two profiles. The only issue we encountered with the fast 3D print were poor overhang capability and surface quality, with this profile leaving visible cavities on the outer layer.
The precision test performed the best in terms of overhangs. This was expected, as the extruded filament was exposed to the cooling fan for longer compared to the faster 3D prints.
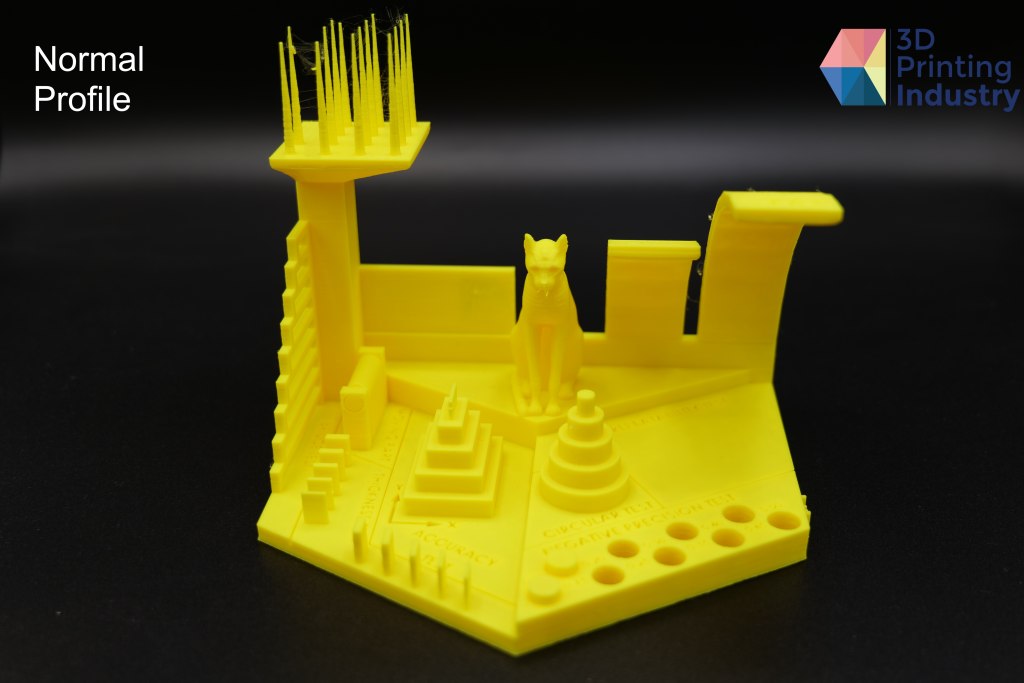
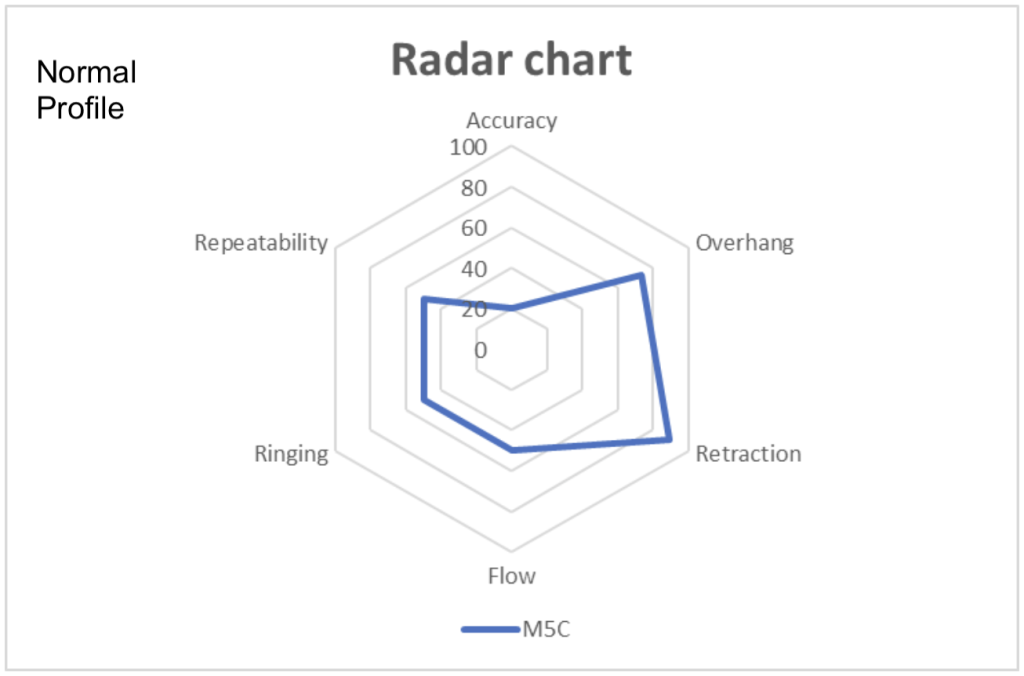
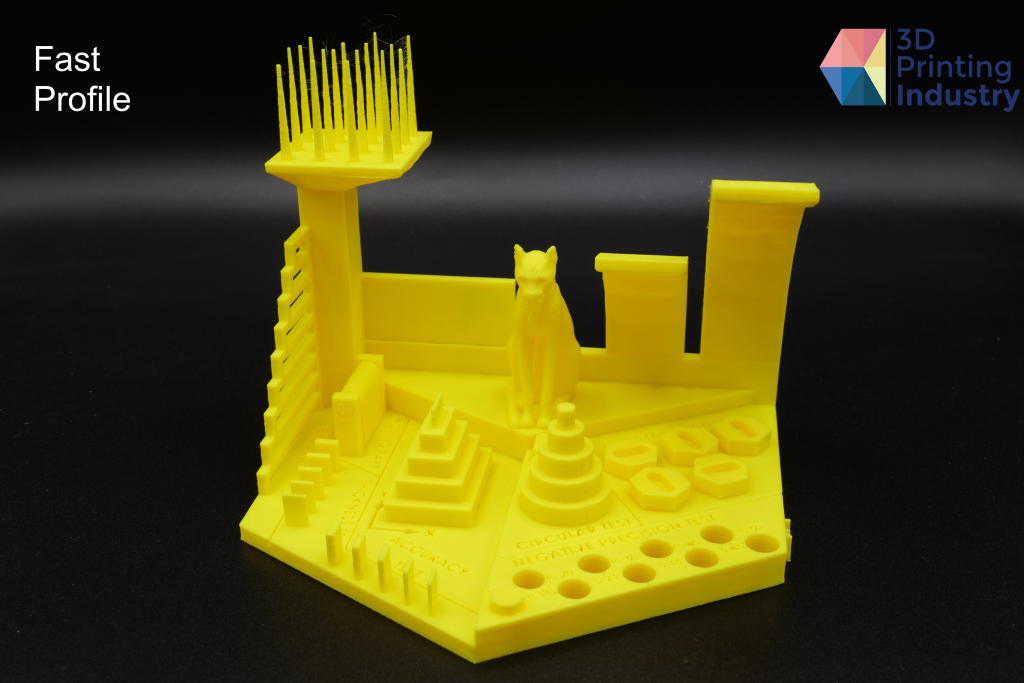
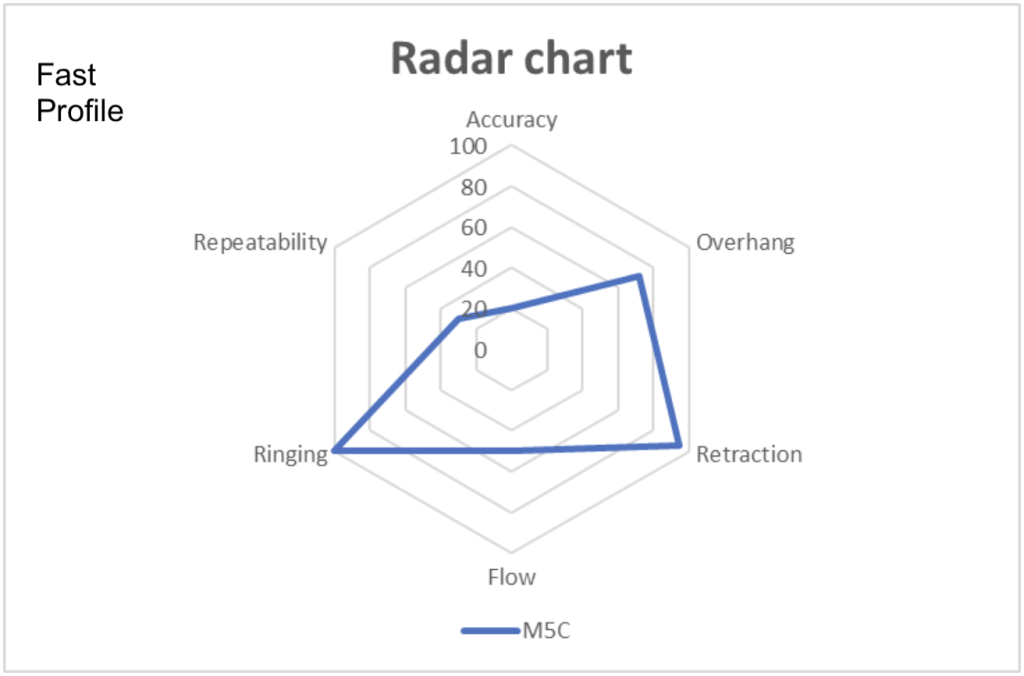
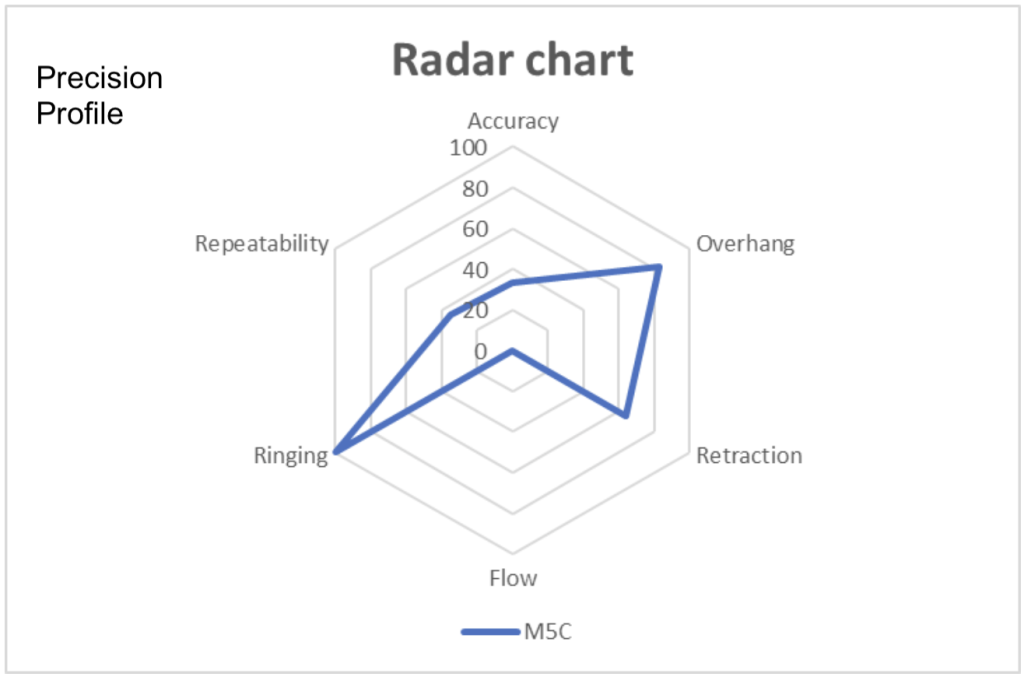
3DPI tests for the normal, fast, and precision profiles. Images and data by 3D Printing Industry.
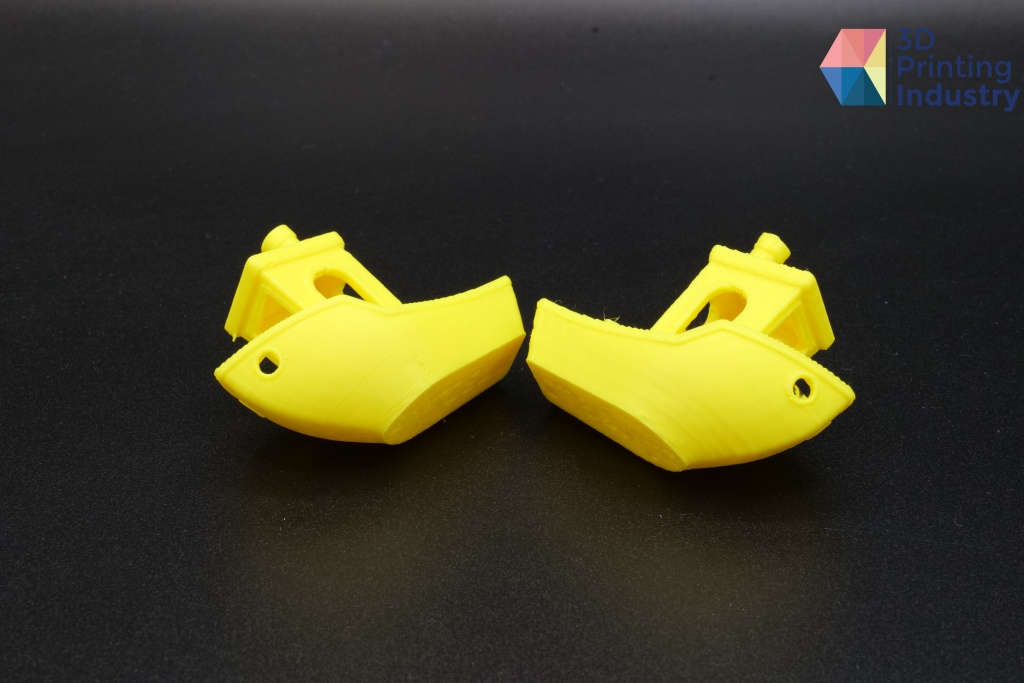
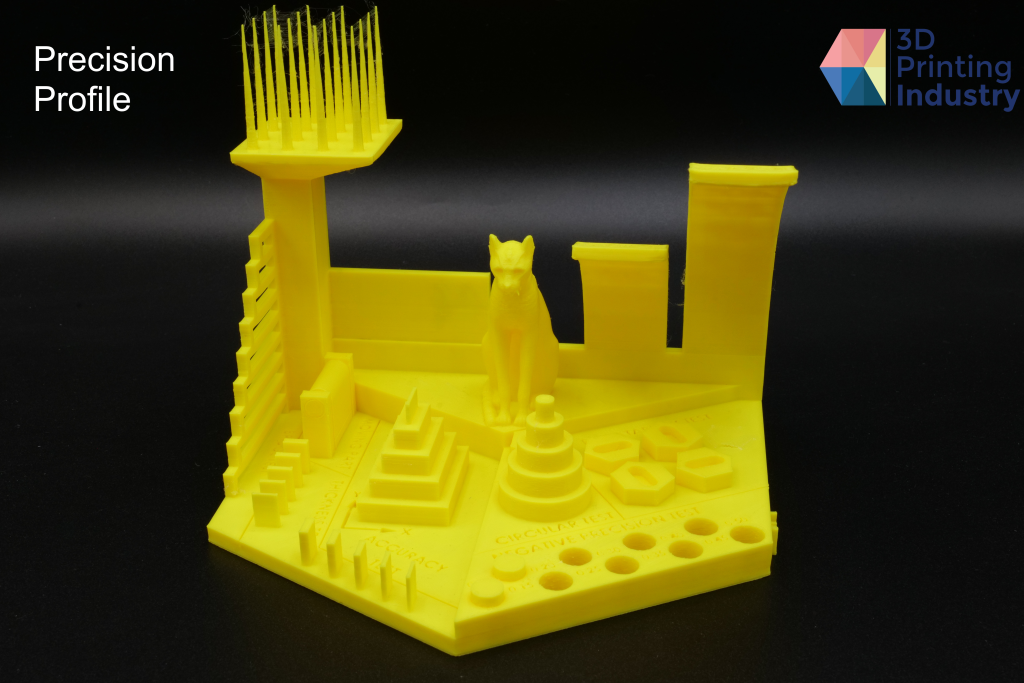
A small and precise parts test was also conducted to determine if the M5C can print a two-part functional nut and bolt model with very small dimensions and tolerances. The 3D printer performed well here, fabricating a part with no interference, even at a 0.2 mm layer height.
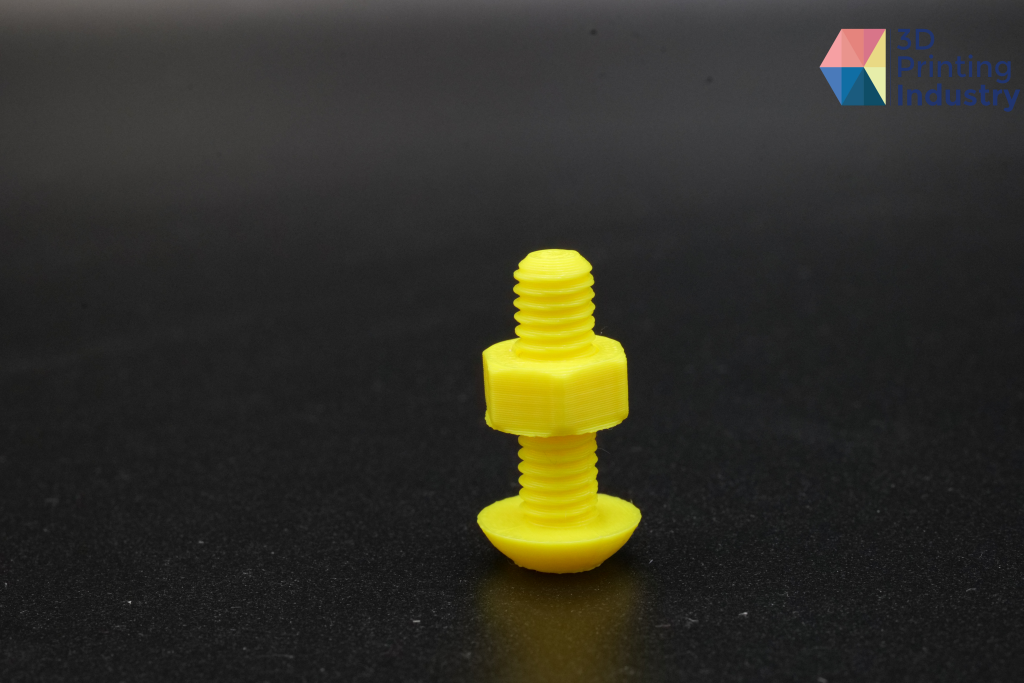
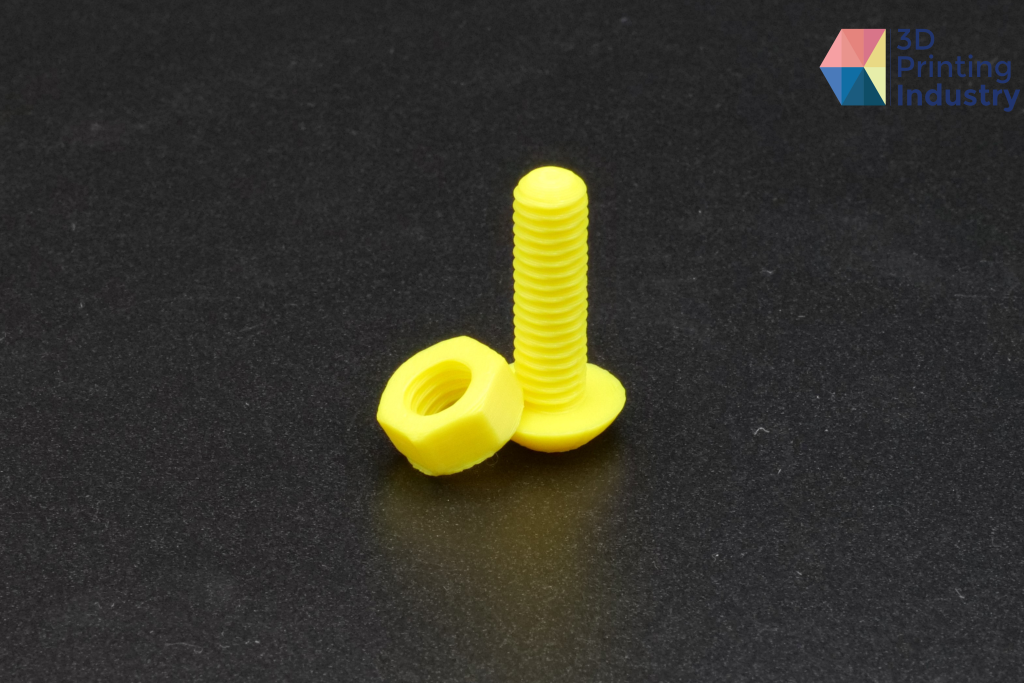
Small and precise parts test. Photos by 3D Printing Industry.
Application tests
Our team also conducted a number of tests to assess how well the M5C handles different materials and real-world use cases.
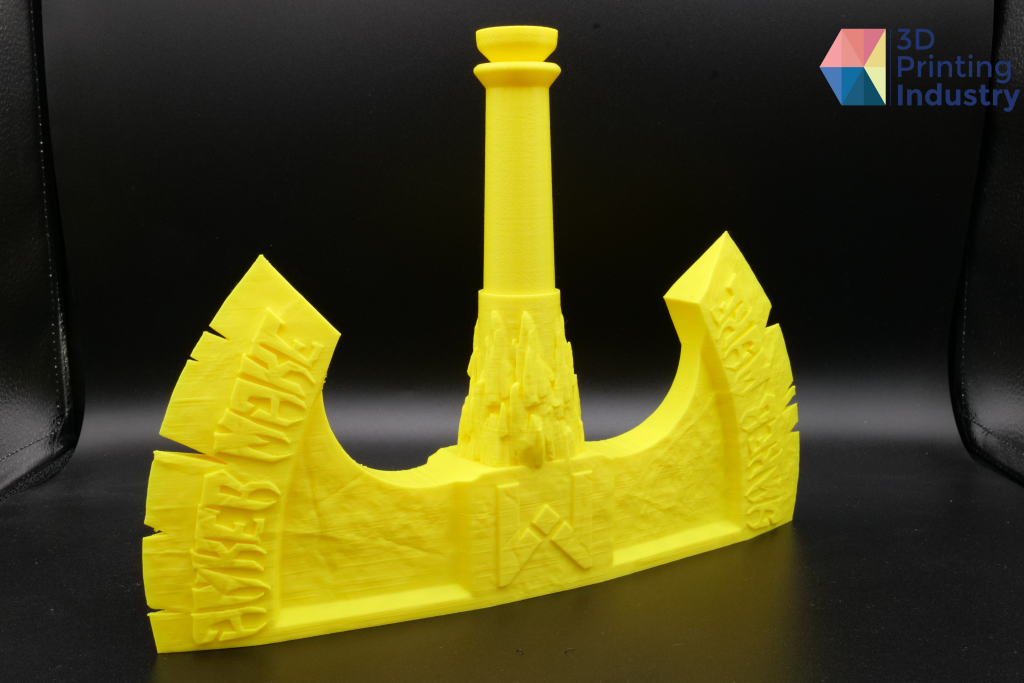
We first 3D printed an extendable ax model, taking 10 hrs and 45 mins in the 3D printer’s normal mode. The surface quality of this part was quite impressive, however there were sections where the 3D printer traveled outside the model’s 3D printing zone. This created thin artifact lines on the surface of the part.
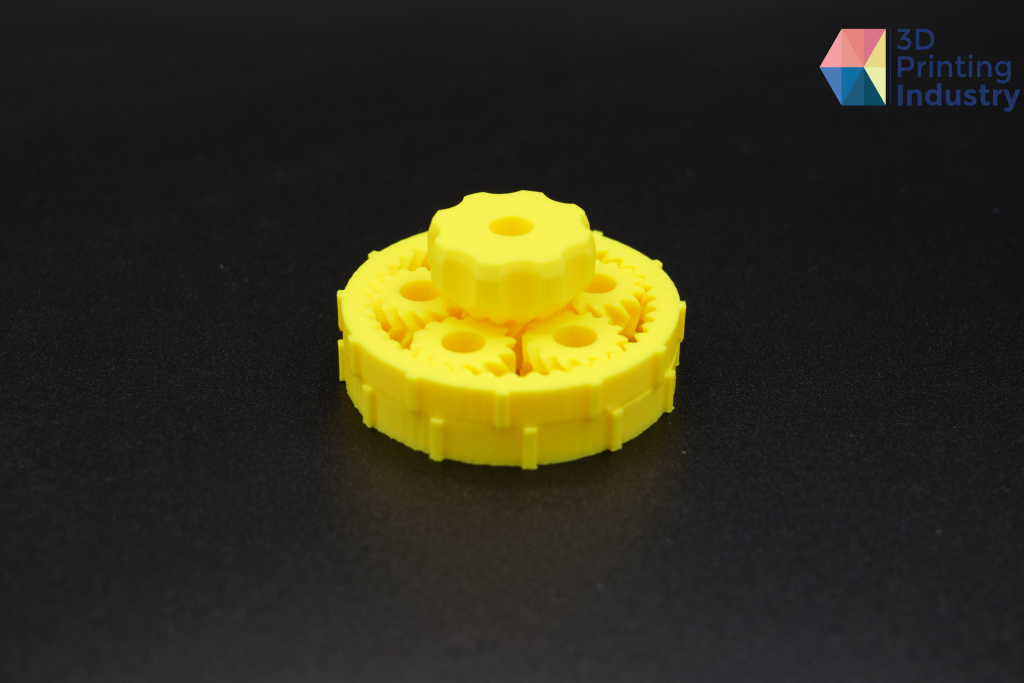
We next 3D printed a planetary gear using PLA, a functional part which includes a lot of high tolerances. When we first previewed the model at 0.20 mm layer height, the gap between the rings was not sufficiently distanced by the slicer. We therefore lowered the layer height so that the slicer would leave a gap. After 3D printing, the model fused and required some manipulation to free the gears. Overall, the quality was good, with the gear system moving smoothly with no excess friction.
Again using PLA, we 3D printed two typical hobbyist miniature models using the 0.2 mm diameter nozzle. These parts were impressive, both possessing a smooth and consistent surface finish with no noticeable ringing.
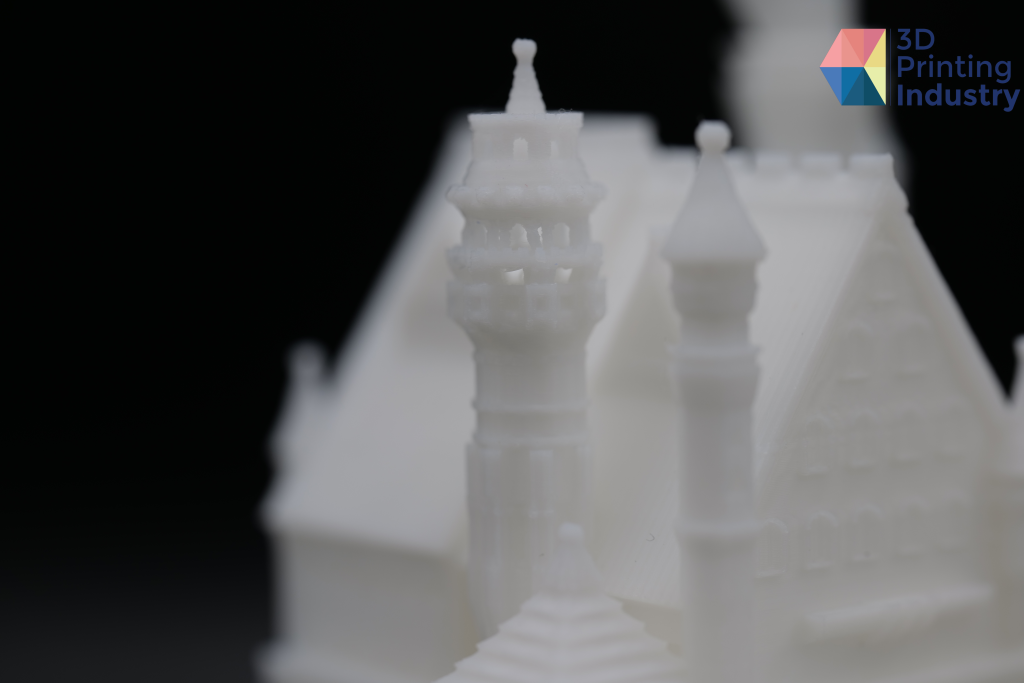
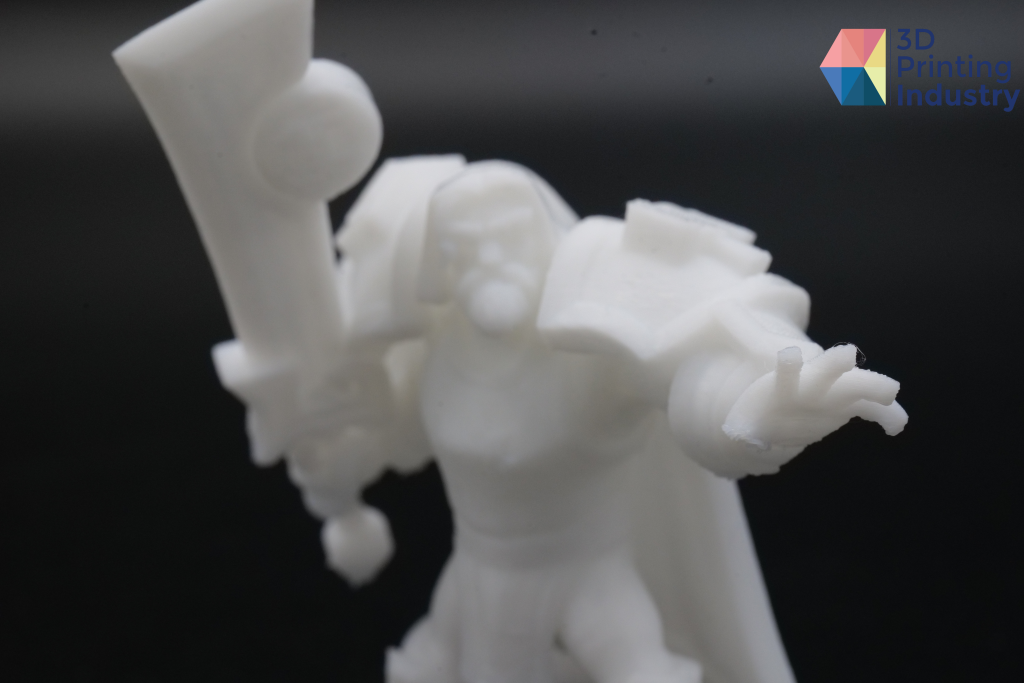
Figurine and Castle models. Photos by 3D Printing Industry.
A Voronoi tower was also 3D printed in PLA+ to assess the M5C’s ability to handle detailed prints with many overhangs. This model was 3D printed three times using each profile (fast, precision, and normal).
The M5C 3D printed these models without any failed supports or visible defects. All of the detail has been preserved in all three profiles, with the overall quality being very for each high. This showcases the M5C’s ability to 3D print intricate models at high speeds, without sacrificing too much on quality.
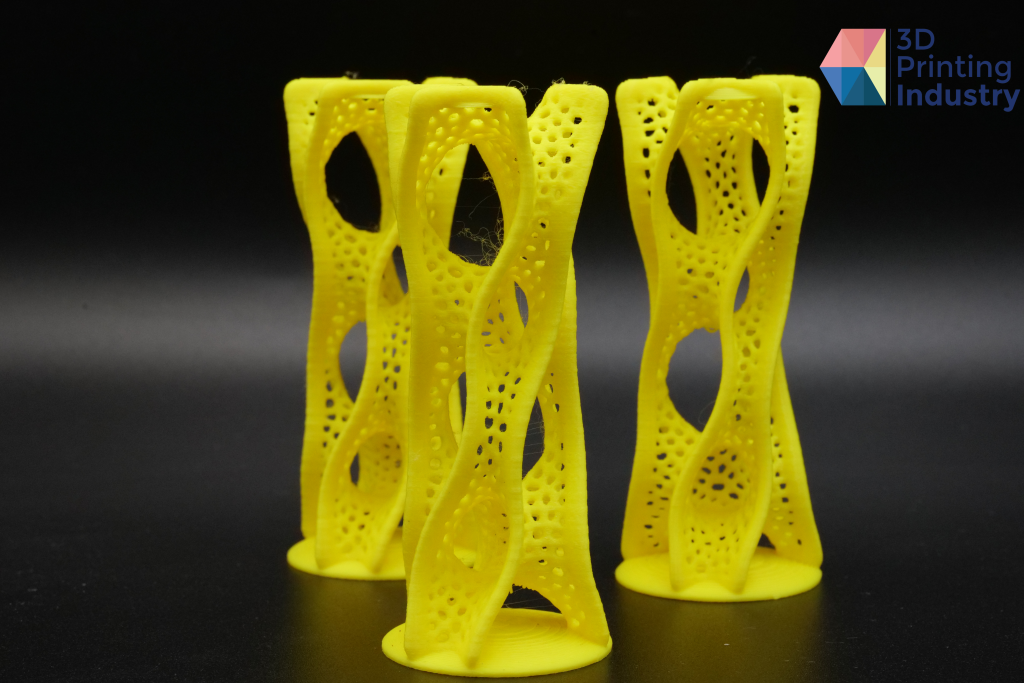
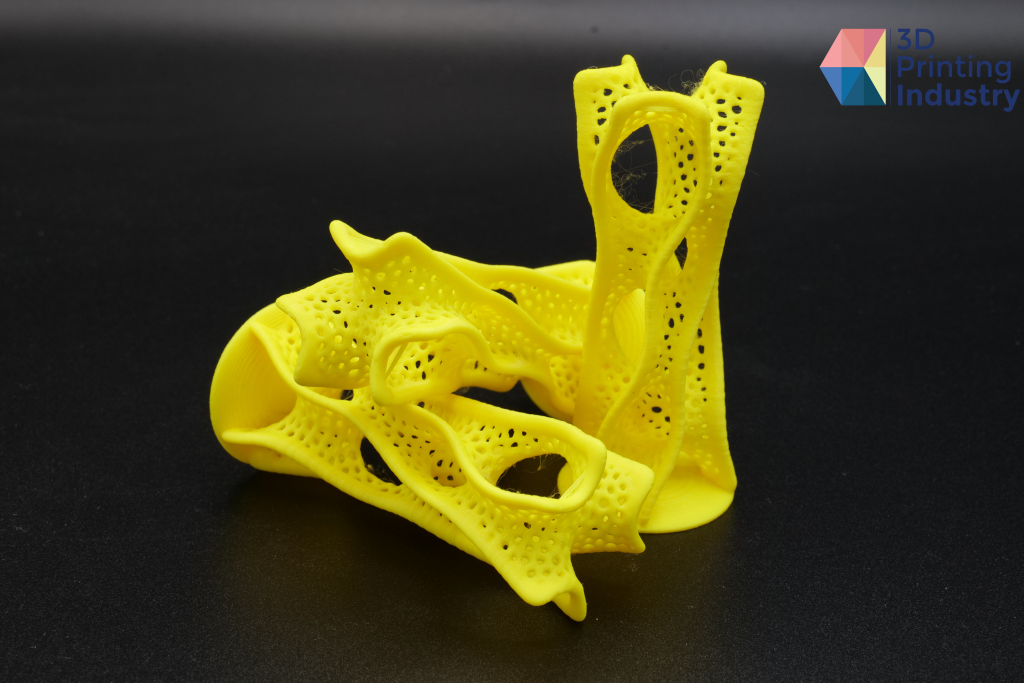
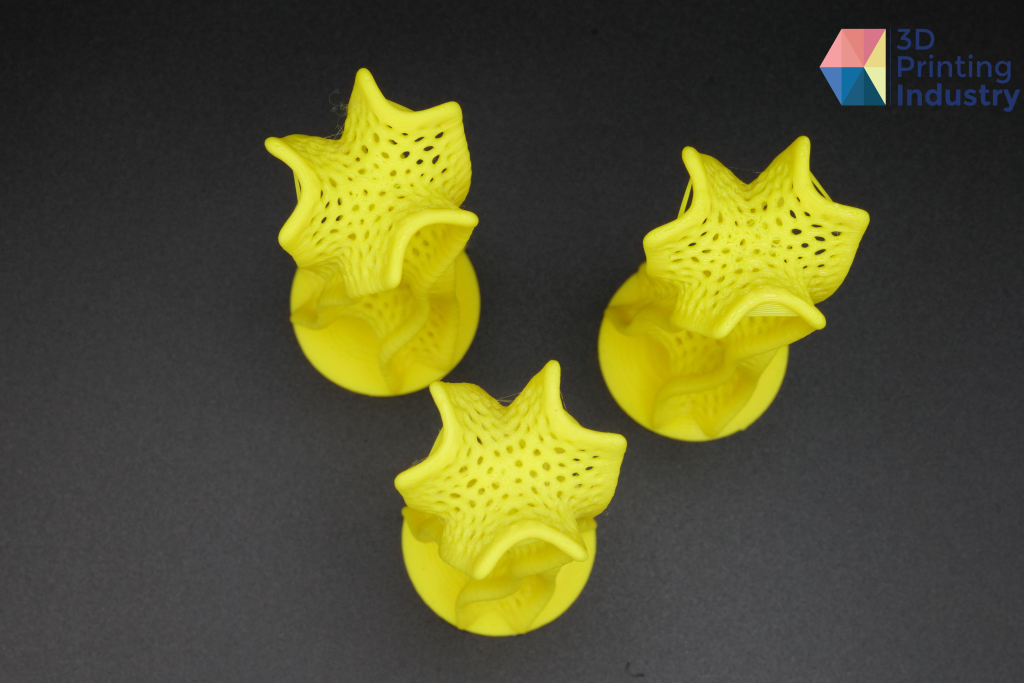
Voronoi tower in 3 profiles (fast, precision and normal). Photos by 3D Printing Industry.
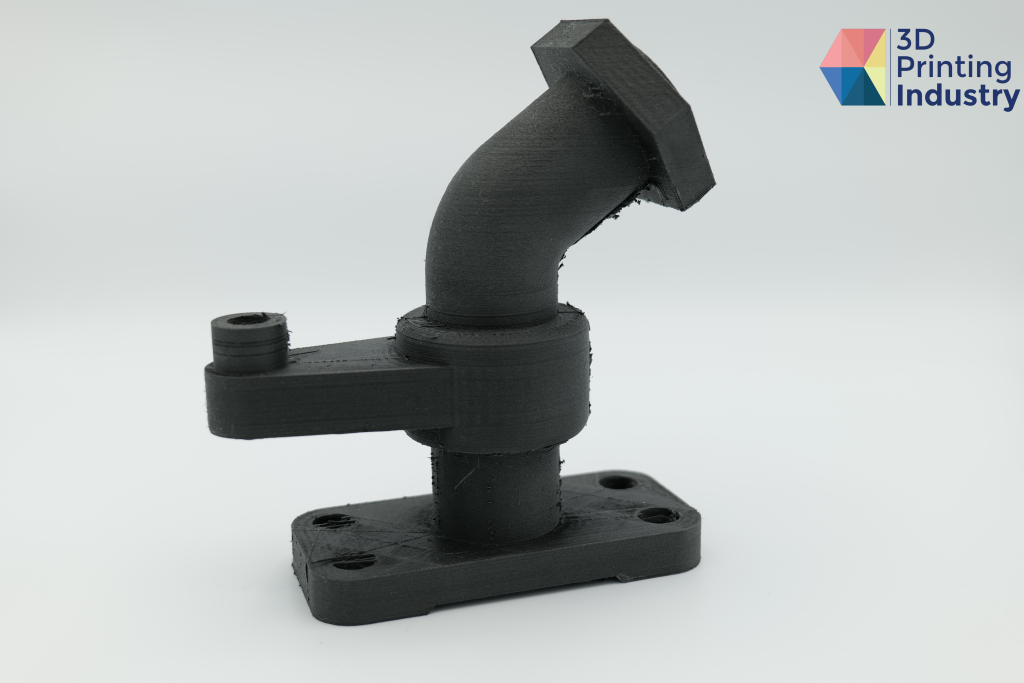
Finally, we 3D printed a functional pipe fixture using Nylon-Carbon Fiber, a composite material. To print this part, we used a hardened steel nozzle with a 0.4 mm diameter.
This part 3D printed very well on the first try, using the default profile that comes with AnkerMake slicer. There was some stringing that was seen while printing the part, but this was easily cleaned after some post processing, and did not significantly impact the 3D print quality.
We were impressed by the M5C’s composite material compatibility, as this expands the 3D printer’s customer base beyond hobbyists to the intermediate market.
Final verdict
Overall, the M5C stands out as a cost-effective and user-friendly FDM 3D printer that offers good 3D print speed and quality. The 3D printer is optimized for beginners, and offers an accessible entry point into desktop 3D printing. Its 300℃ nozzle allows for wide-ranging material compatibility, further expanding the utility of this 3D printer for intermediate users.
The reliability of the M5C is something that really stood out during this testing process. Indeed, we did not encounter a single failed 3D print or any sensor errors. What’s more, the M5C consistently delivered on its advertised ability to produce high-quality parts.
The M5C’s ability to consistently and successfully complete 3D prints sets it apart from many other 3D printers on the market at this price point, making it an excellent choice within the desktop space.
The M5C’s build quality also impressed, with its solid and well-constructed frame bolstering its reliability and enhancing its aesthetics. Moreover, this impressive build quality extends to the 3D printers internal components and materials, ensuring durability and longevity.
Ultimately, users seeking a 3D printer that combines performance, reliability, and aesthetics will find the M5C to be an excellent choice. We can confirm that AnkerMake’s M5C provides very solid 3D printing performance with none of the hassle, making it an ideal entry-level FDM 3D printer.
| 3D Printing Technology | FDM (Fused Deposition Modeling) |
| Build Volume | 220 x 220 x 250 mm |
| 3D Printer Dimensions | 466 x 375 x 480 mm |
| Maximum 3D Print Speed | 500 mm/s |
| 3D Print Acceleration | 5000 mm/s² |
| Maximum Flow Rate | 35 mm3/s |
| Maximum Nozzle Temperature | 300℃ |
| Heated Build Plate Temperature | Up to 100℃ |
| Advertised Filament Compatibility | PLA+, TPU, ABS, PETG, PA, PETG-CF, PA-CF |
| Layer Thickness | 0.1 – 0.25 mm |
| Nozzle Diameter | 0.2 mm & 0.4 mm |
| Filament Diameter | 1.75 mm |
| Extruder Quantity | 1 |
| Body Material | Aluminum Body |
| Hotend | All Metal Hotend |
| Gross 3D Printer Weight | 12.8 kg |
| Slicer Compatibility | AnkerMake Slicer, Cura, PrusaSlicer |
| Connectivity | USB-C, WiFi, Bluetooth |
| File Output | .gcode |
Subscribe to the 3D Printing Industry newsletter to keep up to date with the latest 3D printing news. You can also follow us on Twitter, like our Facebook page, and subscribe to the 3D Printing Industry Youtube channel to access more exclusive content.
Are you interested in working in the additive manufacturing industry? Visit 3D Printing Jobs to view a selection of available roles and kickstart your career.
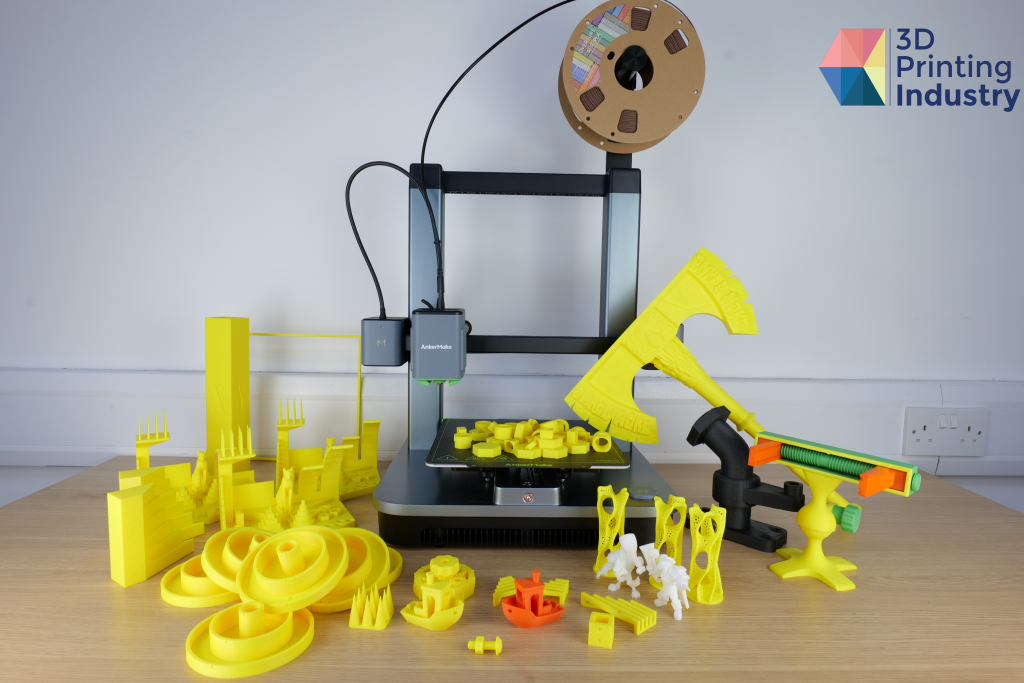
Featured image shows the AnkerMake M5C. Photo by 3D Printing Industry.