
3D Printing Industry reviews the Raise3D Pro3 3D printer.
Based in Irvine, California, and founded in 2013, Raise3D is an FFF 3D printer manufacturer well-known for its established portfolio of professional-grade machines.
The company’s Pro3 3D printer range comprises the smaller Pro3 (300 x 300 x 300mm) and the larger-format Pro3 Plus (300 x 300 x 605mm). Successors to the widely-successful Pro2 series, the Pro3 printers are characterized by their generous build volumes, dual extrusion setups, and high-performance filament printing capabilities.
Aimed at prosumers, engineering and design professionals, and commercial enterprises, the Pro3 systems are suitable for everything from functional prototyping to end-use multi-material small batch production. The Pro3 starts at $5,249 while the Pro3 Plus starts at $7,249.
For this review, we’ll be working with the base Pro3 model.
Progressing the Raise3D bloodline
Like all of Raise3D’s systems, the Pro3 comes complete with everything you need to set up and begin 3D printing. Inside the box, you’ll find two spools of PLA filament, heat-resistant gloves, a few tools for machine maintenance, a USB stick, a leveling card for printer calibration, and even some brand stickers to add a bit of visual flair.
The Pro3 is a fully-enclosed cartesian axis machine with a simple but sturdy all-metal frame. The coordinate configuration is known to be more rigid and accurate than a delta or CoreXY system, albeit slower. A transparent plexiglass casing borders the workspace with a door on the front and a removable cap on the top. The double entrance design is great when it comes to printer maintenance as some of the internal components can be tricky to reach through the front door.
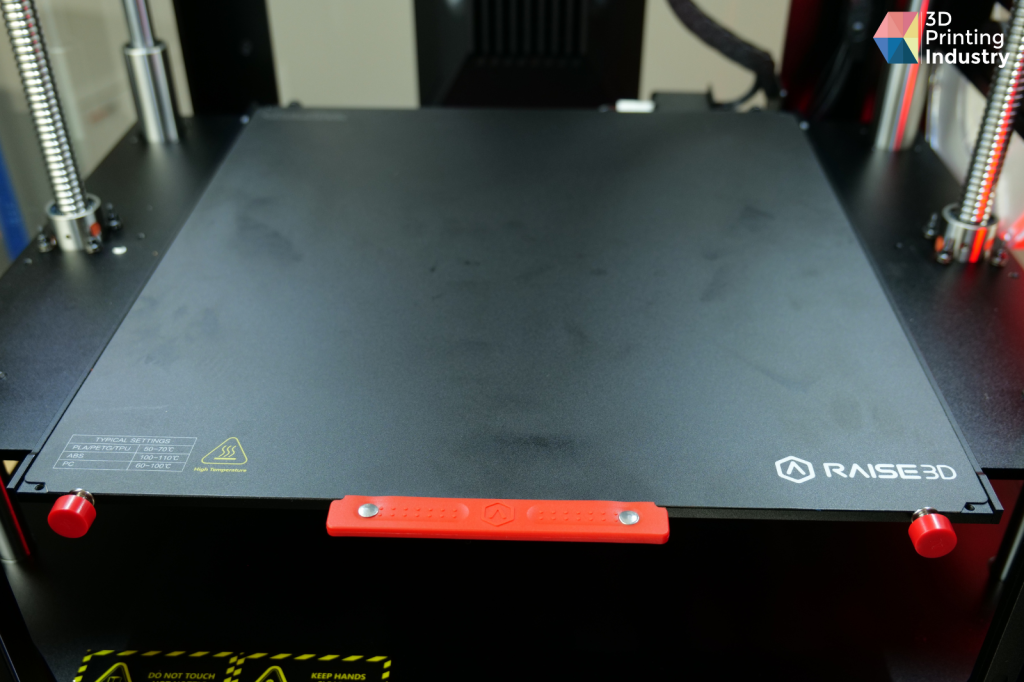
With a build volume of 300 x 300 x 300mm, users are given ample space to play around with for larger part projects. Looking at the build plate, the Pro3 has a flexible, magnetic bed and a silicone print surface, meaning part removal is fast and easy. Of course, the bed can also be heated up to 120°C, which is crucial when it comes to avoiding shrinkage-induced warping and delamination issues with higher-temperature engineering filaments.
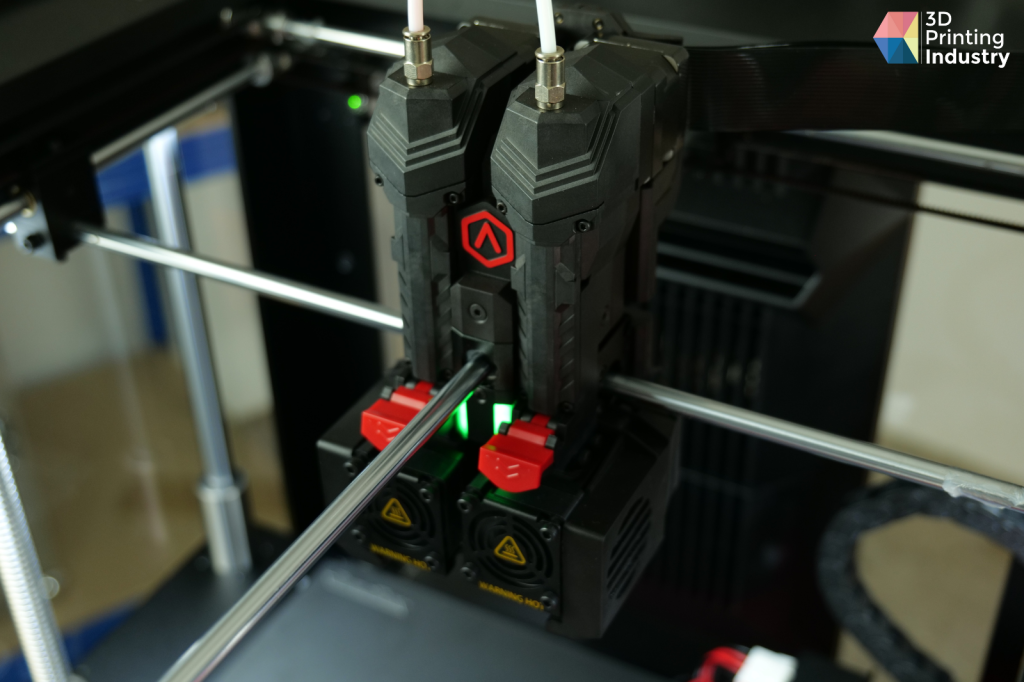
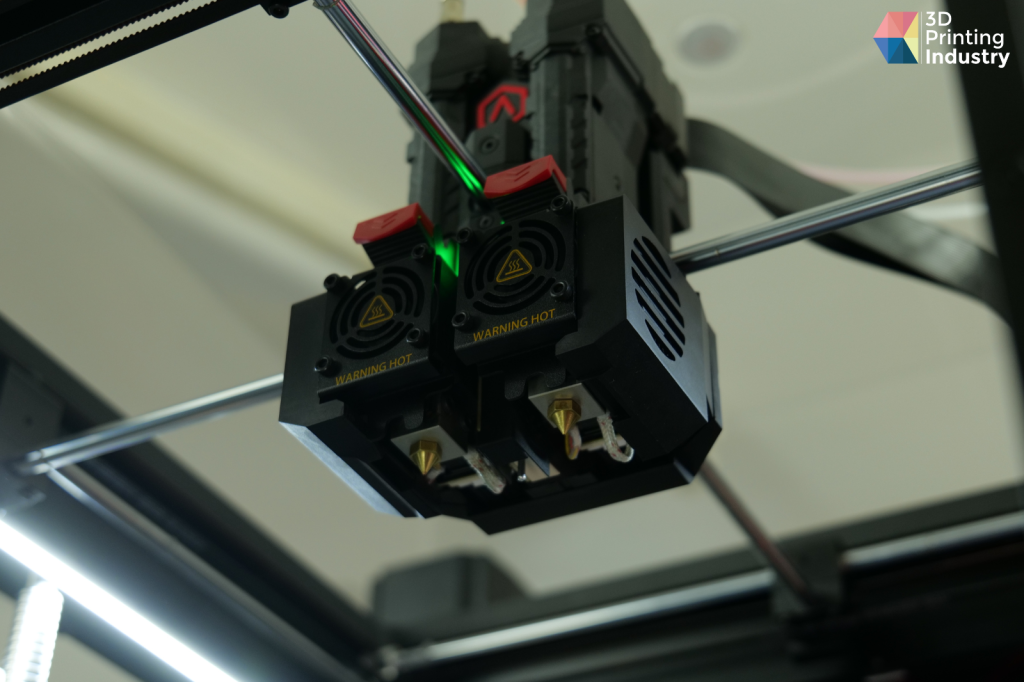
Where the Pro3 really shines is in its dual extruder assembly. Raise3D has designed the extruders of the machine to be modular for streamlined maintenance, with a novel quick-swap hotend system that ensures component switching is a breeze. This is particularly useful for customers looking to regularly switch between non-abrasive and abrasive materials, as these tend to require different nozzle types.
With a maximum hotend temperature of 300°C and a direct-drive setup, the Pro3 can print a wide variety of thermoplastic filaments such as ABS, PC, TPU, TPE, PETG, ASA, PP, PVA, Nylon, glass fiber composites, carbon fiber composites, and even metal fill filaments. The printhead also comes with a leveling sensor as standard and two high-performance 4010 fans.
Our first impressions of the printer’s build were overwhelmingly positive. Between the two huge lead screws supporting the bed and the linear rods enabling the mobility of each axis, the Pro3 feels extremely solid.
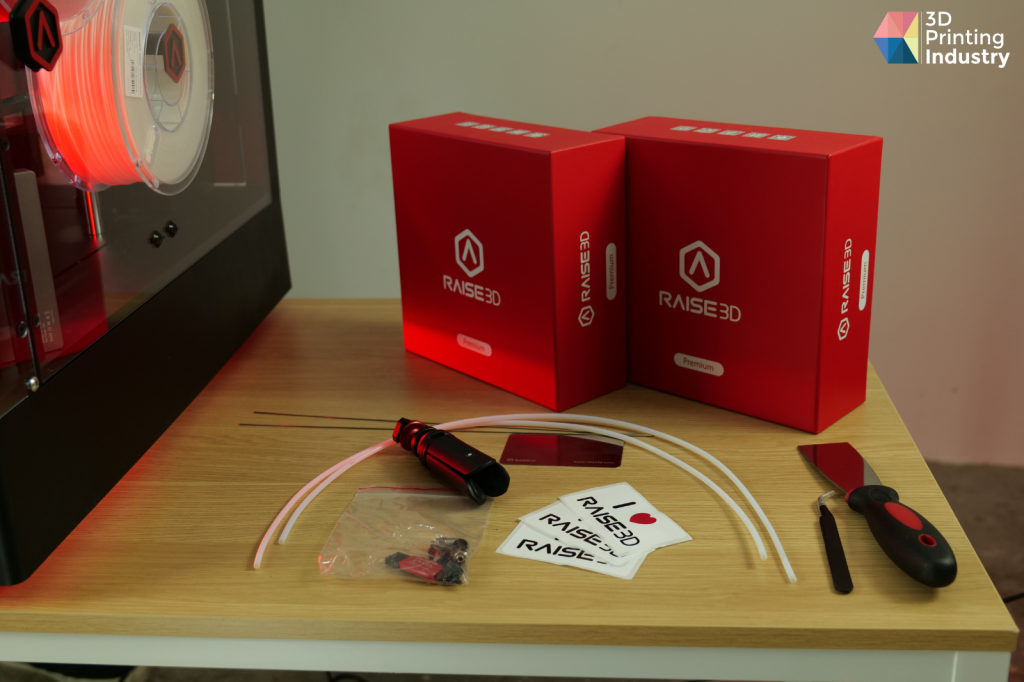
The Pro3’s accessories and dual extrusion printhead. Photos by 3D Printing Industry.
All the bells and whistles
On the electronics side, the Pro3 is equipped with a 7” full-color touchscreen that allows for automatic bed calibration, filament loading, and build management. We found the UI to be extremely clean and intuitive to navigate, so thumbs up there.
The system is also equipped with Raise3D’s proprietary EVE Smart Assistant system, which comes preloaded with a number of common printing problems identified by the company. When these issues arise, EVE can guide users in diagnosing and resolving them. The Smart Assistant can also be set to send reminders about regular scheduled maintenance operations, ensuring the Pro3 is in tip-top shape.
Additional features include a filament runout sensor, power loss recovery, a built-in HD camera for build monitoring, Wi-Fi connectivity, and an H13 HEPA filter (active carbon) for safe indoor use. There’s even an internal humidity-controlled filament storage chamber for keeping the printing materials dry at all times. In short, the Pro3 has just about all the bells and whistles you might expect from a 3D printer in this price range.
Raise3D’s ideaMaker slicer
Like most 3D printer manufacturers today, Raise3D also has its own slicing software for use with the Pro3. The ideaMaker slicer operates very similarly to most FFF slicers on the market with basic translation, rotation, and rescaling functionality – all wrapped in a dark grey color scheme that’s easy on the eyes.
It’s worth noting that ideaMaker’s UI is jam-packed with a plethora of model manipulation functions that are great for advanced users but may be a little intimidating for newcomers without much experience in 3D printing.
Still, there’s a set of Recommended settings that streamline the workflow for beginners who are still finding their footing. In this basic mode, users can choose the materials they’ll be using, modify key parameters such as resolution, and create and edit support structures. More experienced users out there may find it handy to dive into the Advanced settings, where there are more niche features such as dimensional compensation, gradual infill, and 3D model editing.
All in all, ideaMaker is a highly refined slicer and offers the kind of quality you’d expect from a company like Raise3D. We found it to be among the easiest-to-use programs in its class, with a distinct lack of bugs and great technical performance.

Benchmarking the Pro3 3D printer: 71/100
So how did the Raise3D Pro3 3D printer do in our benchmarking tests? We start with 3D Printing Industry’s own benchmarking model in PLA, which consolidates many of our smaller print tests (also shown below) into one comprehensive part. We assign each of the individual sections a weighted score based on factors such as dimensional precision, surface quality, and structural integrity. The Pro3 earned an overall 3D Printing Industry score of 71/100 – a high-performing professional-grade 3D printer is a 60+ score, so we consider the Pro3 to be a very high performer in this test, making it a dependable and reliable 3D printer for professional users.
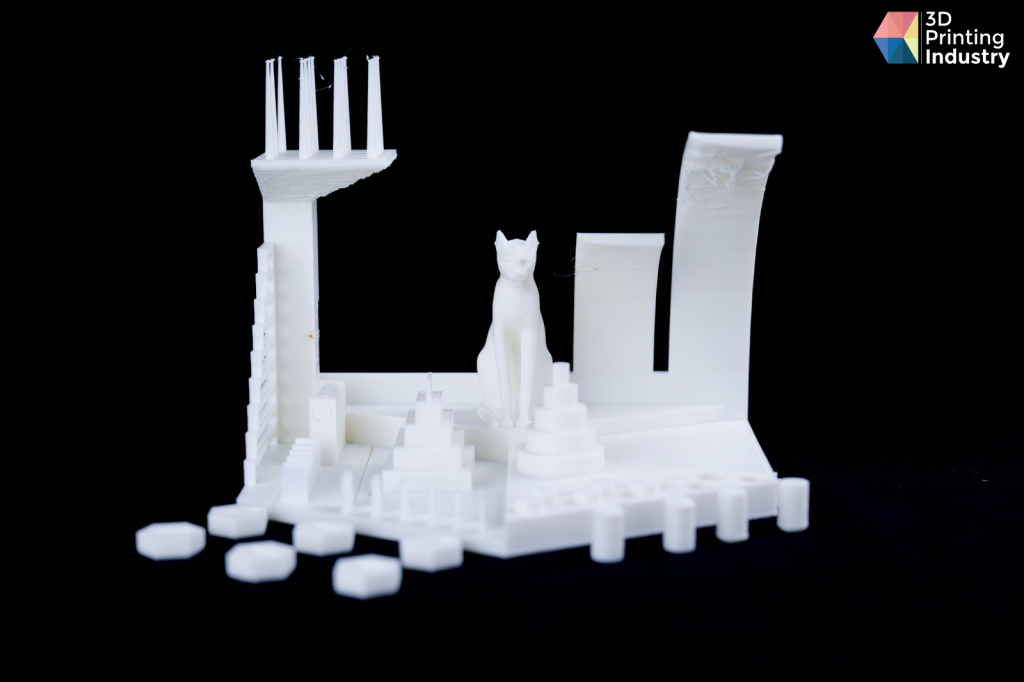
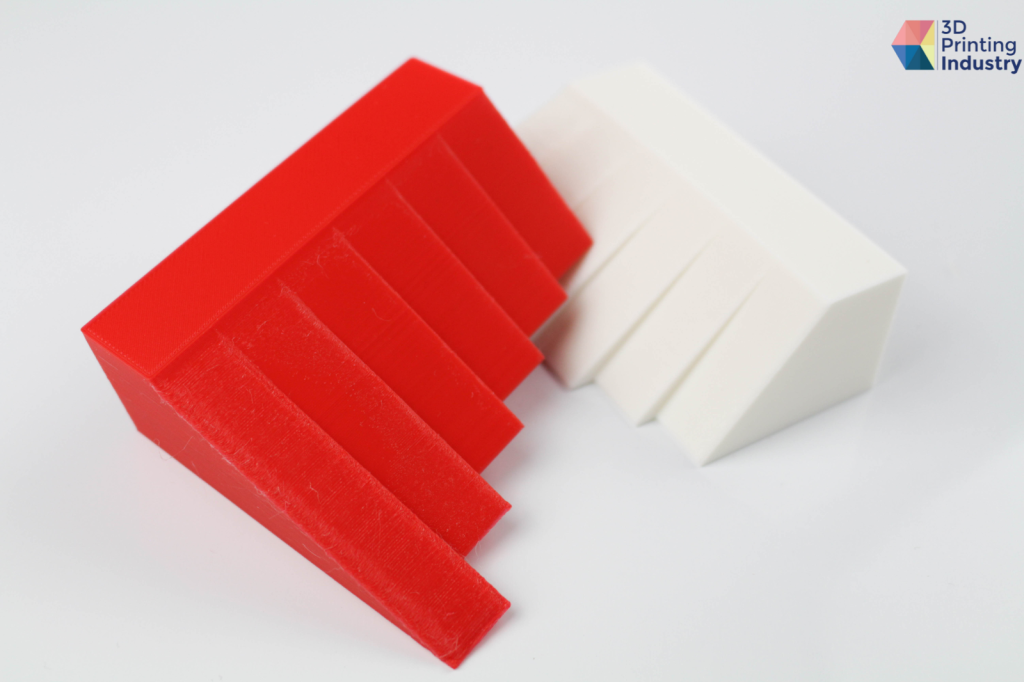
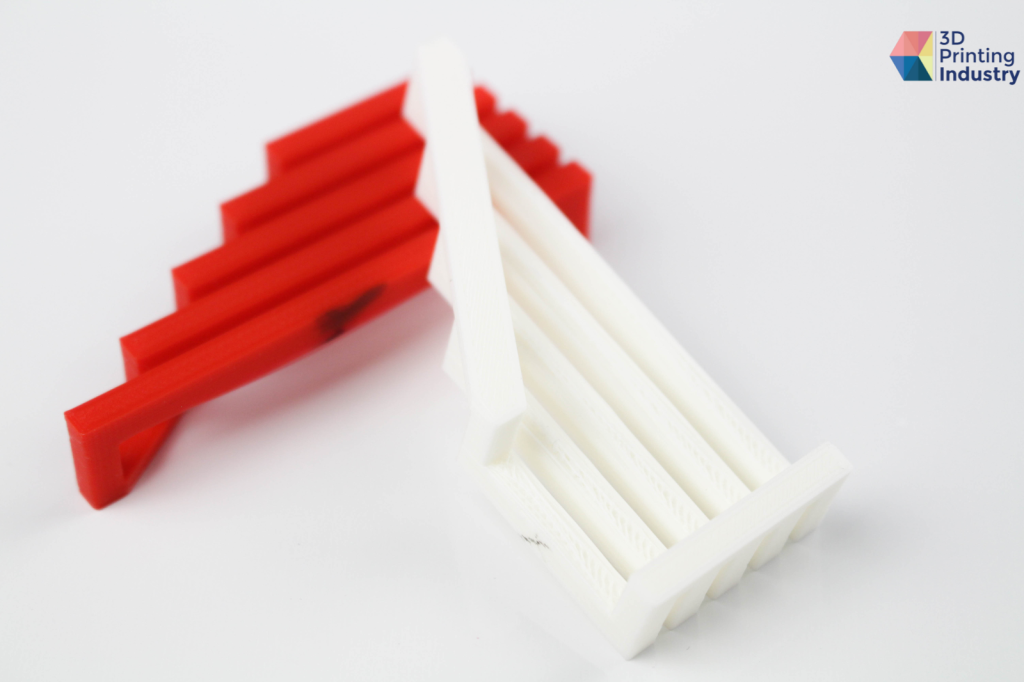
3DPI benchmarking test. Photos by 3D Printing Industry.
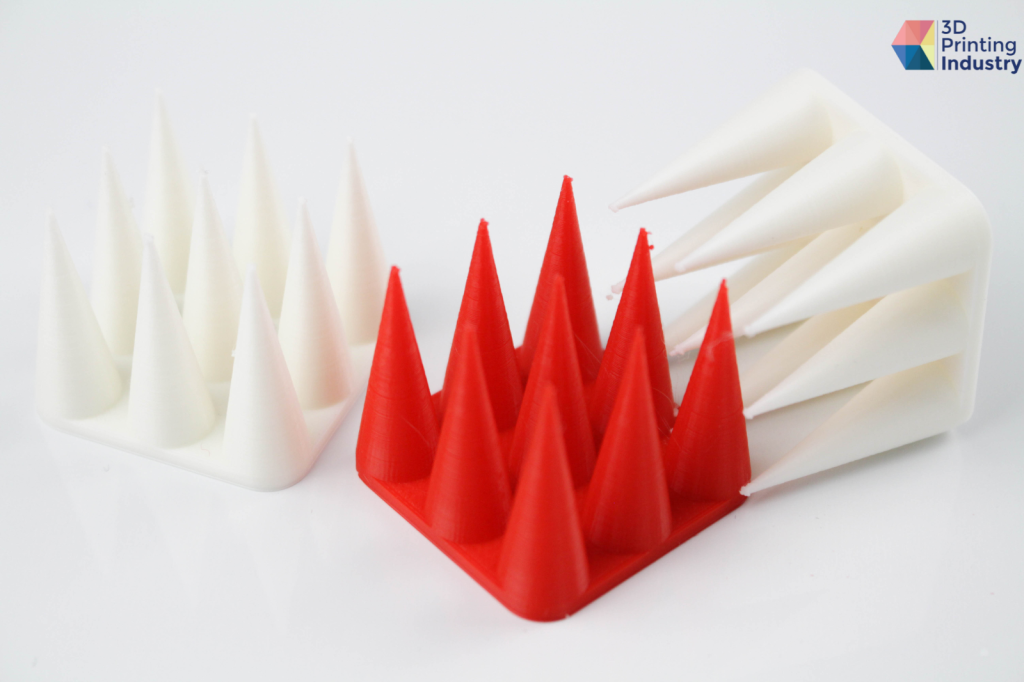
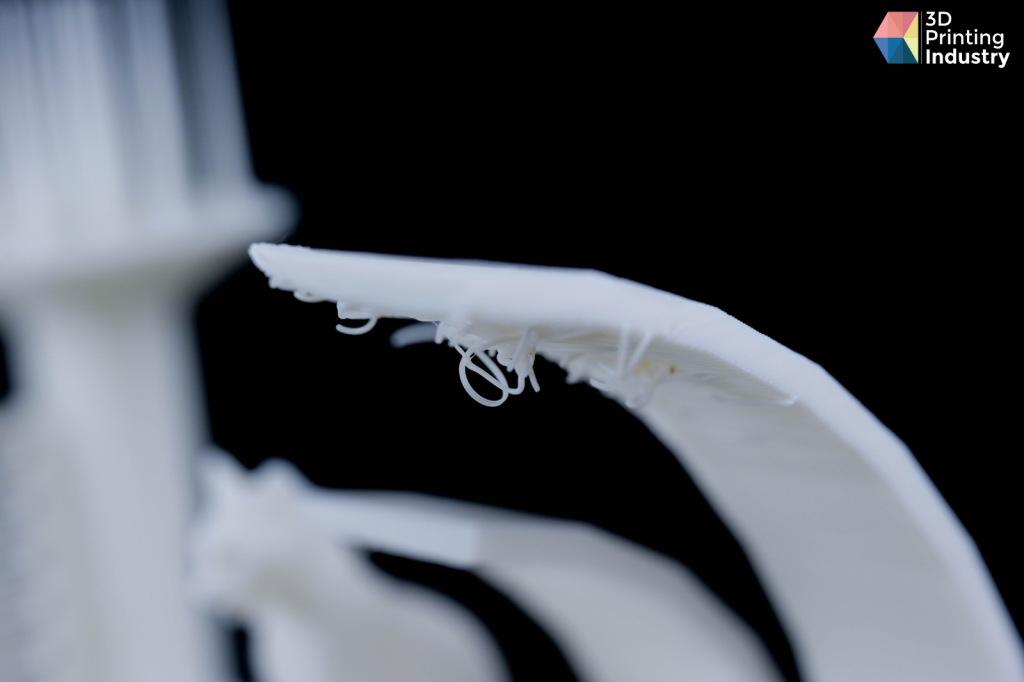
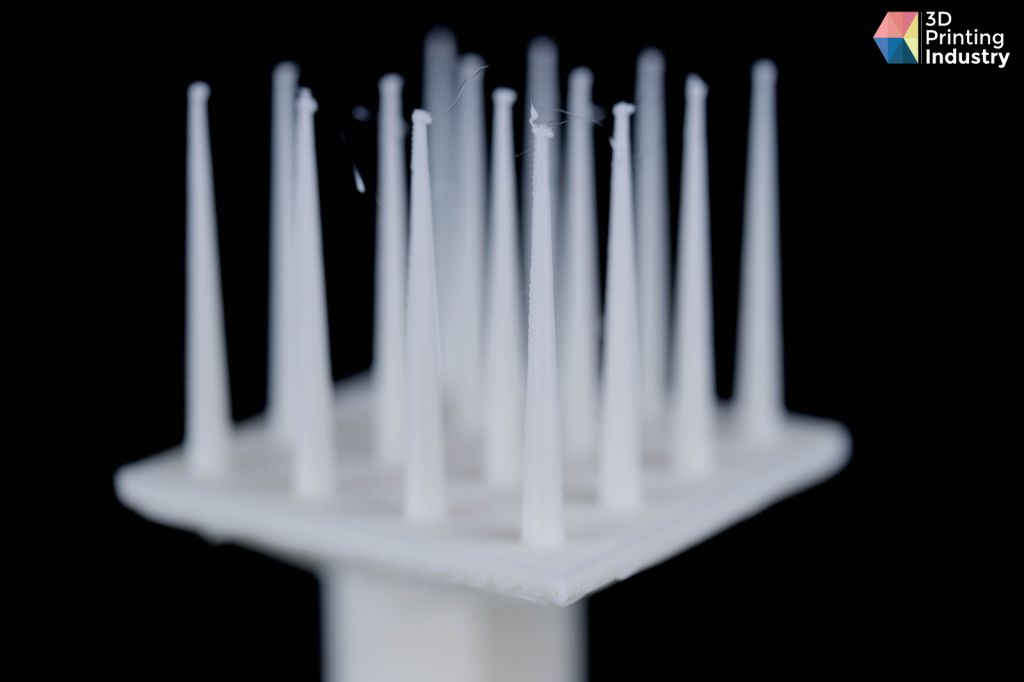
Independent overhang, bridging, and retraction print tests. Photos by 3D Printing Industry.
Overall, the benchmarking model was definitely impressive. Firstly, the overhang portion of the test is designed to determine the angles at which the system is able to print without the use of support structures. The Pro3 managed to print at up to 60° without any problems, which is a respectable result for PLA.
Similarly, the bridging test is intended to determine a system’s horizontal printing capabilities. The Pro3 managed to reach the 30mm bridge length successfully, which is again a solid result.
Finally, we look at the retraction test, which gives us a qualitative method of evaluating the 3D printer’s extruder capabilities. This is where the system really impressed as it managed to fabricate the entire spike array with minimal artifacting and virtually no stringing, resulting in an extremely clean test.
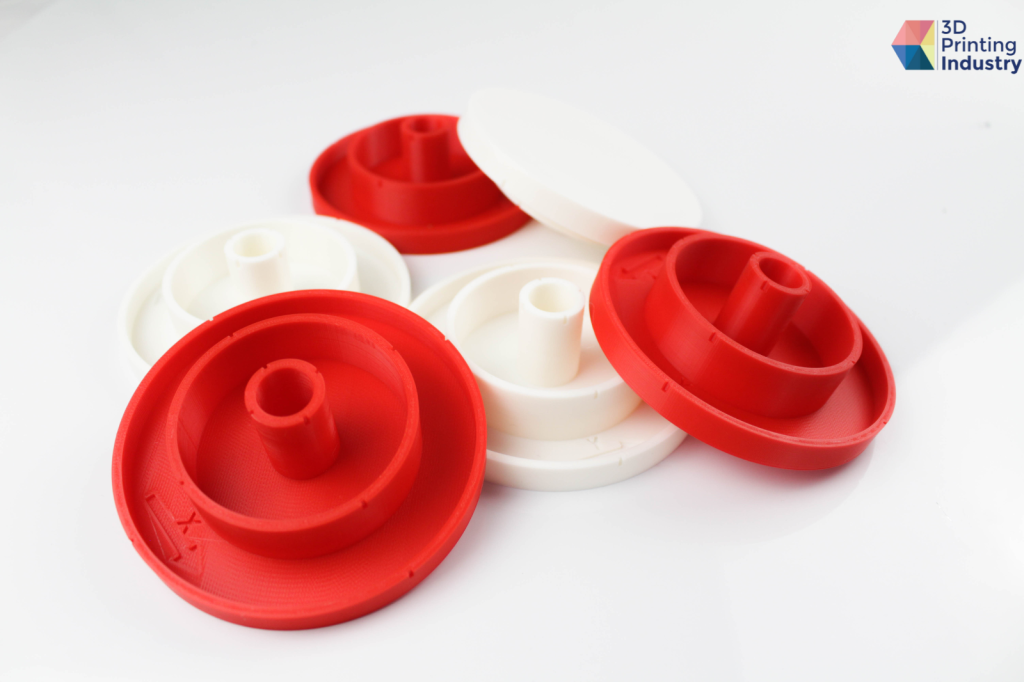
Circular trajectory test
We then 3D printed a circular trajectory test to see how the Pro3 would handle circular structures. By studying the normal distribution of the three concentric circles’ diameters, we can say that the printer offers sufficient repeatability when the average dimensional imprecision is under 0.1mm and the standard deviation is under 0.05mm. Our measurement devices are accurate up to ±0.015mm.
This is the first time the Pro3 really stumbled. The system delivered an average offset of 0.2329mm for the X-axis and 0.2462mm for the Y-axis, resulting in an average of 0.240mm for all axes. While this imprecision is a little high compared to other printers in the price range, the average standard deviation came in at just 0.033mm, which is a great result.
It’s worth noting here that the larger the circle diameter, the less accurate the prints become. For example, Circle 1’s X-axis (20mm) was off by an average of 0.1003mm, while Circle 3’s X-axis (100mm) was off by a considerable 0.3283mm. To remedy this, we’d suggest providing the user with a parameter to adjust the step/mm to fine-tune the accuracy of the Pro3. Thankfully the Pro3 is very precise when it comes to 3D prints, so this issue can be easily addressed by the user if necessary with XY corrections. Given that the Pro3 is intended to print large parts, we do not think that this XY discrepancy will have any practical impacts.
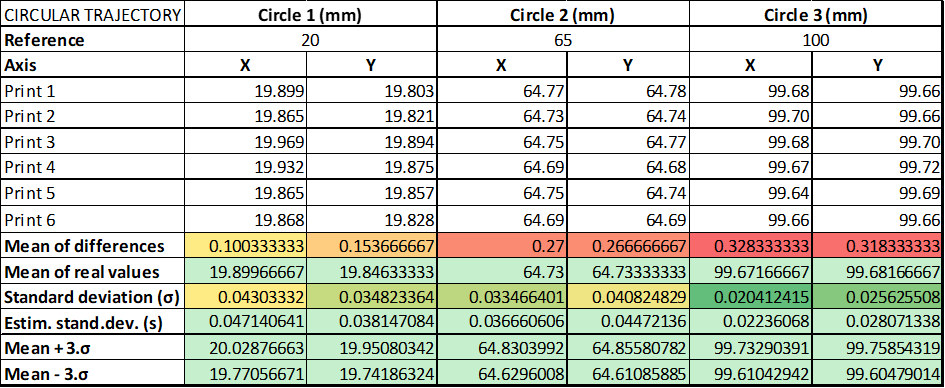
Below you’ll find the bell curves for the best and worst circles in the test – Circle one for the X-axis and Circle three for the X-axis. In the best case, 99.6% of the 20mm circles manufactured by this 3D printer will be between 19.77mm and 20.03mm. In the worst case, 99.6% of the 100mm circles fabricated by this 3D printer will be between 99.61mm and 99.73mm.
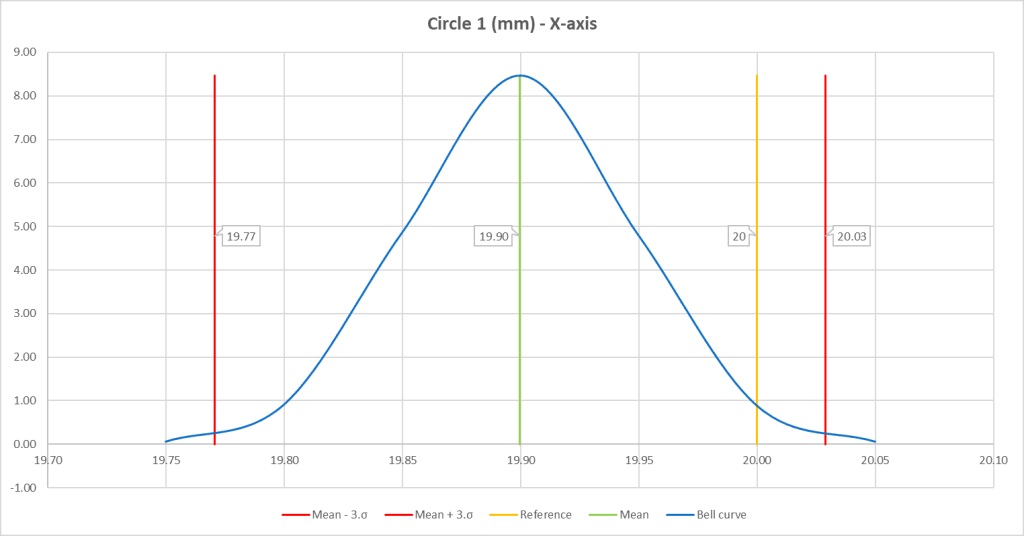
Bell curves – Circle one for the X-axis and Circle three for the X-axis. Images by 3D Printing Industry.
Capability test
Stemming from the US automotive industry, the capability test is a concept used for statistical process control. The capability of a production process is defined as its ability to achieve the required manufacturing performance in regard to accuracy and precision.
To evaluate capability, we print the same model 150 times. This allows us to simulate the mass production of a part. From this group, we select 16 samples at random and measure each part three times along the same face. We then calculate the mean and standard deviation of these three measurements, which allows us to calculate the process capability index (Cp), the minimum process capability index (Cpk), and the machine capability index (Cpm). For reference, the target dimension is 20mm and the upper and lower tolerances (Upper Spec Limit and Lower Spec Limit) are ±0.20mm.
In this case, we have a Cp of 7.56, which is a great score and means that with the current process we would have about 0 parts per million that would be non-compliant.
This suggests a very capable process output with consistent values within the specification limits compared to its natural variability. Therefore, this value suggests that the process is highly precise and the Pro3 is dependable in a manufacturing setting.
We deem the Pro3 to be well suited for reliable scaled production of identical parts. One thing to note, based on our accuracy and precision tests, is that the printer must first be investigated as it may be necessary to apply a geometric correction in XY, to achieve truly perfect parts.
An engineering material powerhouse
One of the Pro3’s main selling points is its extensive set of filament capabilities, so we put these to the test. We start off nice and easy with a set of PLA prints: a hand screw clamp and a 3D printed subwoofer.
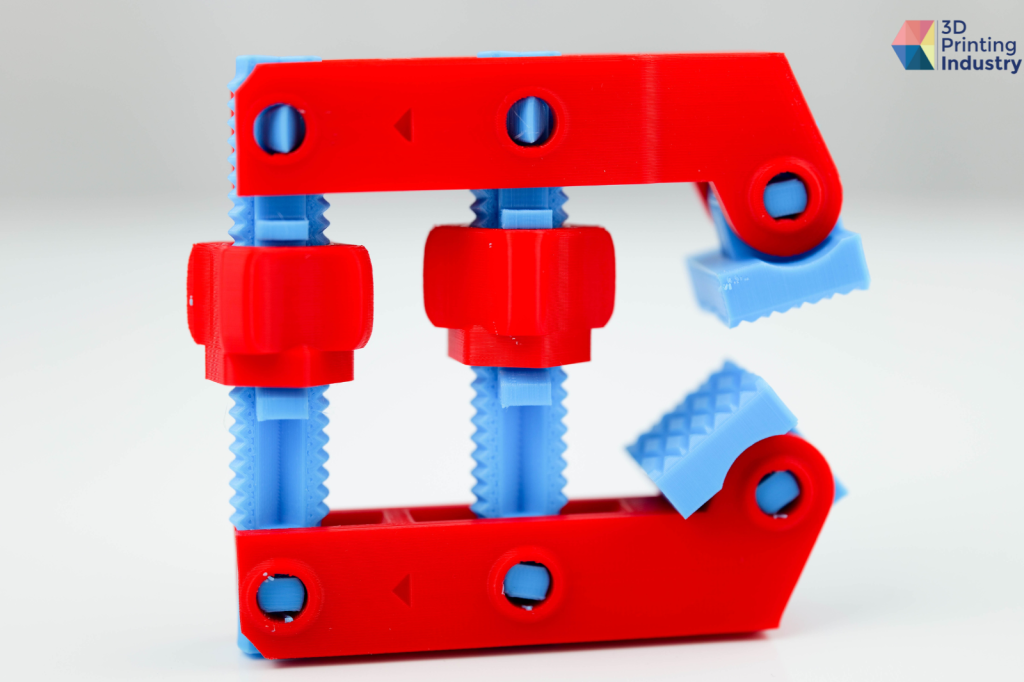
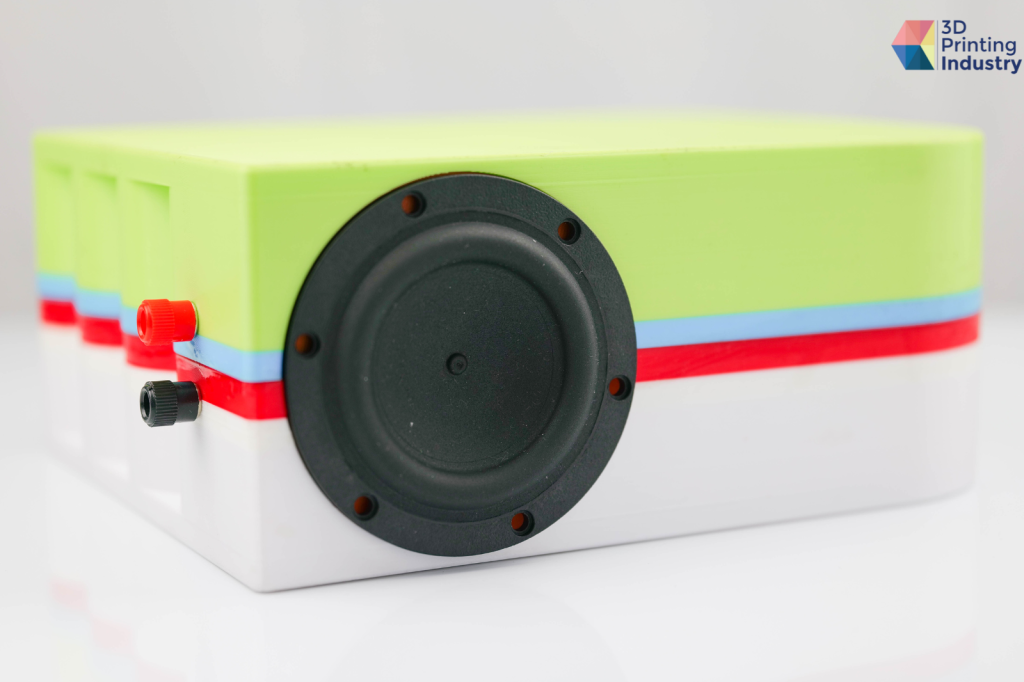
PLA 3D print tests. Photos by 3D Printing Industry.
The clamp was printed using two different PLA filaments and assembled from scratch. All of the individual elements are of excellent quality and the assembly as a whole works perfectly. A big win.
Similarly, the subwoofer was printed in separate parts using a variety of PLA colors, totaling 140 hours of print time. The first print run actually failed on this test as we ran into a voltage issue on the drivers controlling the motors but we reprinted the model without any problems. Due to the long print time, we also had a few filament spools run out on us mid-build, but the Pro3’s filament sensor was able to pause the job and resume printing once we loaded a new one. Overall, a great success.
Our next print test was a planetary gear system 3D printed in PLA.
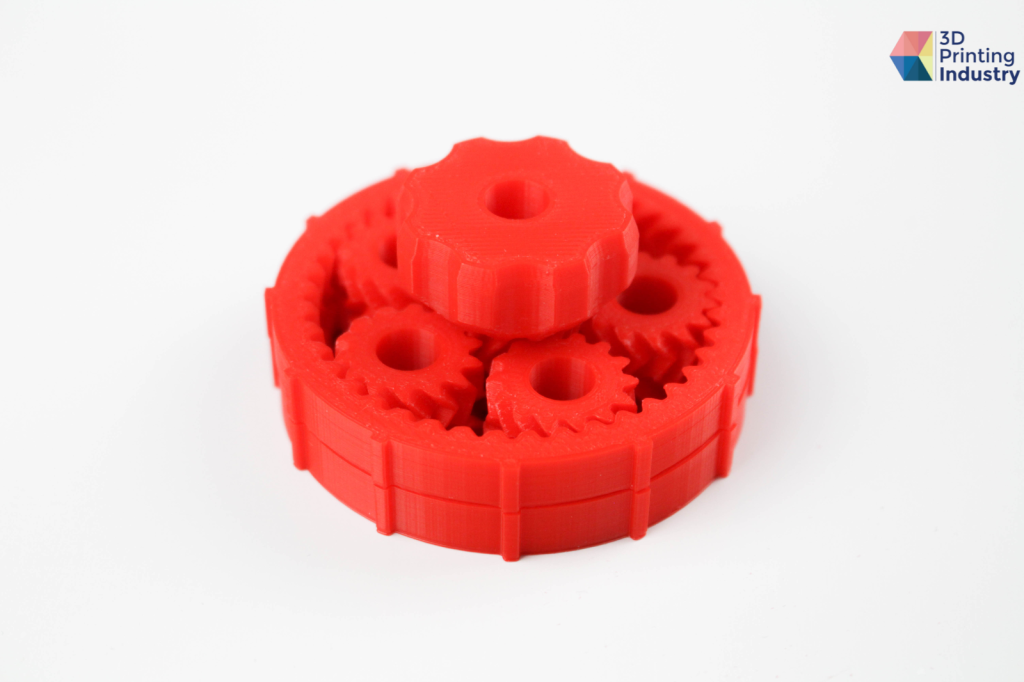
Dynamic prints like this one give us an indication as to just how tight the tolerances of the 3D printer are, as the ease of assembly and overall fluidity of the system can be judged very easily. The Pro3 did an excellent job with this print, as the mechanism could be assembled very easily and could be rotated with minimal resistance.
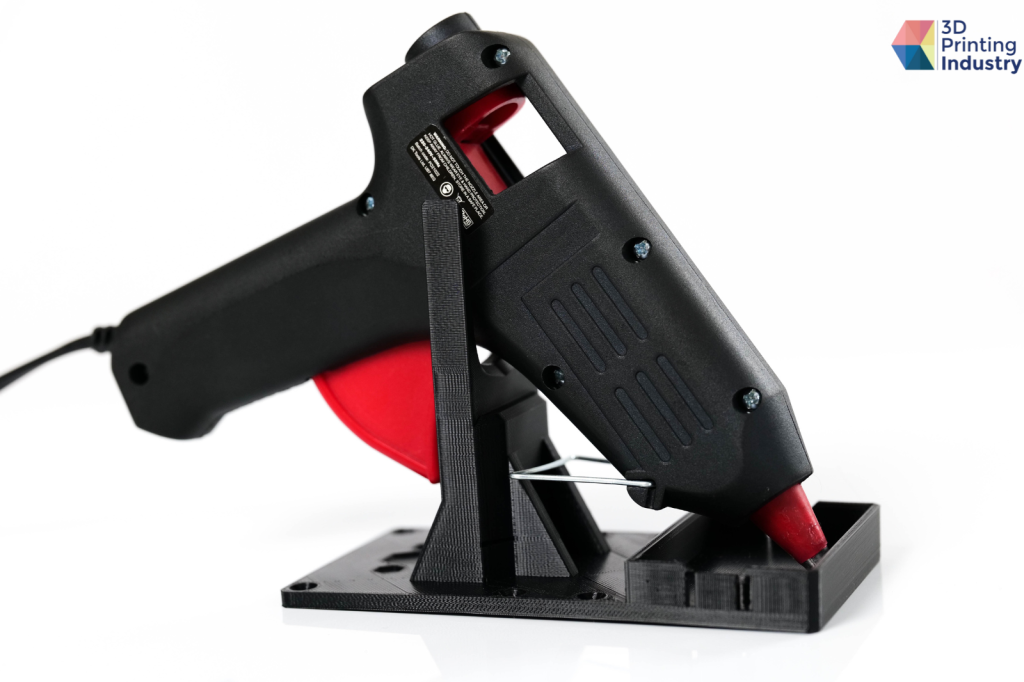
We then 3D printed a set of ABS parts: a Logitech C920 webcam cover and a glue gun stand. ABS is a low-cost polymer that’s great for printing tough and durable parts, owing to its heat and impact resistance.
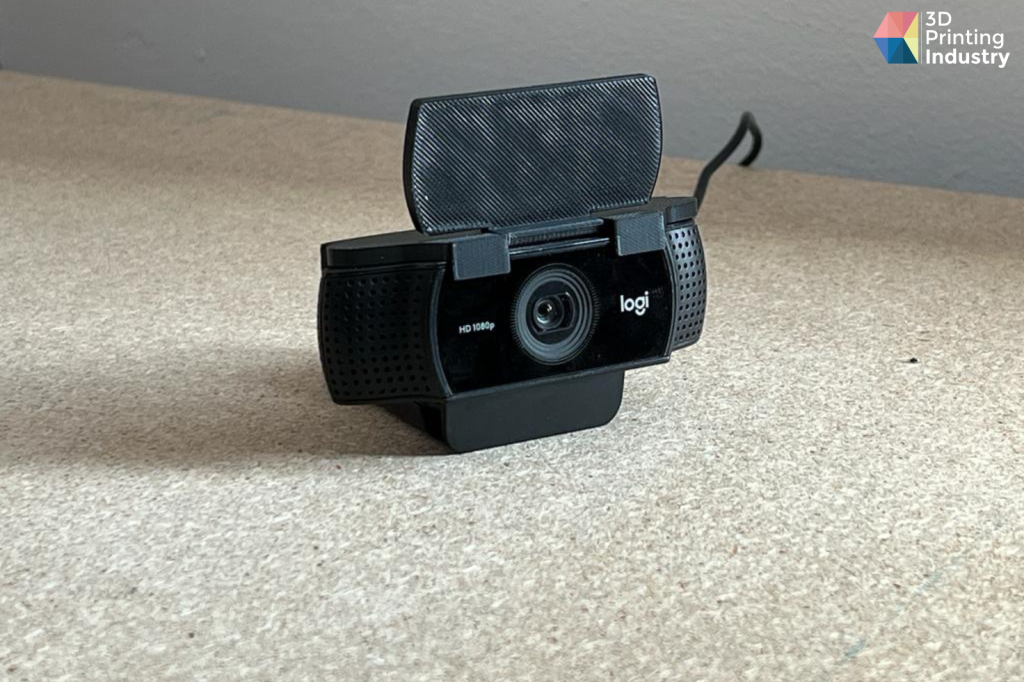
ABS 3D print tests. Photos by 3D Printing Industry.
There’s not much to say other than the fact that both prints went as smooth as butter. The webcam cover features excellent surface quality, and requires no post-processing whatsoever. Moreover, the glue gun stand is a perfect fit for its application, with no warping, invisible layer lines, and no stringing on any of the finer feature details. Both parts are solid, functional, and durable.
Next up was an engineering component – a helical bevel gear – 3D printed in polycarbonate (PC). The high-strength thermoplastic offers a combination of high heat deflection and impact resistance, qualifying it for high-performance applications in demanding environments.
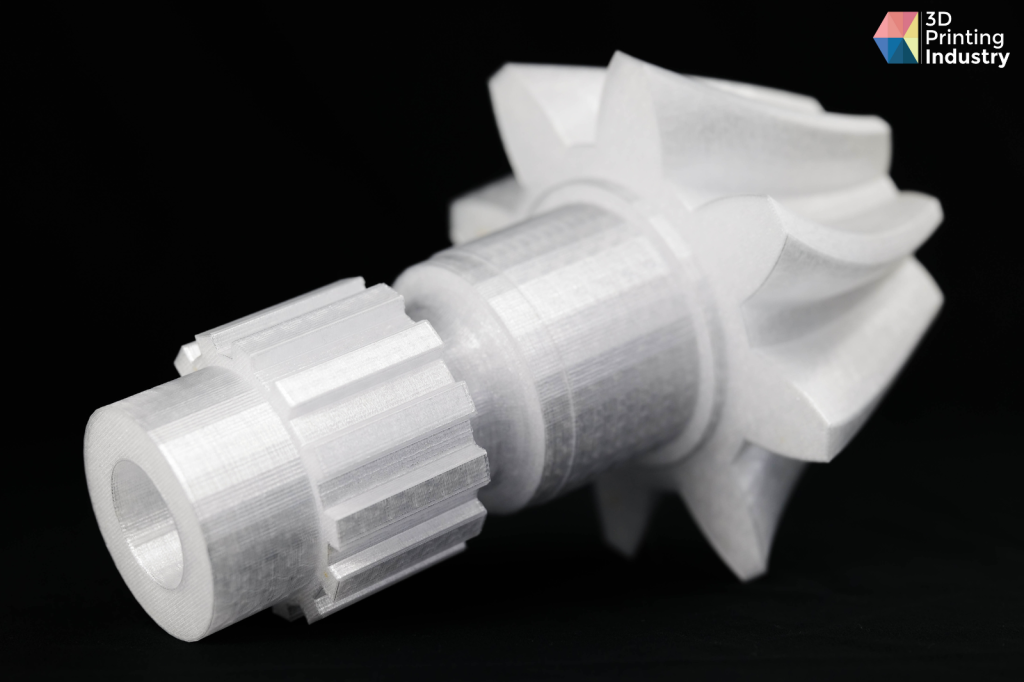
Again, the Pro3 held its own admirably when it came to 3D printing PC. The bevel gear is completely defect-free with great surface quality to boot. The only post-processing we had to do was limited to support removal and it left no visible marks.
Finally, we 3D printed a sealing gasket using flexible TPU filament. The part is designed to be placed between a speaker and its corresponding cabinet.
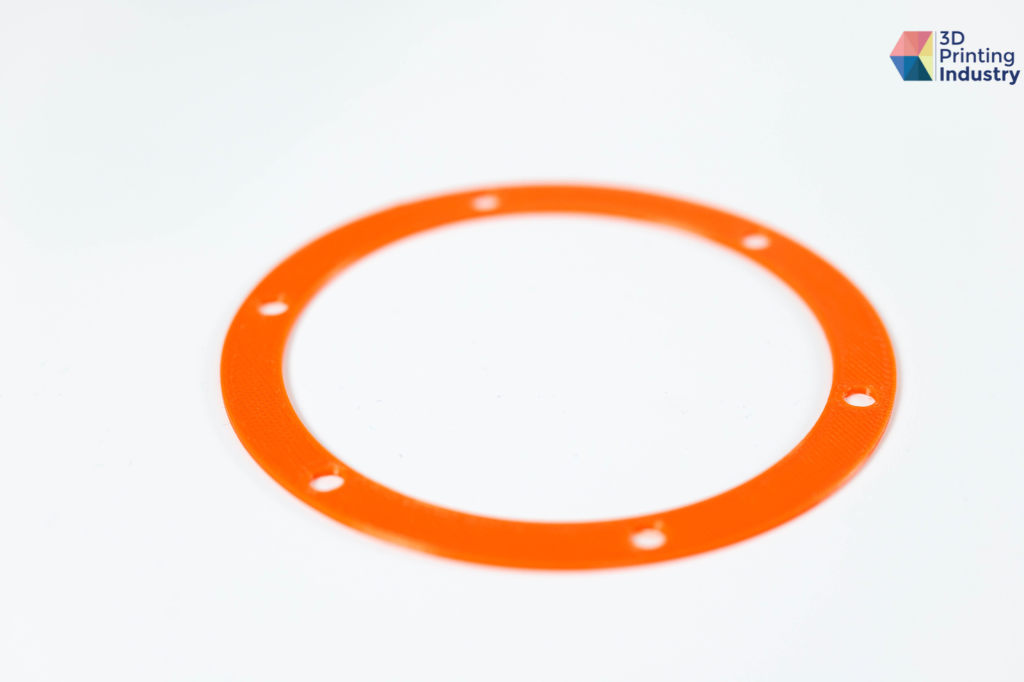
To print with flexible filaments successfully, you need a direct-drive extruder like the one mounted in the Pro3’s printhead. Our first attempt at this part was derailed when the TPU managed to wrap itself around the gears of the extruders, so we disassembled the printhead to clean it out and ran the same build a second time. The redo was the charm and we have to say the system finished strong, delivering a flawless TPU print fit for purpose.
The verdict
Raise3D’s Pro3 3D printer is defined by its undeniable reliability, boasting a robust set of hardware components from the dual extrusion printhead to the magnetic print bed. The firm has also beefed up the machine’s rods and lead screws when compared to its predecessor, the Pro2, resulting in what can only be described as a premium feel.
Similarly, the ideaMaker slicer is refined and easy to use, regardless of the user’s experience levels. It’s one of the strongest proprietary slicers we’ve had the pleasure of testing here at 3D Printing Industry: a testament to Raise3D’s market expertise.
When it comes to print quality, the Pro3 delivers on its promises. The system is capable of processing a wide variety of complex filaments such as PC, ABS, and TPU with grace, all with excellent surface finishes and fine feature details. The only thing we were mildly disappointed with was the repeatability on the Pro3, especially with larger parts where discrepancies seemed to increase with size, however this issue can be addressed by the user by correcting the X and Y axes if necessary.
Ultimately, with its plethora of quality-of-life features, including the filament runout sensor, power loss recovery, and built-in HD camera, the Pro3 is a strong choice for professional users seeking a dual extrusion 3D printer from a reputable company.
Technical specifications of the Raise3D Pro3
| Build volume | 300 x 300 x 300mm |
| Printheads | Two |
| Machine dimensions | 620 x 626 x 760mm |
| Weight | 52.5kg |
| Filament diameter | 1.75mm |
| Travel speed | 30 – 150mm/s |
| Max build plate temperature | 120°C |
| Layer height | 0.01 – 0.25mm |
| Max nozzle temperature | 300°C |
Buy the Raise3D Pro3 3D printer here.
What does the future of 3D printing hold?
What near-term 3D printing trends have been highlighted by industry experts?
Subscribe to the 3D Printing Industry newsletter to keep up to date with the latest 3D printing news.
You can also follow us on Twitter, like our Facebook page, and subscribe to the 3D Printing Industry Youtube channel to access more exclusive content.
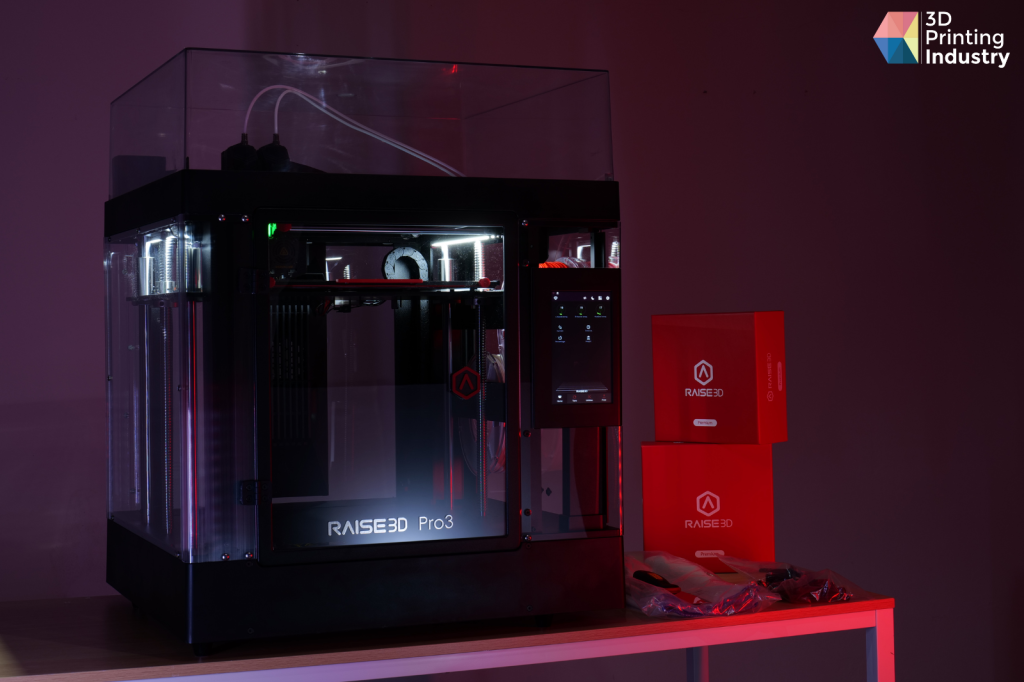
Featured image shows the Raise3D Pro3 3D printer. Photo by 3D Printing Industry.