
3DMakerpro specializes in the production of high-precision 3D scanners. Founded in 2015 and based in Shenzhen, the company employs a team of 100 R&D staff and has established a 3D scanning portfolio which includes the Whale, Mole, and Lynx models.
In this article we review the 3DMakerpro Seal, the latest addition to the portfolio.
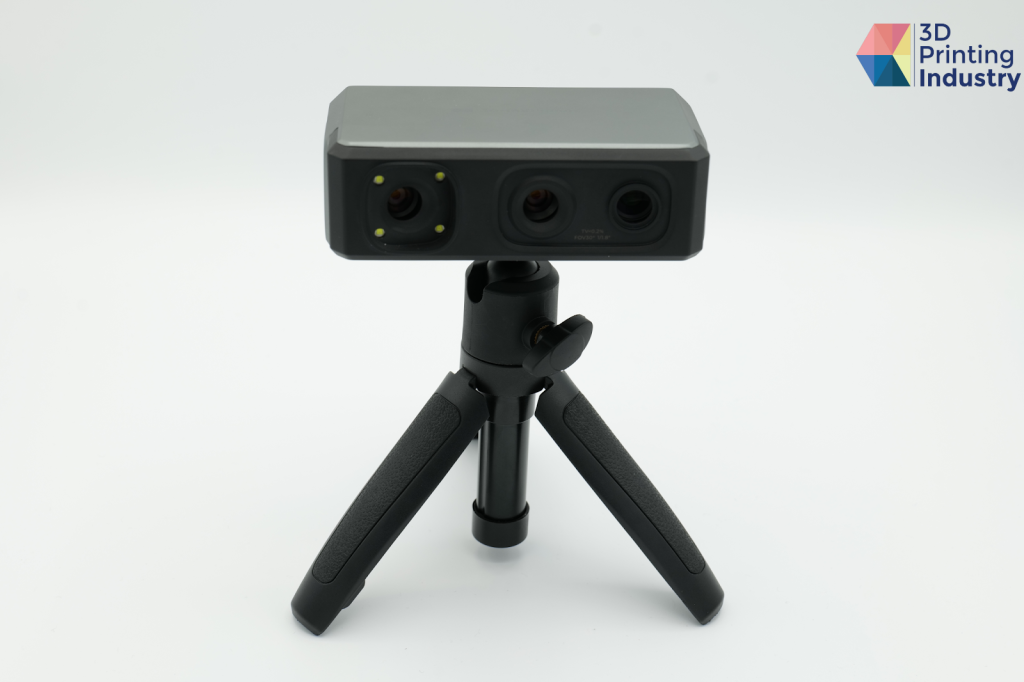
The 3DMakerpro Seal is a portable, pocket-sized 3D scanner targeted towards entry-level users looking to achieve high-quality 3D scans at a low cost. Advertised as offering an impressive 0.01mm accuracy and 0.05mm resolution, the Seal boasts up to 5x the resolution of comparable 3D scanners on the market.
With prices starting at just $699, the Seal is an affordable entry into the 3D scanning market and can be purchased on the official 3DMakerpro online store.
Key features of the Seal
Despite its low price-point, the Seal is advertised as featuring high-quality 3D scanning capabilities. With a reported 0.01mm accuracy and 0.05mm resolution, 3DMakerpro’s newest 3D scanner also incorporates anti-shake optical lenses. This allows for better results and a more stable 3D scanning experience.
The Seal’s 24-bit High-Definition Color Texture Camera incorporates a high-quality CMOS image sensor, facilitating the capture of fine object details. Moreover, with full-color capabilities, the Seal can capture up to 16,777,216 colors, enabling life-like model texture scanning.
The Seal is also notable in that it employs a blue light when scanning, as opposed to more conventional LED or NIR light sources. The blue light possesses a shorter wavelength of 400 to 500 nanometers. This reportedly enables 5x more detail than comparable 3D scanners. The blue light’s shorter wavelengths also encounter less diffraction, allowing for sharper focus across greater distances, resulting in higher precision and finer detail.
Thanks to the Seal’s AI visual tracking technology, no markers are needed during the 3D scanning process. This can pose problems when attempting to align multiple scans of parts that are symmetrical or possess large flat surfaces. However, these problems can be solved with the manual alignment tool.
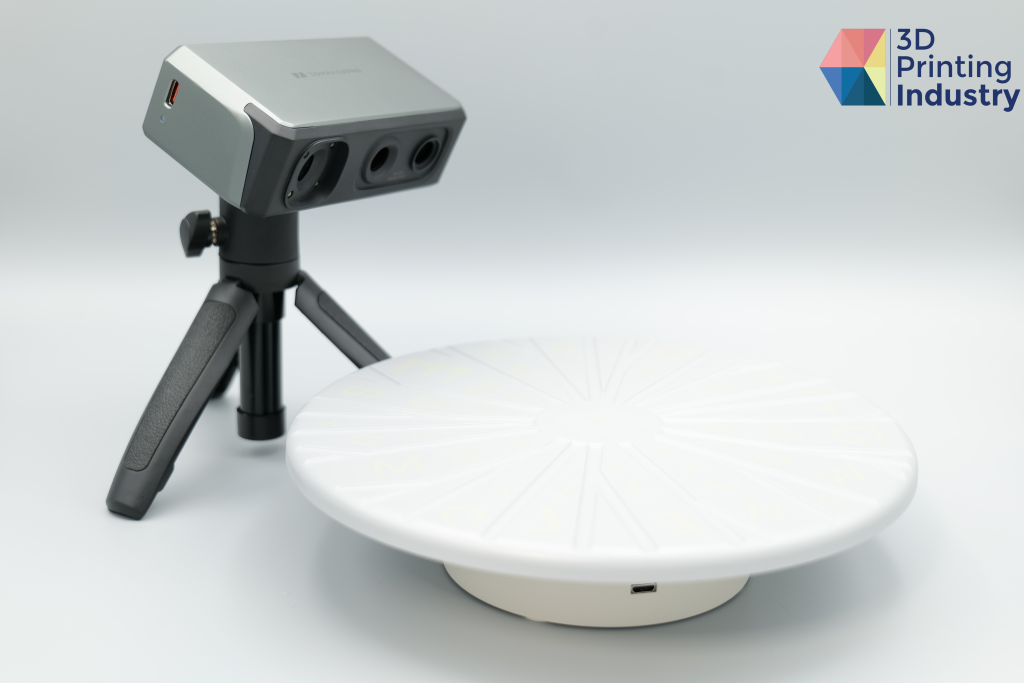
Users can conduct 3D scans in multiple modes, including Turntable Mode, Handheld Mode, and a combined Turntable + Handheld Mode.
Pocket-sized 3D scanning
With a sleek, minimalist design, the Seal features an all-aluminum-alloy body, giving it a robust, high-quality feel.
A key feature of the Seal is its compact size. Measuring 110mm x 60mm x 35mm and weighing just 200 grams, the Seal is portable and ideal for those who want to 3D scan on the go.
Moreover, the 3D scanner’s blue light faces limited interference from environmental factors, making the Seal well-suited to use in a range of indoor and outdoor spaces.
Overall, our Seal 3D scanner was well packaged and was delivered without any damage or missing parts. Our package included the telescopic tripod and multi-axis turntable optional add-ons. These components, which can be purchased from the 3DMakerpro online store, expedited the 3D scanning process and enabled 3D scanning in ‘table mode.’
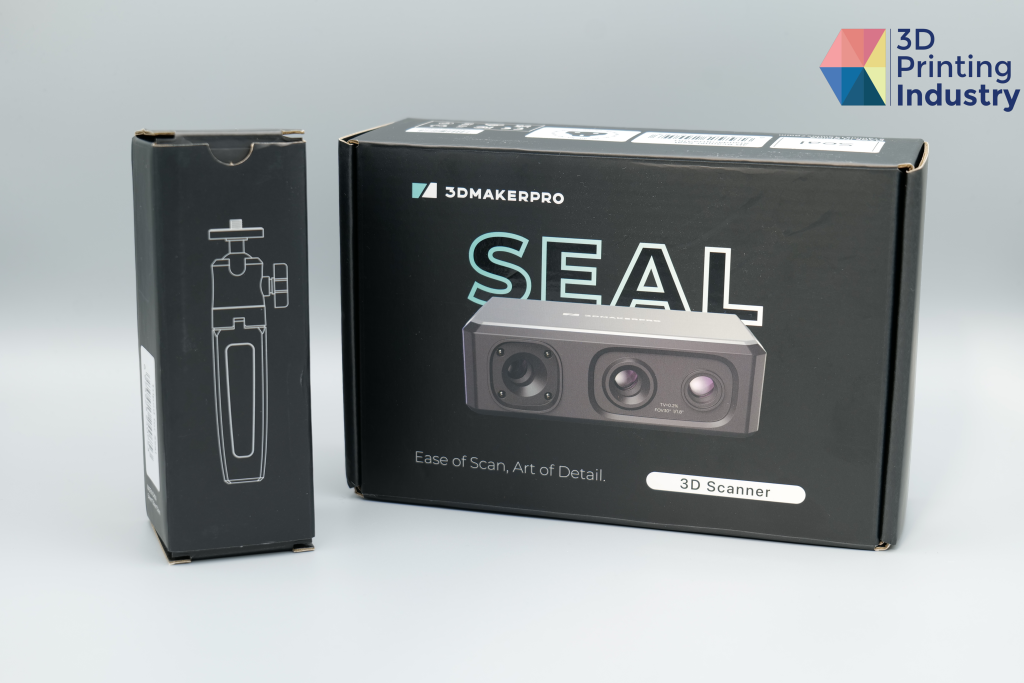
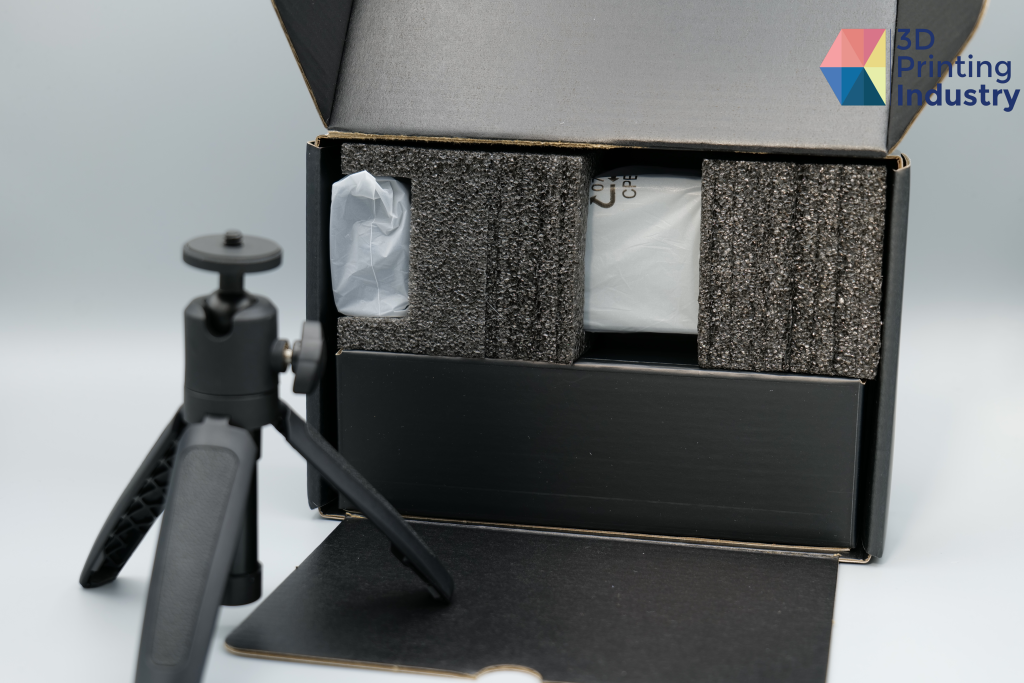
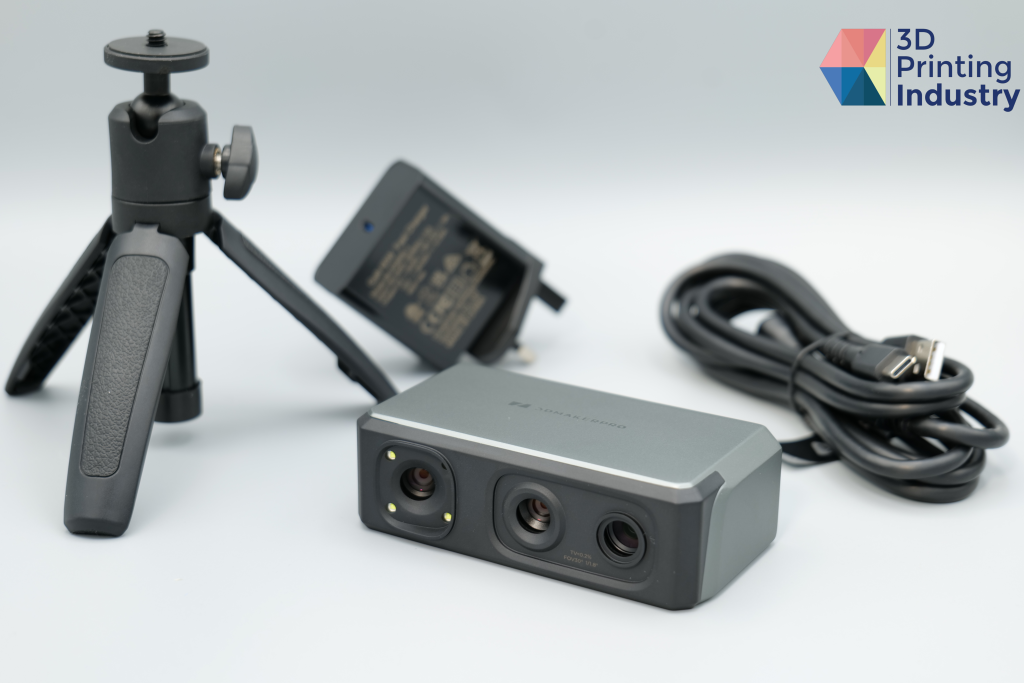
The Seal’s packaging and included accessories. Photos by 3D Printing Industry.
Calibration and setup process
3DMakerpro supplies its own proprietary software, JMStudio, for use with the Seal 3D scanner. This software is free, and can be easily installed online here. IOS and Android JMStudio apps are also available, allowing users to control their 3D scans with smartphones and tablet devices.
We found JMStudio to be especially easy to use, with the software featuring a simple and straightforward user interface (UI). Minimal manipulation and setup are needed to achieve good results, allowing users to start 3D scanning straight out of the box. No manual calibration is required, with the Seal quickly connecting to JMStudio.
JMStudio offers three modes: Easy Scan, Table Scan, and Edit Mode. Easy Scan allows users to 3D scan a model freehand, whilst Table Scan employs the turntable and tripod to achieve 360° scans of models from a set angle. Through Edit Mode, users can align 3D scans, and complete meshes for exporting in OBJ, STL, or PLY file formats.
The included ‘working distance indicator’ highlights the ideal 3D scanner and object position in real time. This tool was found to be particularly useful in achieving optimal 3D scans, and speeding up the 3D scanning process.
We were also impressed by the tutorial which is available when loading up the software for the first time. This feature would certainly be helpful for entry-level users and those unfamiliar with 3D scanning.
However, the simplicity of JMStudio is not ideal for more advanced users. More mesh cleaning and alignment options could be added to JMStudio, as it can be unclear which scans are being auto-aligned and which are not.
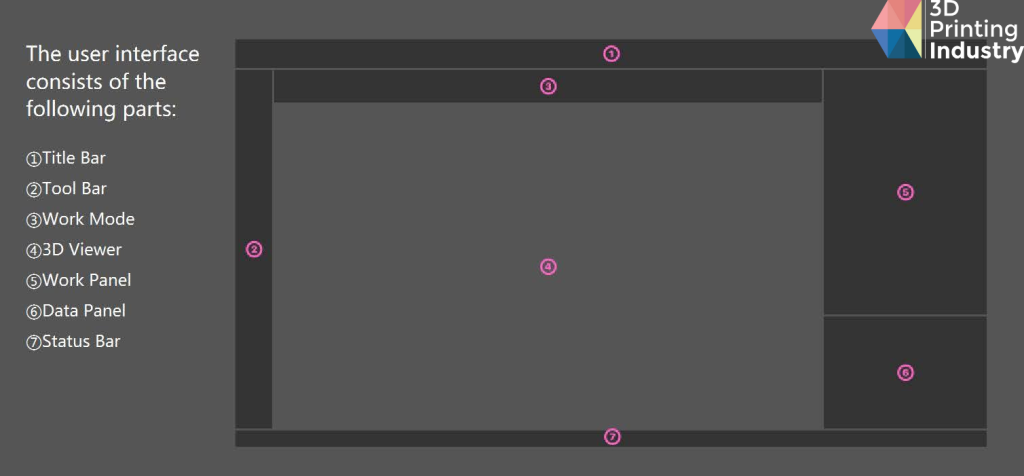
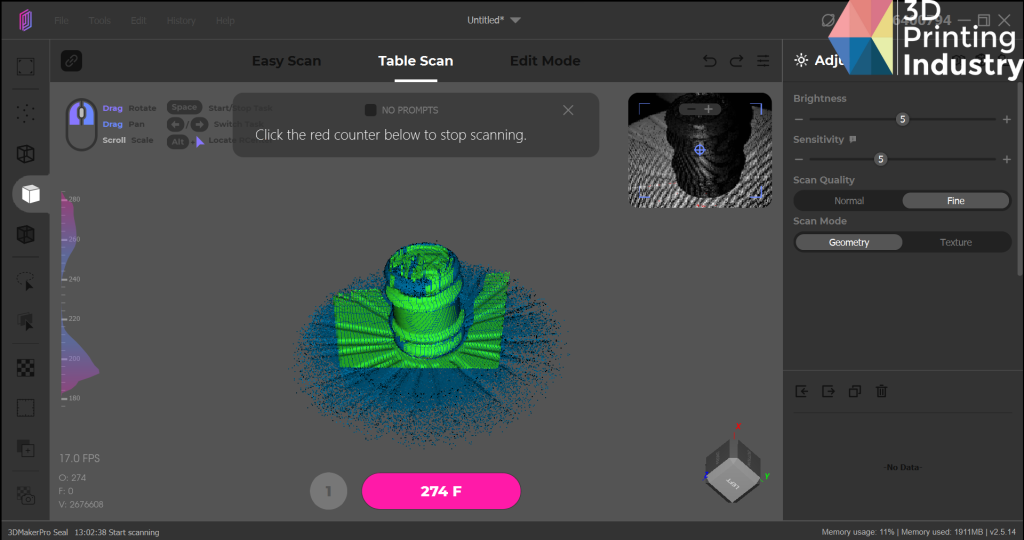
The JMStudio user interface overview and 3D scanning screen. Images by 3D Printing Industry
Benchmarking the Seal
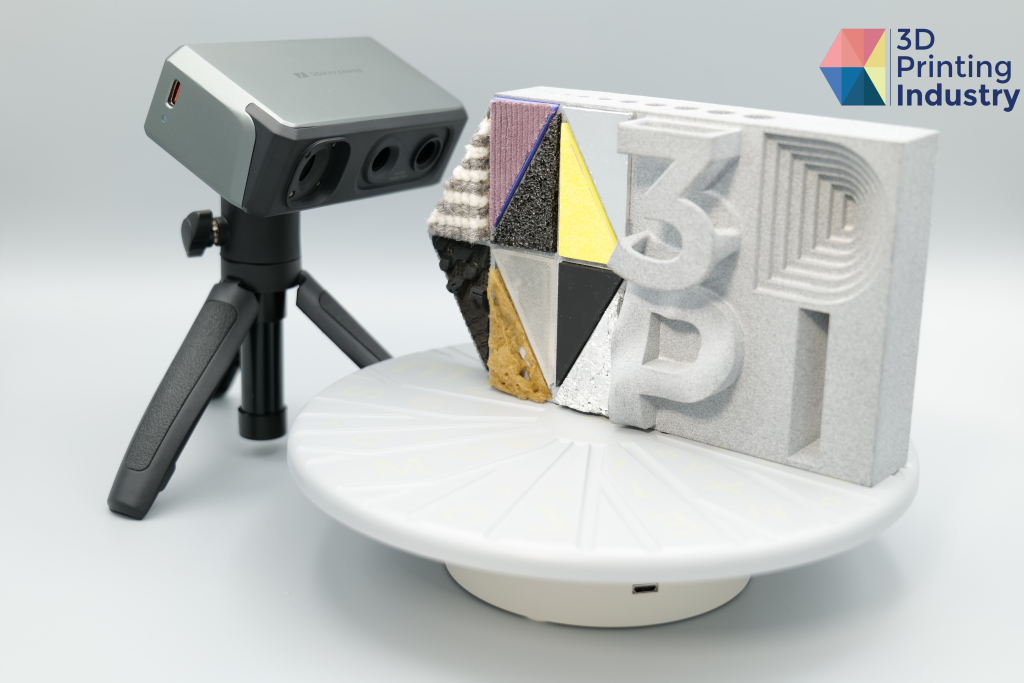
To assess the versatility of the Seal, our team conducted the 3DPI 3D scanning benchmarking tile test. This model features a range of geometric shapes on both sides, material textures, and colors that can often pose challenges for 3D scanners.
The Seal experienced some minor problems with this benchmarking test. Our team found that the Seal 3D scanner would lose tracking near the edge of the tile, making it difficult to scan both the front and rear of the 3DPI benchmark together. It should be noted that the processing power of the PC could have contributed to this. As a result, we scanned the front and rear faces of the tile separately.
On the front of the 3DPI benchmark, most of the complex geometry 3D scans came out well, with the Seal offering good durability for a range of object shapes and depths. What’s more, the reflective mirror piece, which poses problems for most 3D scanners, was successfully captured by the Seal. The carpet texture and sandpaper material were also successfully scanned to a high standard.
Other materials, such as the tyre and clear PETG were less successful. Most 3D scanners struggle to scan transparent materials, as there is no clearly defined surface for the light to reflect from.
The Seal 3D scanner also achieved good results on the geometries on the rear of the benchmark tile. The underside D, I, and “square snake” geometries were all scanned to a high level of accuracy and detail, all being good representations of the real model.

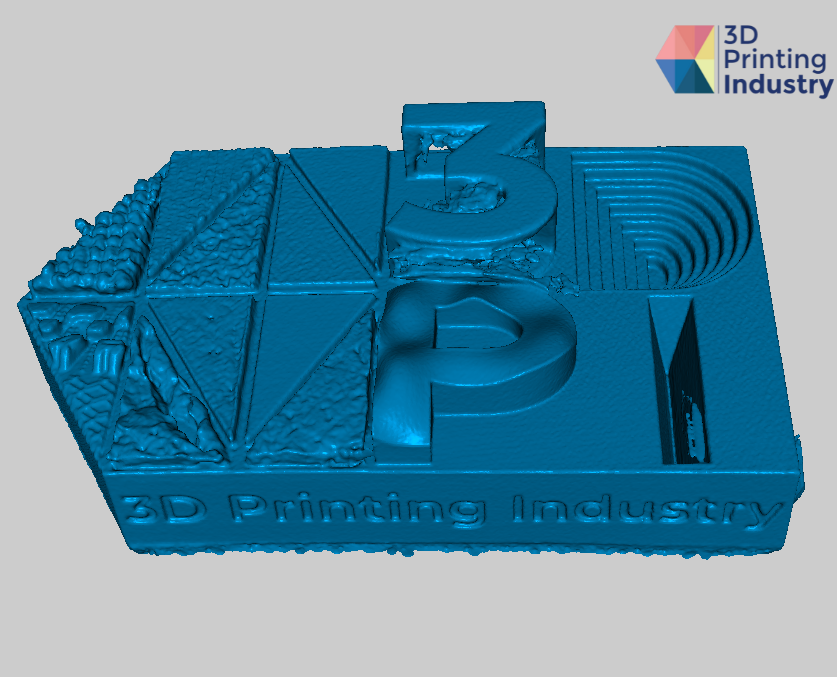
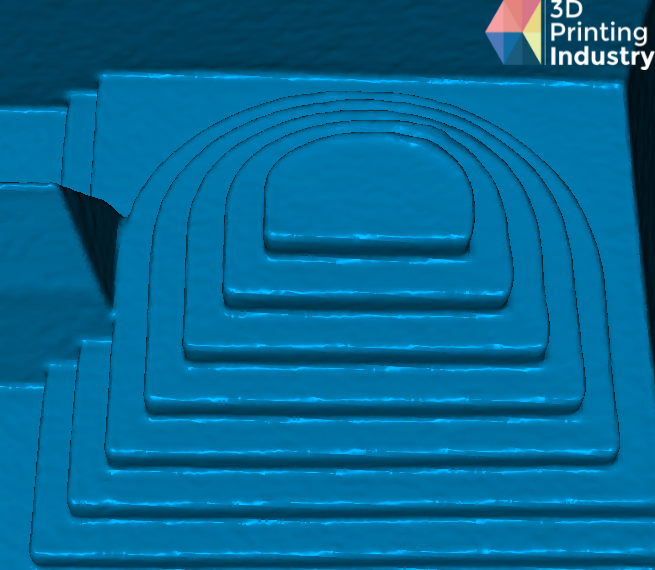
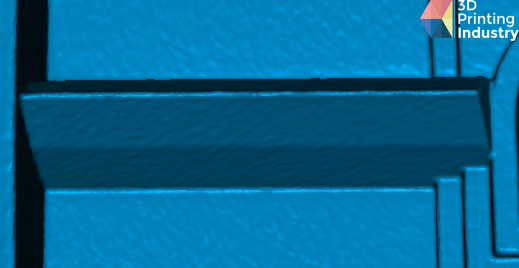
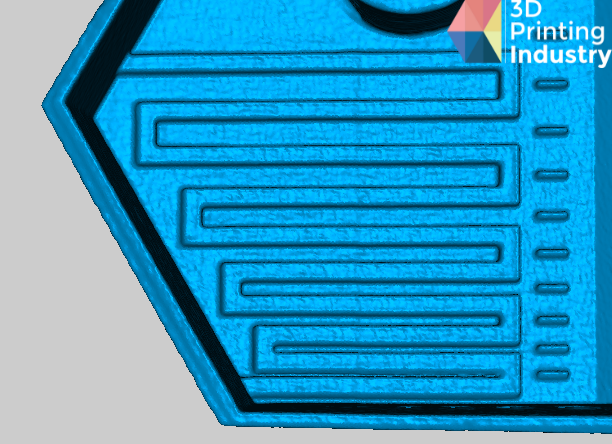
The 3DPI tile and 3D scan results, including D, I, and “square snake” underside geometries. Photo and Images by 3D Printing Industry.
To determine the 3D scanning accuracy of the Seal, our team then conducted a 3D scan of a 15mm x 20mm x 25mm cuboid block. The results were then compared against the known dimensions of the part. Using the turntable mode, the Seal achieved very good results in this test. 0.02 mm accuracy was achieved on the X and Z axes, with -0.16 mm on the Y axis.
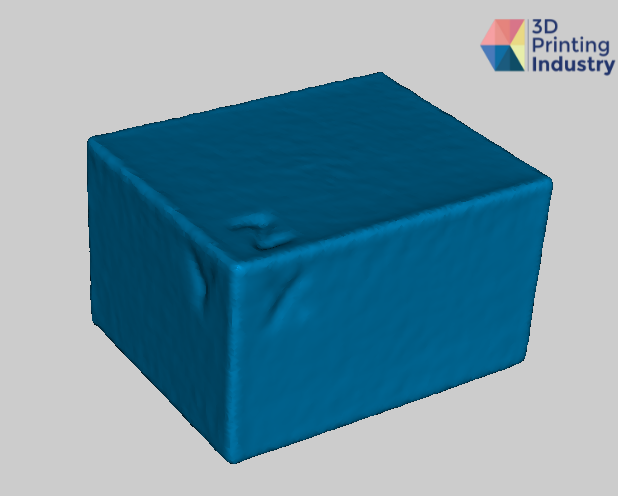
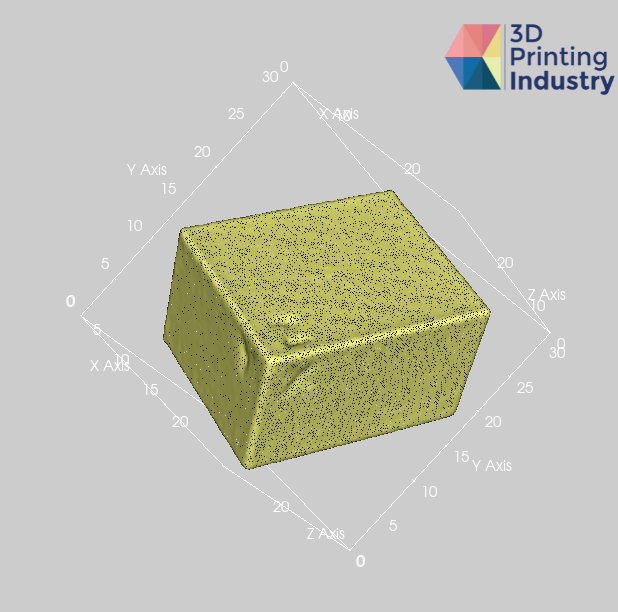
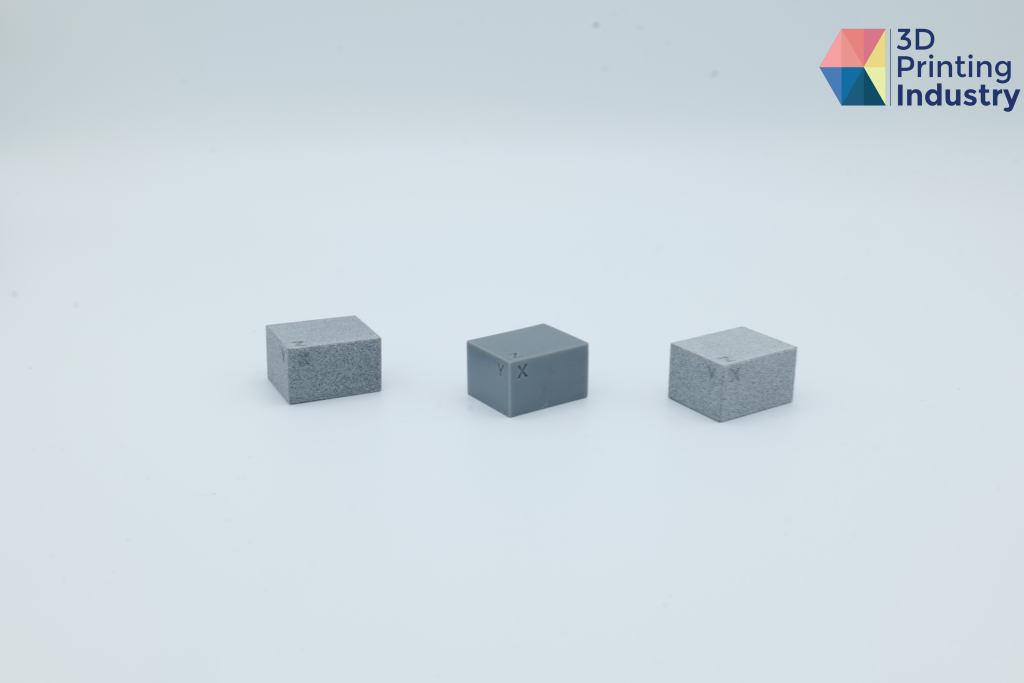
3D scanned reference block. Photo and images by 3D Printing Industry.
Application tests
Our team also conducted a range of application tests to assess real-world use-cases of the Seal.
To assess the Seal’s ability to 3D scan models with fine details, a 3D printed white statue was scanned. This 3D scan was conducted freehand through JMStudio’s Easy Scan mode.
The results of this scan were very impressive, demonstrating high-definition accuracy and successfully showing the 3D printed layer lines of the model. Two 3D scans were conducted, which provided enough data to successfully complete the model to a good standard. The Seal did not lose tracking while scanning, and the JMStudio auto-align tool worked perfectly with no complications.
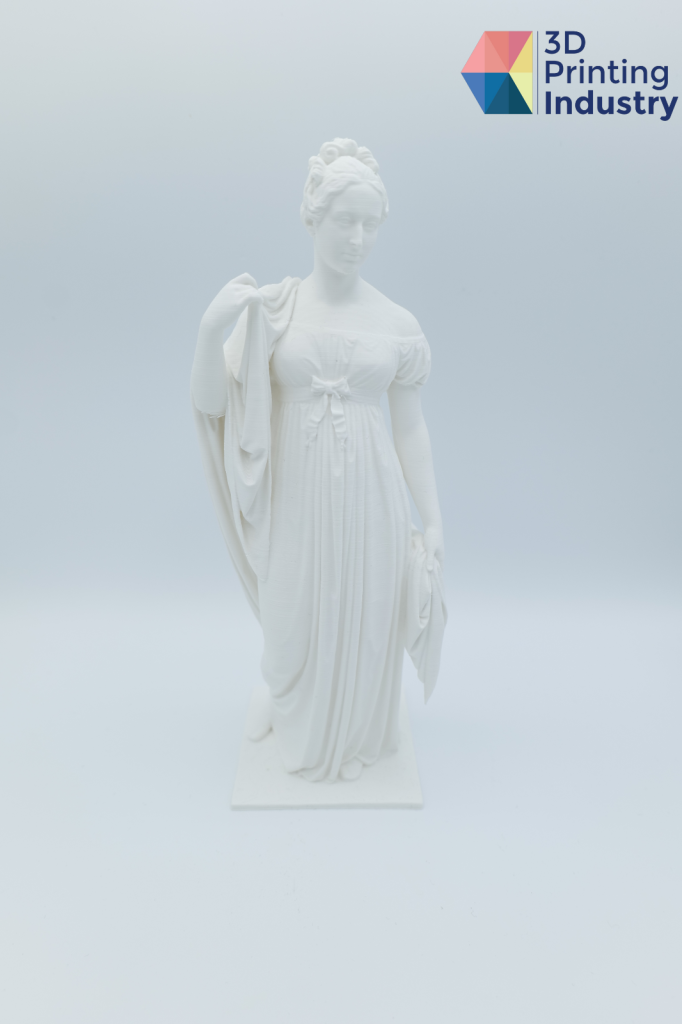
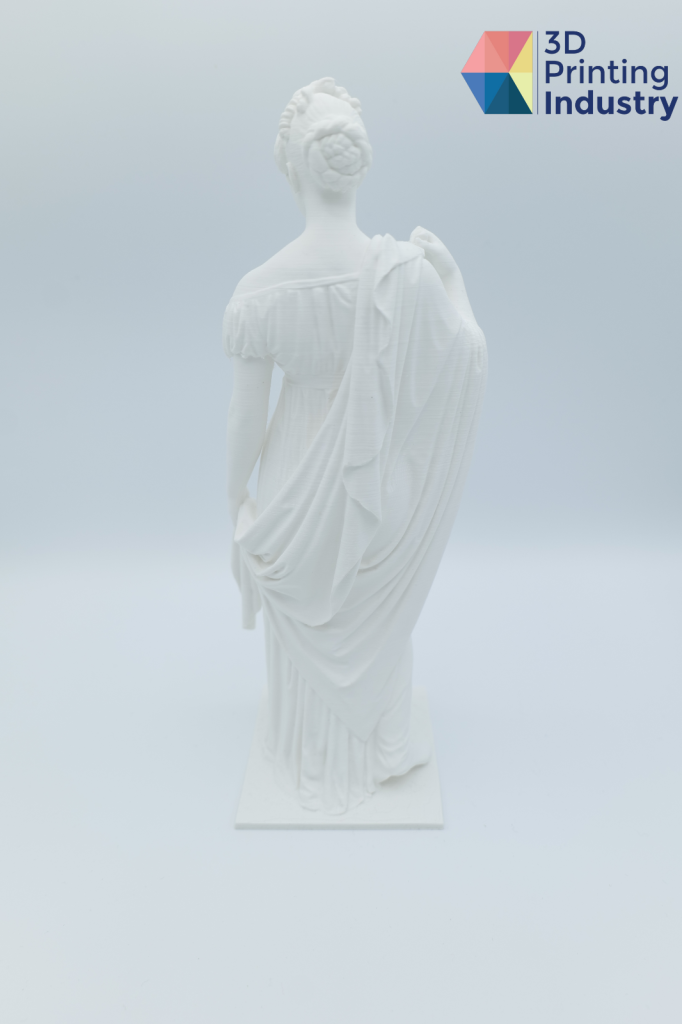
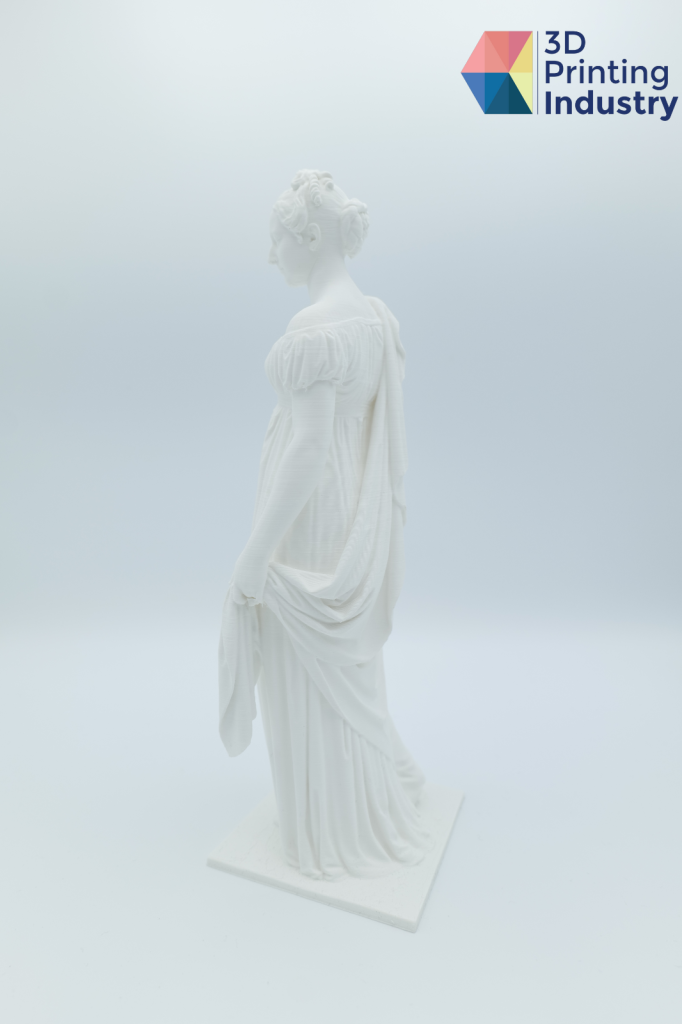
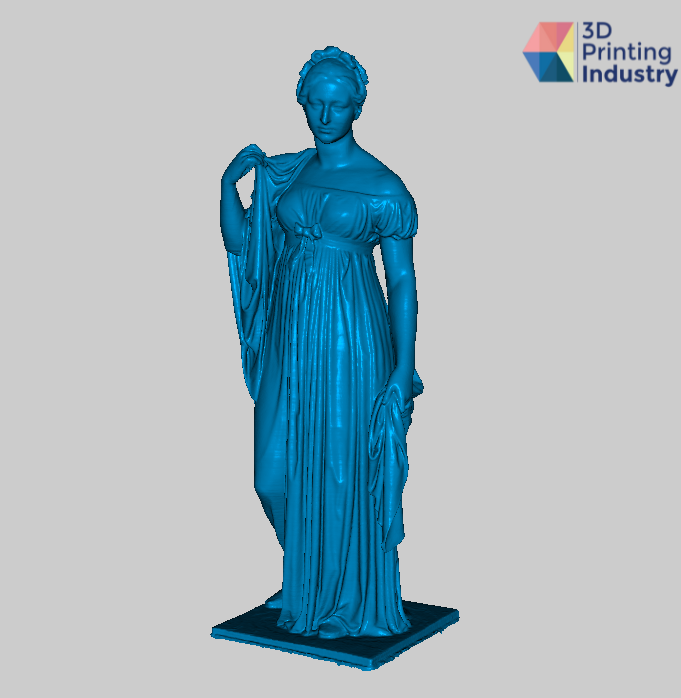
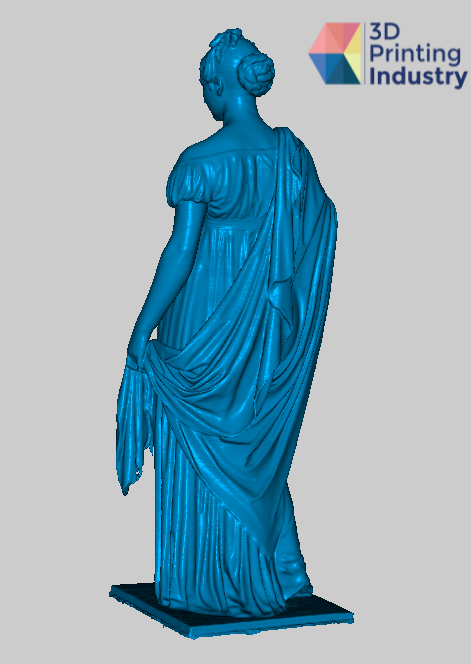
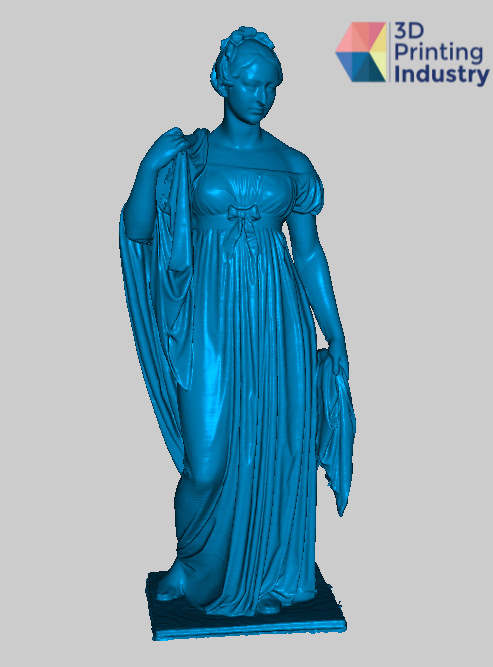
3D printed statue and scanned results. Photos and images by 3D Printing Industry.
We next tasked the Seal with a 3D scan of pliers, a more challenging object that contains a mixture of metal and rubber materials. After several unsuccessful 3D scans, scanning spray was added to the metal end of the pliers to ensure that frames could be captured without losing track.
The limitations of the Seal when scanning metal and shiny objects was apparent in this test, with the 3D scanner often duplicating the plier head or creating noise fragments from reflected light. However, after applying spray to the metal, we achieved accurate and detailed results.
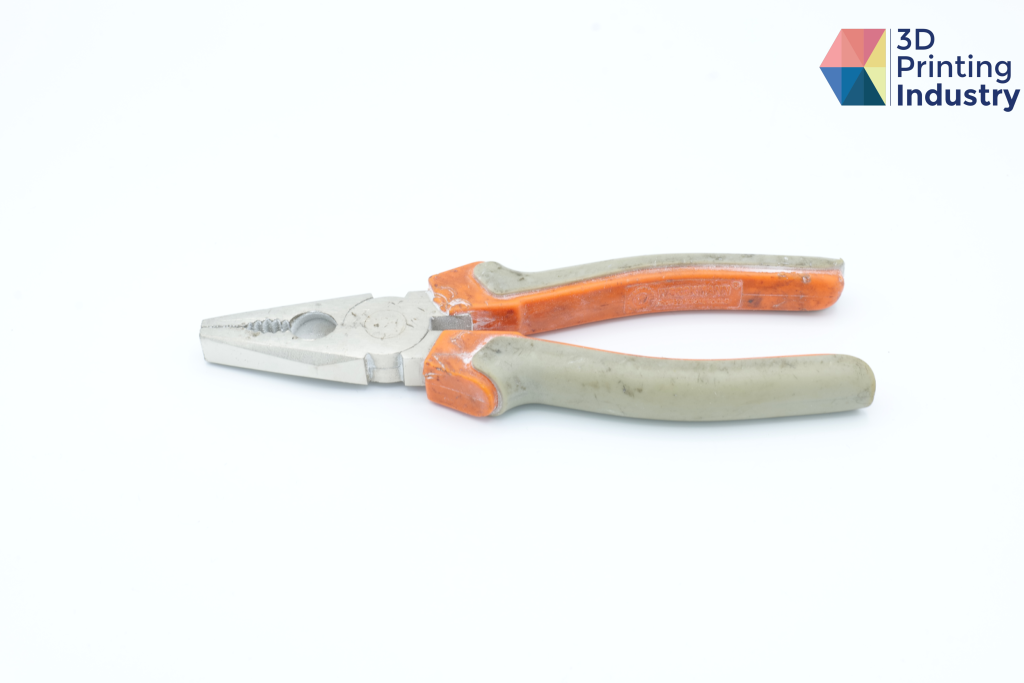
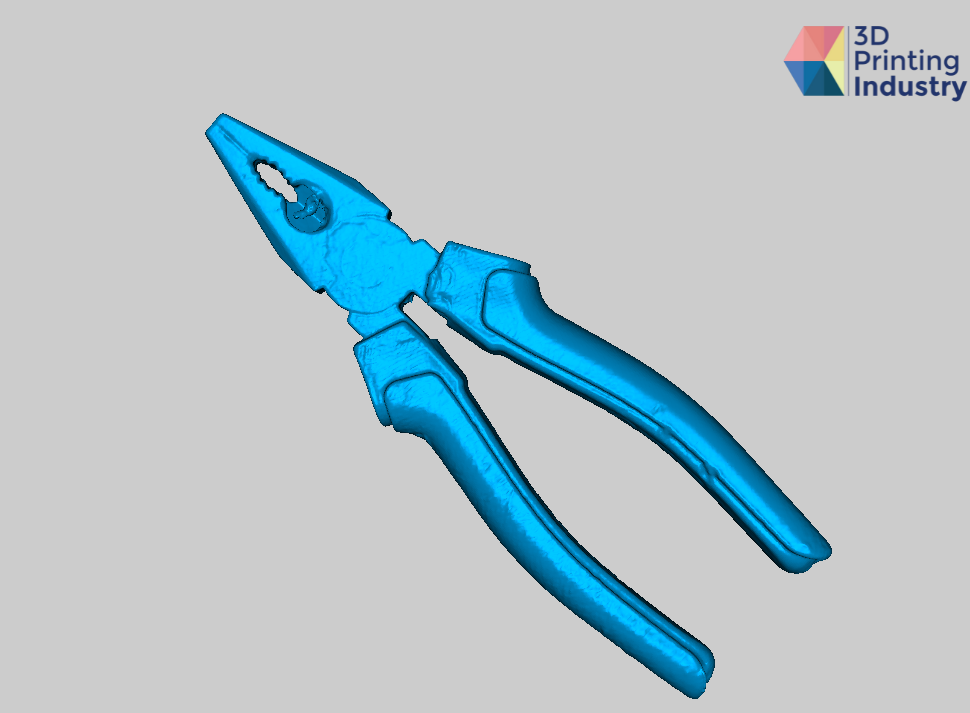
Pliers object and 3D scan result. Photo and image by 3D Printing Industry.
We next produced a 3D scan of a motorcycle indicator featuring transparent plastic and a solid black casing. This was a good test of the Seal’s ability to 3D scan both transparent and black plastics, and a good showcase of the scanners used for reverse engineering applications. Motorcycle indicator 3D scans could be used to create alternative designs, while maintaining the necessary fitting dimensions and wire length.
Once again, scanning spray was required as the Seal struggled with both the transparent and black surfaces. The successful scans included limited deformations, but included some noise fragments which could not be removed in JMStudio. Moreover, the auto alignment feature inaccurately fused the three scans. This required manual intervention to rectify.
In this test, the Seal demonstrated good dimensional accuracy. The 3D scan possessed a minor discrepancy of -0.053mm, only marginally smaller than the actual object’s dimensions.
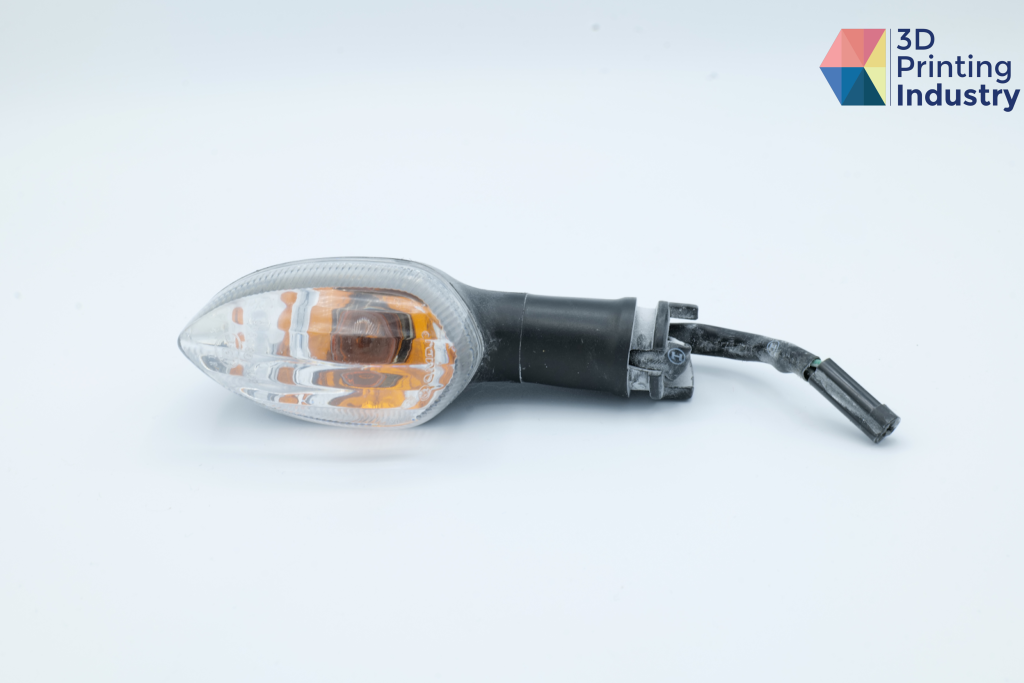
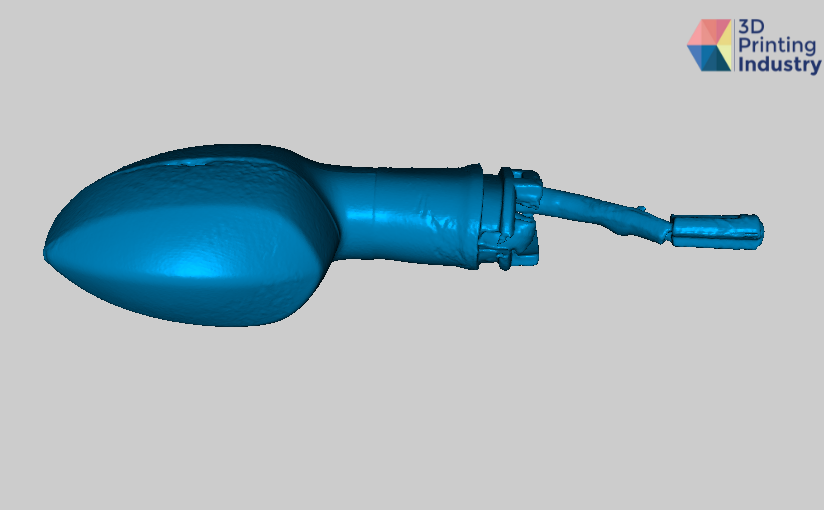
Motorcycle indicator object and 3D scans. Photo and images by 3D Printing Industry.
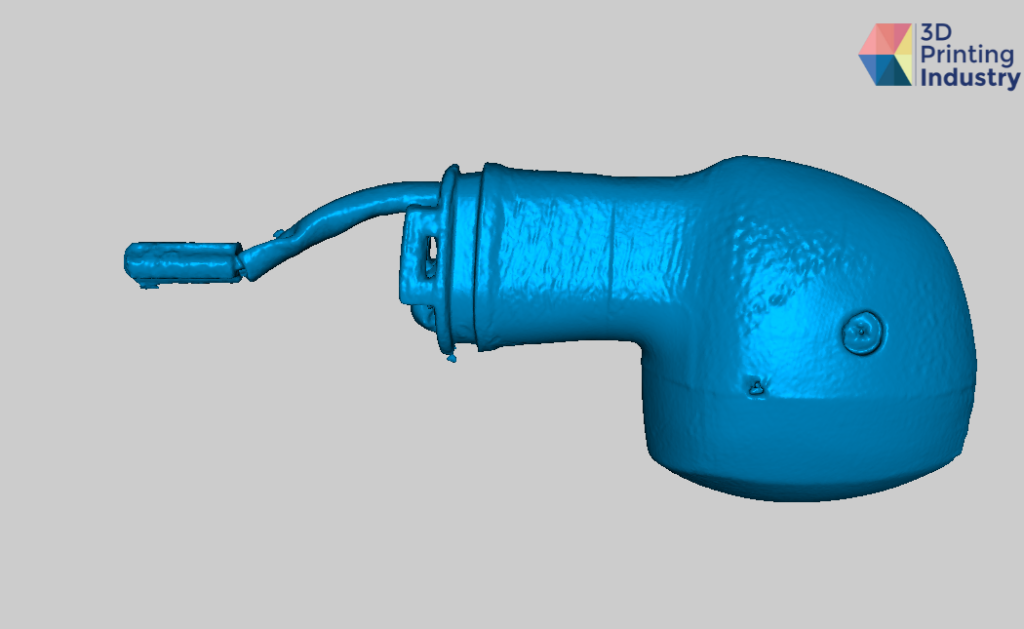
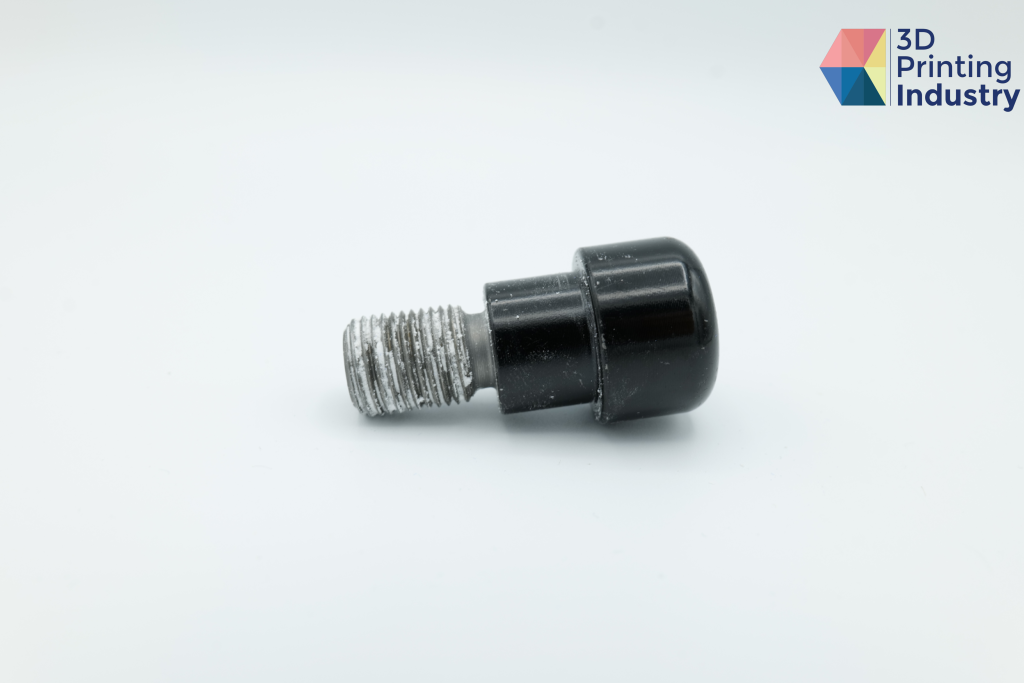
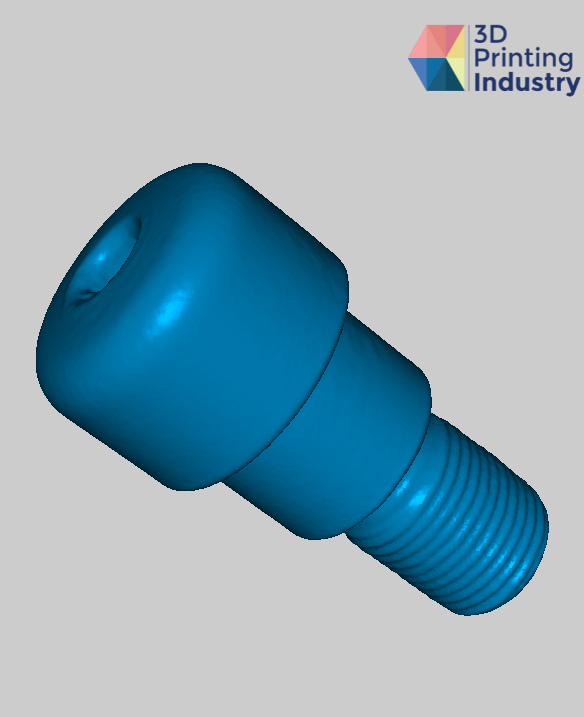
Next we scanned an e-scooter front suspension component, possessing challenging chrome metal surfaces and a complex coil geometry. The model was scanned four times, and once again required spray to be applied to the shiny surfaces. JMStudio frequently lost track of the coil section, with the auto align tool failing to accurately join the 3D scans.
Ultimately, the final scan failed to separate the entire coil from the center body. However, the coil pattern came out well, with limited noise fragments. The scanned leg height section of the component possessed a 0.104mm discrepancy to the actual object, a disappointing result significantly larger than the previous 3D scans.
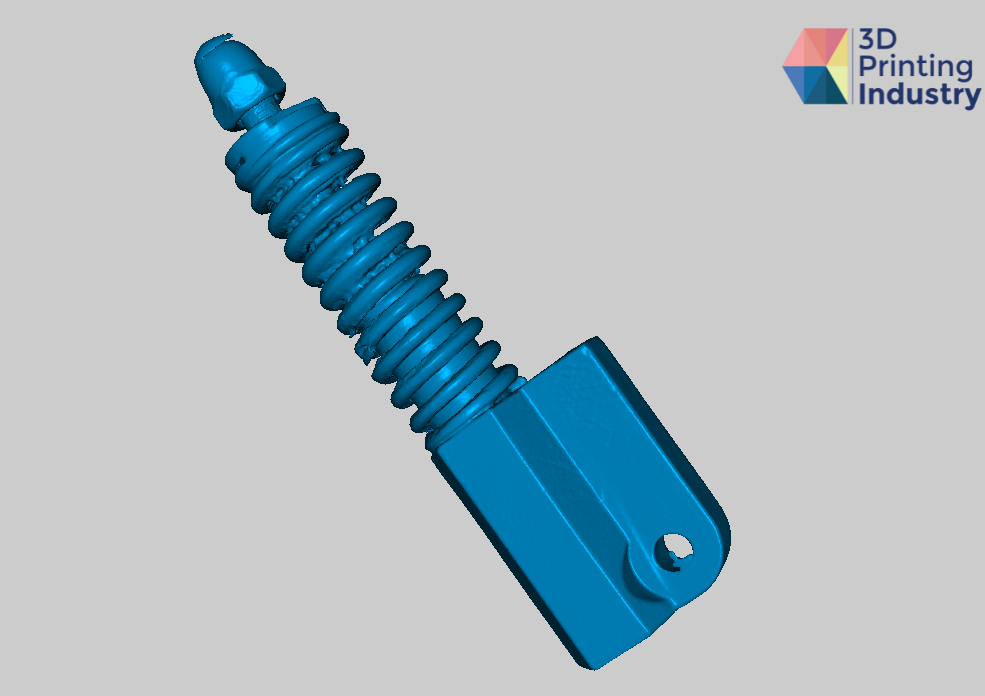
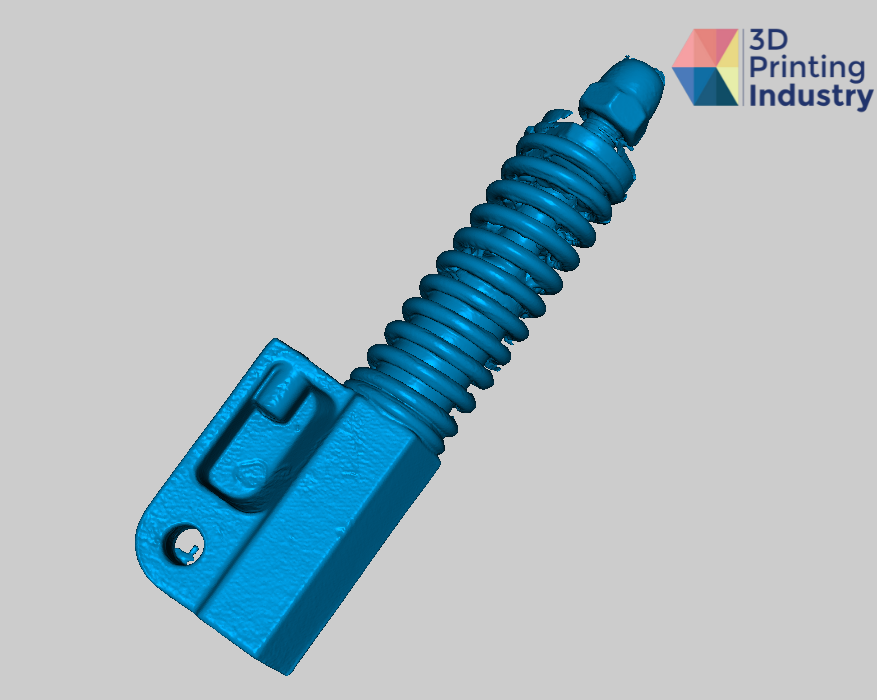
E-scooter suspension component and 3D scan results. Photo and images by 3D Printing Industry.
A motorcycle handle bar end protector was also 3D scanned with the Seal. This component is made from steel and possesses a glossy black finish. Ideally, the 3D scan accuracy of this part’s screw threads would be high enough to allow a functional part to be 3D printed.
Scanned using Turntable Mode, the spray was again required to counteract the object’s glossy finish. The screw threads and allen key port unfortunately did not contain enough detail to offer functionality. As such, the model would have to be further processed on a CAD software to be made applicable.
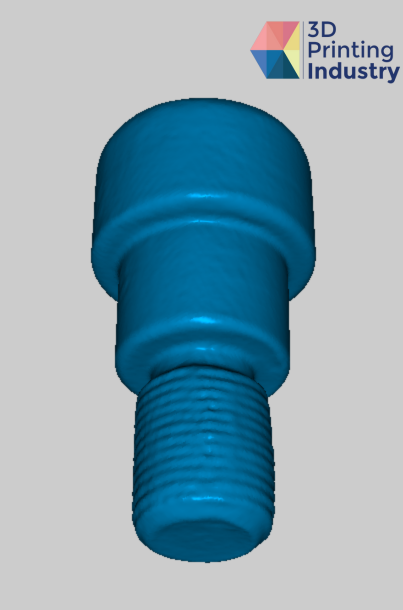
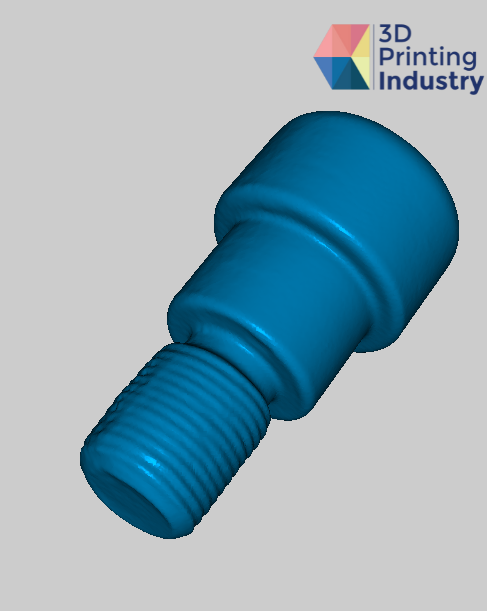
Handle bar end mount object and 3D scan result. Photo and images by 3D Printing Industry.
Next, a bicycle derailleur mech containing multiple complex and small geometries was 3D scanned. With a black and silver finish, this object consists of multiple small springs and jockey wheels. These small hidden details offer a good test of the Seal’s blue light depth. Spray again had to be applied to the parts black, metallic, and reflective surfaces.
The Seal successfully maintained tracking while scanning the derailleur. The parts were scanned in segments, with the auto align feature stitching these 3D scans together quickly and effectively.
However, the Seal was unable to retrieve frame data from all depths of the part, with the spring unable to be identified. Nothing could be done to overcome this, meaning these results were ultimately below average. Additionally, water was needed to wash away the spray. This limits the Seal’s applications away from electrical components that cannot be washed.
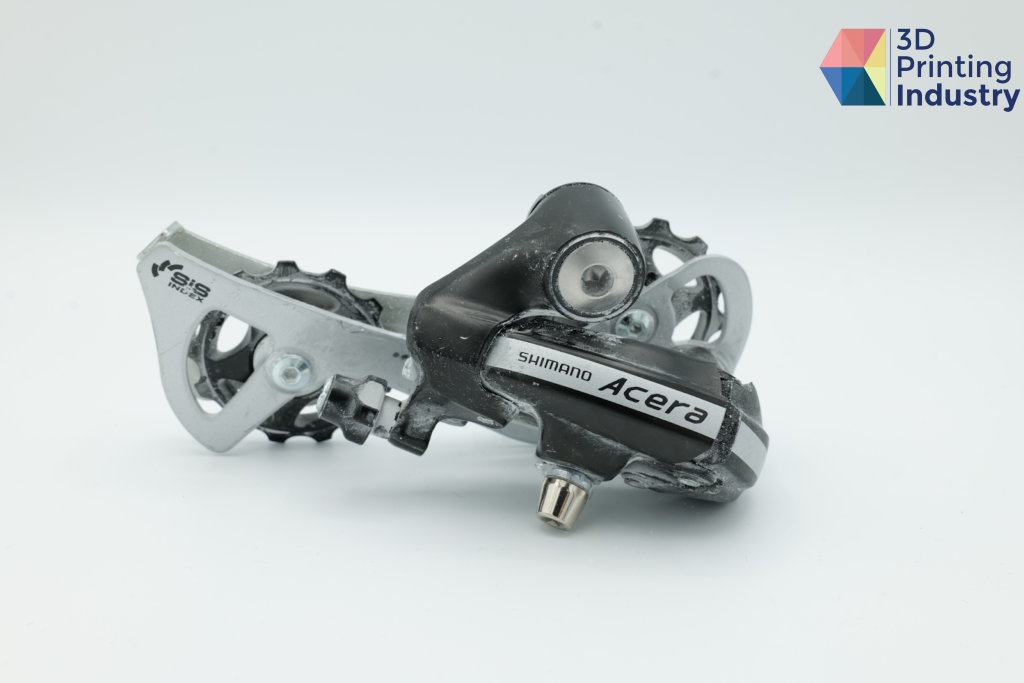

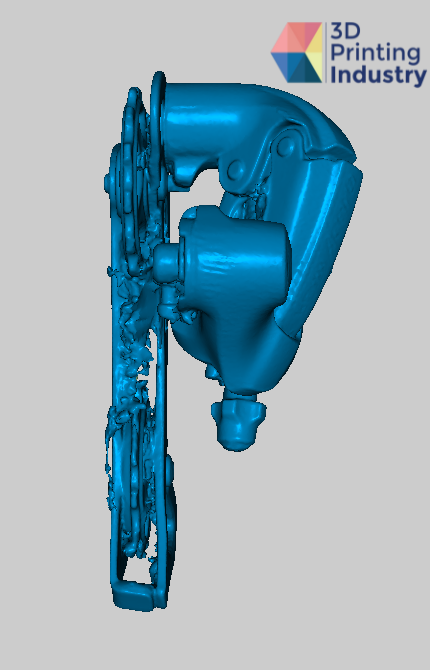
Derailleur object and 3D scan results. Photo and images by 3D Printing Industry.
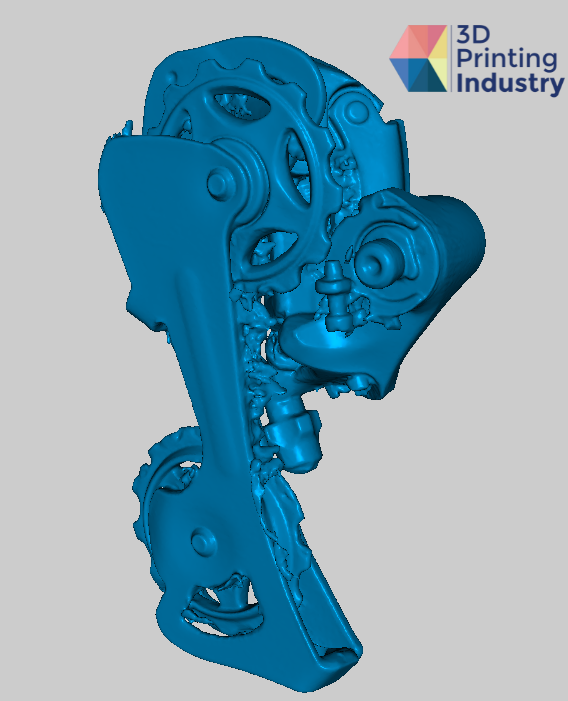
A broken motorcycle clutch basket possessing a unique geometry was also 3D scanned by the Seal. Although 3DMakerpro does not recommend the Seal for use with mechanical components, this test offers good insight into the processing of larger metallic objects. Spray was required to counteract the parts’ shiny metallic surface.
This part ultimately highlighted the main weaknesses of the Seal, with the clutch basket arms duplicating due to its lack of features and symmetrical pattern. As such, reference markers had to be added to improve the results. Moreover, both auto and manual alignment tools struggled with this part. We believe JMStudio’s alignment feature would benefit from additional tools, such as cursor-based part manipulation commonly found in other CAD software.
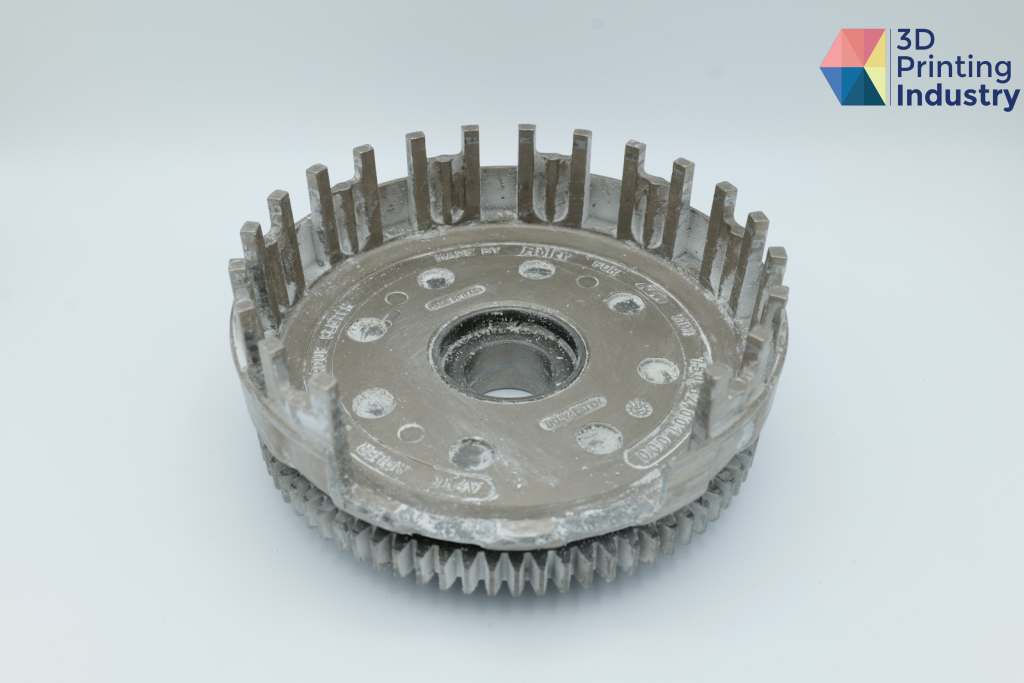
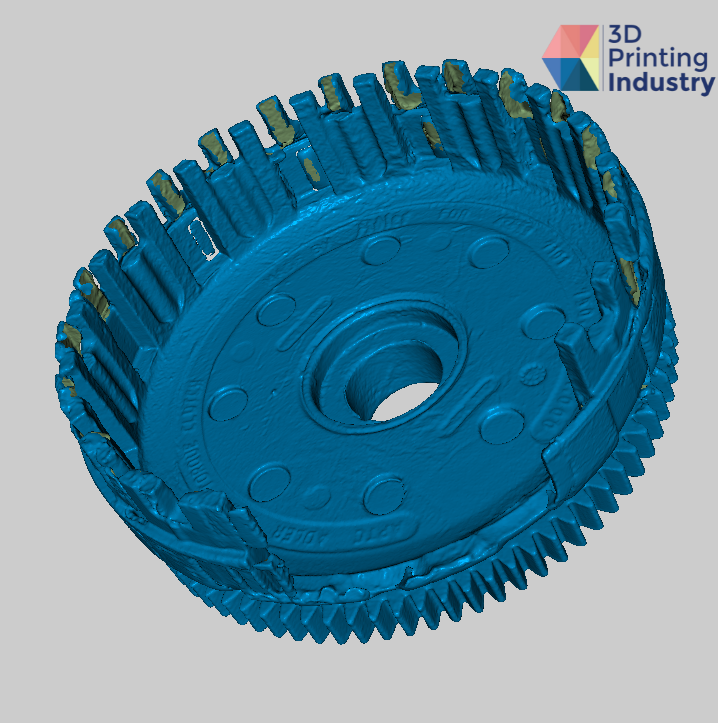
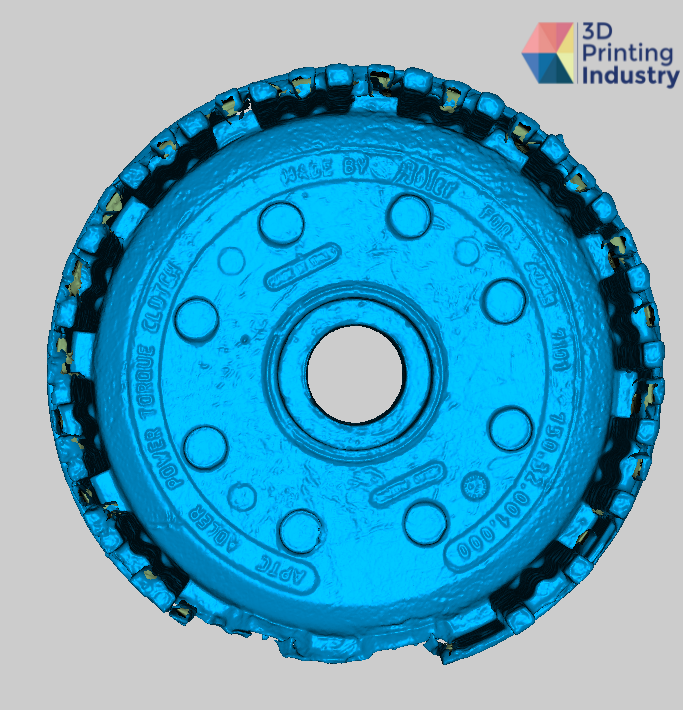

Clutch basket object and 3D scan results. Photo and images by 3D Printing Industry.
Finally, a 3D scan of a Native American clay sculpture model was conducted. Featuring a range of colors and textures, this model offered a good test of the Seal’s advertised texture mapping, and multi-color capabilities.
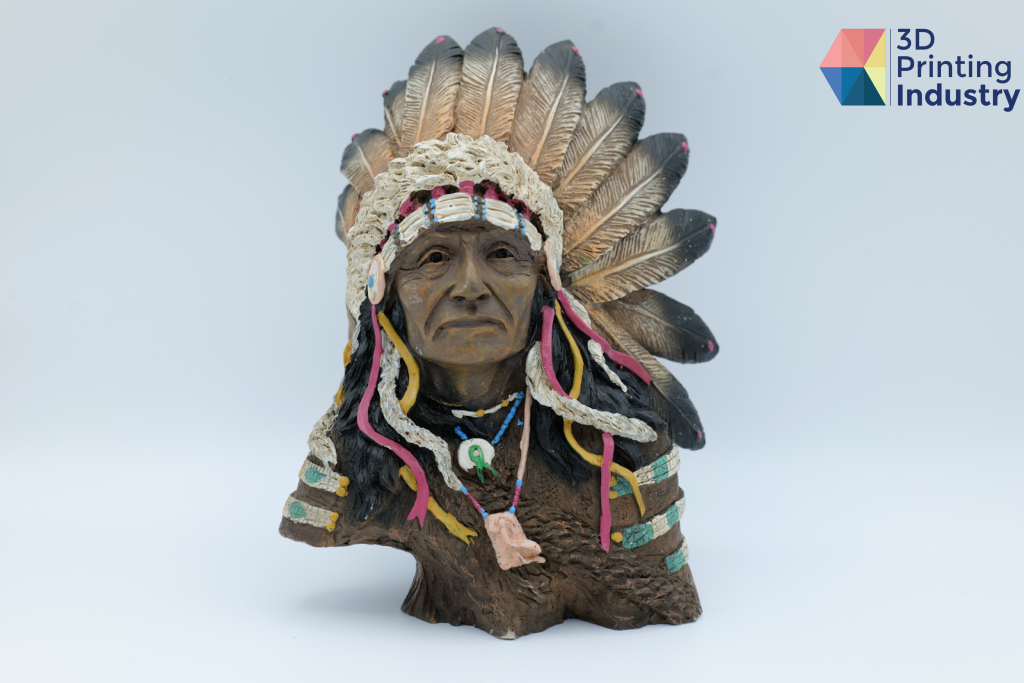
The Seal worked well during this test, easily 3D scanning up to 1300 frames with limited tracking issues. The auto-alignment tool also worked well here, with this 3D scan achieving a high level of detail. Having easily exported the 3D scan as an STL file, we 3D printed the model in PLA, with the end result being a near-perfect representation of the original model.
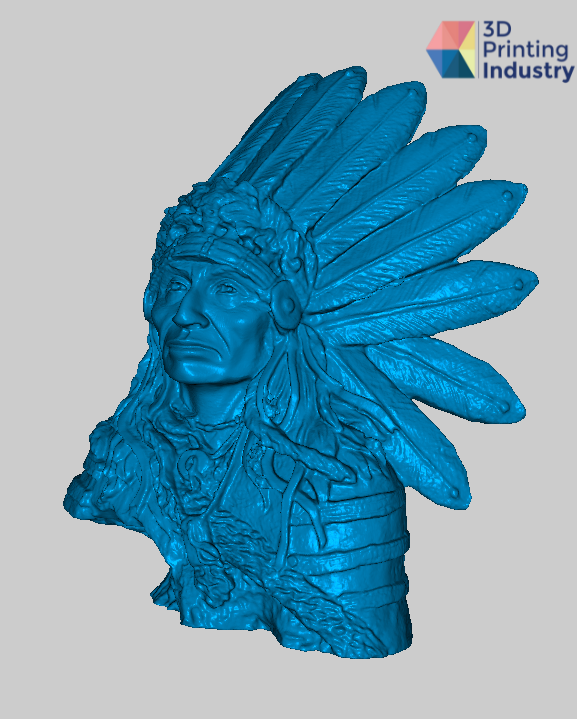
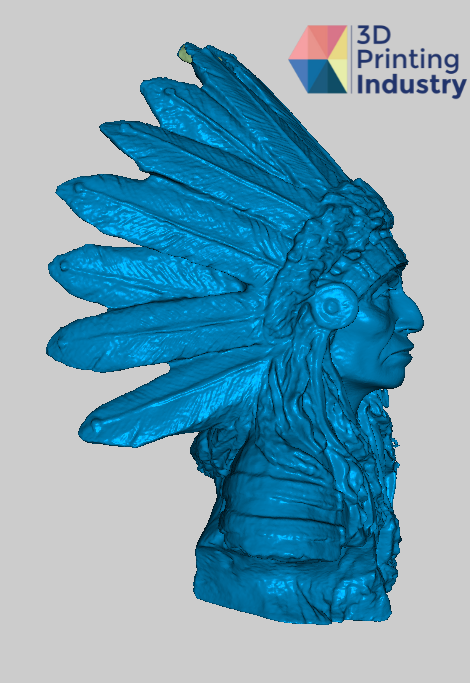
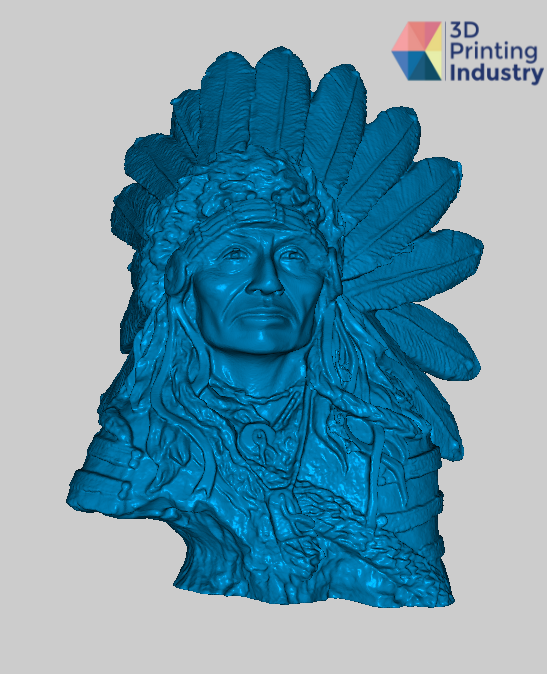
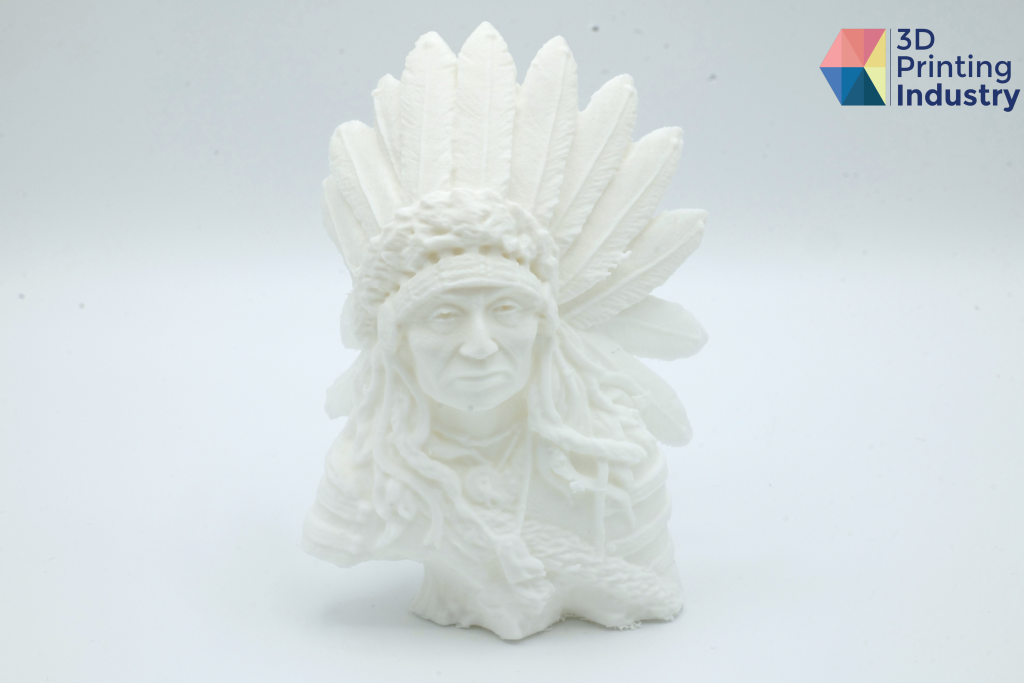
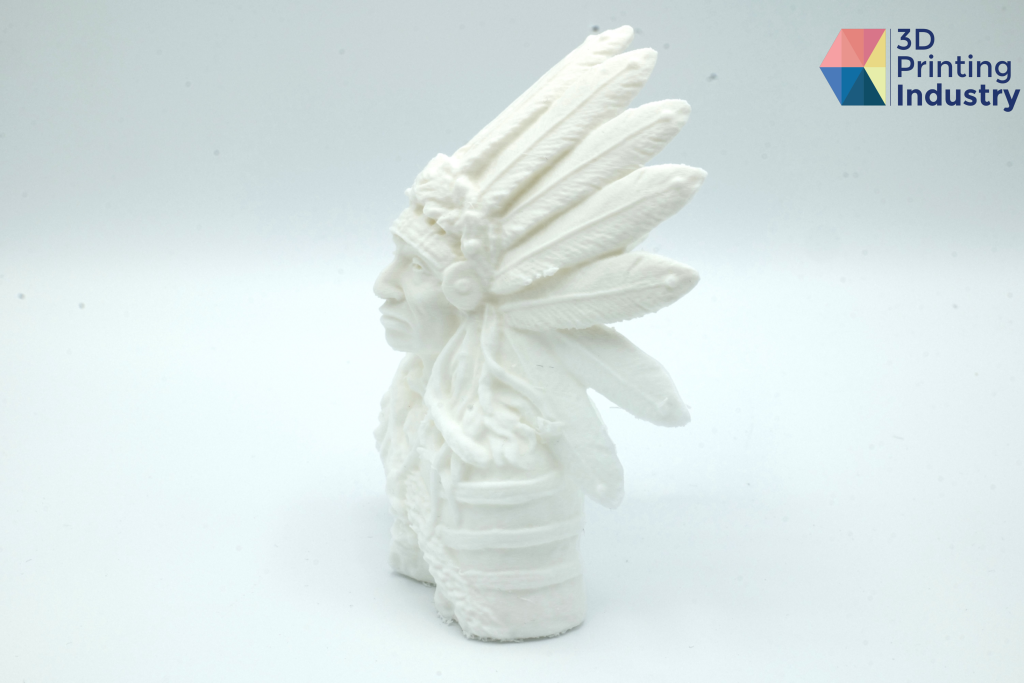
Native American sculpture 3D scan results and 3D printed model. Images by 3D Printing Industry.
However, we failed to achieve a full textured model from the 3D scan using the texture mapping feature, due to object size limitations in JMStudio. It is worth noting that this function may have been further limited by the computational processing power of the PC, with rendering taking a substantial amount of time to complete.
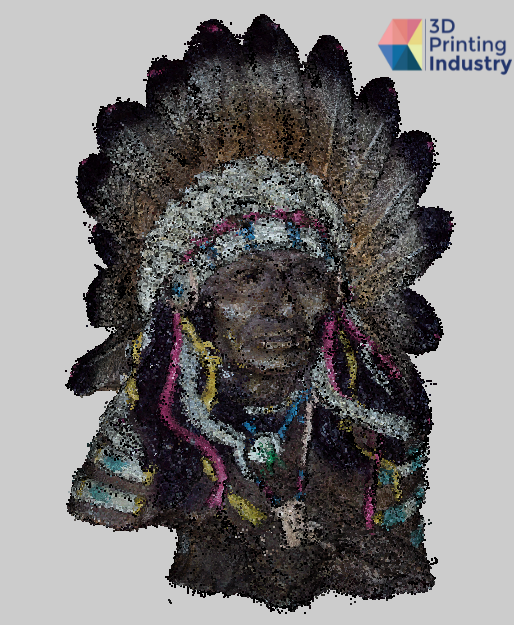
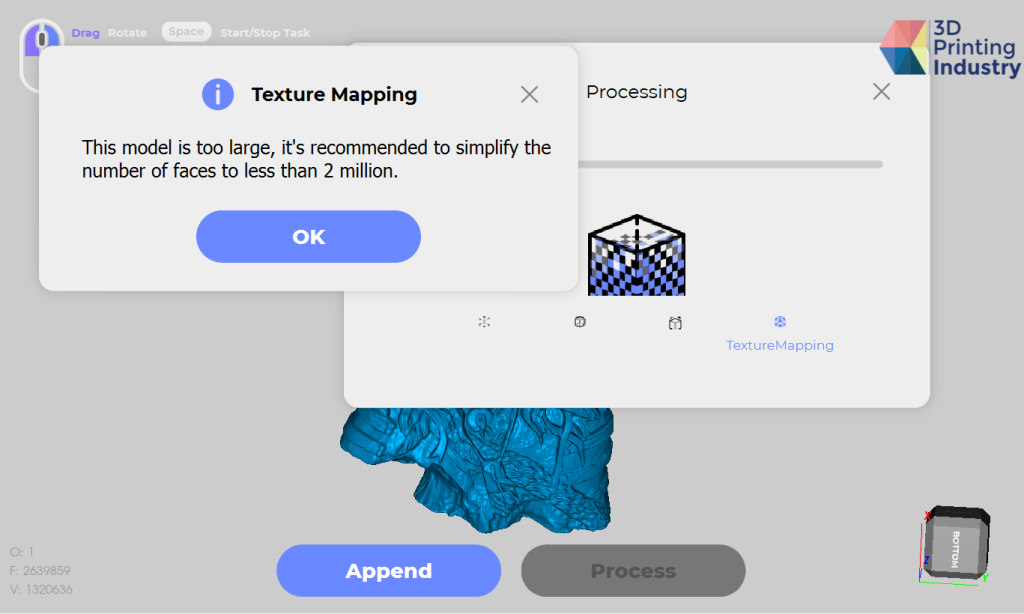
Native American sculpture scans merged and texture mapping issues. Images by 3D Printing Industry.
These results highlight the strength of the Seal as being in small to medium sized objects such as toy figures or statues, as advertised by 3DMakerpro.
Final verdict
The Seal 3D scanner is an ideal option for entry-level users. The setup process is very intuitive, and the JMStudio software is easy to navigate. While ideal for those new to 3D scanning, this poses limitations for more experienced users seeking advanced functionality.
Our testing confirmed 3DMakerpro’s claims that the Seal can produce high quality and accurate results. We successfully achieved 0.02mm accuracy, close to the company’s advertised 0.01mm 3D scanning accuracy.
Although limited for larger objects, the Seal’s texture mapping feature is effective within the software limits. Impressive colorful results with defined textures can be visualized in JMStudio, offering great potential for 3D scanning small models and figurines. As such, the Seal is especially well suited to hobbyist, toy development, and gaming applications.
The Seal struggled to detect black objects and metallic surfaces, leading to frequent use of dry shampoo spray to capture necessary data. However, this is a limitation found in most 3D scanners on the market. The Seal’s auto-tracking also faced challenges when scanning symmetrical models, while the blue light’s short wavelength struggled to obtain geometrical data behind crevices and overhangs.
JMStudio software failed to consistently produce accurate scan mergers, often requiring the 3D Printing Industry team to conduct alignment manually. This process was quite tedious, and was not 100% accurate. We also encountered a number of software bugs and crashes, impeding the 3D scanning process.
Ultimately, despite these limitations, the Seal 3D scanner is certainly capable of producing accurate 3D scans with good quality and reproducing models with complex geometries and fine details. The Seal’s affordability and user-friendly setup make it an accessible option for those new to 3D scanning. What’s more, the Seal is especially well suited to those within the hobbyist market looking to scan, design, and 3D print small-scale models.
Technical specifications of the Seal 3D scanner
| Accuracy | 0.01mm |
| Resolution | 0.05mm |
| Color-scanning | 24-bit color |
| Work distance | 180 – 200mm |
| Frame rate | 10fps |
| 3D Scanner size | 110mm x 60mm x 35mm |
| Weight | 254g |
| Output file type | .obj, .stl, .ply |
| Light source | Blue light source |
Subscribe to the 3D Printing Industry newsletter to keep up to date with the latest 3D printing news. You can also follow us on Twitter, like our Facebook page, and subscribe to the 3D Printing Industry Youtube channel to access more exclusive content.
Are you interested in working in the additive manufacturing industry? Visit 3D Printing Jobs to view a selection of available roles and kickstart your career.
Featured image shows the 3DMakerpro Seal 3D scanner. Photo by 3D Printing Industry.