3D Printing Industry reviews the Scan Dimension SOL 3D scanner.
Based in Denmark, Scan Dimension is a fast-rising competitor in the 3D scanning market space. The firm operates as a division under Global Scanning, a self-proclaimed heavyweight in the image-capturing sector with over three decades of experience in 2D scanning.
Scan Dimension already has two full-color desktop 3D scanners to its name: the original SOL and the higher-performance SOL PRO. Designed for small to medium part scanning, the base SOL model is built with affordability and accessibility in mind, boasting a largely automated 3D scanning workflow perfect for those that don’t want to worry about technical details.
The scanner is priced at just $799 and is aimed at everyone from hobbyist makers to educators and small businesses. For context, many industrial-grade 3D scanners can feature price tags of around $15,000 or more, so this offering is well-suited to just about anyone operating on a budget.
Accessible 3D scanning for the desktop
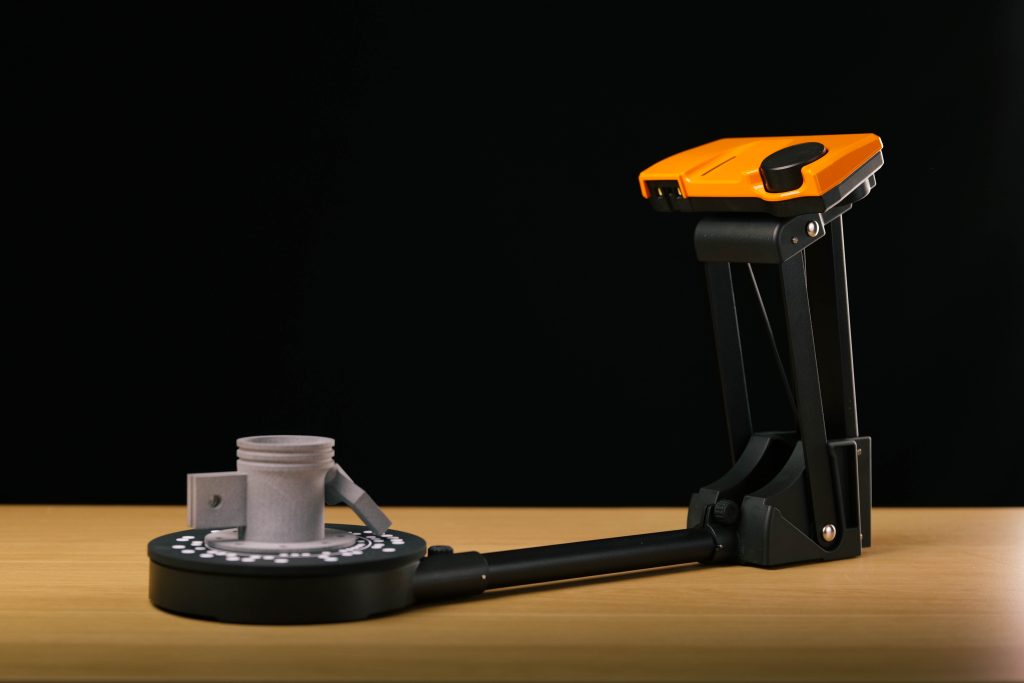
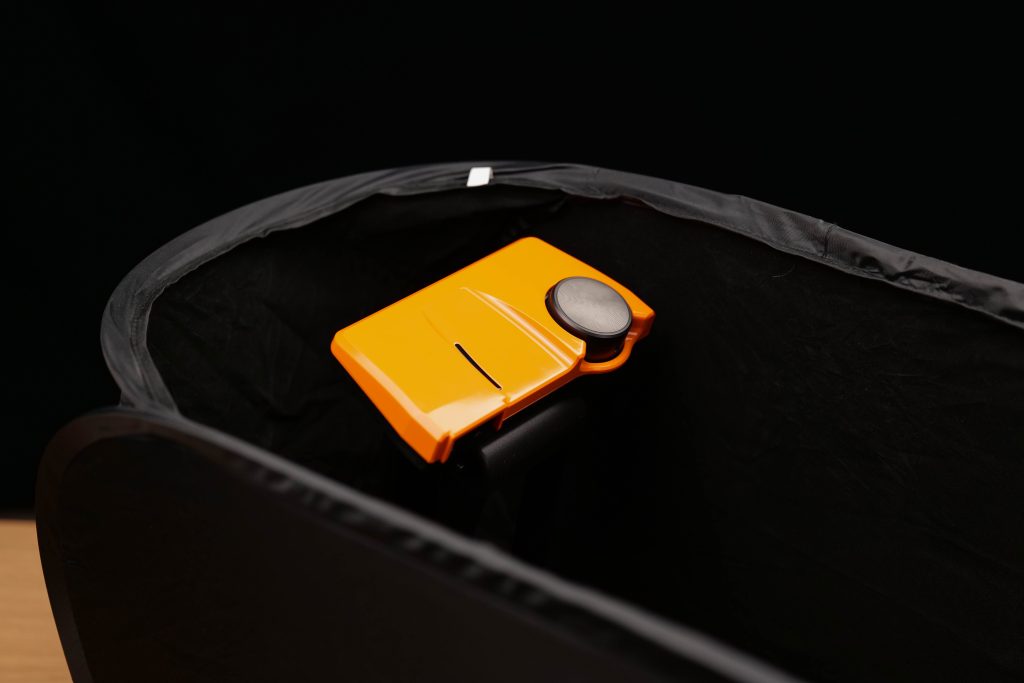
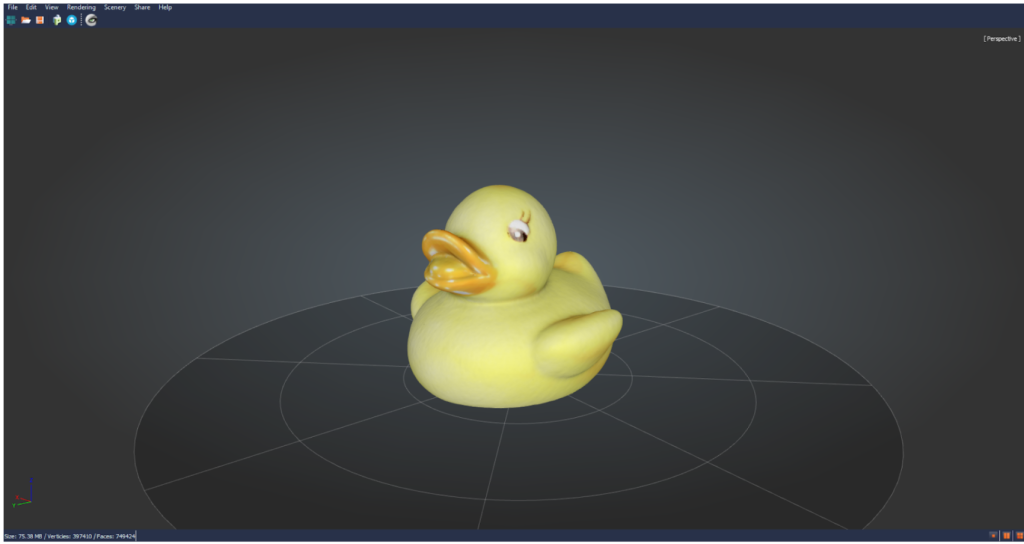
First of all, what’s in the box? The SOL comes complete with everything you need to get started. This includes the scanner itself, the turntable, all of the necessary wiring, and a black-out cover tent that you can use to ensure a dark scanning environment. Additionally, the scanner even comes with a rubber duck to use in the first scan run – cute.
Scan Dimension’s 3D scanner is based on red laser diode technology, which is safe for unintentional exposure but not for extended exposure (the scanner should be placed in the tent while scanning). Packed in a desktop-based orange form factor, the SOL comes equipped with a single camera and two white LEDs.
Looking at some of the key tech specs, the SOL features a minimum object size of 25 x 25mm, a maximum object size of 170 x 170mm, a maximum object weight of 2kg, a maximum accuracy of 0.1mm, and a 5MP camera. Scan Dimension has designed its system to work without any positioning targets whatsoever, so users can jump straight in with the confidence that it’ll perform regardless of how complex the parts are.
Owing to the laser-based scanning process, the SOL should also handle darker objects much better than structured light technologies. Objects that are too shiny or pitch-black may still pose a problem, however, as they can be too reflective or absorptive to capture. As such, we recommend having a primer spray or powder-coating spray handy at all times – these can be used to coat parts to make them more visible to the scanner.

Calibrating the SOL 3D scanner
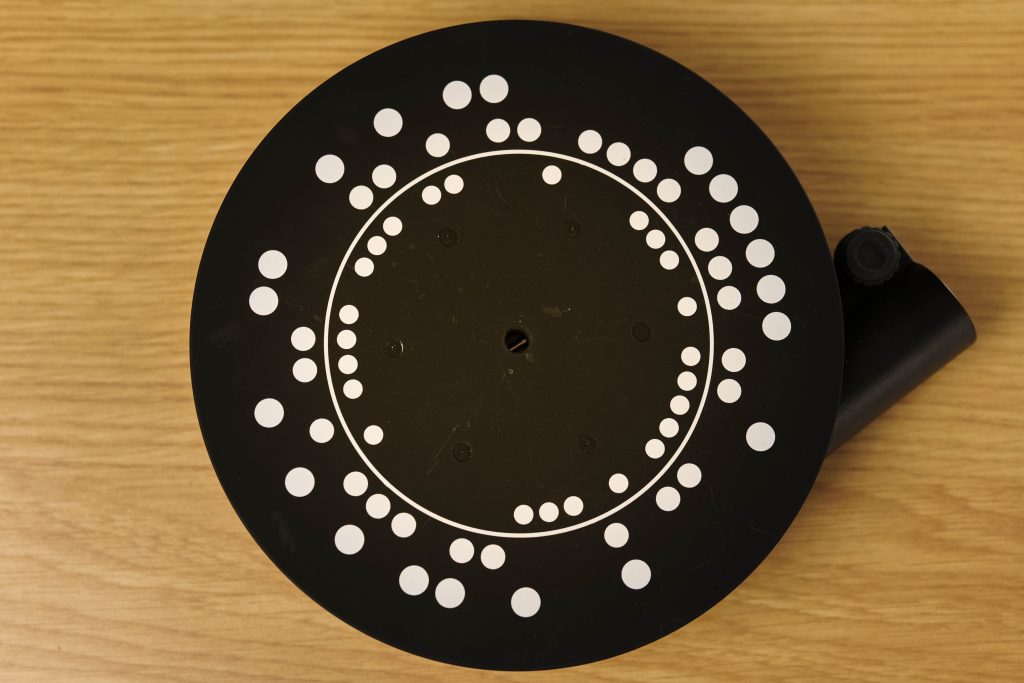
All 3D scanners need to be calibrated at some point, and the SOL is no exception. In fact, the system should really be calibrated before every scan run, ensuring the device delivers the highest precision possible.
We’re happy to confirm that when it comes to scanner calibration, ease of use and accessibility really are front and center here. When working with the SOL, all the user needs to do is initiate the automated calibration process and the scanner will analyze the white sections of its turntable. Based on the turntable’s patterning, the SOL determines its exact position relative to the scanning area and voilà, it’s ready to scan in under ten minutes.
SOL Creator and SOL Viewer software
To make use of the SOL 3D scanner, you’ll need to get familiar with two different programs: SOL Creator, which is used for scan processing, and SOL Viewer, which is used to view and export scans.
In line with the product’s objectives, SOL Creator is about as easy to use as it gets. All the user needs to do is hit Start, place the object on the turntable, and wait for the scan to complete. It’s possible to scan an object up to five times in different positions to capture sections that the scanner couldn’t catch the first time around, such as the underside.
Once complete, SOL Creator automatically aligns the scans and opens the SOL Viewer software to display the final 3D model. We’ve never come across a 3D scanning workflow this automated, so Scan Dimension really wasn’t kidding when it marketed its system in this manner.
All in all, we were very impressed with the ‘one-click scan’ approach developed by Scan Dimension here, as there are plenty of other companies out there who haven’t been able to get this right. It works perfectly for the most part and really makes the system great for those that don’t have much 3D scanning experience. The user interface is quite basic and somewhat dated but functional and easy to use and navigate overall.
However, we did think that SOL Creator could do with some added editing functionality, perhaps allowing users to edit and delete scans manually. This would eliminate the need to redo a scan run when problems arise, as users would simply be able to fix the models themselves. We also ran into a few bugs with scan files disappearing or becoming corrupt, but nothing too severe.
Benchmarking the SOL
It’s time to evaluate the performance of the SOL 3D scanner. We put the system through a variety of scan tests involving artistic models, 3D printed objects, and functional parts.
The first of the tests was a 100mm long benchmarking cuboid of known dimensions. We scanned the model and compared the resulting scan file to the original STL of the part, giving us a quantitative method of evaluating the scanner’s dimensional precision (as shown in the heat maps below). For our point cloud analysis, we used the GOM Inspect and CloudCompare software packages.
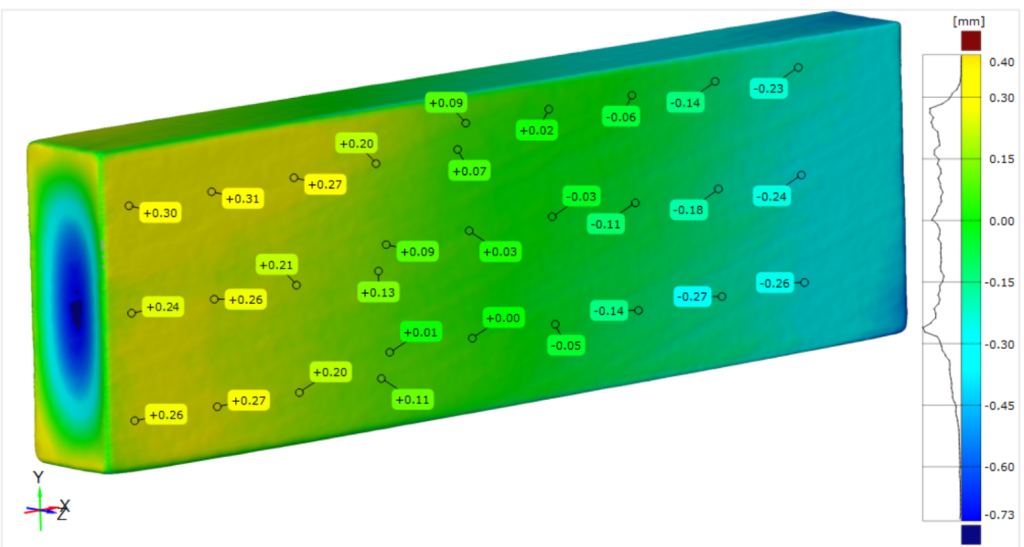
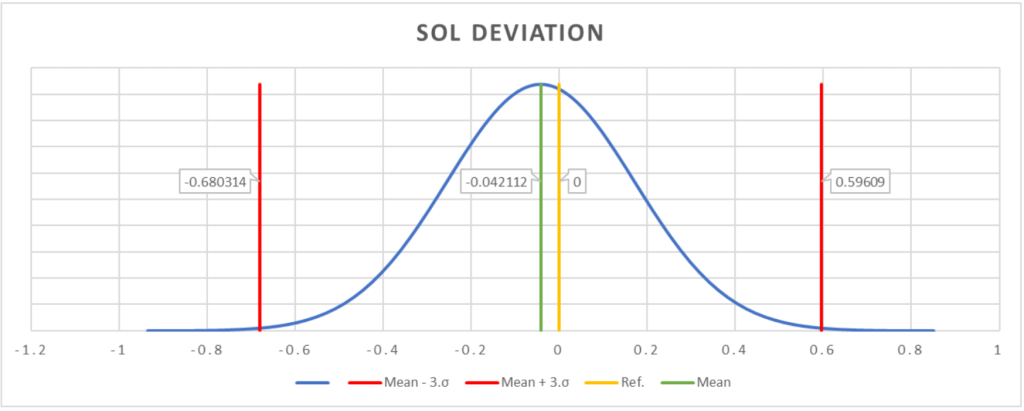
The SOL displayed excellent precision here as most of the points on the scanned model were quite close to their intended dimensions. The average offset clocked in at -0.0421mm with a standard deviation of 0.2127mm. To put this into context, 99.6% of the scanned points lie between -0.68mm and +0.60mm of their intended dimensions. Considering the price point of the scanner, this is a great result.
Next up, we put the SOL to the test with a set of generic full-color scan tests: a rubber duck, a polymer head 3D printed on a Mimaki 3DUJ-553, and a 3D Printing Industry trophy.
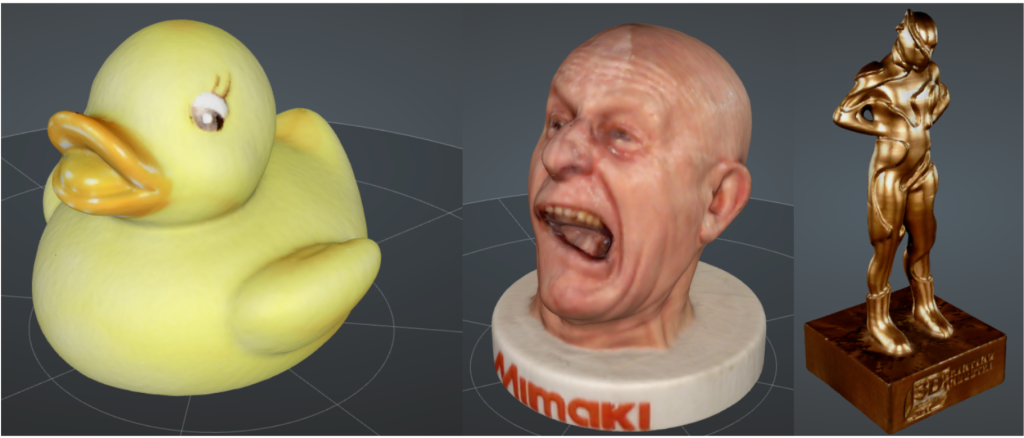
The first set of qualitative scans was actually surprisingly clean. The SOL managed to capture much of the detail in the parts, with surface features and grooves coming through successfully. One thing that’s particularly noteworthy here is the faithful preservation of the colors and textures: they’re true to life and authentic.
Then we put the scanner through its paces with a set of electronic components: a PCB voltage converter, a Raspberry Pi Zero, and a stepper motor.
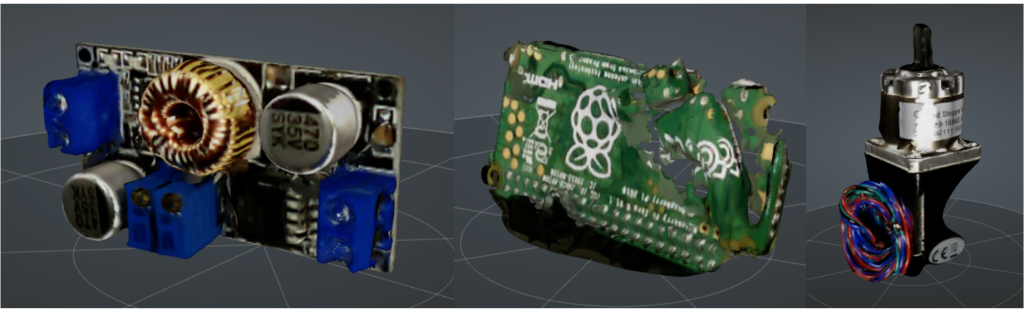
Looking first at the PCB voltage converter, the SOL 3D scanner was somewhat disappointing when it came to the crispness of the model. Although the colors were captured accurately, the 3D textures are warped and messy.
Unfortunately, the scanner failed to successfully scan the Raspberry Pi, with plenty of missing sections throughout. This can probably be attributed to the glossy surfaces of the control board throwing a wrench in the works, so it’s situations like this where a 3D scanning spray would come in handy.
Finally, looking at the stepper motor, the SOL failed once again and produced a model that’s unusable. The are plenty of holes throughout and many of the key surface details are missing. The only saving grace is the writing, which is surprisingly legible.
Moving on, we 3D scanned a set of CNC milled ornamental models: a lion, a horse, and a triple helix.
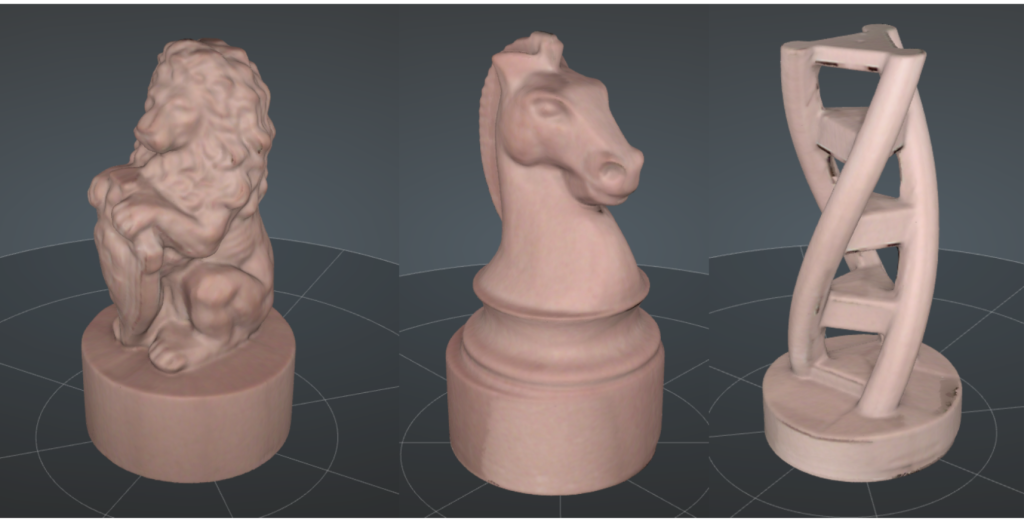
The scans of these CNC milled parts really highlight the capabilities of the SOL. The scanner was able to capture an impressive amount of detail in the models, with great contrast between the light and shadowed areas to convey a sense of depth in the parts. Again, the SOL proved to be faithful to the colors of the physical parts.
For our final scan run, we 3D scanned six different 3D printed tabletop models. Each of the parts was 3D printed in a matte grey resin.
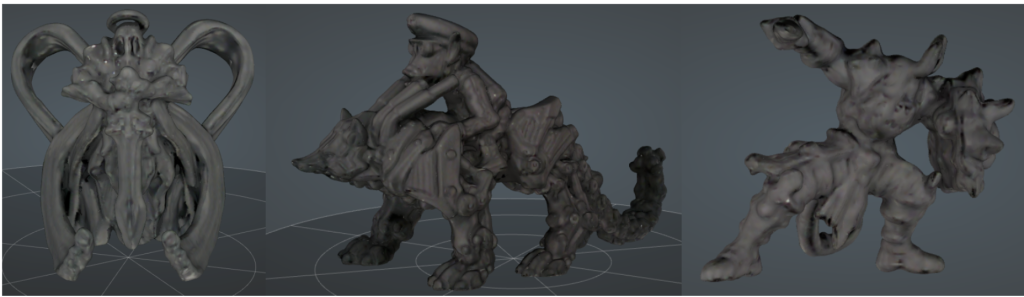
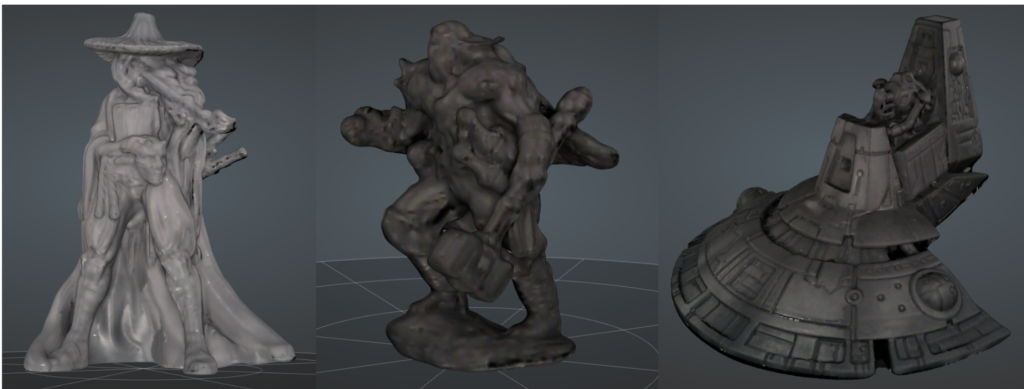
This series of scans truly revealed the full capabilities of the SOL 3D scanner. The system handled the tabletop models with grace, preserving both the silhouettes and many of the finer feature details of the parts. For a scanner in this price range, all of the models came out definitively clean – a big win for the SOL.
The verdict
Ultimately, we were pleasantly surprised with the SOL 3D scanning system. The machine is characterized by its sheer ease of use, giving anyone and everyone the power to capture 3D models with virtually no training.
Scan Dimension went heavy on the accessibility front with its 3D scanner and it shows. Everything from the calibration process to the one-click scan processing is built with user experience in mind, allowing customers to just sit back, relax, and let the system do the worrying for them.
The only real gripe we have is in the barebones nature of the SOL Creator program. The lack of advanced functionality, while great for beginners, may pose a limitation for those with more experience in 3D scanning.
When it comes to overall scan quality, the SOL is capable of capturing most of the finer 3D feature details on the surfaces of parts, especially with materials such as cured matte grey resins. The only parts it really struggled on were the glossy surfaces of our electronic components. On the other hand, the system handles vibrant colors without a hitch, as many of our full-color scan tests came out true-to-life.
As such, what the SOL really provides is value for money – pure and simple. Priced at just $799, the machine truly delivers professional-grade performance without the professional-grade price tag.
Technical specifications
| Max object size | Up to 170 x 170mm |
| Min object size | 25 x 25mm |
| Max object weight | 2kg |
| Working range | 210 – 360mm |
| Accuracy | 0.1mm |
| Camera resolution | 5MP |
Subscribe to the 3D Printing Industry newsletter for the latest news in additive manufacturing. You can also stay connected by following us on Twitter, liking us on Facebook, and tuning into the 3D Printing Industry YouTube Channel.
Looking for a career in additive manufacturing? Visit 3D Printing Jobs for a selection of roles in the industry.
Featured image shows the SOL 3D scanner. Photo by 3D Printing Industry.