Well-established as a manufacturer of desktop FFF 3D printers, Polish company Zortrax made its vat polymerization debut in September 2018 with the compact Inkspire system. Created for low-medium scale production, the Inkspire is marketed as an allrounder for use by engineering, jewelry, dental and design professionals. On its market entry, it also reported the ability to produce at 9 times the precision and 8 times the speed of other comparable SLA systems – bold claims for a market debut.
For over two months, the 3D Printing Industry engineering team worked with the Zortrax Inkspire to compile a detailed report on this 3D printer’s performance. This review summarizes the team’s findings to help you make an informed decision about your next 3D printer purchase.
First impressions of the Zortrax Inkspire
On arrival, the Zortrax Inkspire is packaged with a starter kit containing pliers, spatulas, a knife, security equipment, funnel, and other tools – a thoughtful addition for the first time buyer. The machine itself when unboxed measures approximately 210 mm x 210 mm x 435 mm (L x W x H) and is constructed of a strong, full metal chassis. The workspace you get for a machine of this size is about the average for other UV 3D printers, measuring 74 x 132 x 175 mm (L x W x H).
The resin tank inside the system is composed of two main parts, one metallic part for the tank walls, and an assembly containing the FEP film. The parts are attached to each other by a series of screws, which aid in the easy removal of the FEP film when it needs replacing. With daily usage, the FEP film in our experience needed replacing after the two month test period, this is normal, as this is considered a disposable part of the machine.
Set-up of the 3D printer took 3 minutes, with the system ready-to-print after 1 minute of initialization time. Auto-calibration of the build platform in this machine was effective, and the user is guided through the process via the integrated touchscreen. When referring to the Zortrax Support website on setup, the information we found was comprehensive, helpful, and easy to navigate.
Generally, the Zotrax Inkspire made a good impression on delivery, setup and general use.
UV LCD 3D printing
Vat polymerization technology in the Inkspire is a type of UV LCD method. The main advantage of this technique is build speed in comparison to SLA as the entire surface of the bed can be cured simultaneously, instead of written bit-by-bit with a laser. It also permits a constant XY precision all over the platform, unlike DLP processes. The XY accuracy of prints depends on the LCD resolution.
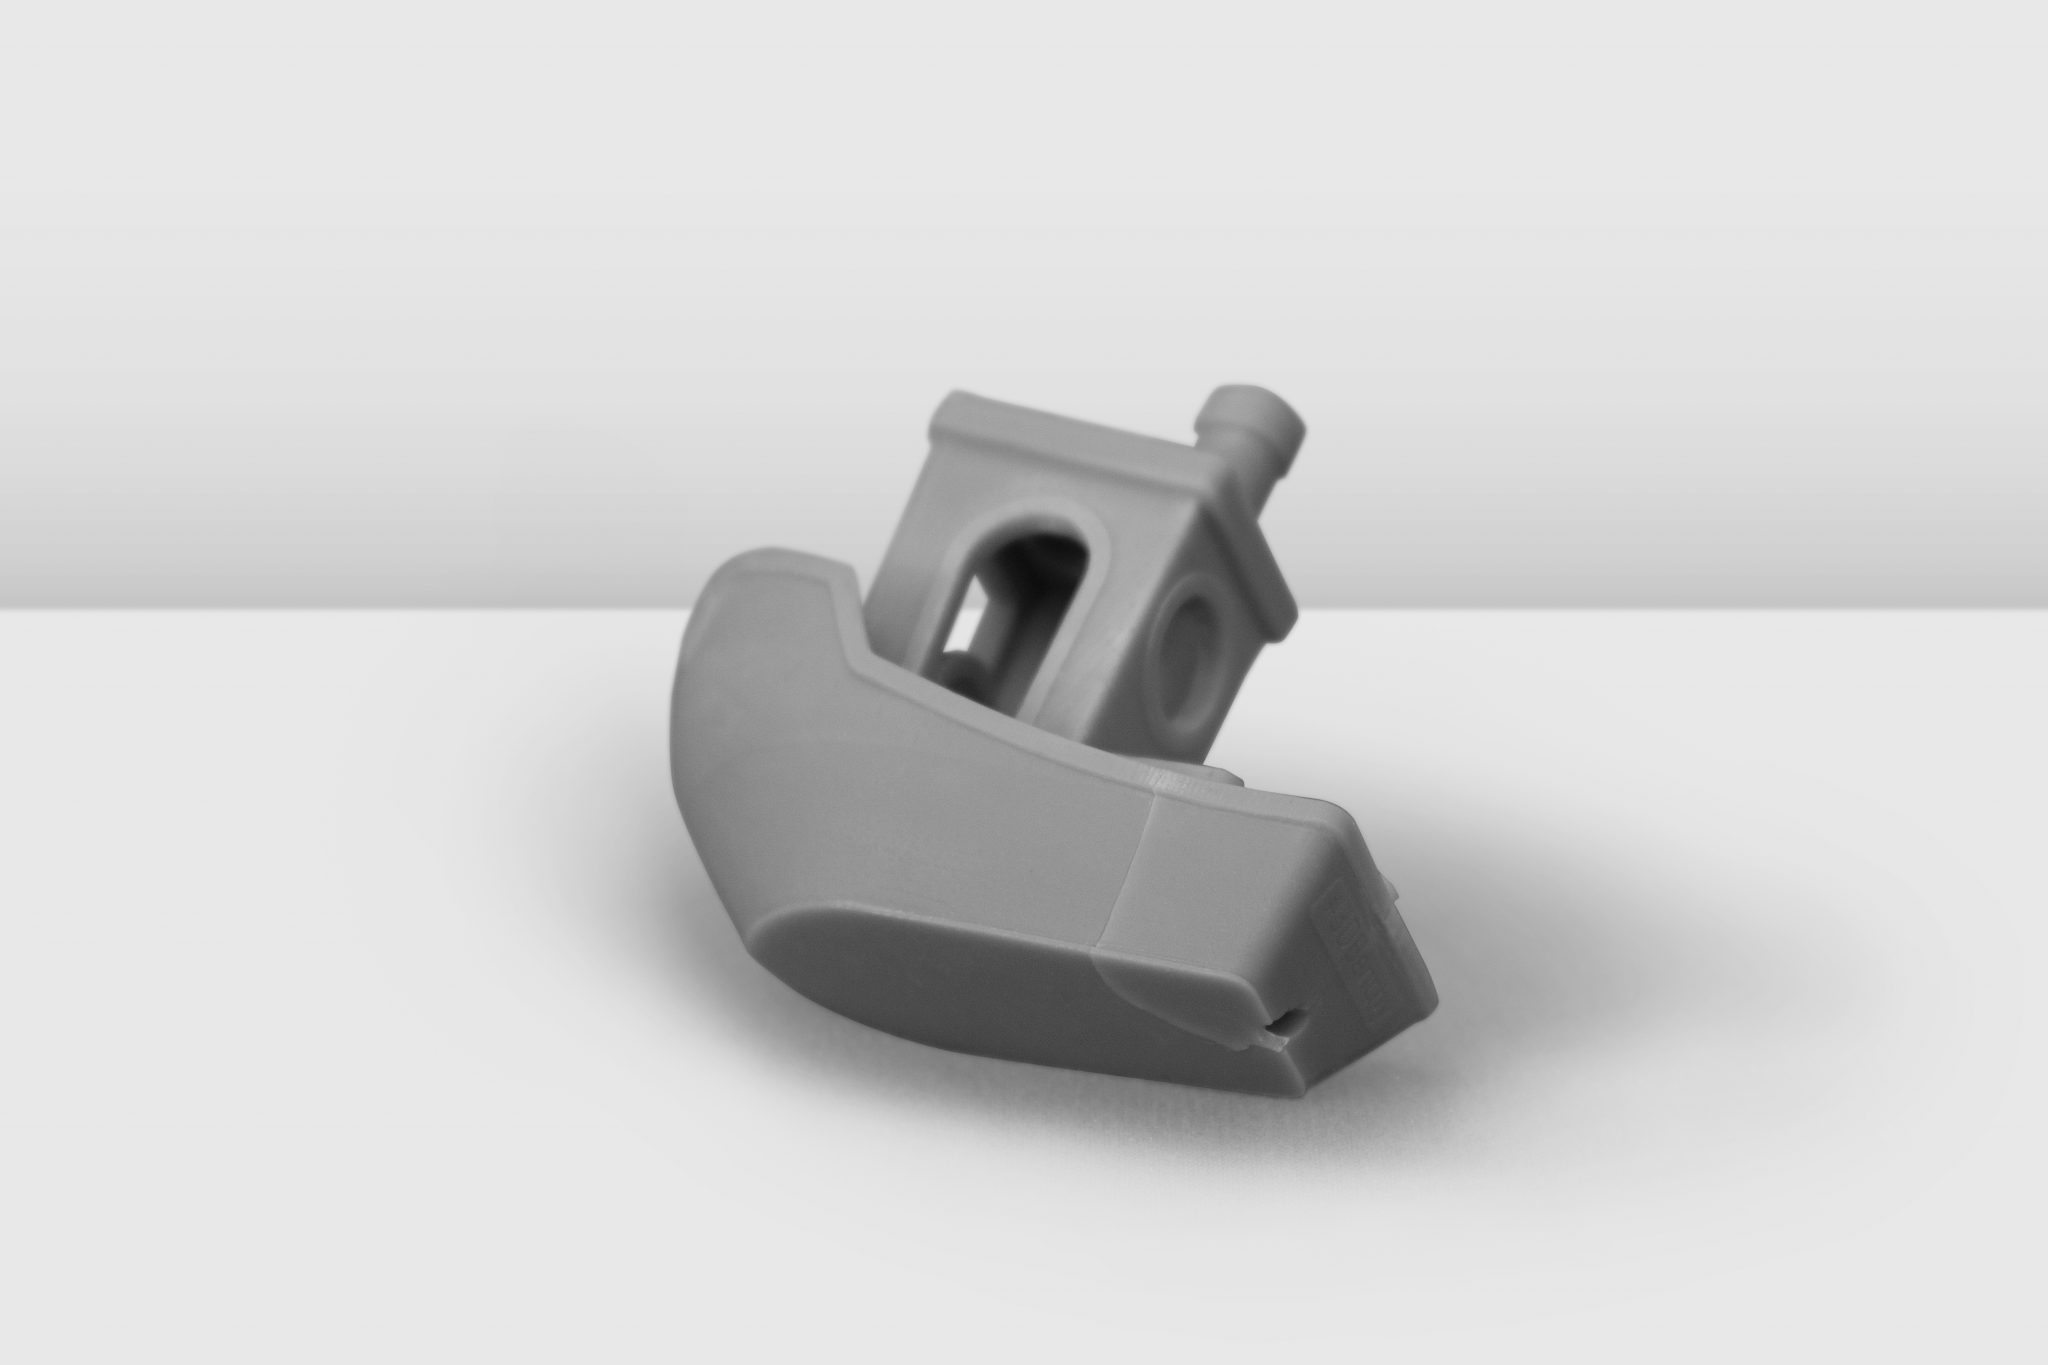
As with all our desktop 3D printer tests, the team’s first object made on the Inkspire was a 3D Benchy benchmarking boat. Smooth, with virtually invisible layer lines, the quality of the 3D Benchy test print was impressive.
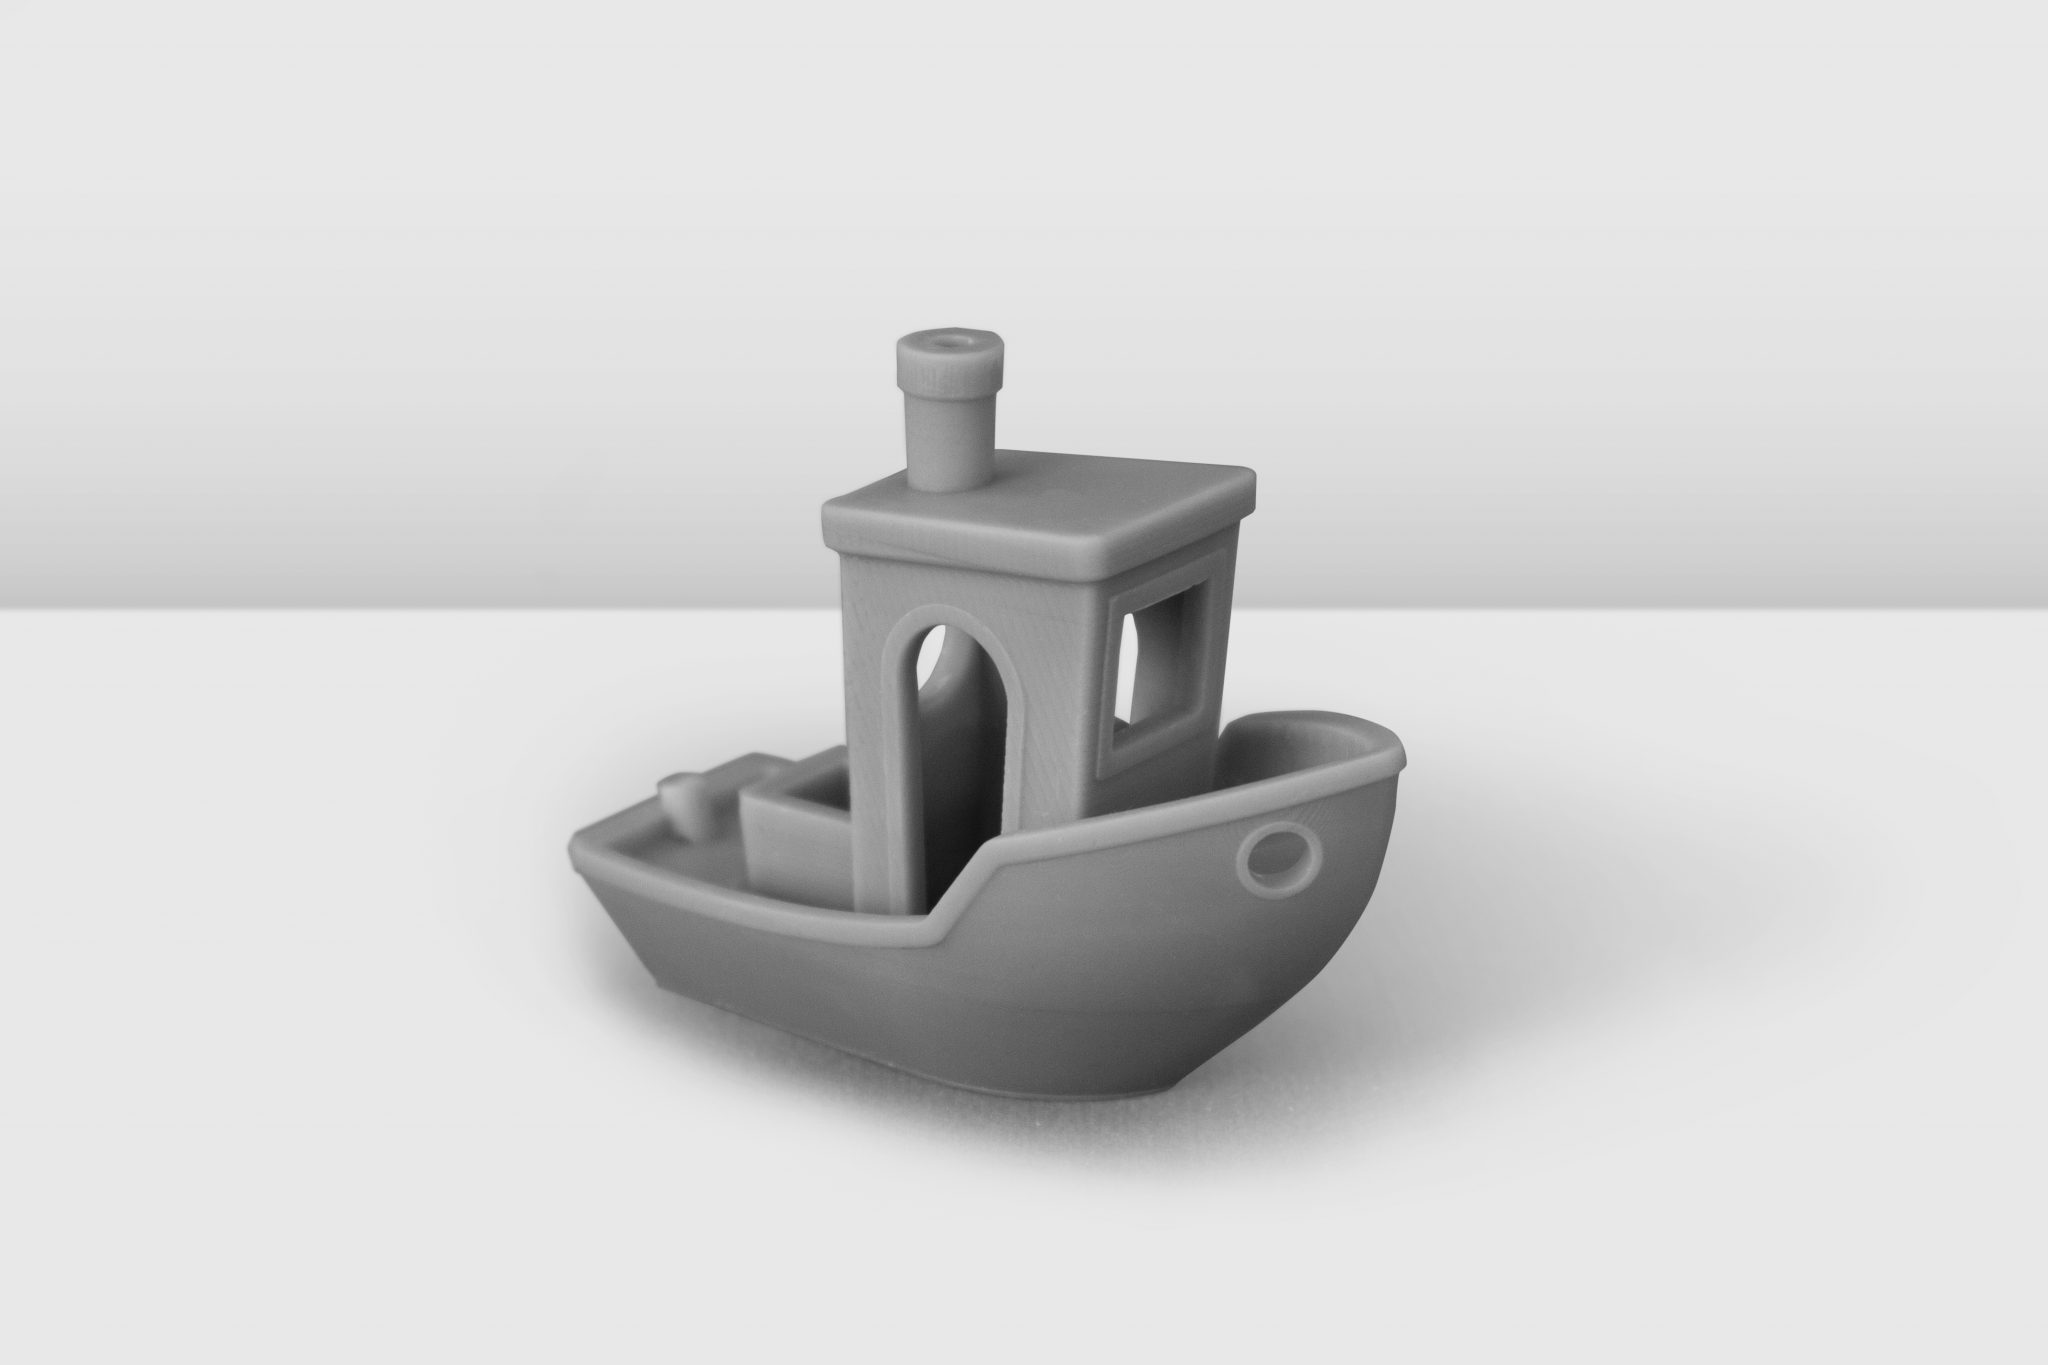
The print time to achieve this result, however, was long, taking above 9 hours to complete. The object also showed some imperfections: pixelation on cabin walls, artifacts on the underside of the roof, and a crack at the stern of the boat.
Pixelation could have been prevented by rotating the model 45° on the Z-axis. Roof artifacts were small and created due to the absence of support material in this bridge. The crack at the stern of the boat was likely linked to the objects’ removal from the bed and post-processing. Extra care must be taken when removing objects from resin vats. In the ultrasonic cleaning process, cracks can propagate and create much bigger flaws in a part.
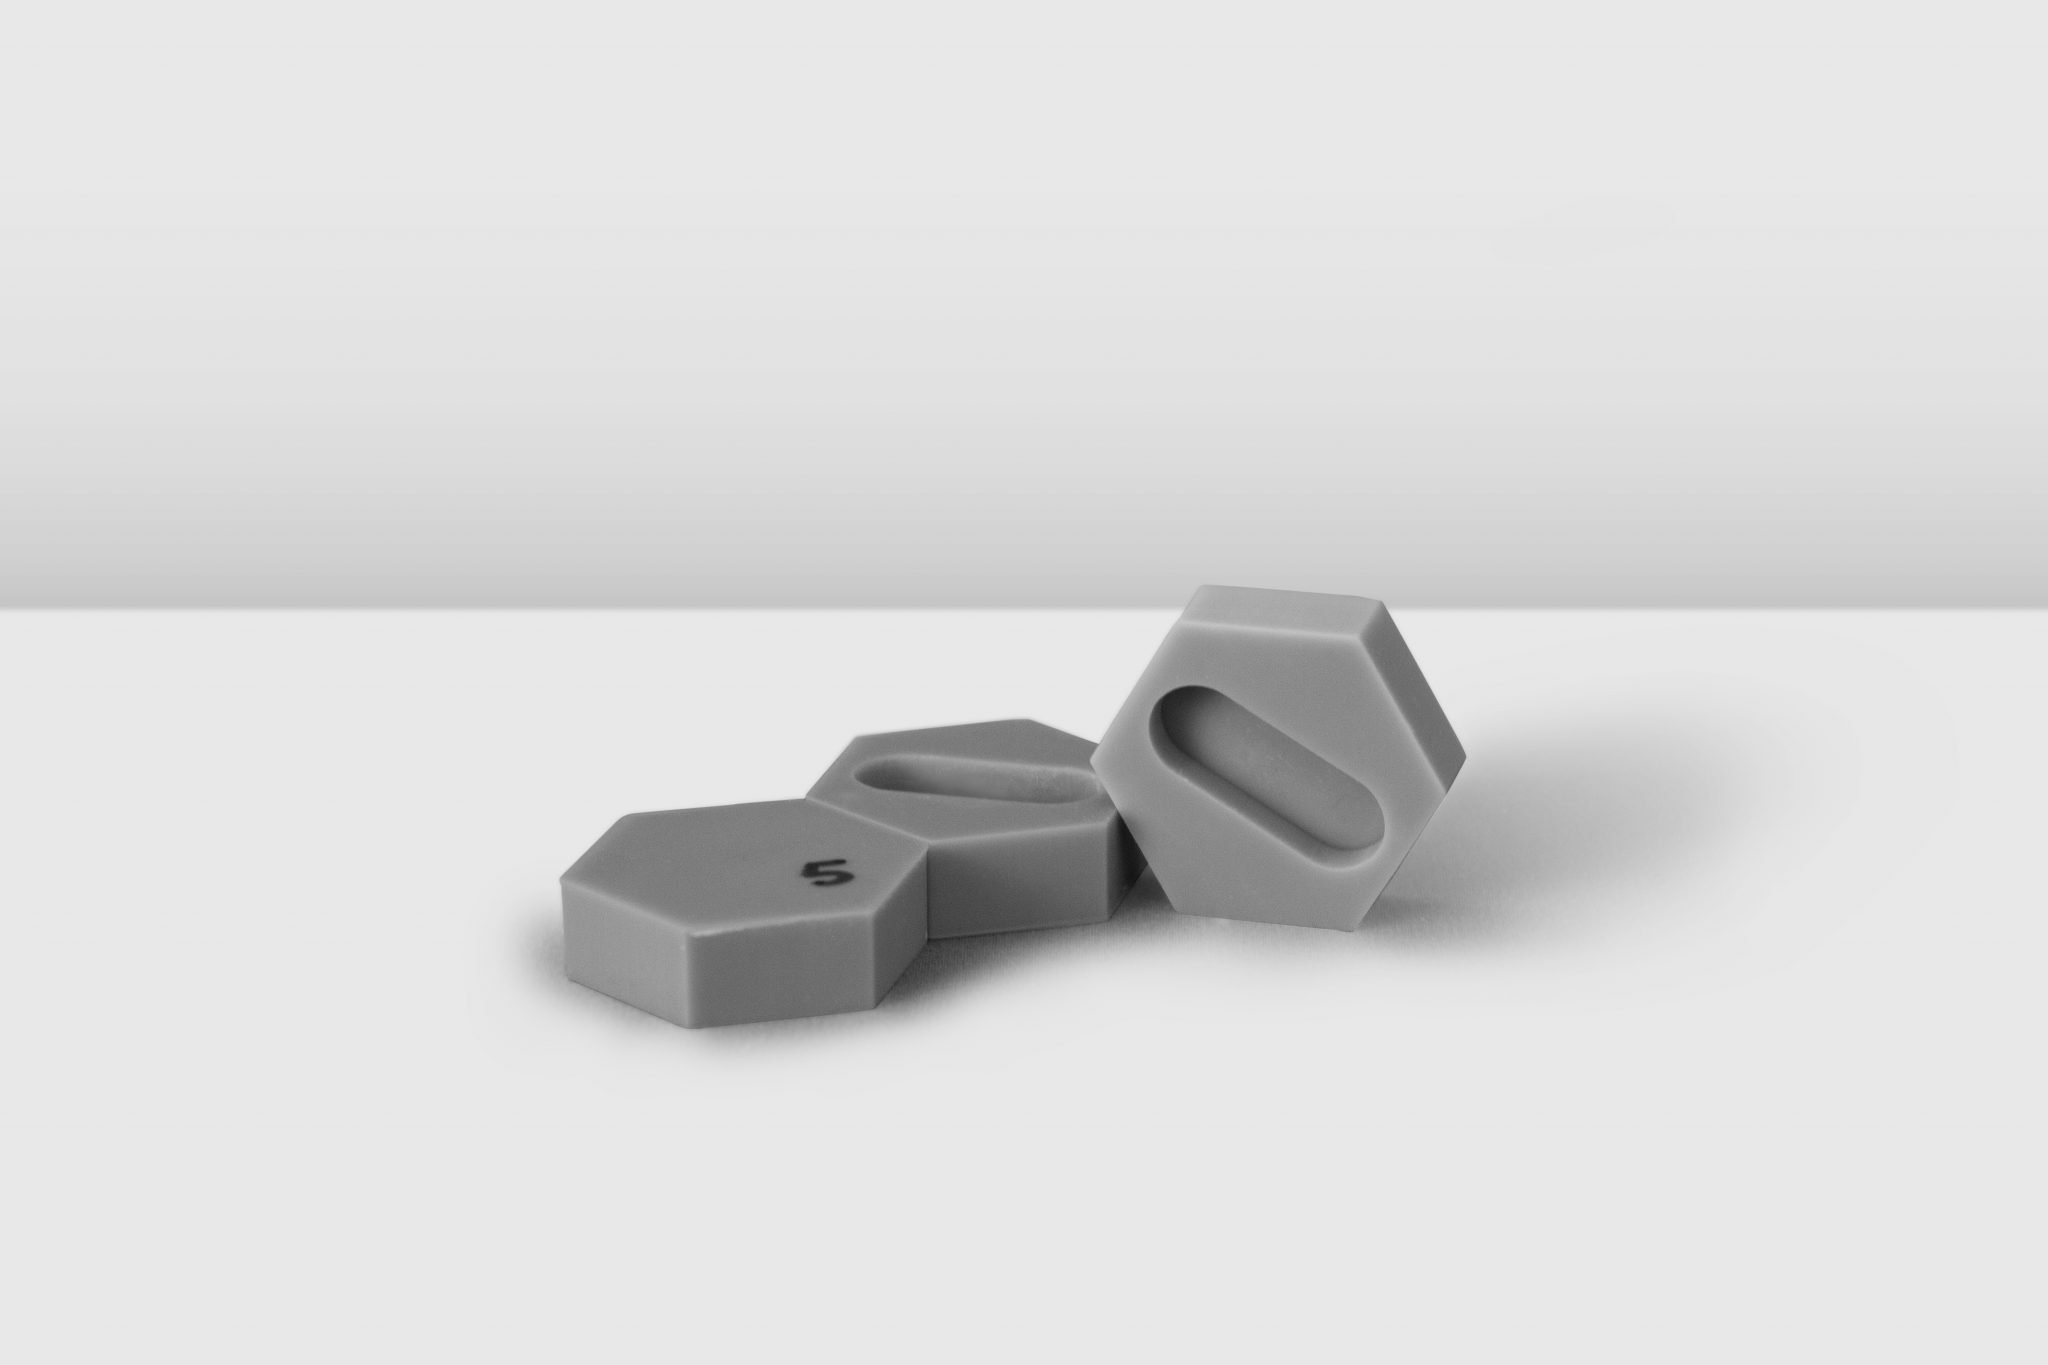
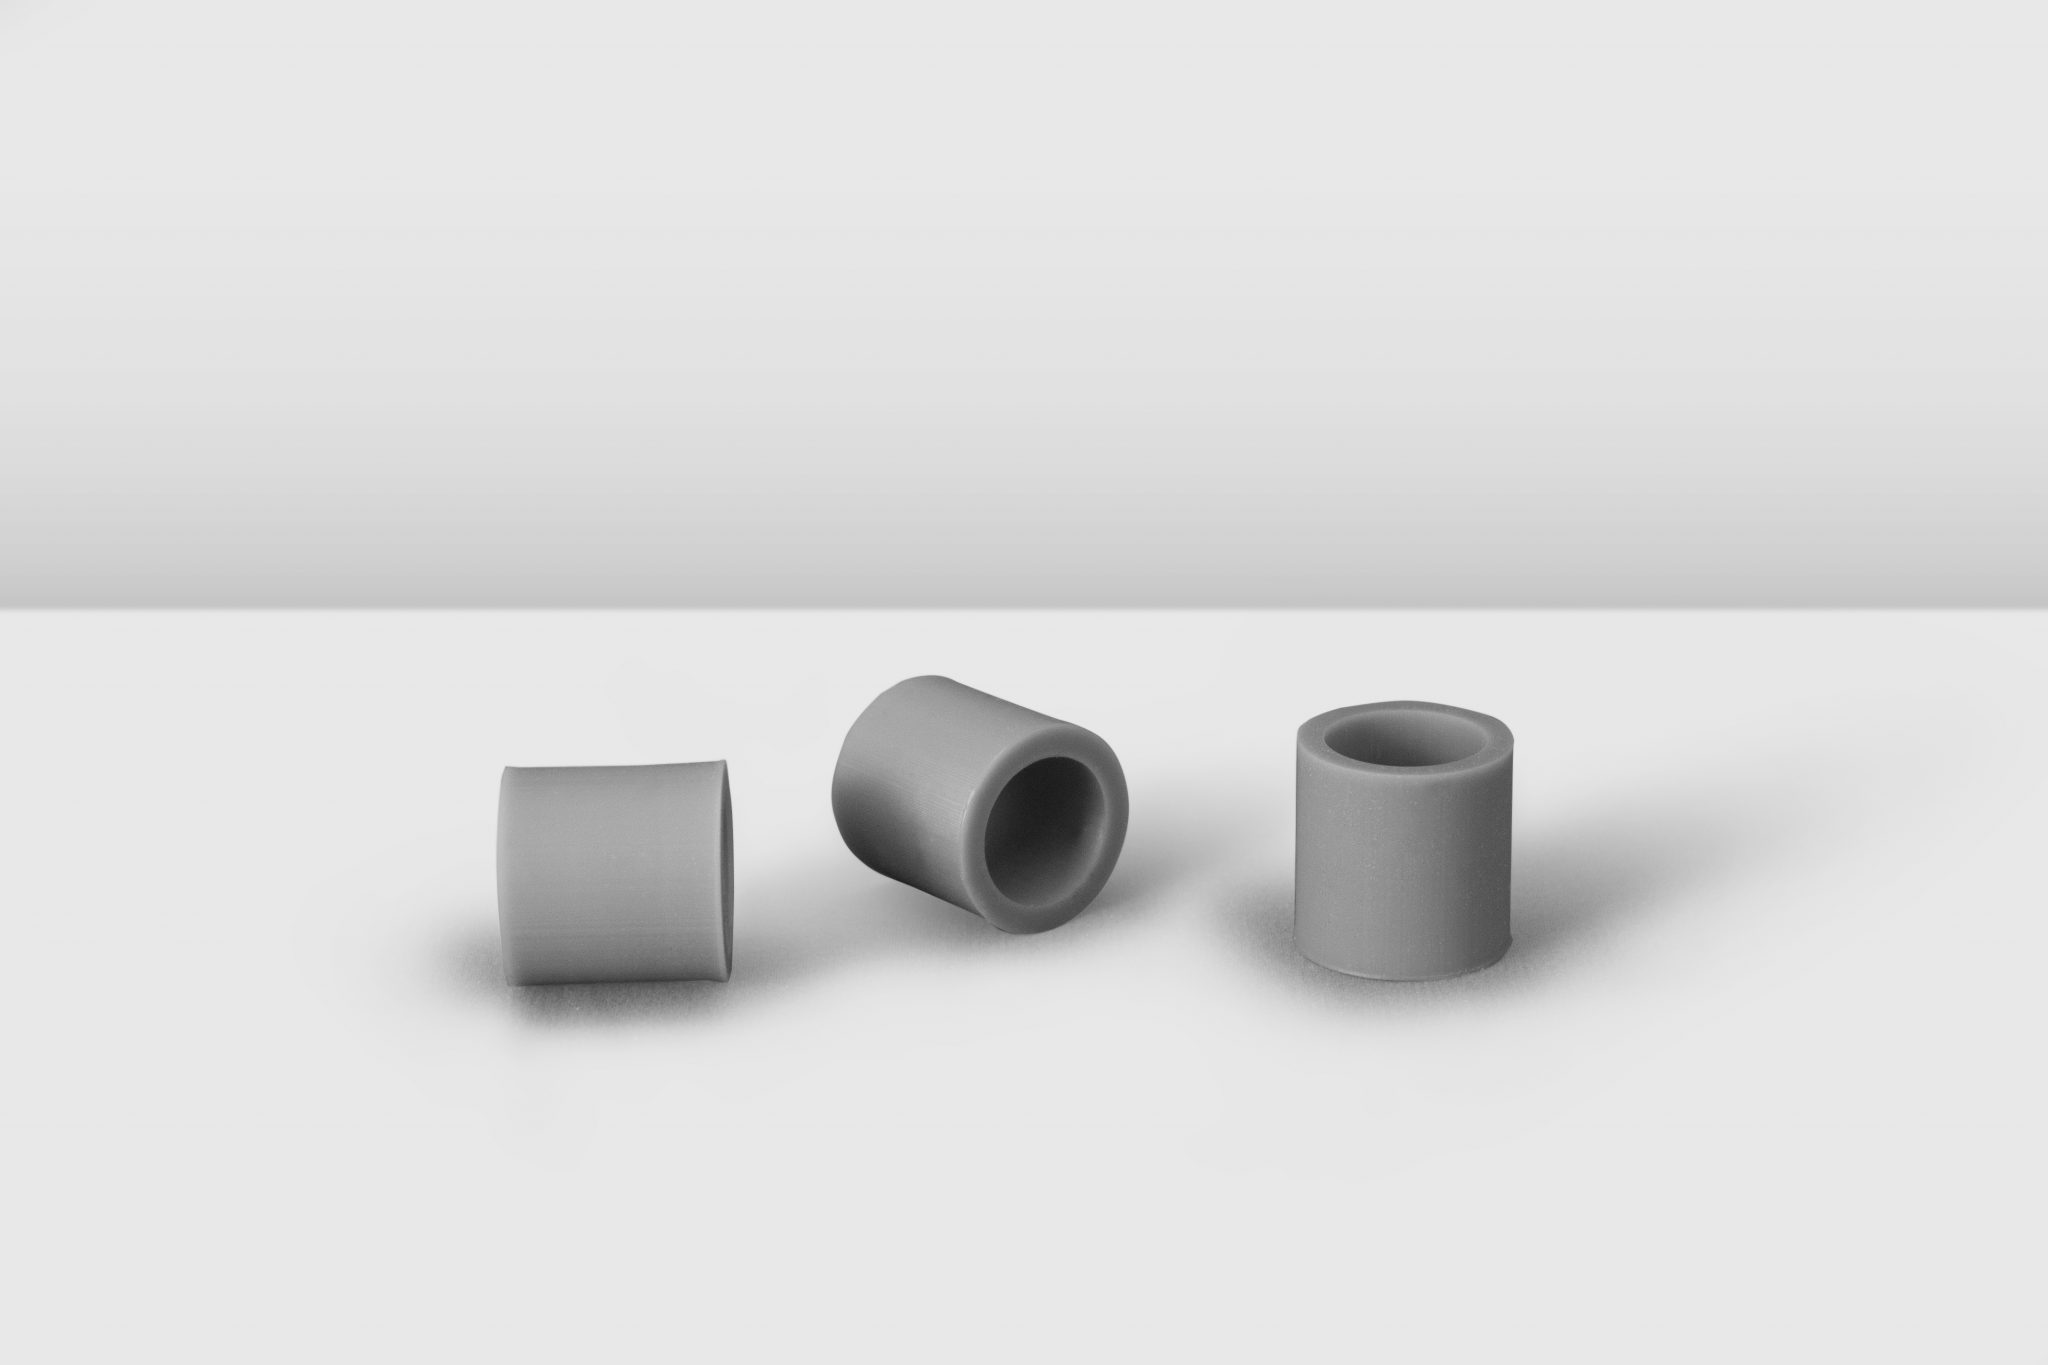
Inkspire 3D printer repeatability
3D Printing Industry’s standard repeatability test artifacts consist of three models: a square with a hole in the middle; a hexagon with a pill-shaped cavity; and tubes. To keep this test fair, all repeatability artifacts on the Zortrax Inkspire were 3D printed using Zortrax Basic Grey resin and without supports under the following parameters:
| Layer thickness (mm) | Layer Exposure Time (s) | Exposure Off Time (s) | Bottom Layer Exposure Time (s) |
| 0.1 | 9.5 | 5 | 80 |
Each of the models were 3D printed in lots of five. To verify the accuracy of a 3D print in each of the artifacts we seek a mean of difference as close to the as-designed dimension as possible.
For the first square test, 12 mm is the targeted dimension of the hole in the center of the object. The standard deviation of objects in this test is good, however, the mean of difference for XY dimensions is less accurate. As actual dimensions across X and Y are always below the 12 mm reference figure, we believe the discrepancy could be innate to the LCD process. It could be that surface pixel are less exposed to UV light than those in the middle in the part. These pixels do not get enough light, and so are difficult to remove during printing and post-processing.
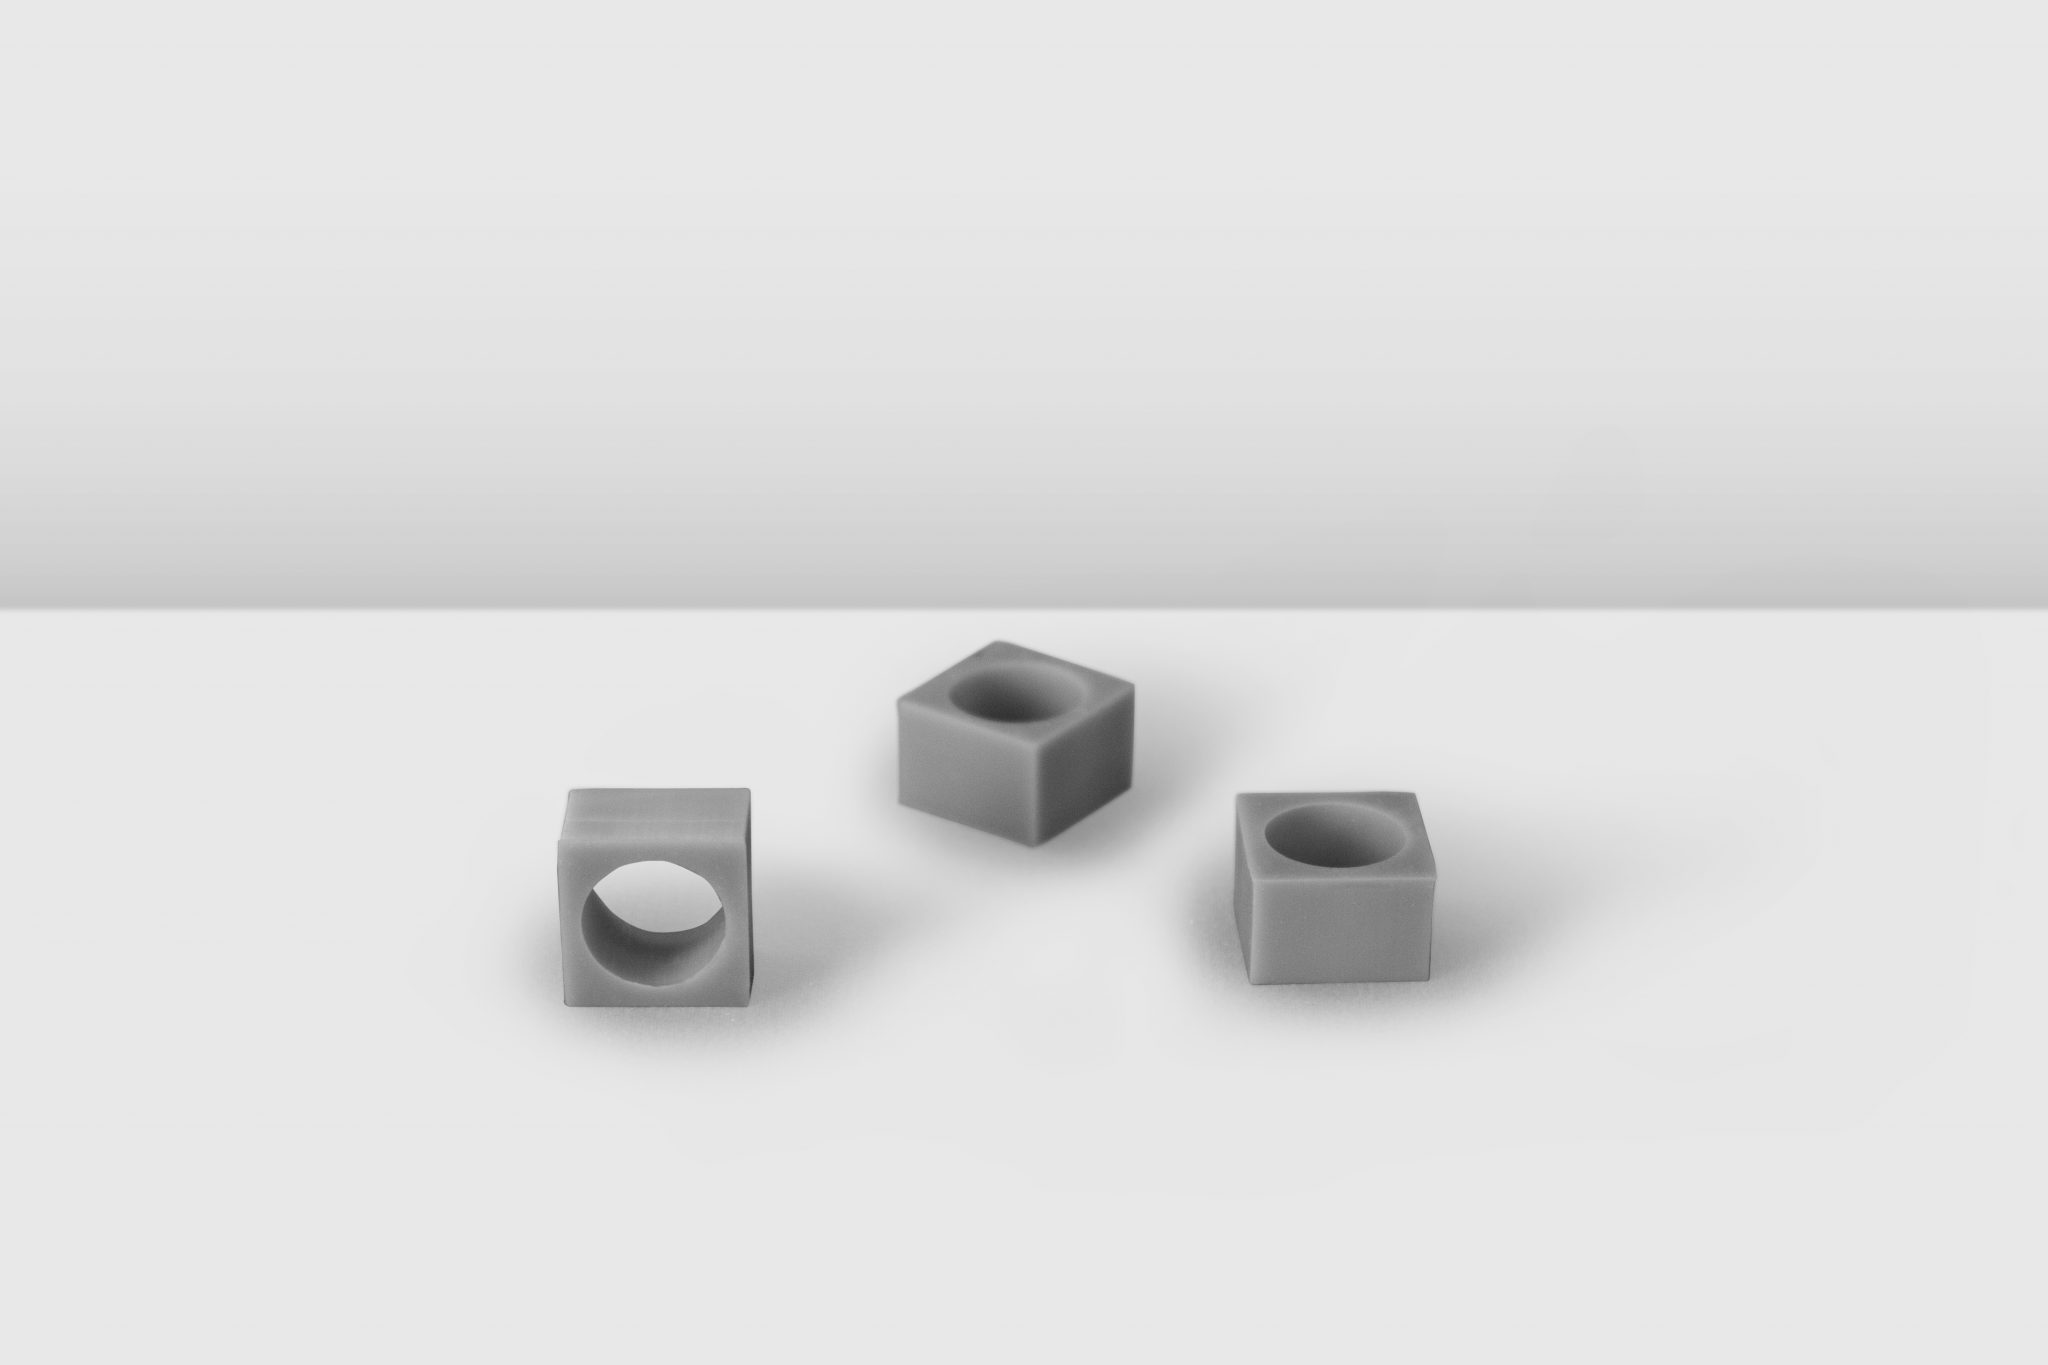
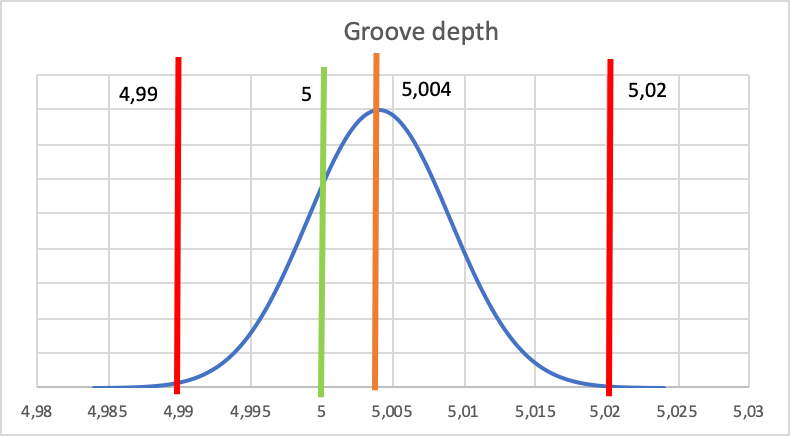
In the second hexagon test, we observed similar inconsistencies between the reference XY and the as-printed dimensions, measuring this time the width of each hexagon. However, the Z-axis precision on these parts was excellent, providing as printed groove depths from 4.99 – 5.02 mm, close to the design reference of 5 mm.
In the final tube test, again standard deviation of parts is acceptable, though lacking in XY accuracy, with excellent Z axis.
Despite issues with XY dependent dimensions, these tests proved that 3D printing on the Inkspire is generally highly repeatable. To fix XY discrepancies, the “undergrowth” option which can be manually adjusted within the slicer to achieve the optimal setting.
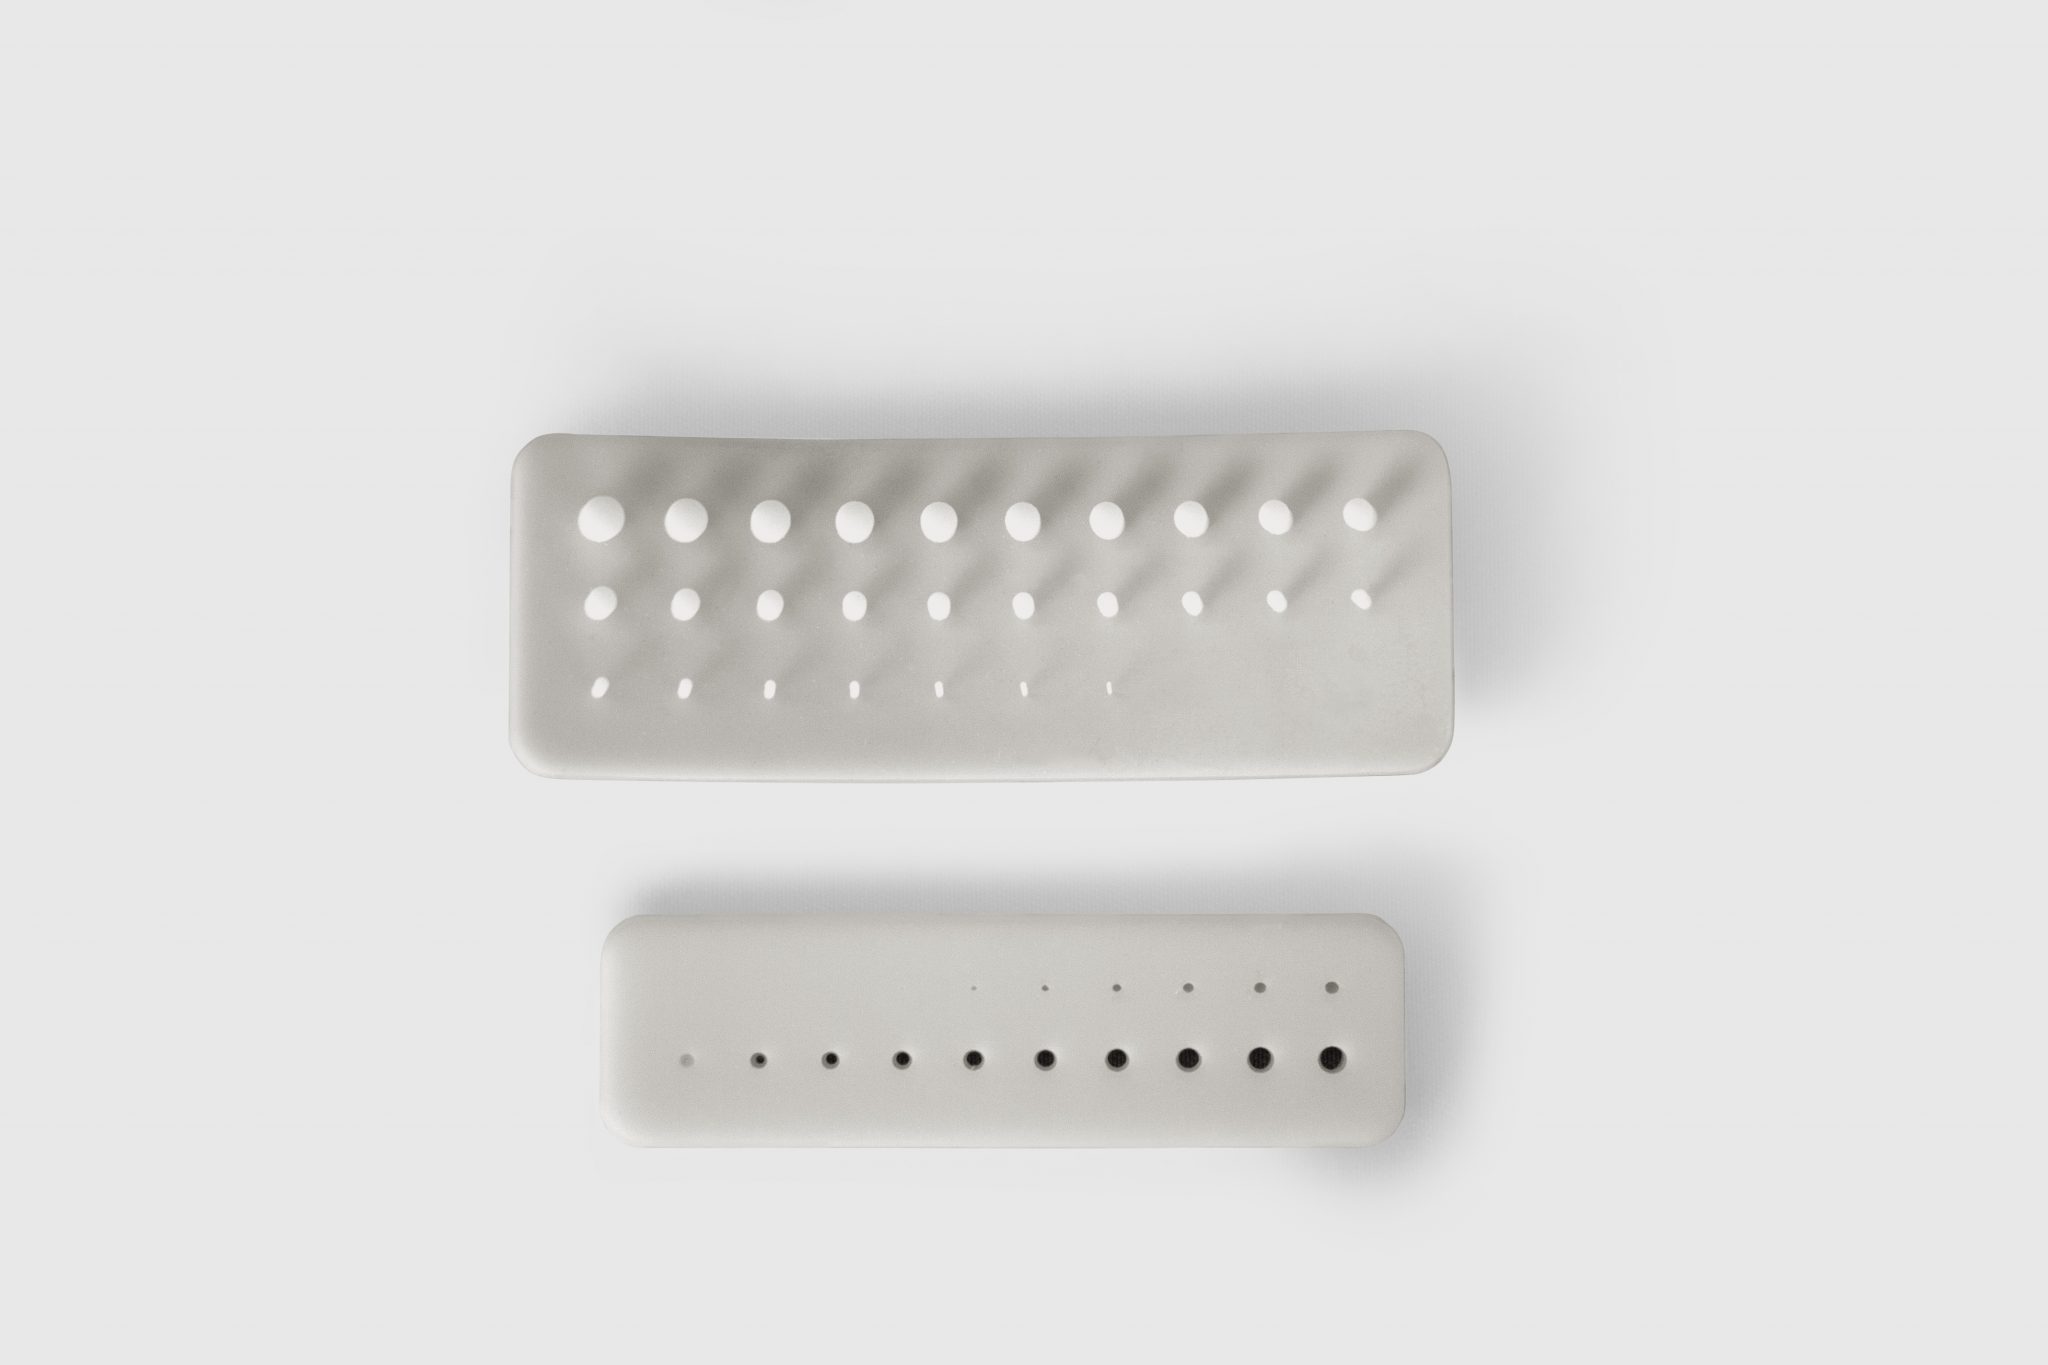
Before moving onto real application tests, the team conducted a precision test using two small panels of columns and holes increasing by 0.1mm increments. Despite some deformation of the base panel for the columns, the results of this test are impressive. The Inkspire is able to print a 0.4mm diameter tower and a 0.4mm diameter hole without issue. The 0.3mm and 0.2mm holes are perceptible, but cannot be qualified as real holes as they appear more as marks on the surface of the plate. It should be noted that the base accuracy for this system is specified at 50 microns.
Real-world applications on the Zortrax Inkspire
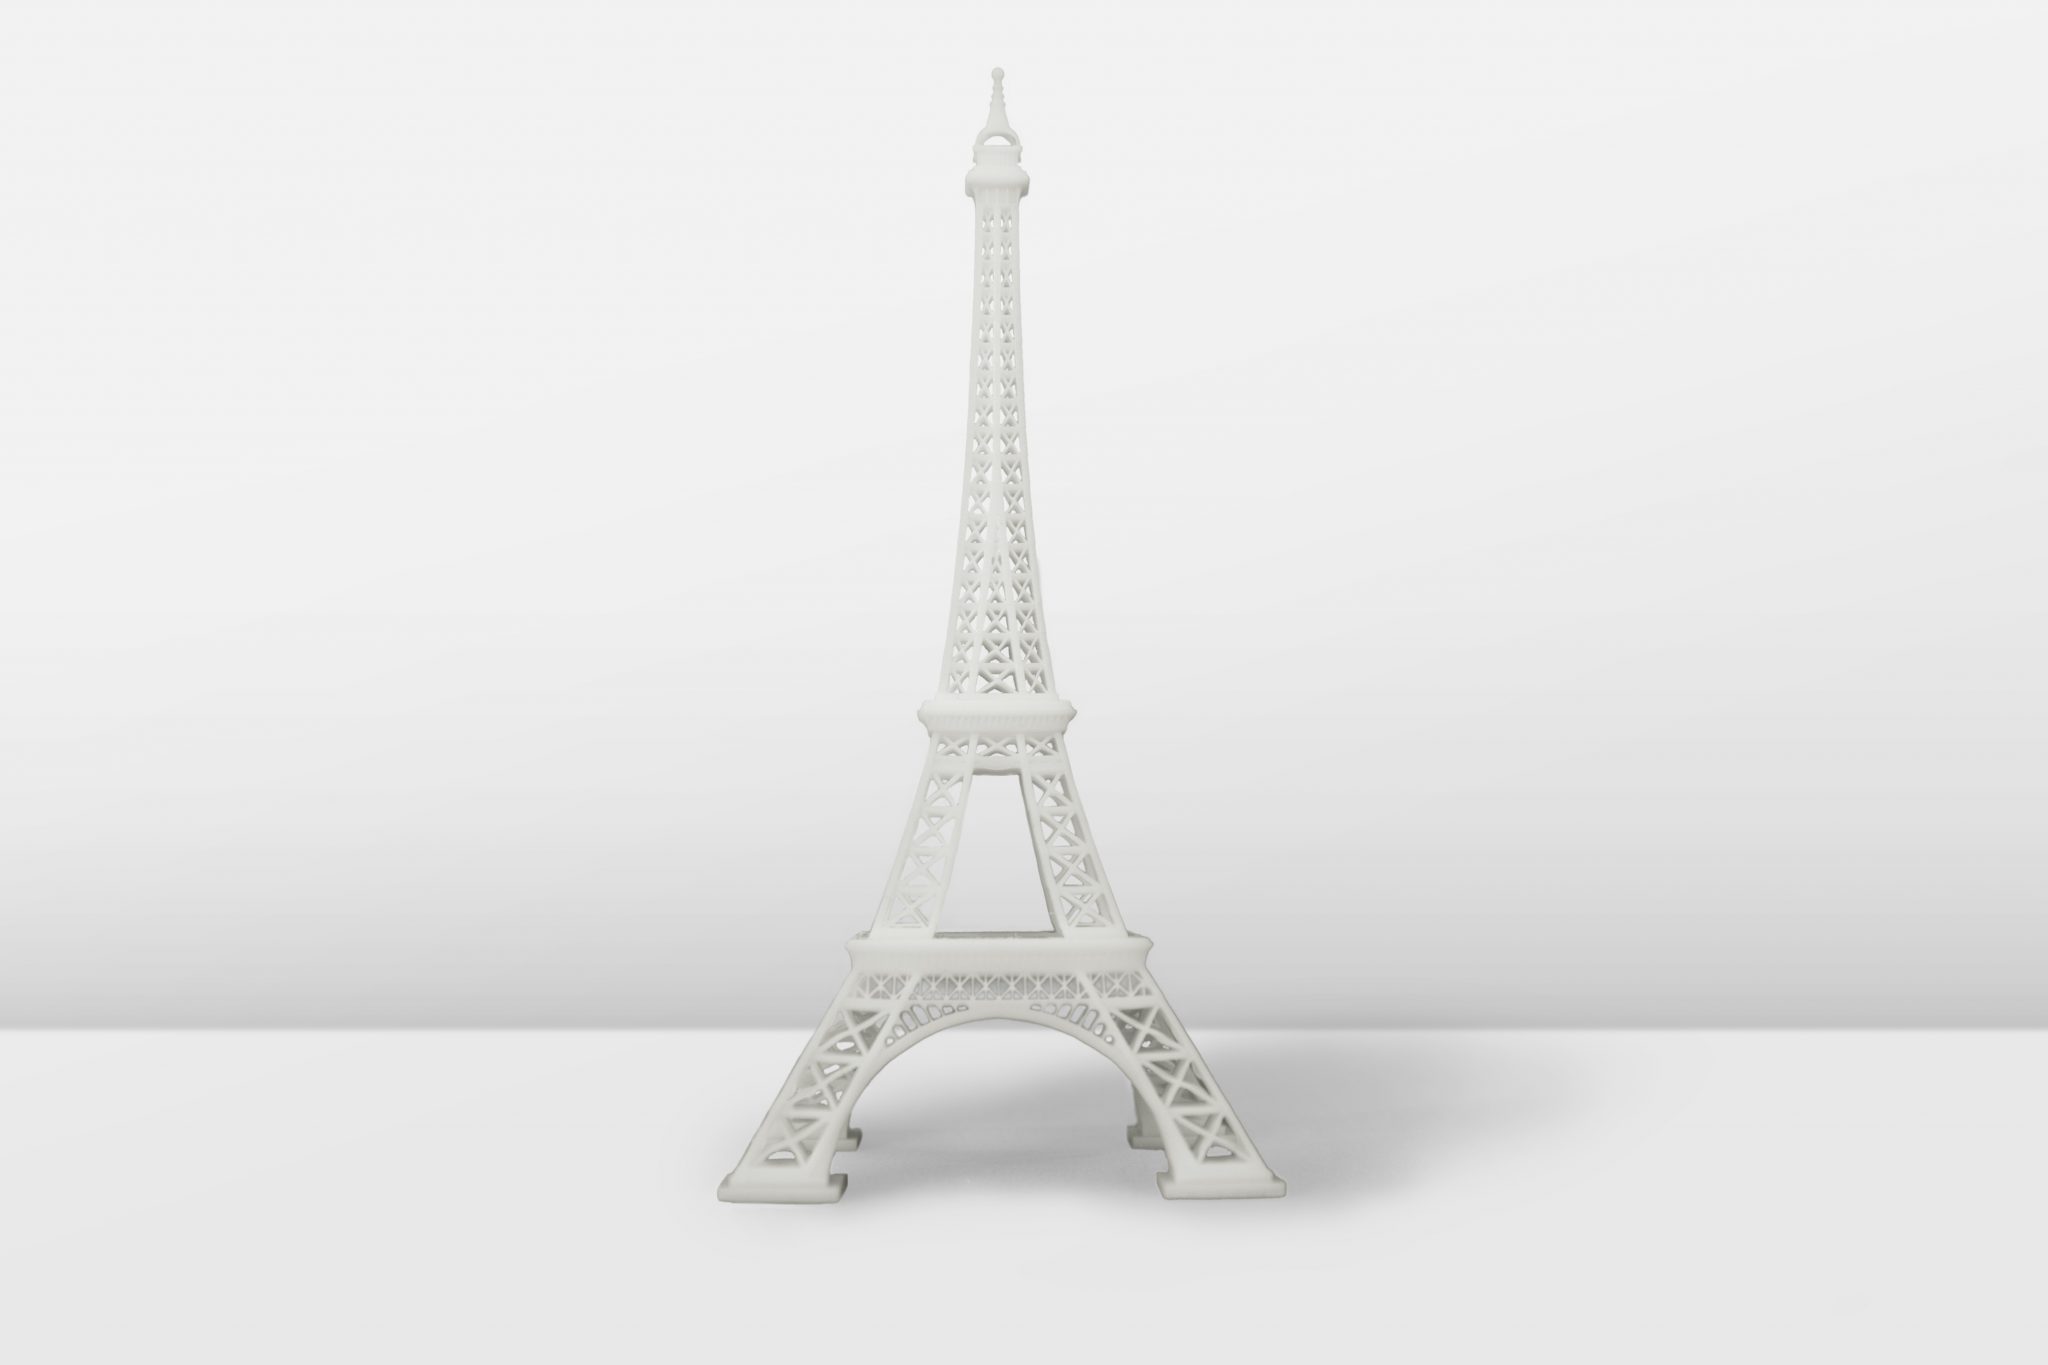
Focusing again on the accuracy, the first real-world application test of the Inkspire was a 3D printed Eiffel Tower. This model is interesting because it is composed of a mesh structure, which creates a lot of overhangs and bridges.
Zortrax Basic White/Ivory was the material used in this print. We set layer thickness to 0.025 mm, exposure time to 6s, off time 5s and bottom layer exposure to 60s. No supports were used.
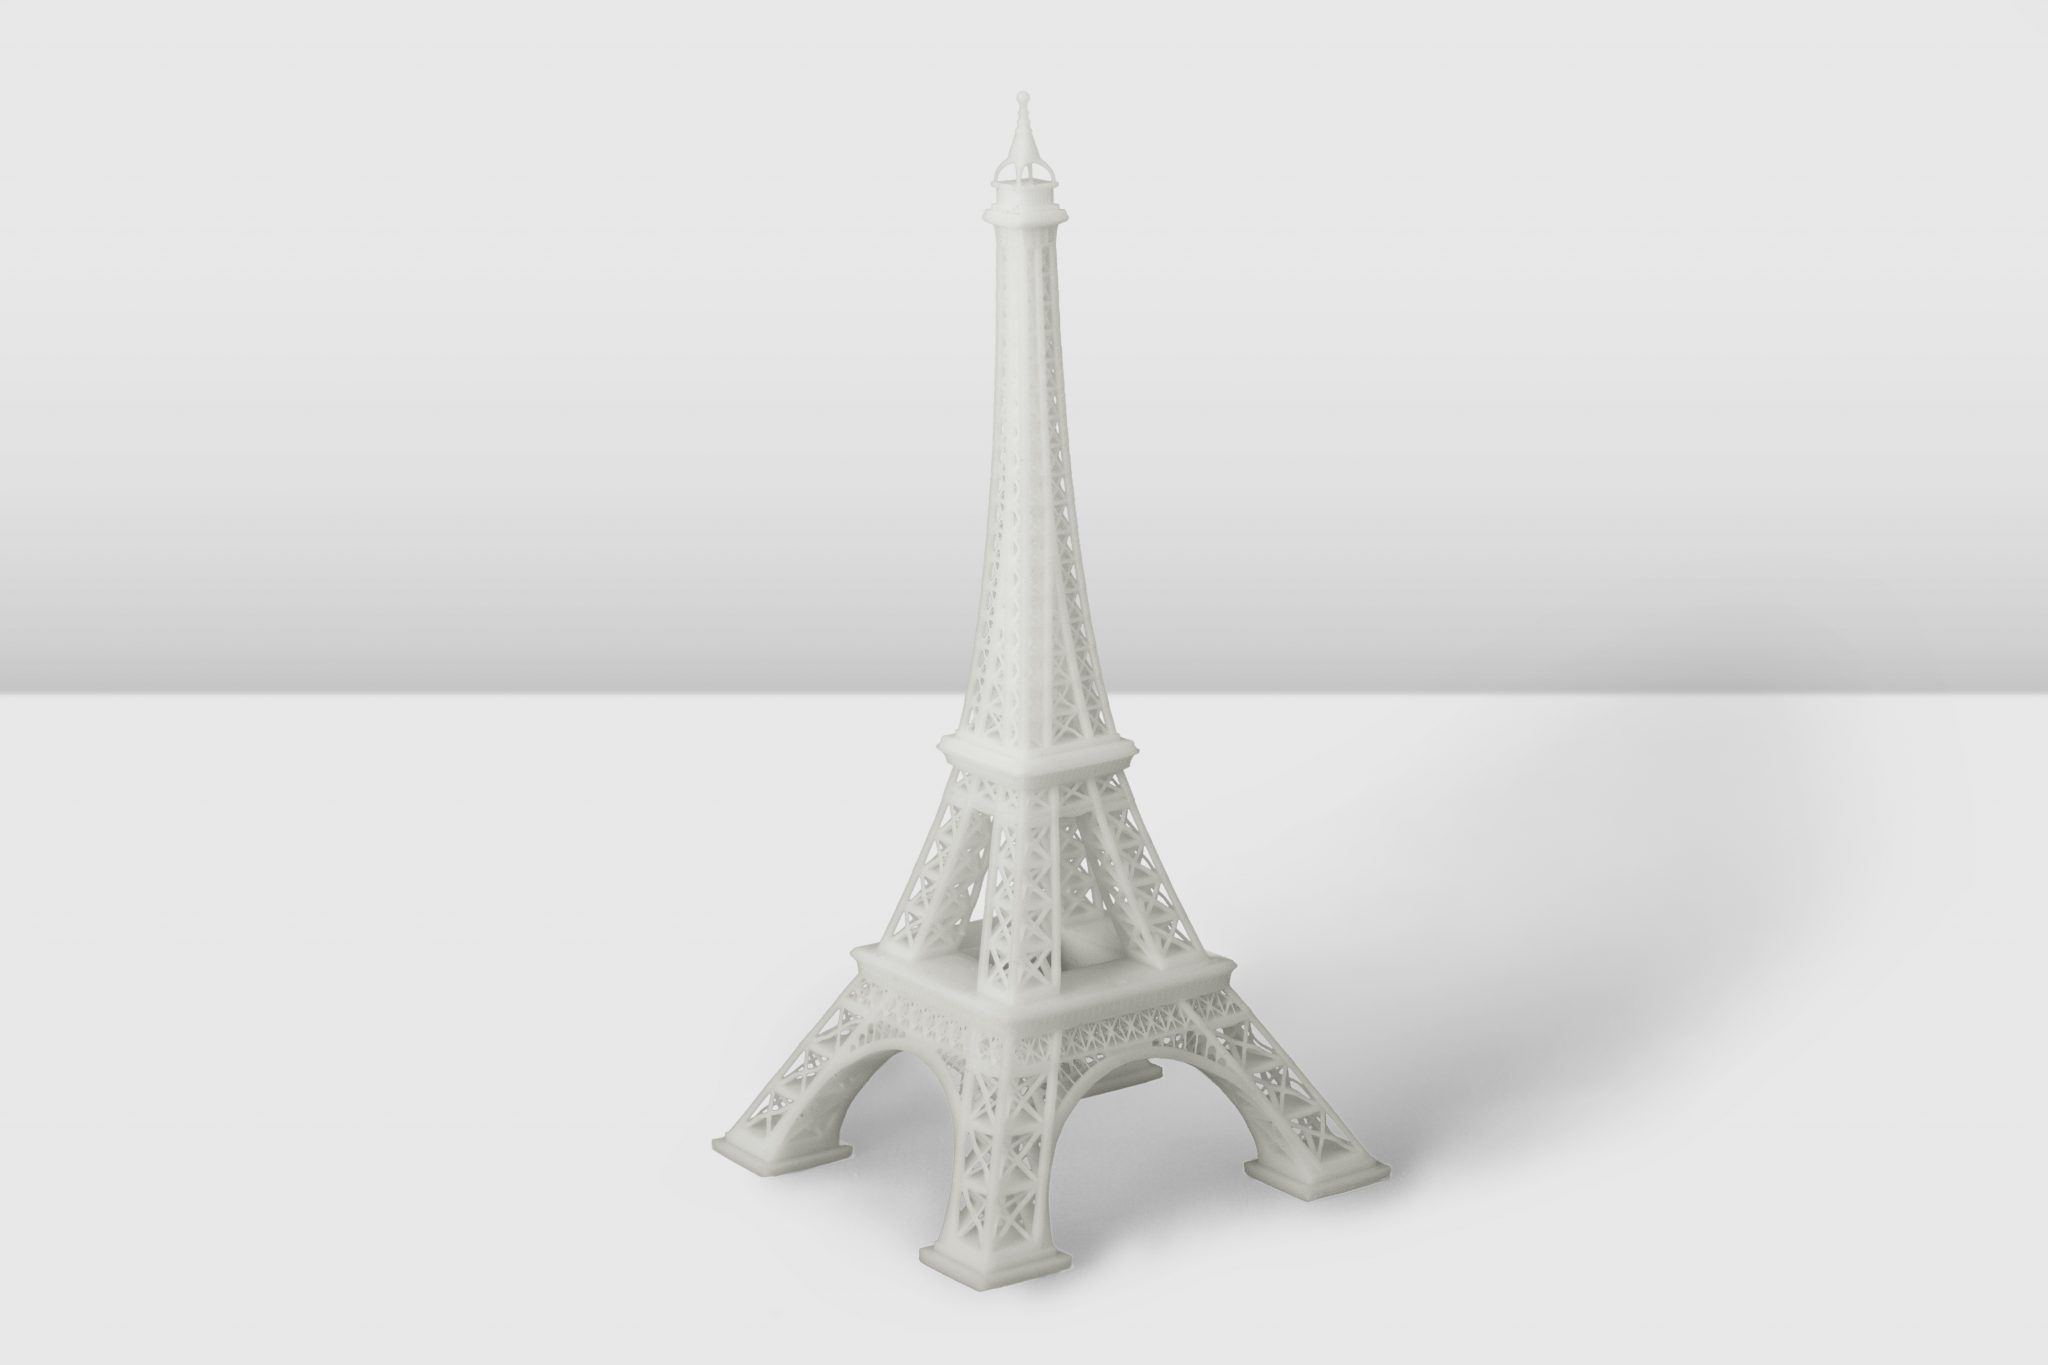
The quality of this model was outstanding. Layer lines could only be observed when closely examining the object, and the fine, lattice-like beam structure of the model was well detailed. Improvements could have been made to the object by altering its orientation on the build platform. The thin guardrail on the first tier of the model also failed, though its absence does not detract from the overall appearance.
Functional prototyping
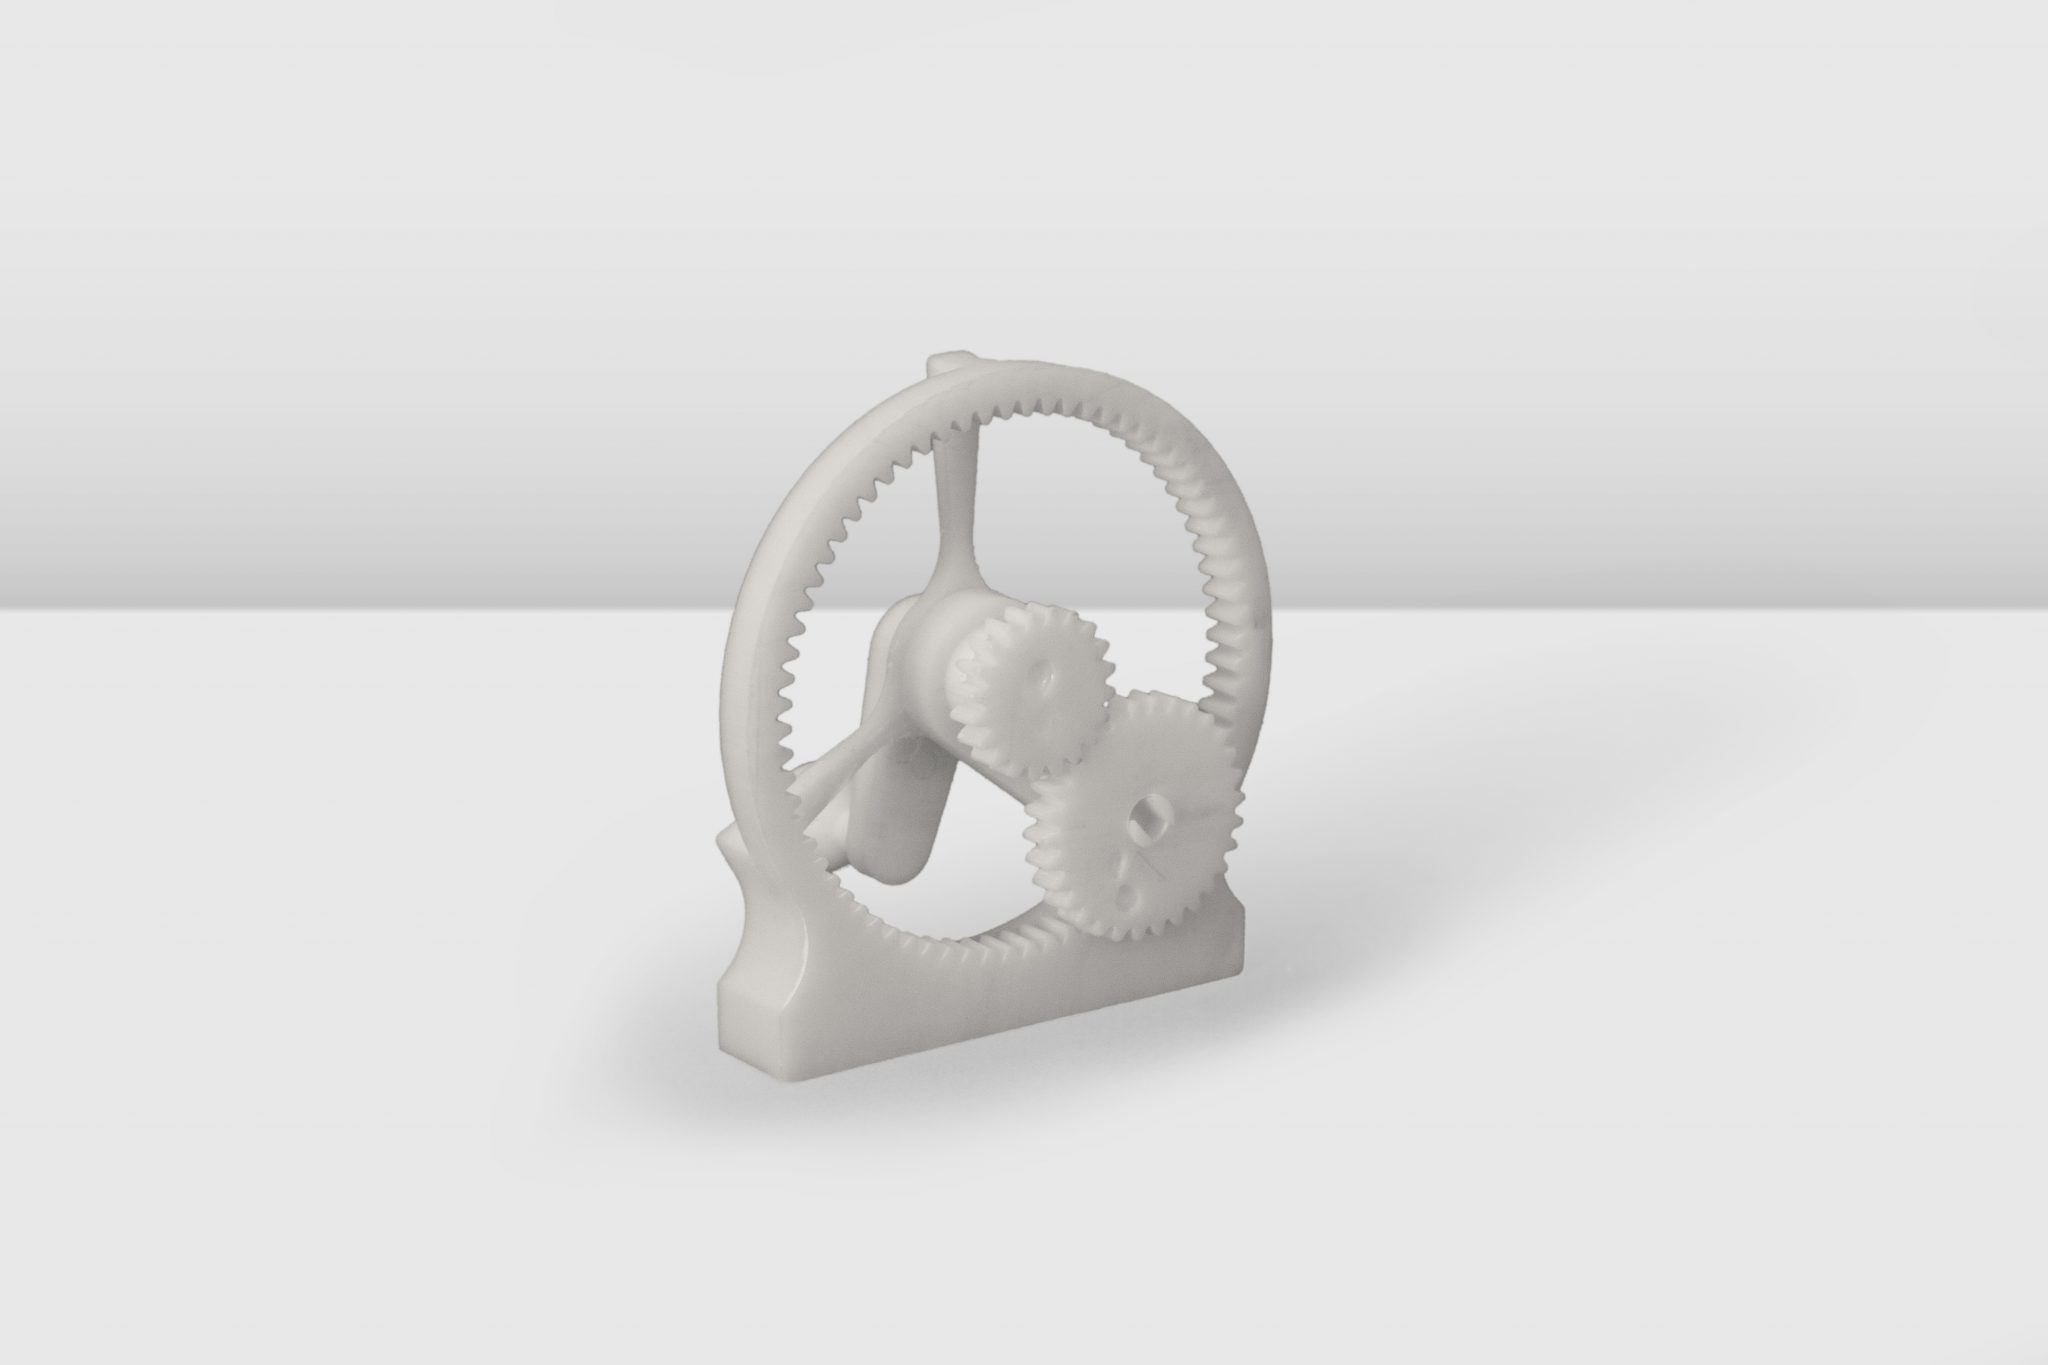
Moving on to functional prototyping, and investigating the potential for engineering use, the team 3D printed a planetary gear assembly. All functional aspects of this object were produced well and fit together enabling free rotation. The only article the model was missing were the non-functional stamps on the surface of gears.
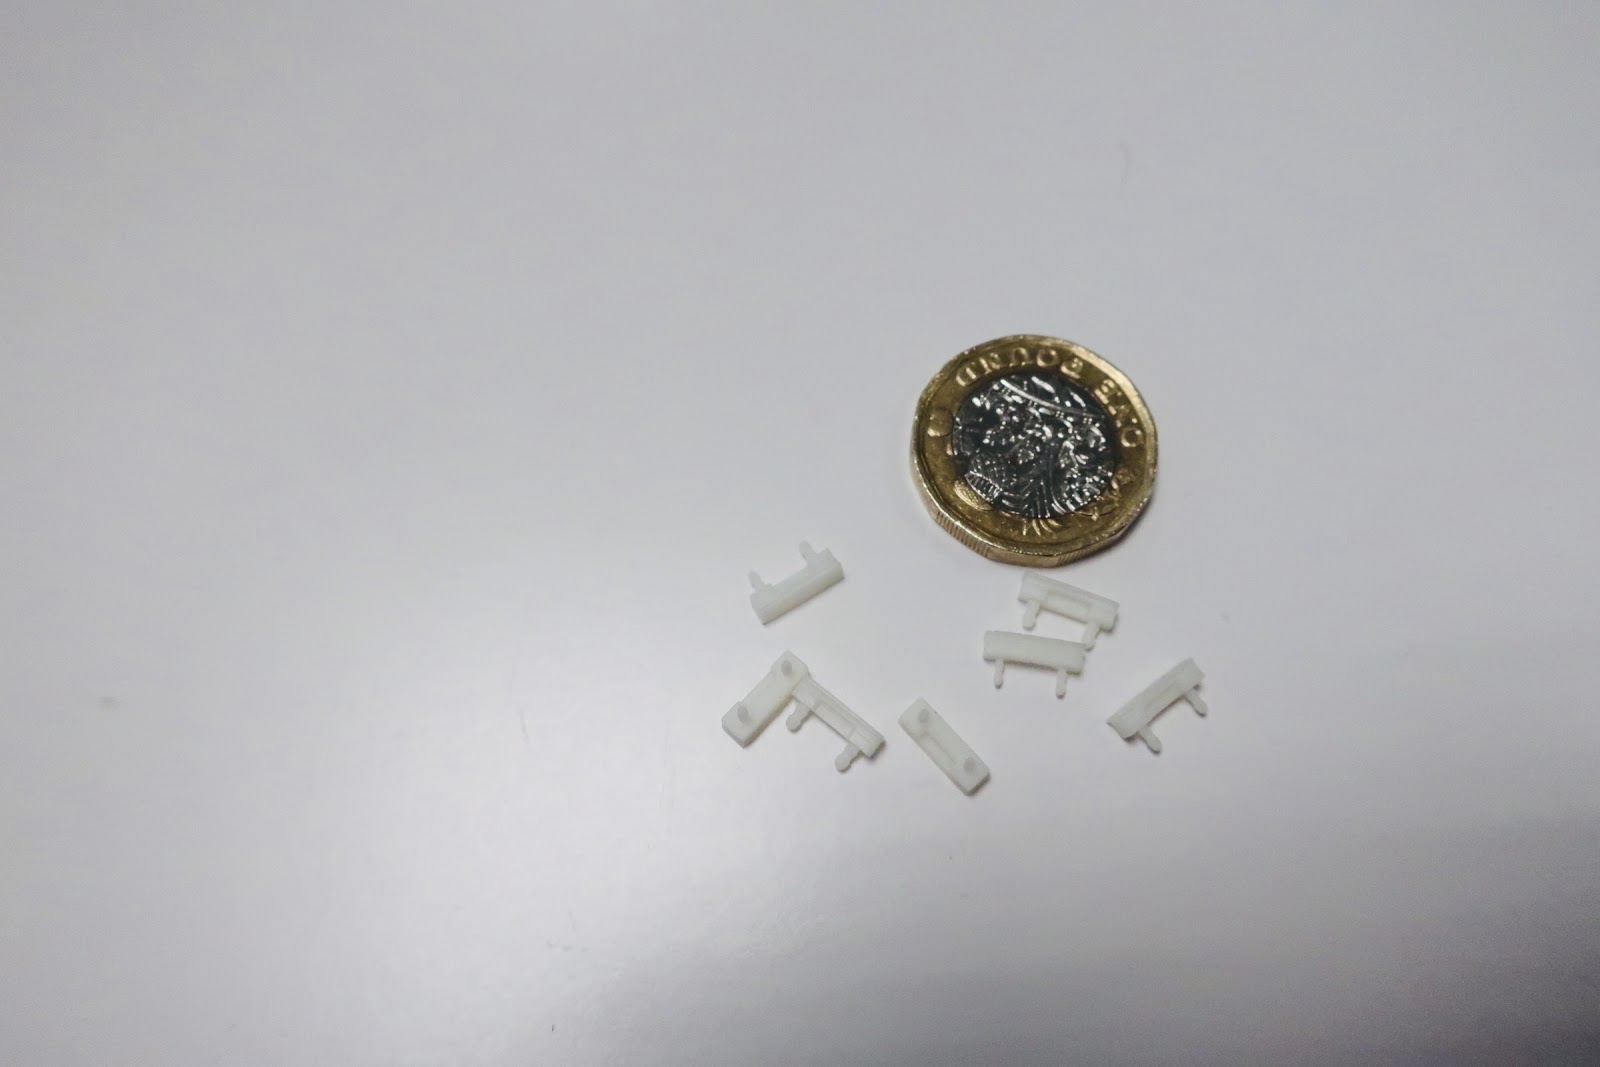
Testing tight tolerances in another way, the team also 3D printed a replacement part for a hinge on a pair of glasses. The small pin features of the part matched the designed dimensions well. Crucially, though, the tolerances achieved in these pins meant that the glasses repair was successful.
Jewelry
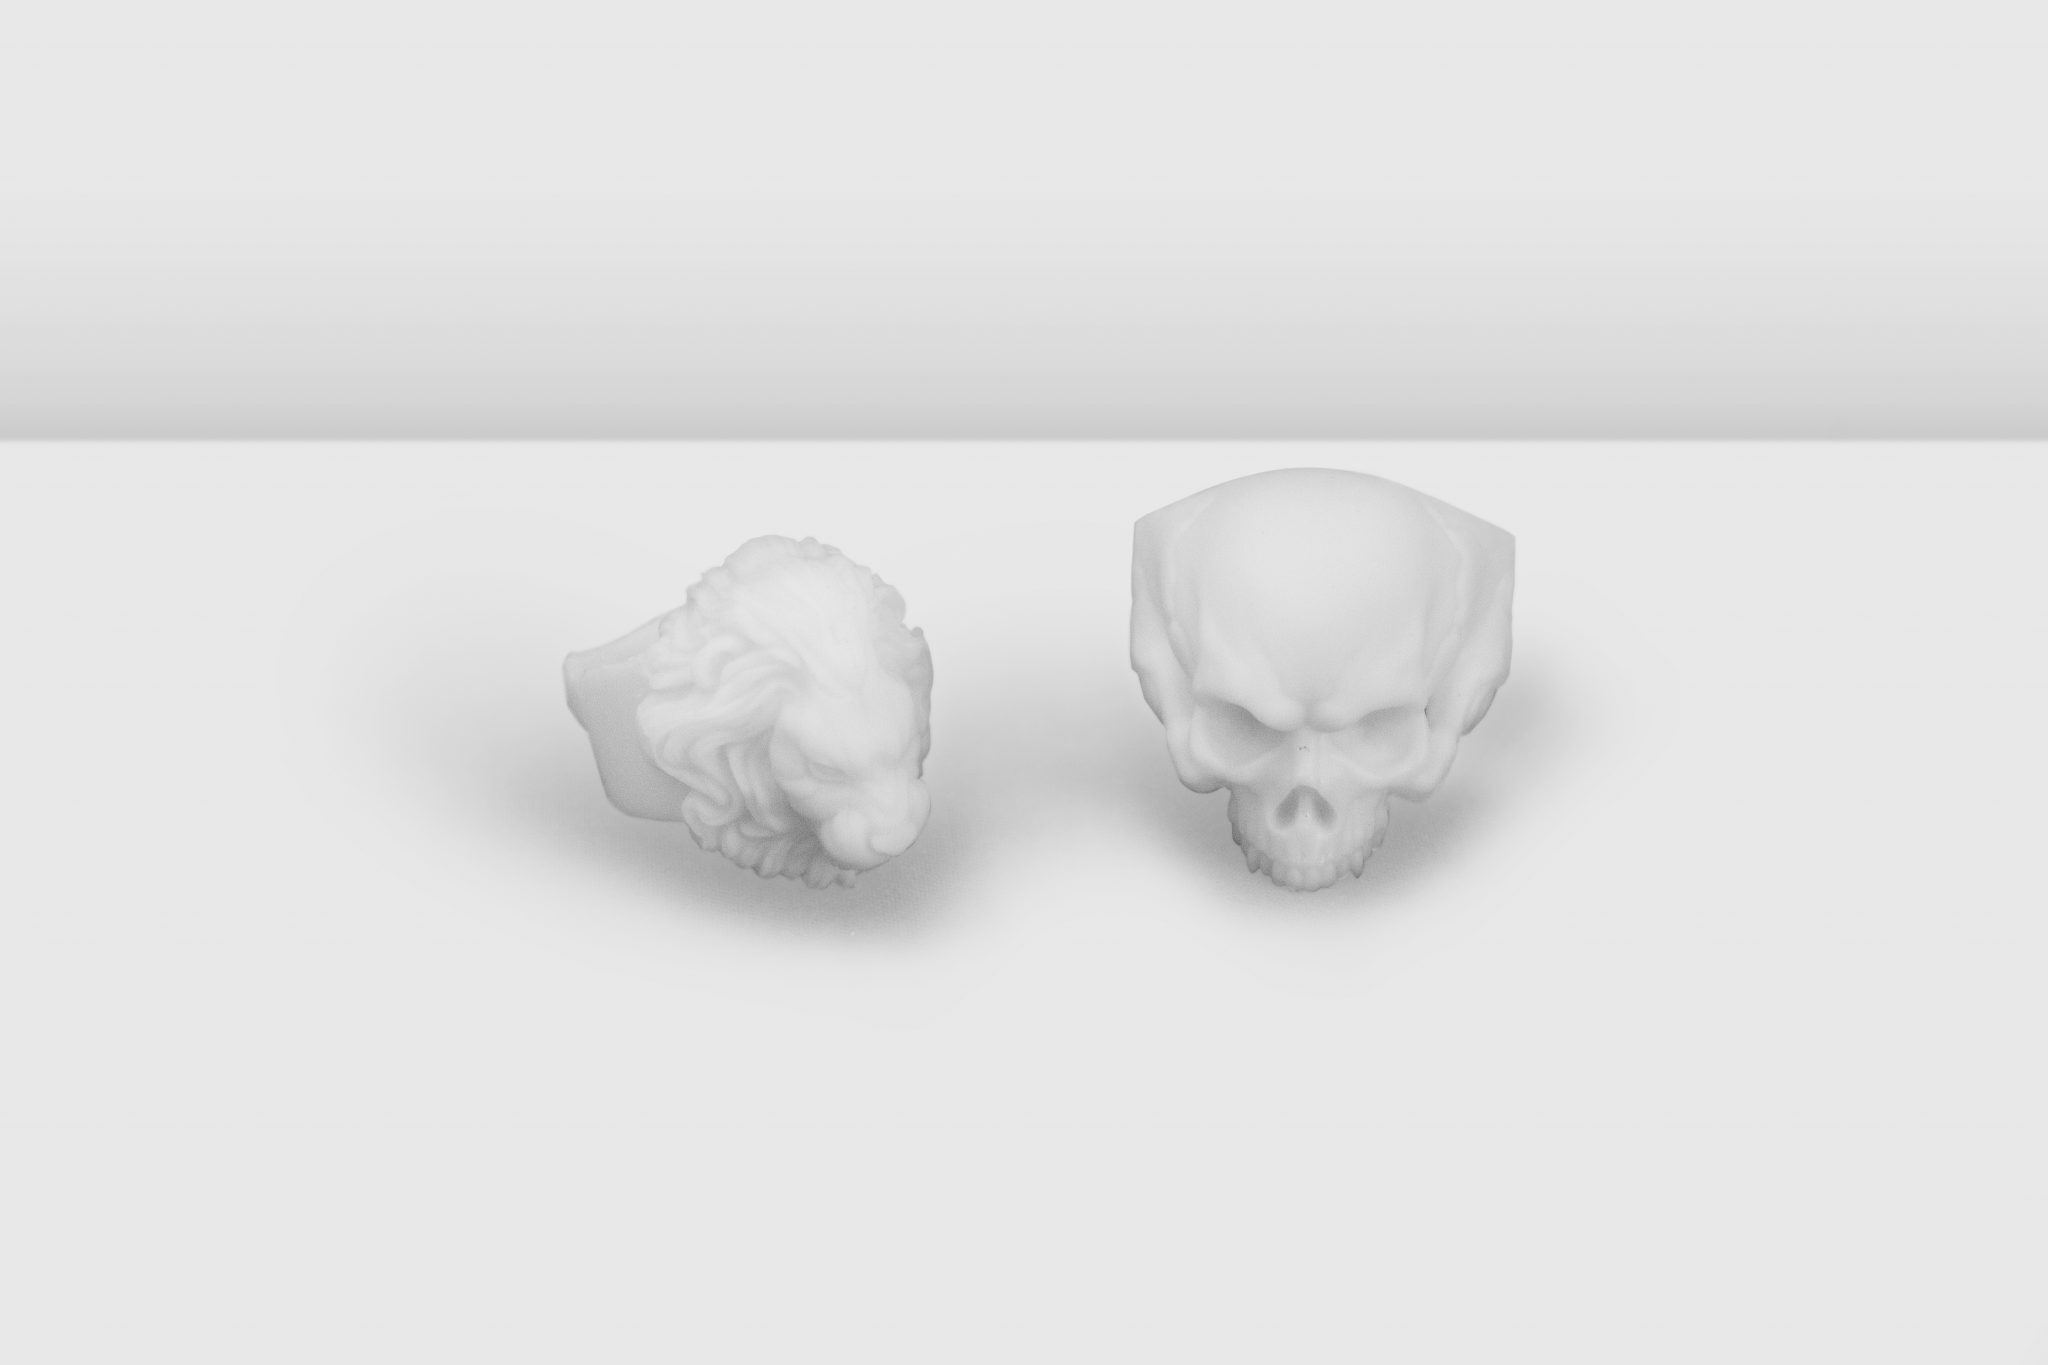
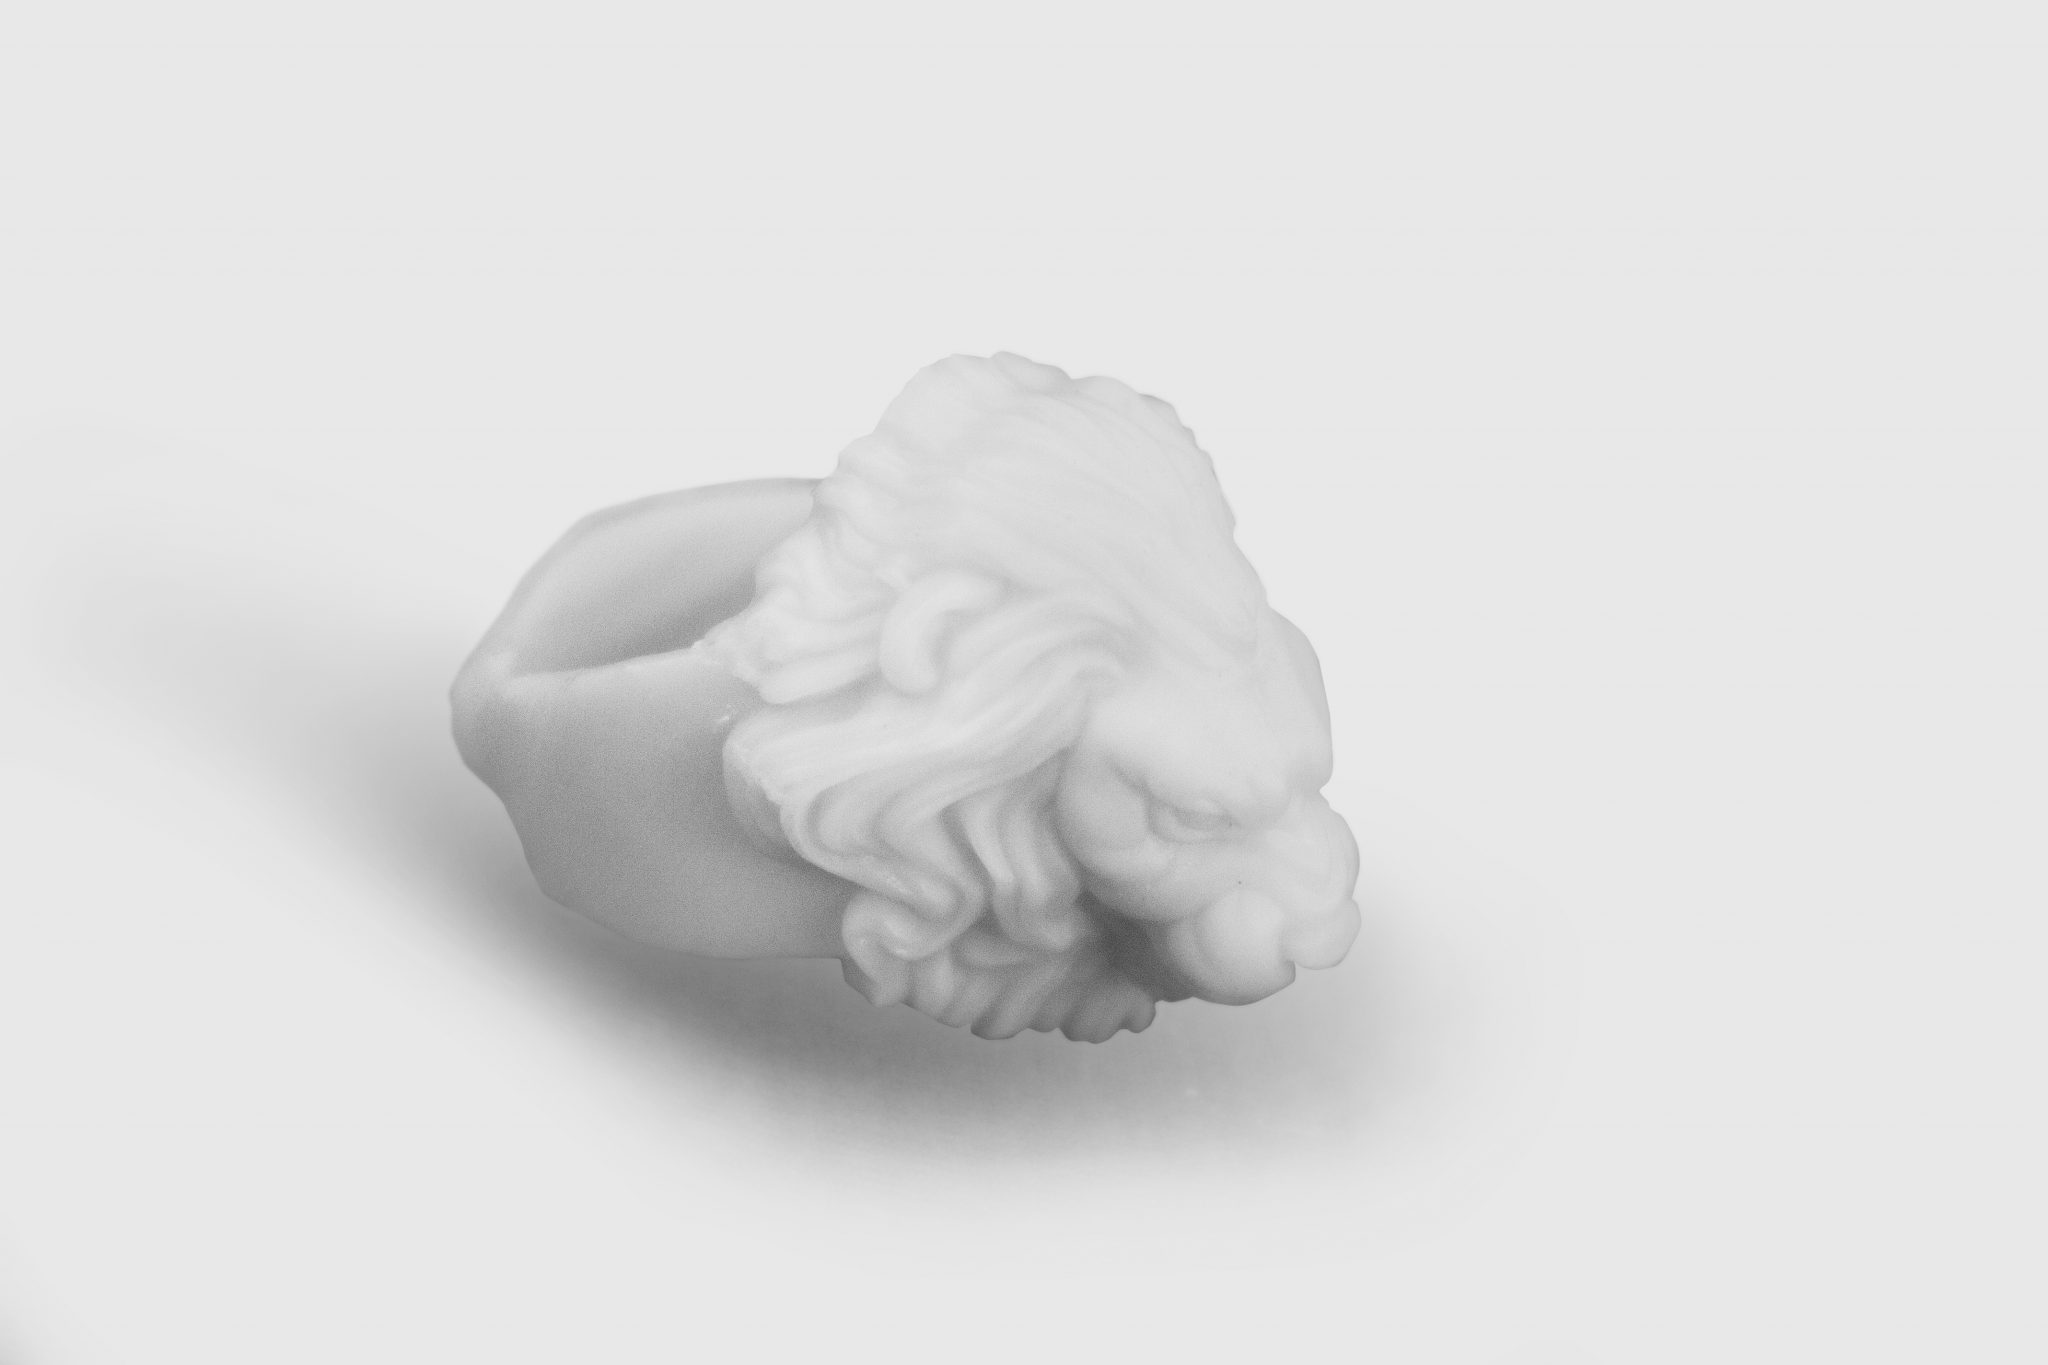
Due to its high accuracy, and ability to define fine details vat polymerization is the method of choice for many jewelers. To test the Inkspire’s capabilities in this sector, the team 3D printed two highly-detailed ring models, that would be used for metal casting.
To prepare these files, we used the “Rotation Optimization” option in the provided Z-SUITESuite slicer. This permits the user to find the orientation that requires minimal support material, therefore reducing any blemishes that would affect the quality of the final cast. A higher degree of print quality is also achieved with this option, as straight lines and flat surfaces of the model are dealigned from the XY pixels, eliminating square edges.
In the first trial print of the two ring models, one a lion and one a skull, the objects failed, due to the strength of supports. We resolved this problem simply by adding 2 additional seconds to support exposure time.
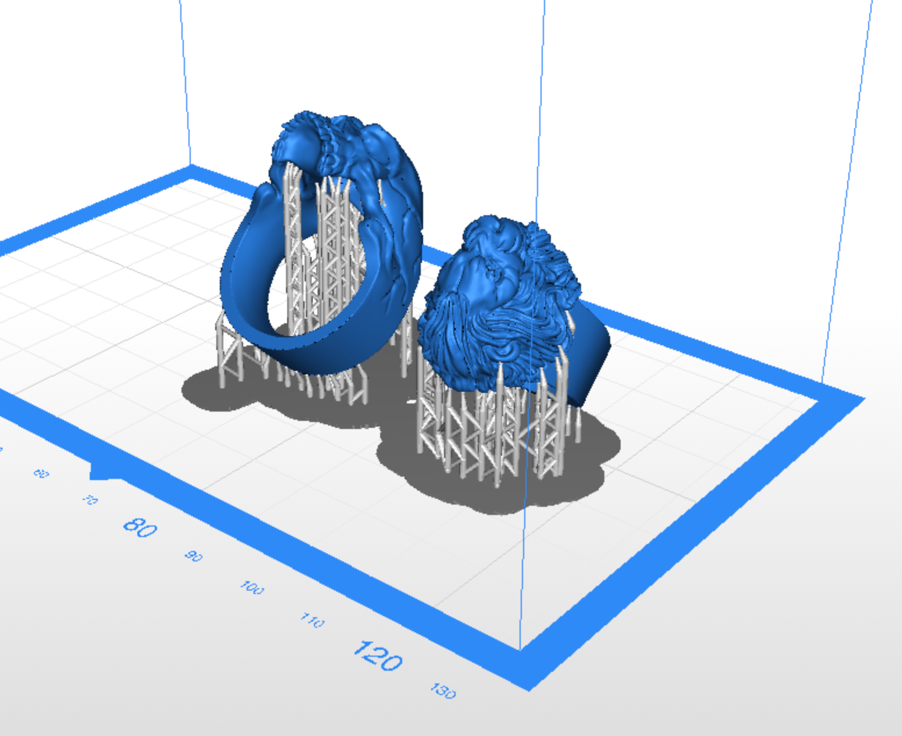
The overall quality of the successful ring prints is exceptional. The surface smoothness of the objects is comparable to injection molded parts, creating the ideal conditions for casting. After support removal, we observed a small defect at the bottom of the lion ring. This can be easily fixed for casting.
Small batch 3D printing
Moving to the next core claim of the Inkspire, we put the 3D printer to the test in small batch production.
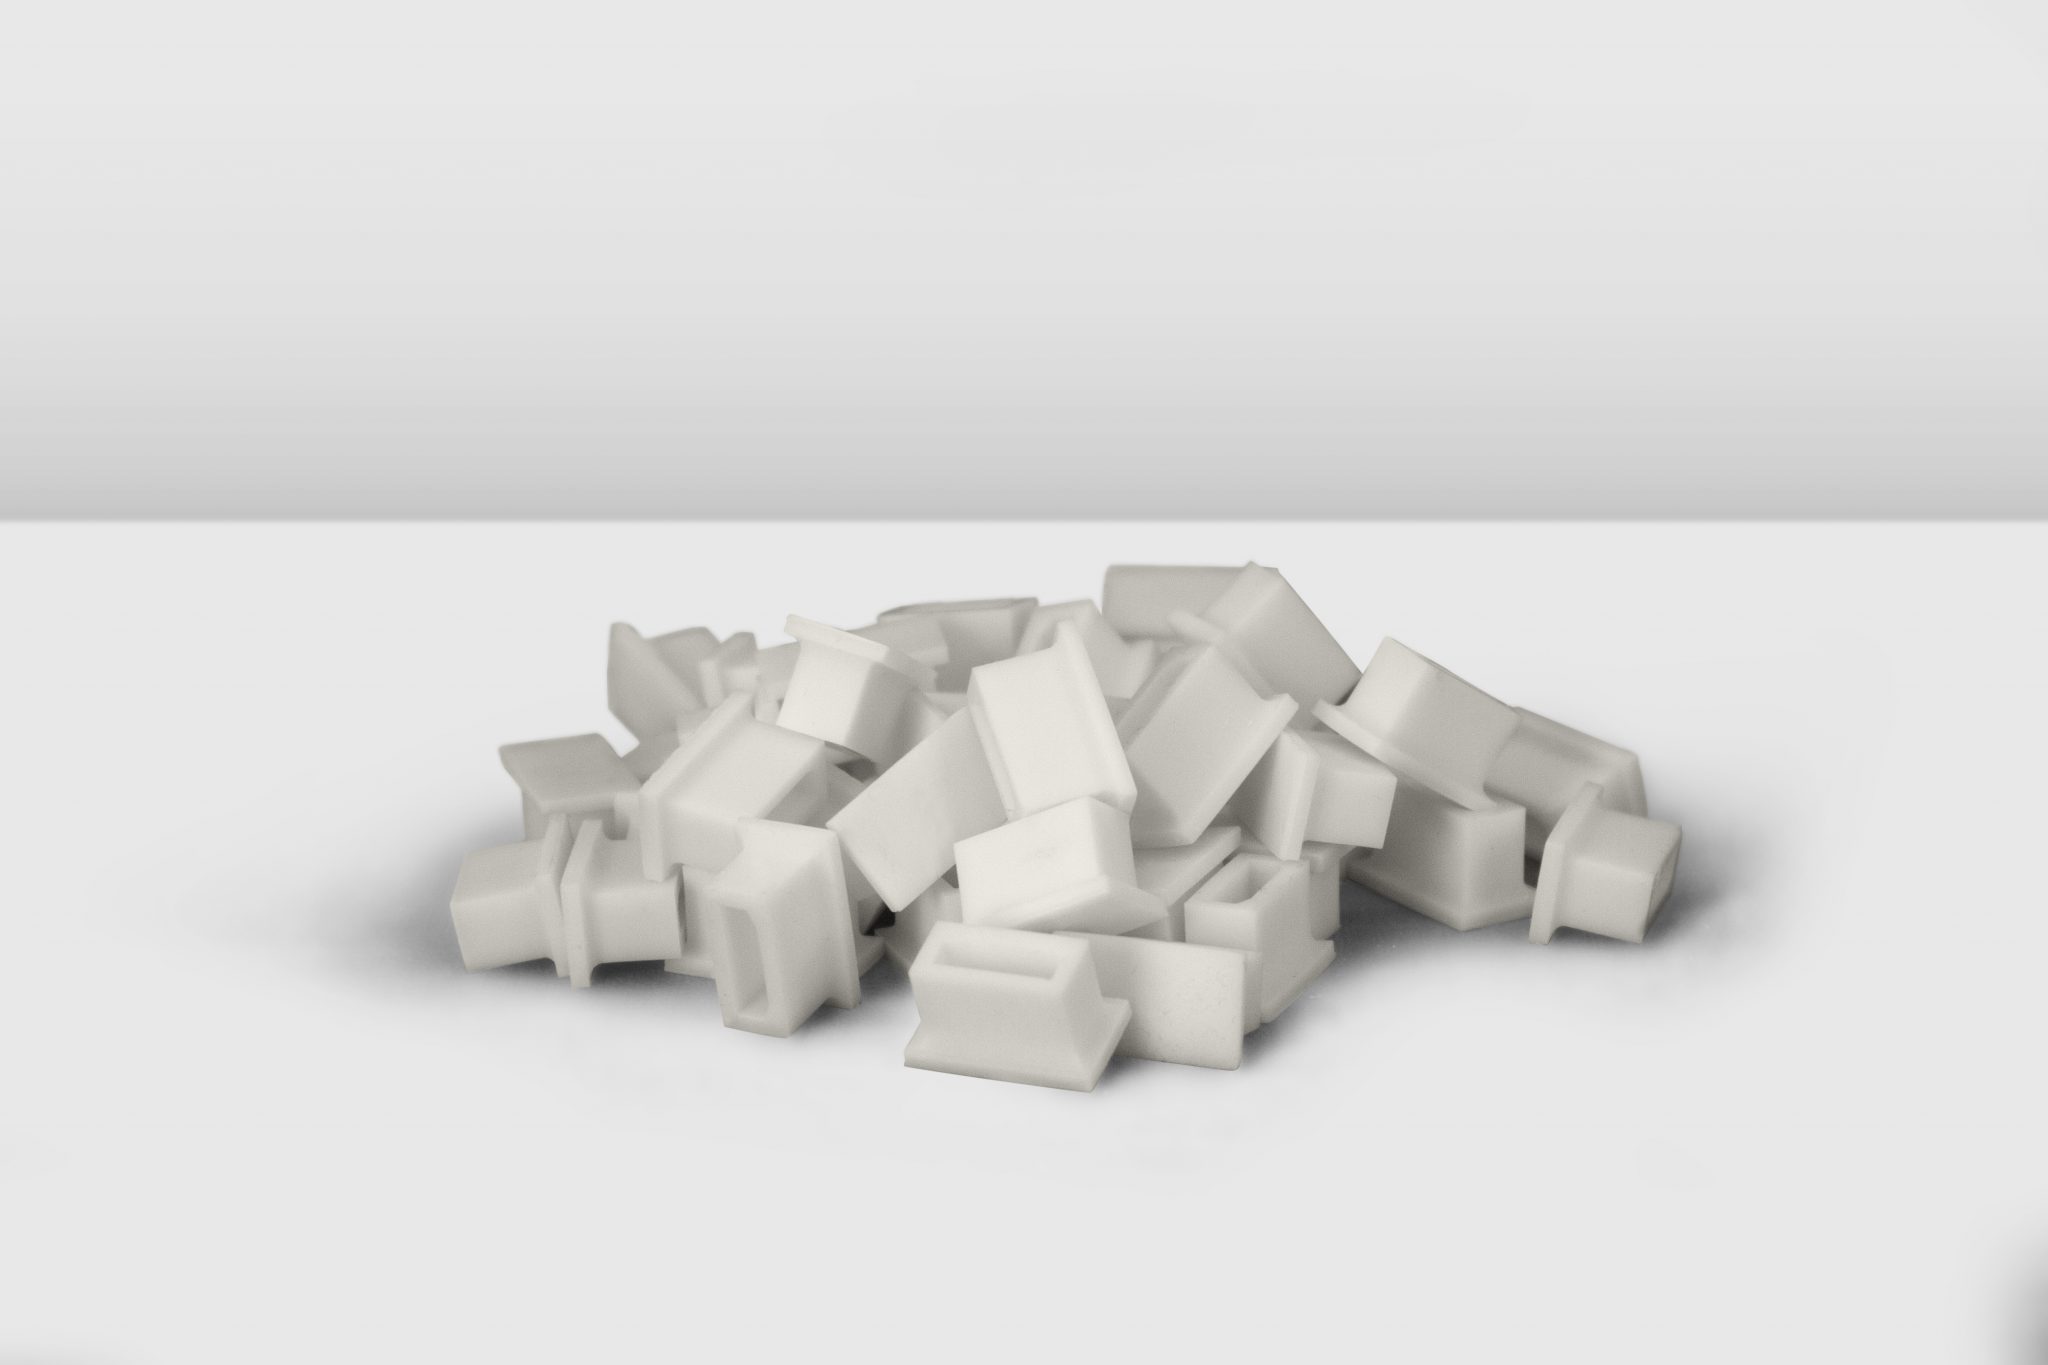
For this test, we nested 20 replacement HDMI cable caps within the build area – though there was the possibility of nesting more if needed by taking care of orientation and arrangement.
We loaded the printer with the 20-part build multiple times over the course of an 8 hour workday. By the end of the day, it had successfully completed the production of 160 visually-identical cable caps in eight 1-hour print cycles. No failures or faults were experienced during the production of the batches, and the quality of parts was very good.
Based on this run, we can deduce that the Zotrax Inkspire is capable of catering to low-medium volume production runs. Quantity of parts, of course, depends on geometry, size, and nesting.
Specialist materials: flexible
To fully cater to the needs of each of the different markets targeted by Zortrax, the Inkspire must also prove its capabilities working with different and more challenging materials.
In this final print test, we run the machine using materials outside of the standard Zortrax Basic White/Ivory and Grey. The first of these is Zortrax Flexible Transparent Yellow. The properties of this resin promise high flexibility, impact resistance, details and sharp edges.
The first model made using the material was a miniature tire. Fine tread-marks on this model were picked out well with the resin, and its density suggests good shock absorbency.
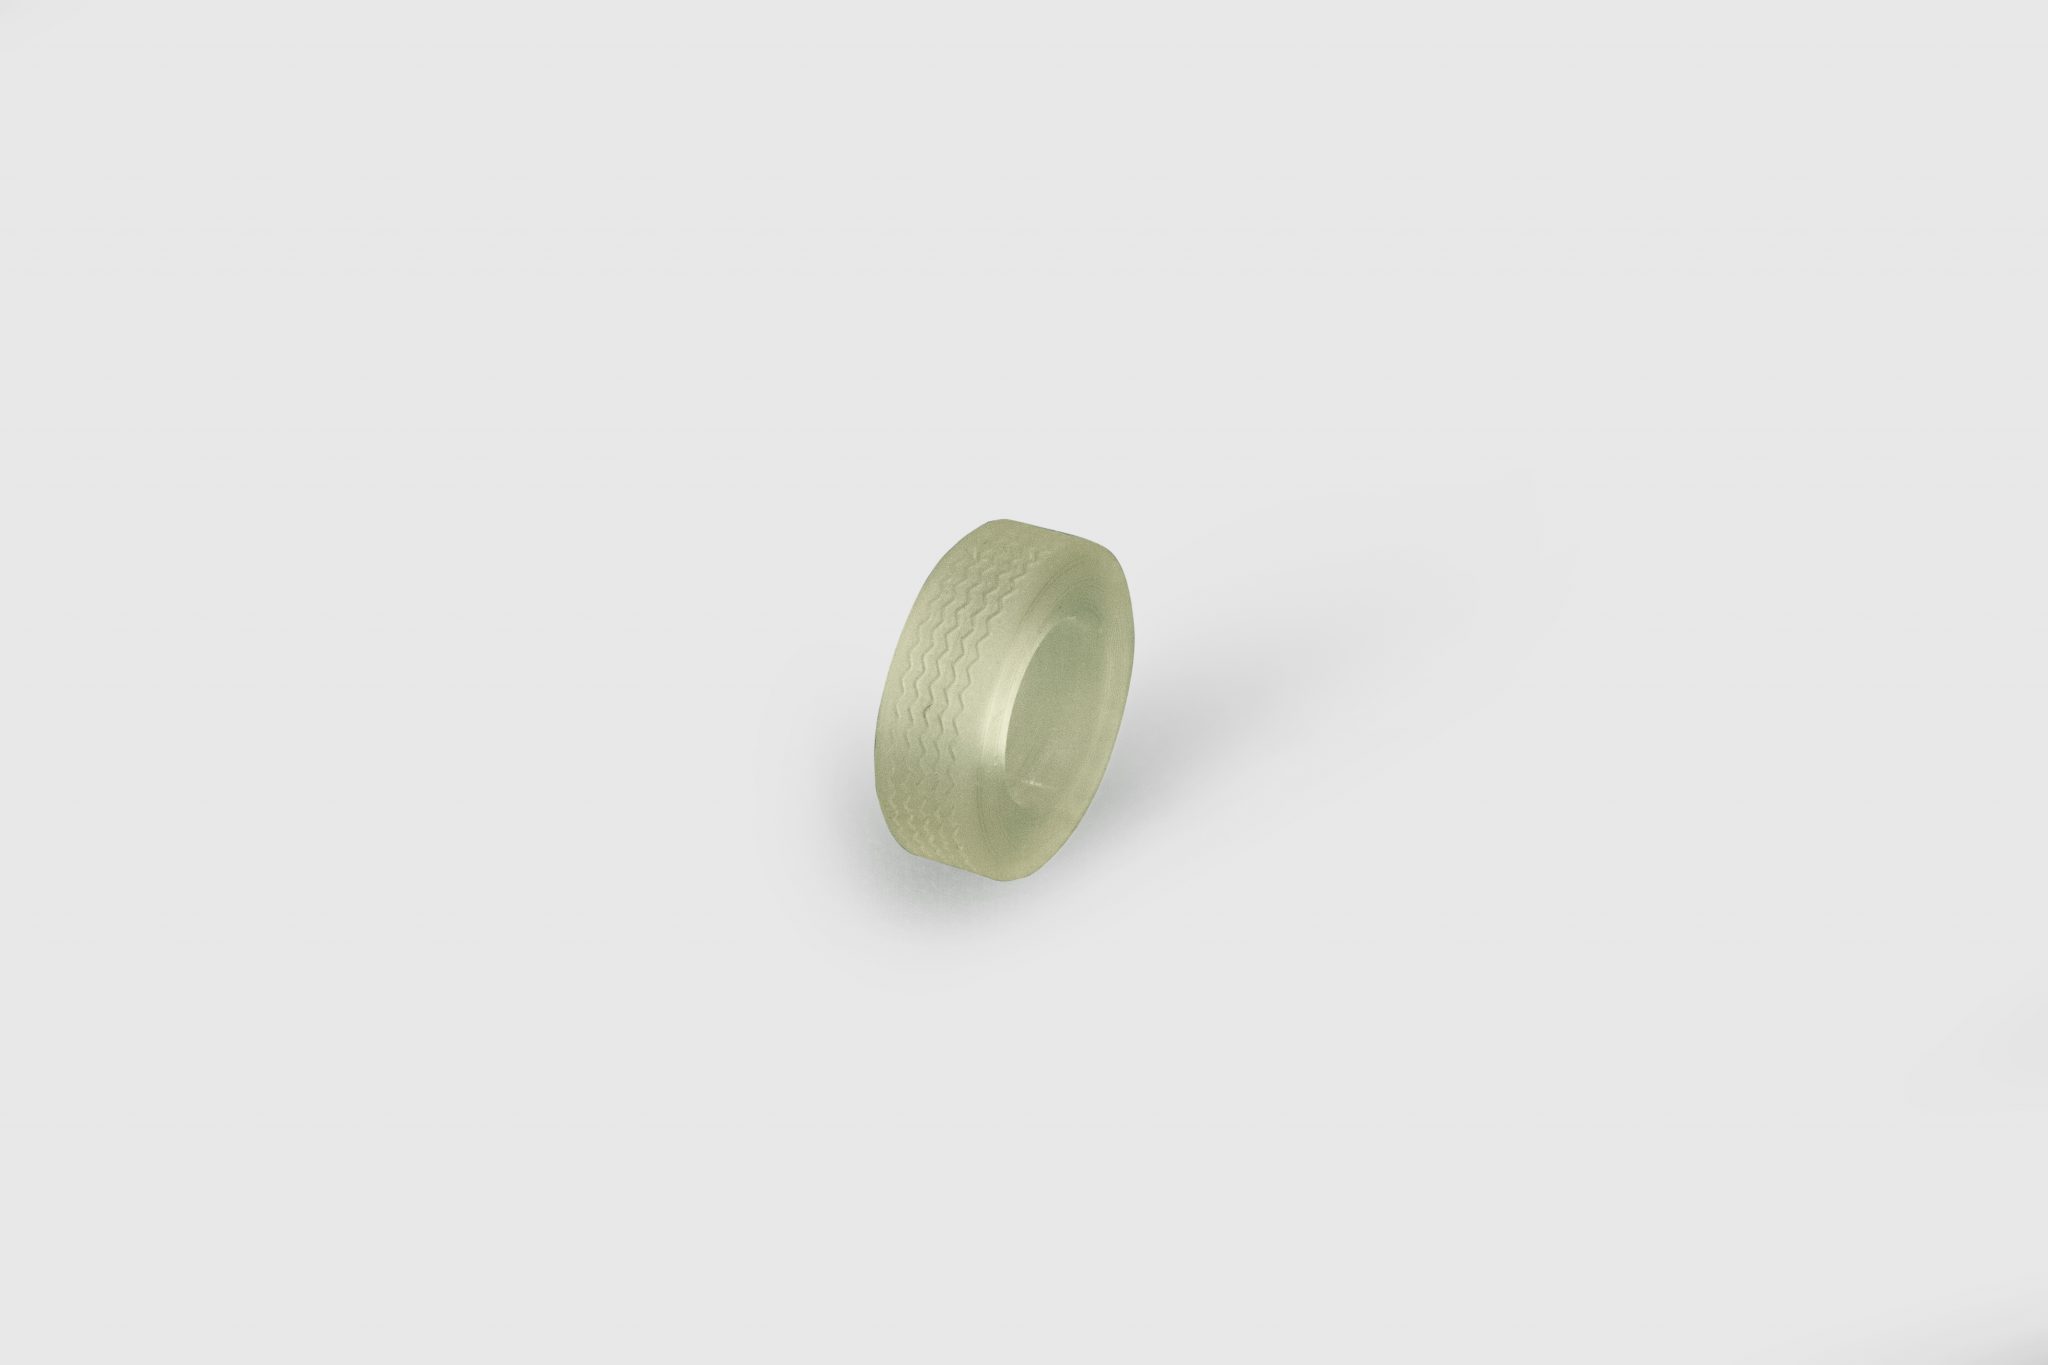
Unfortunately, the miniature tire did not prove to be very flexible when compressed. Assuming this to be due to its geometry rather than the resin itself, the team decided to try a thinner object.
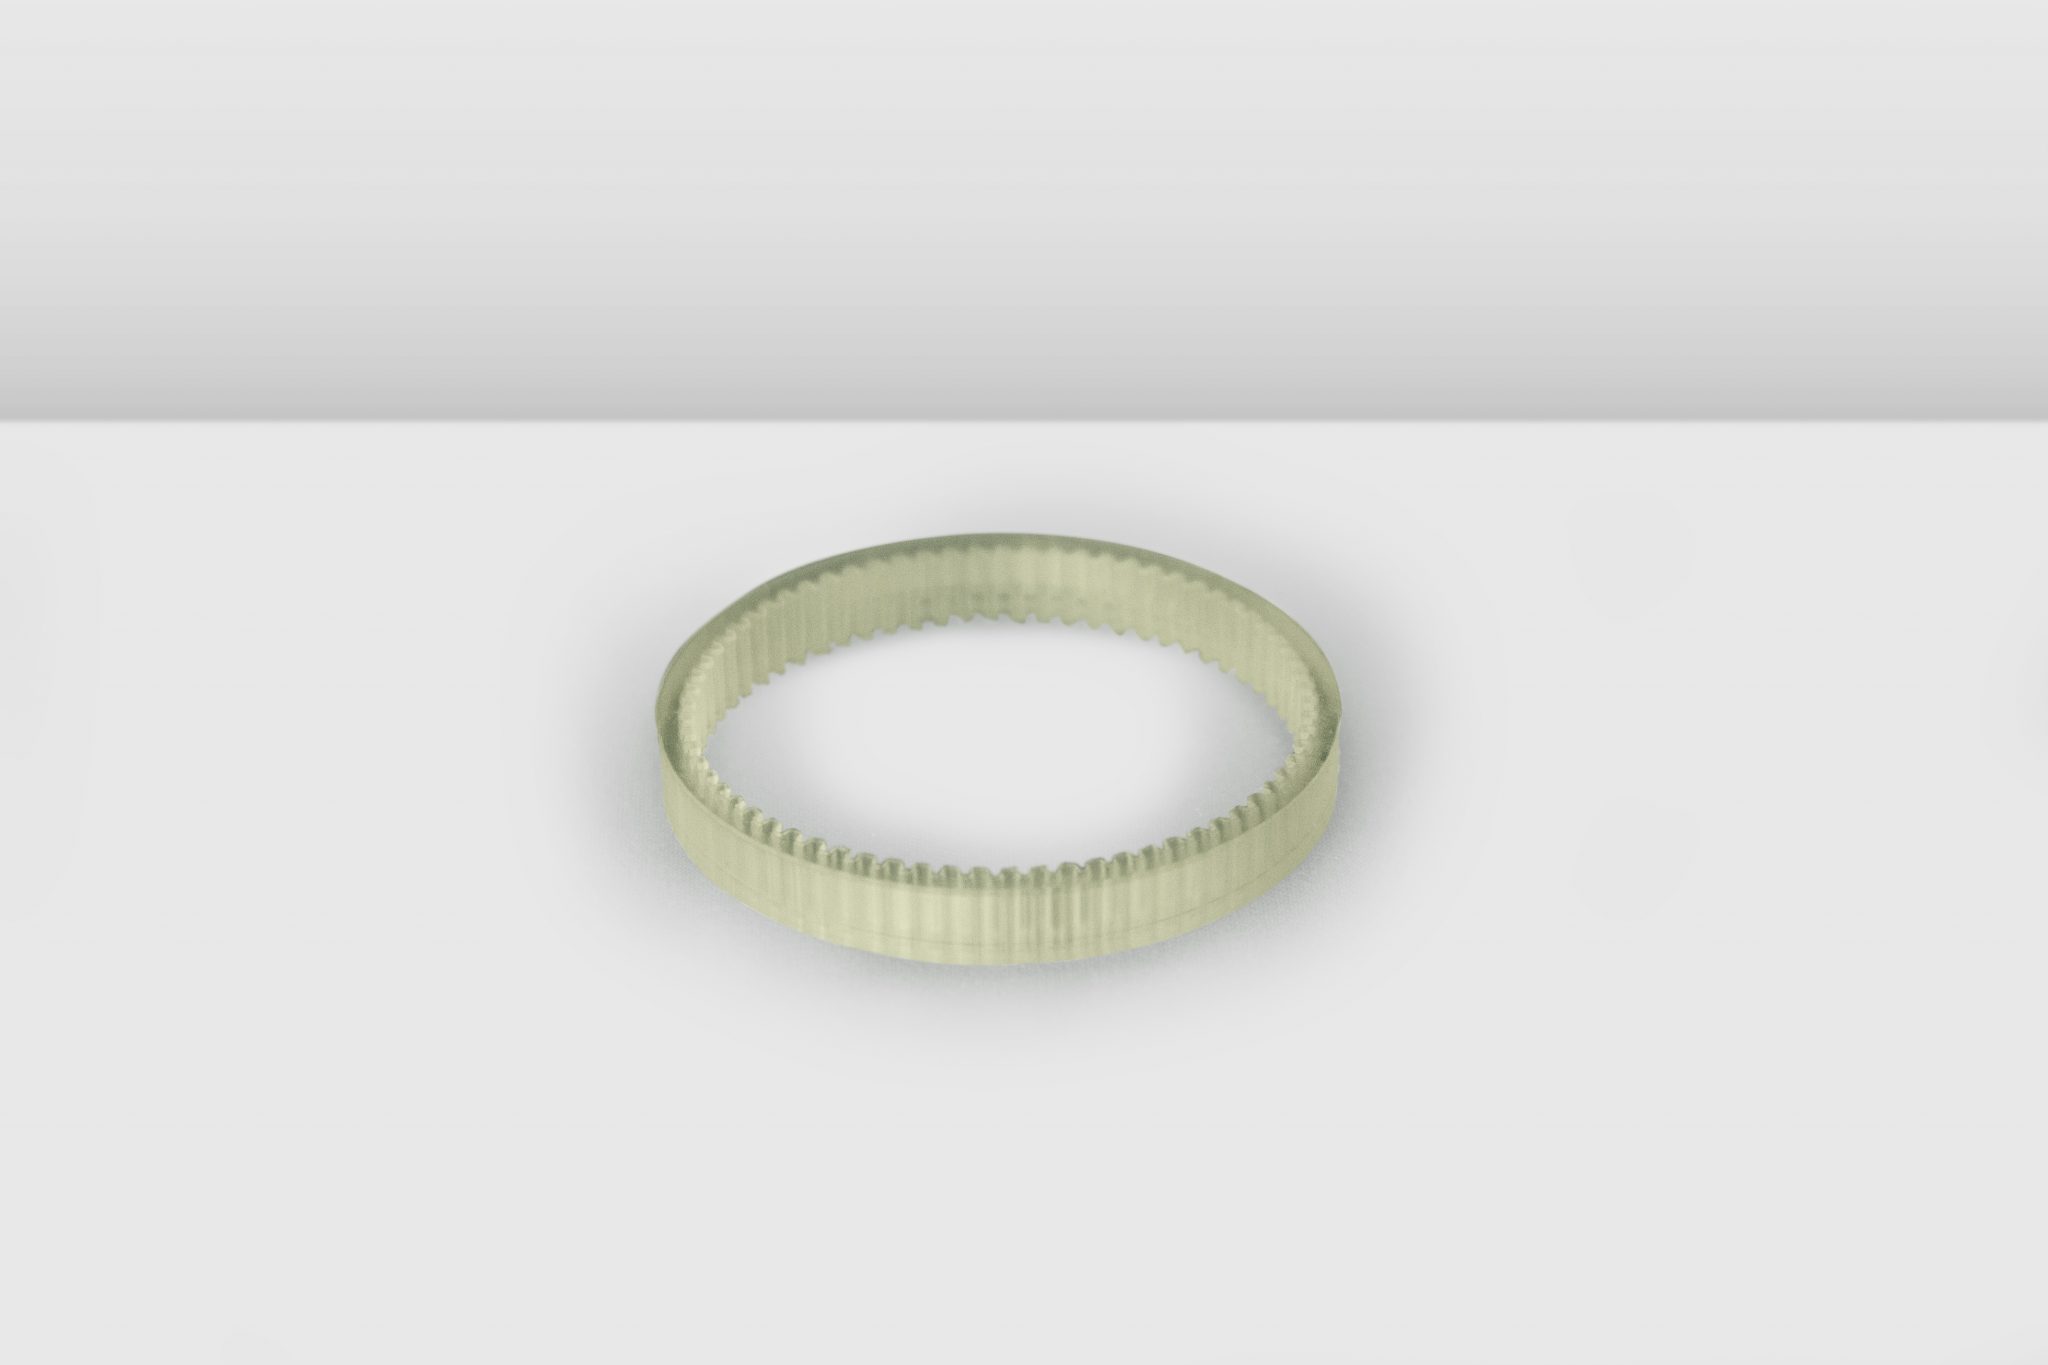
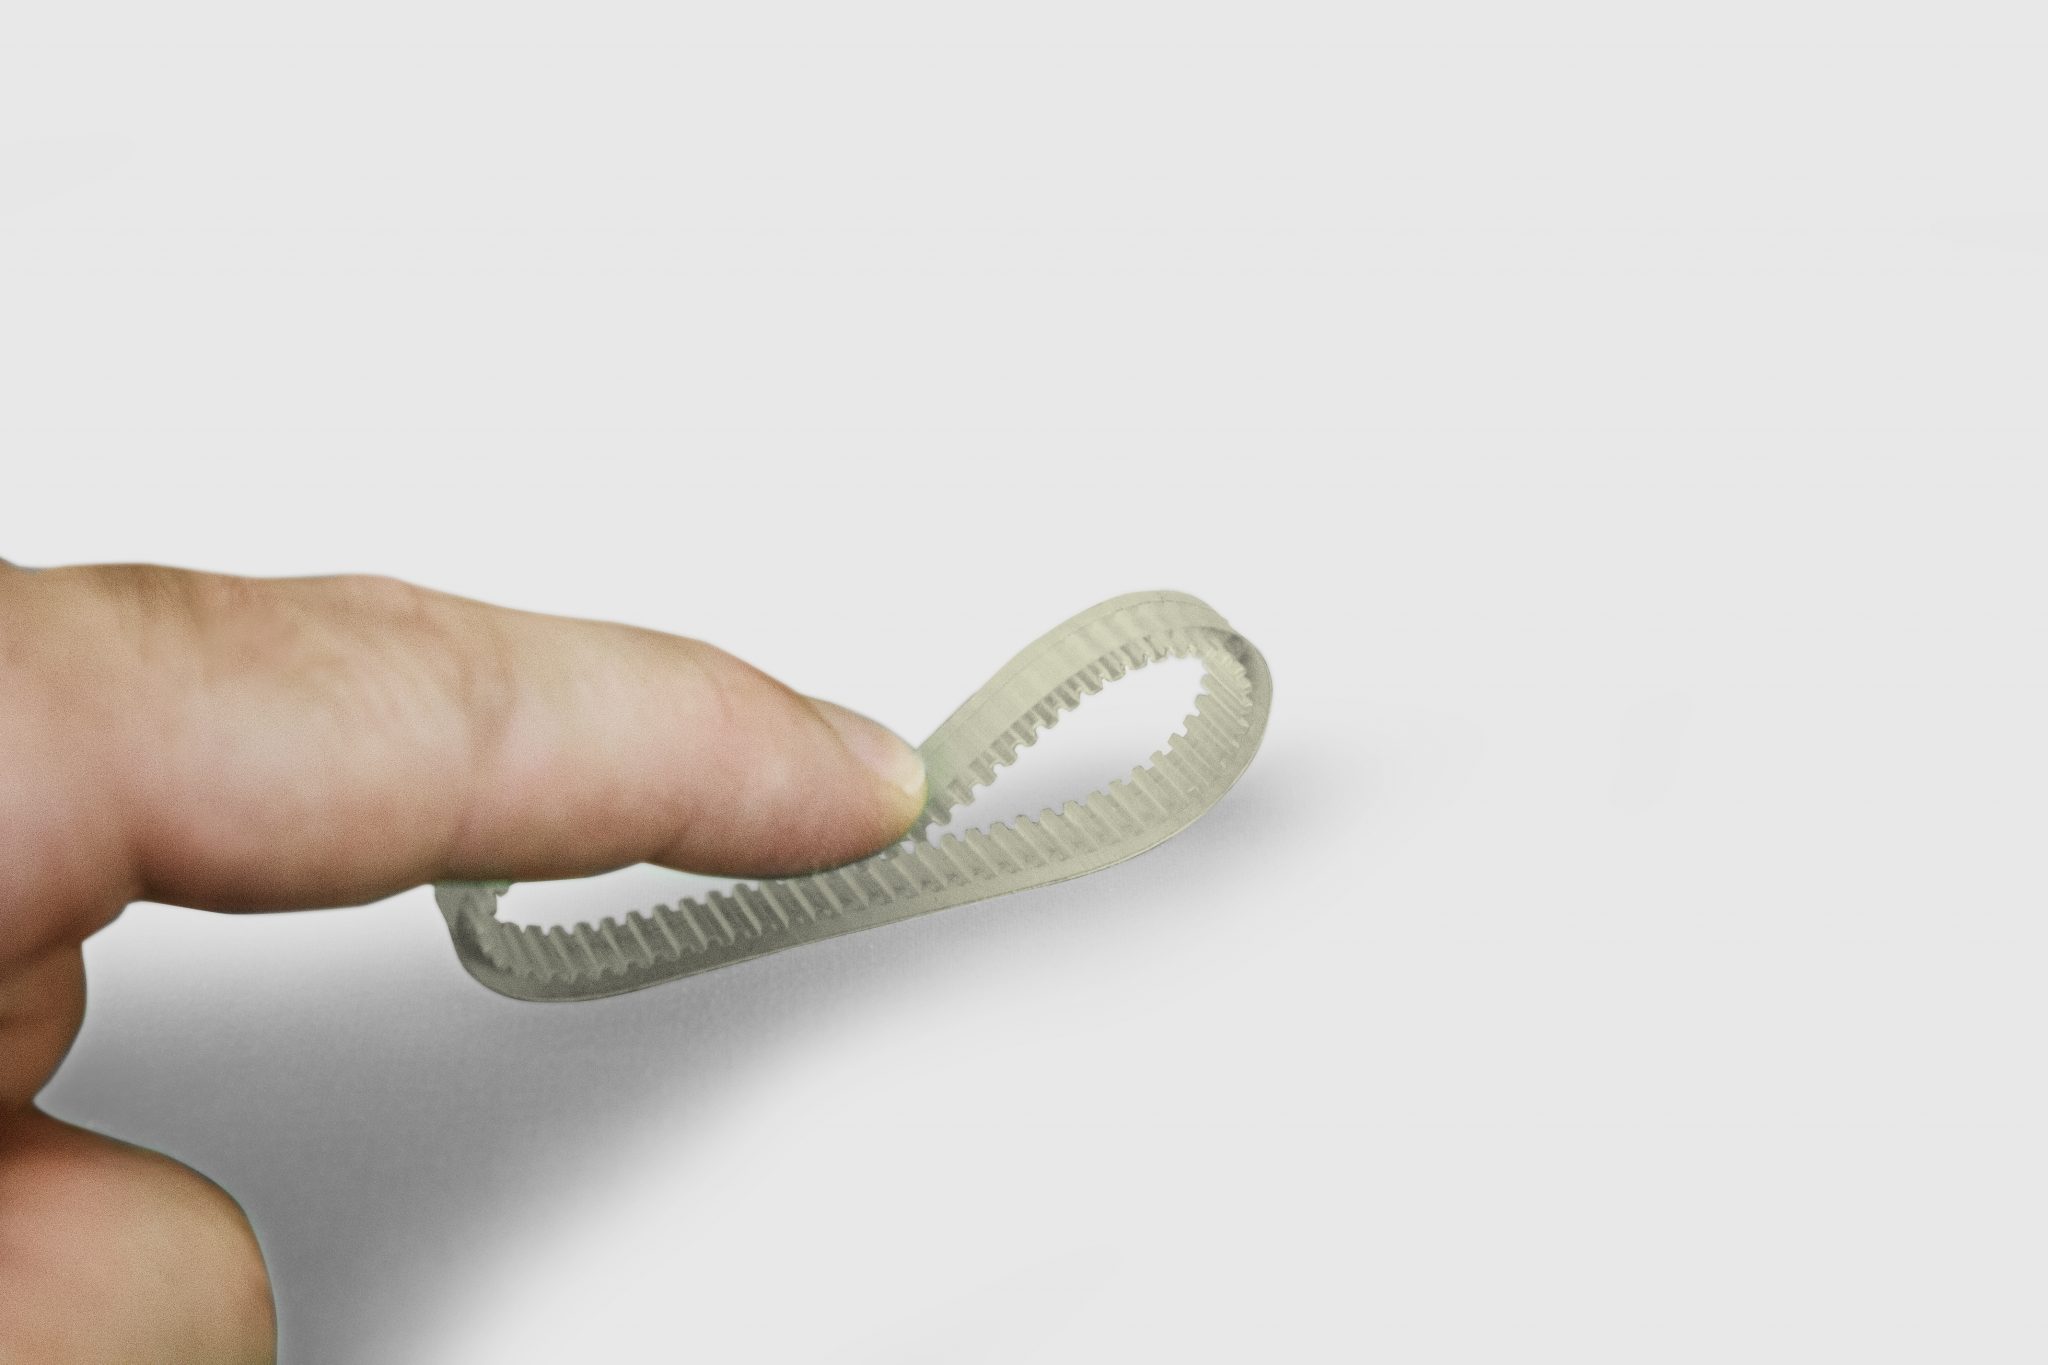
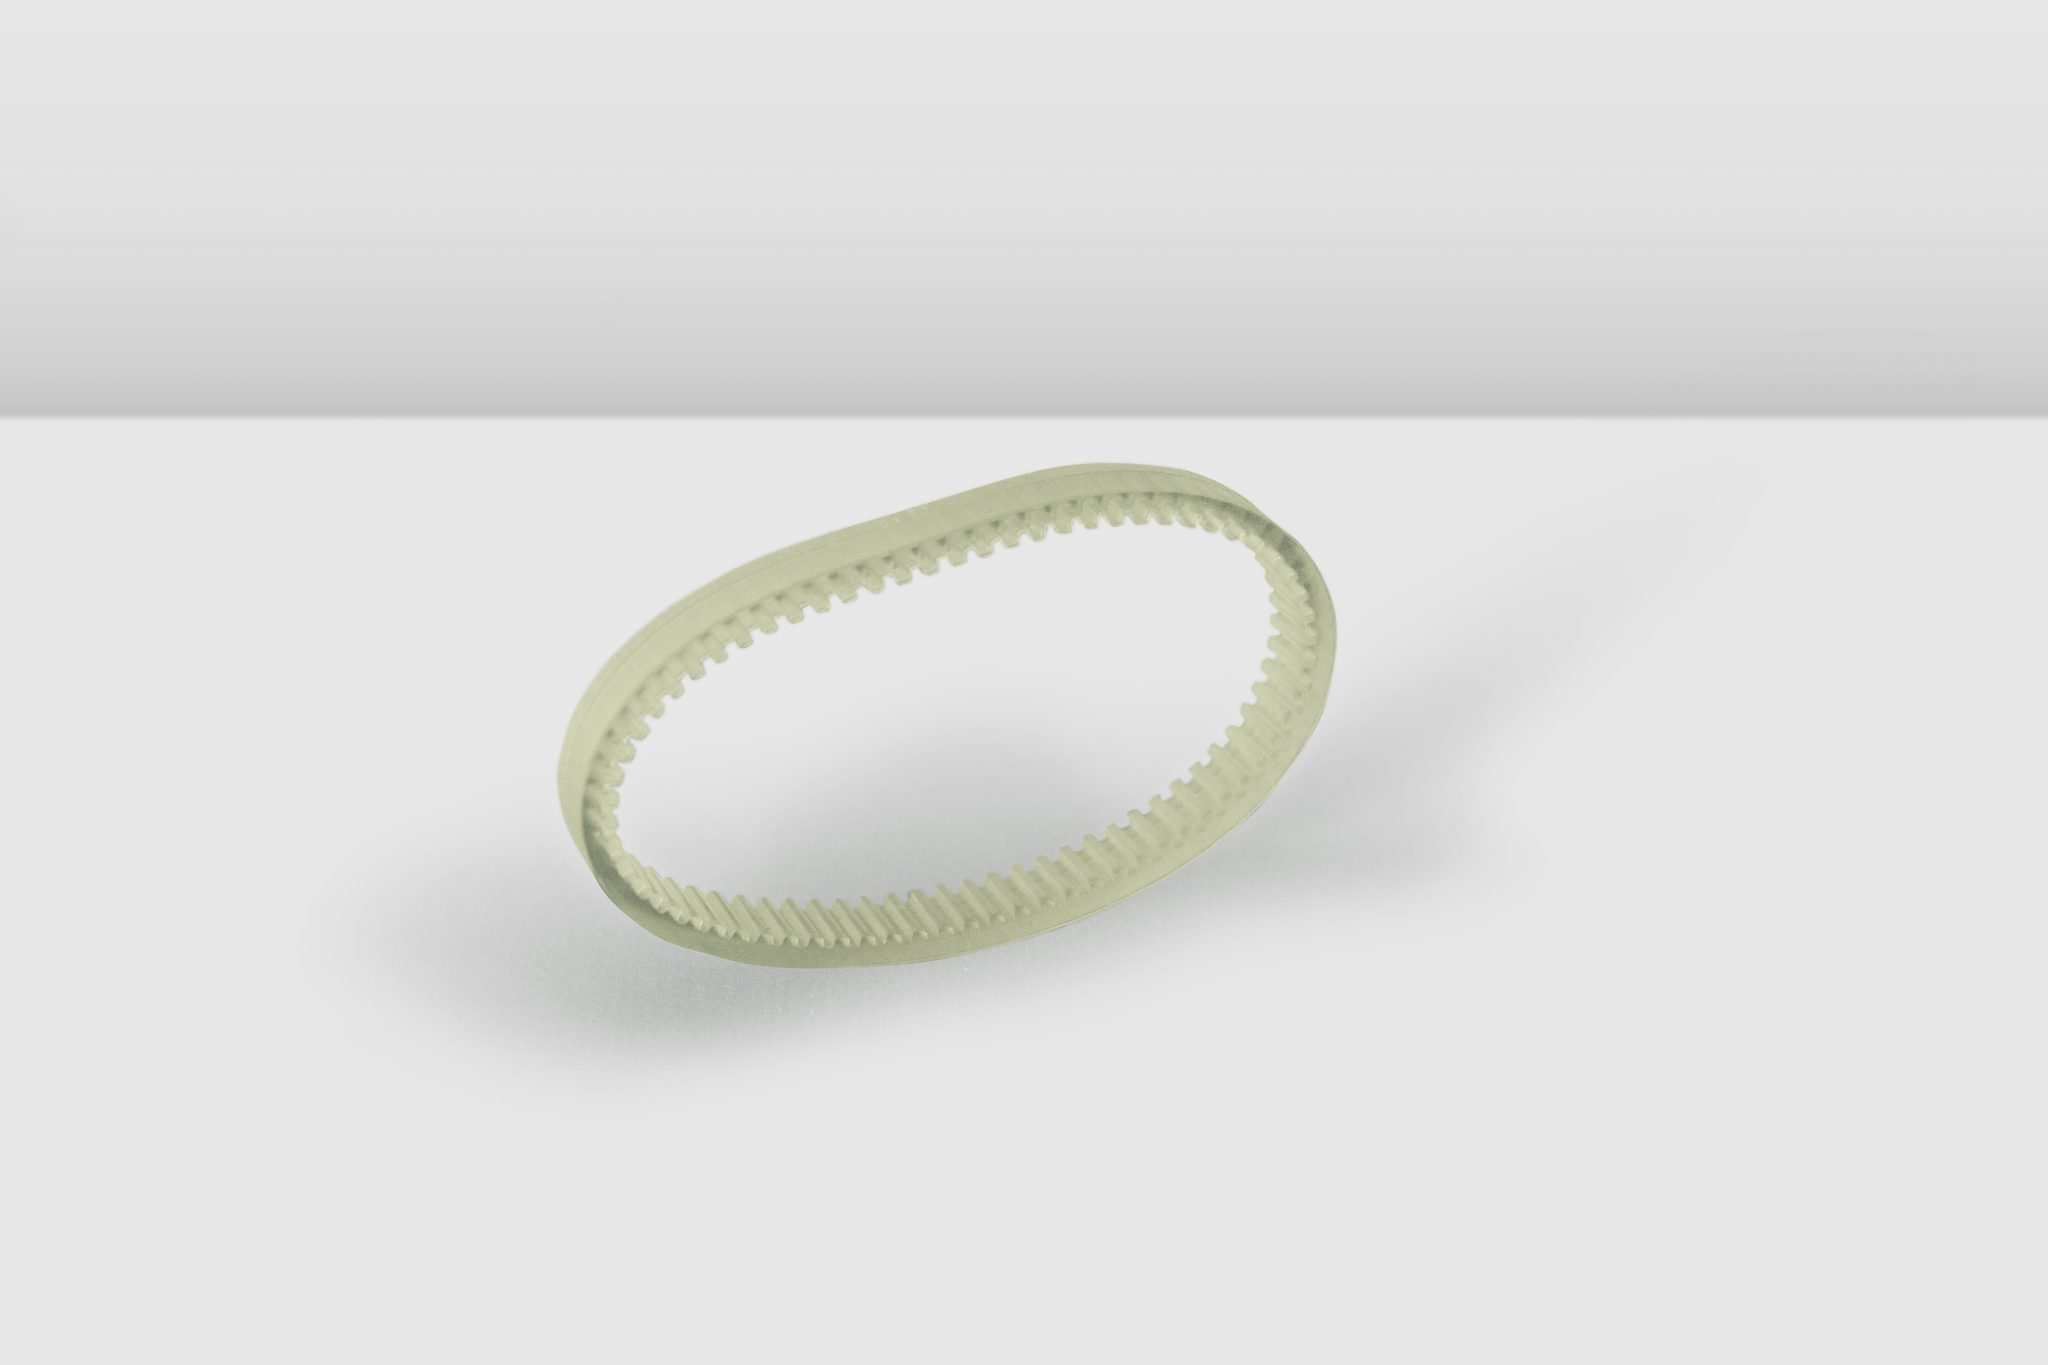
A timing belt, used to transfer power between two sub-assemblies, was the second test model made from Zortrax Flexible Transparent Yellow in our report.
When first out of the 3D printer, the timing belt demonstrates some flexibility when compressed, though it appears brittle when highly deformed and doesn’t return to its original shape after squeezing. With these properties, the belt could still be used in a low-torque mechanism, however, after 1 week the model became very brittle and cracked.
In order to maximize the potential applications of the Inkspire, Zortrax would have to undertake some improvements to its flexible material. In addition to its wear, this resin is considerably less easy to print than the Basic resin, the cure time is longer and it has trouble printing overhangs and bridges. The final result is very dependent on successful post-processing.
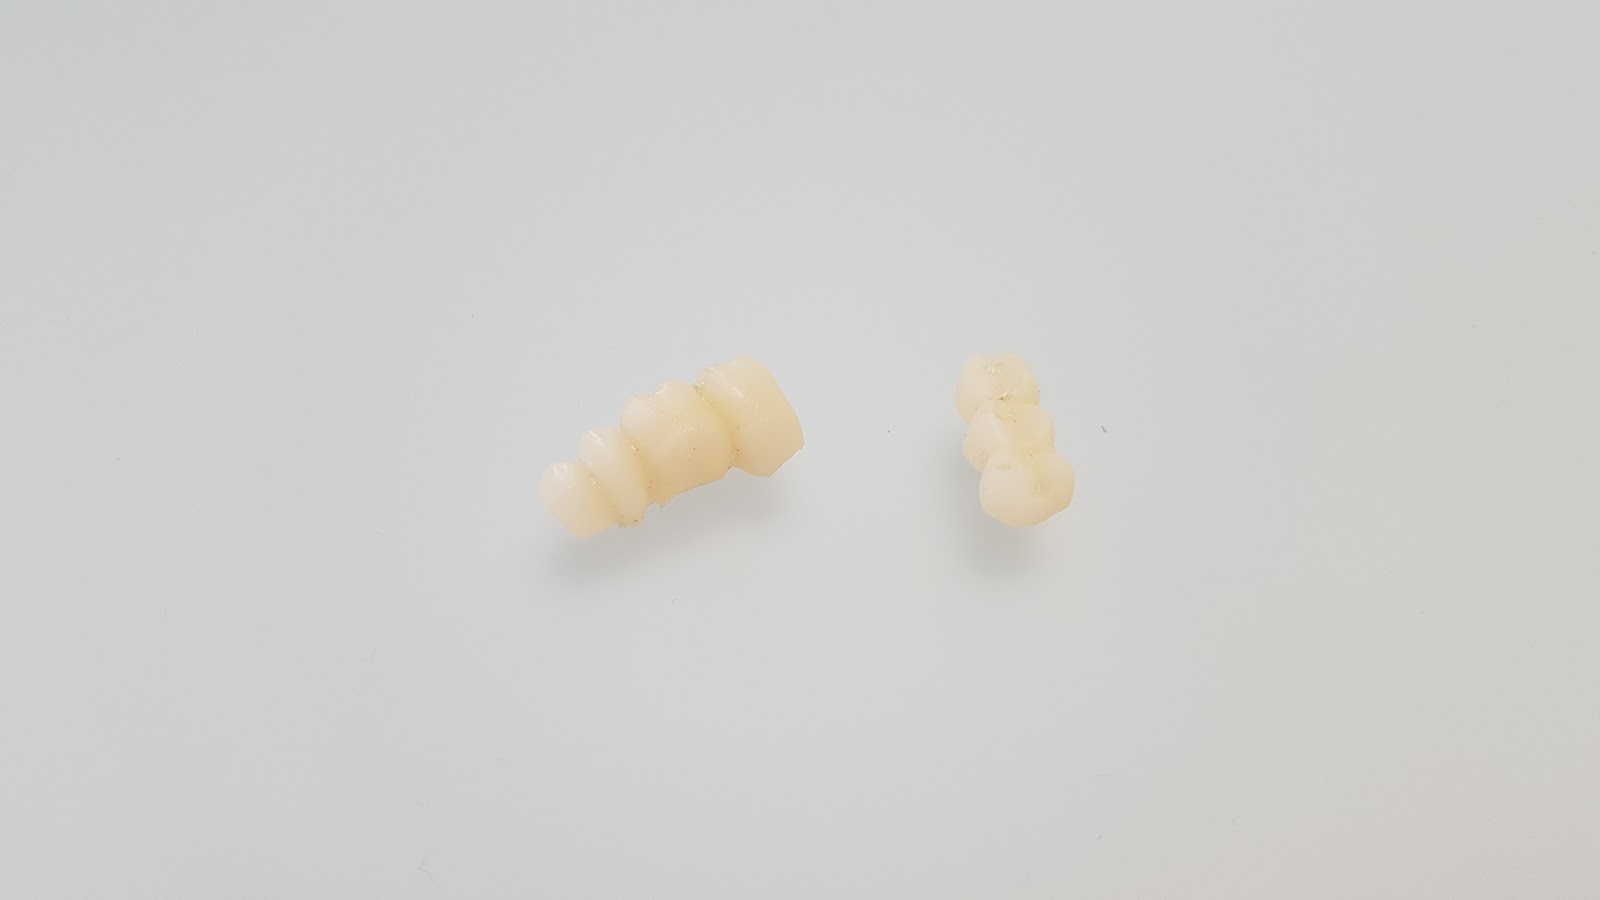
Specialist materials: dental
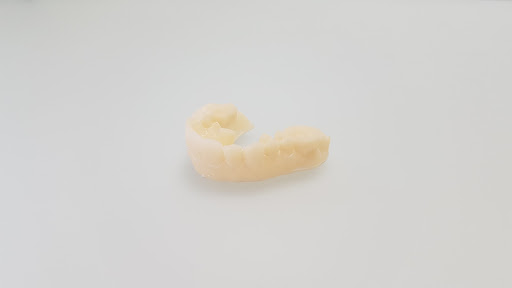
In a second specialist material test, we investigated the Inkspire’s ability to work with class I and IIa biocompatible resins. First were the Raydent Crown and Bridge class IIa resin made for 3D printing dental models.
Used to make small dental crowns and a bridge, we found this material very easy to work with – an essential quality for resins used by people that aren’t necessarily highly trained 3D printer engineers. It is also fast to cure, helping to cut production turnaround in a time-restricted environment. The detail of the parts was excellent. The only downside to the Raydent Crown and Bridge resin is that it is harder to clean the machine after use, and requires a concentrated isopropyl alcohol rub.
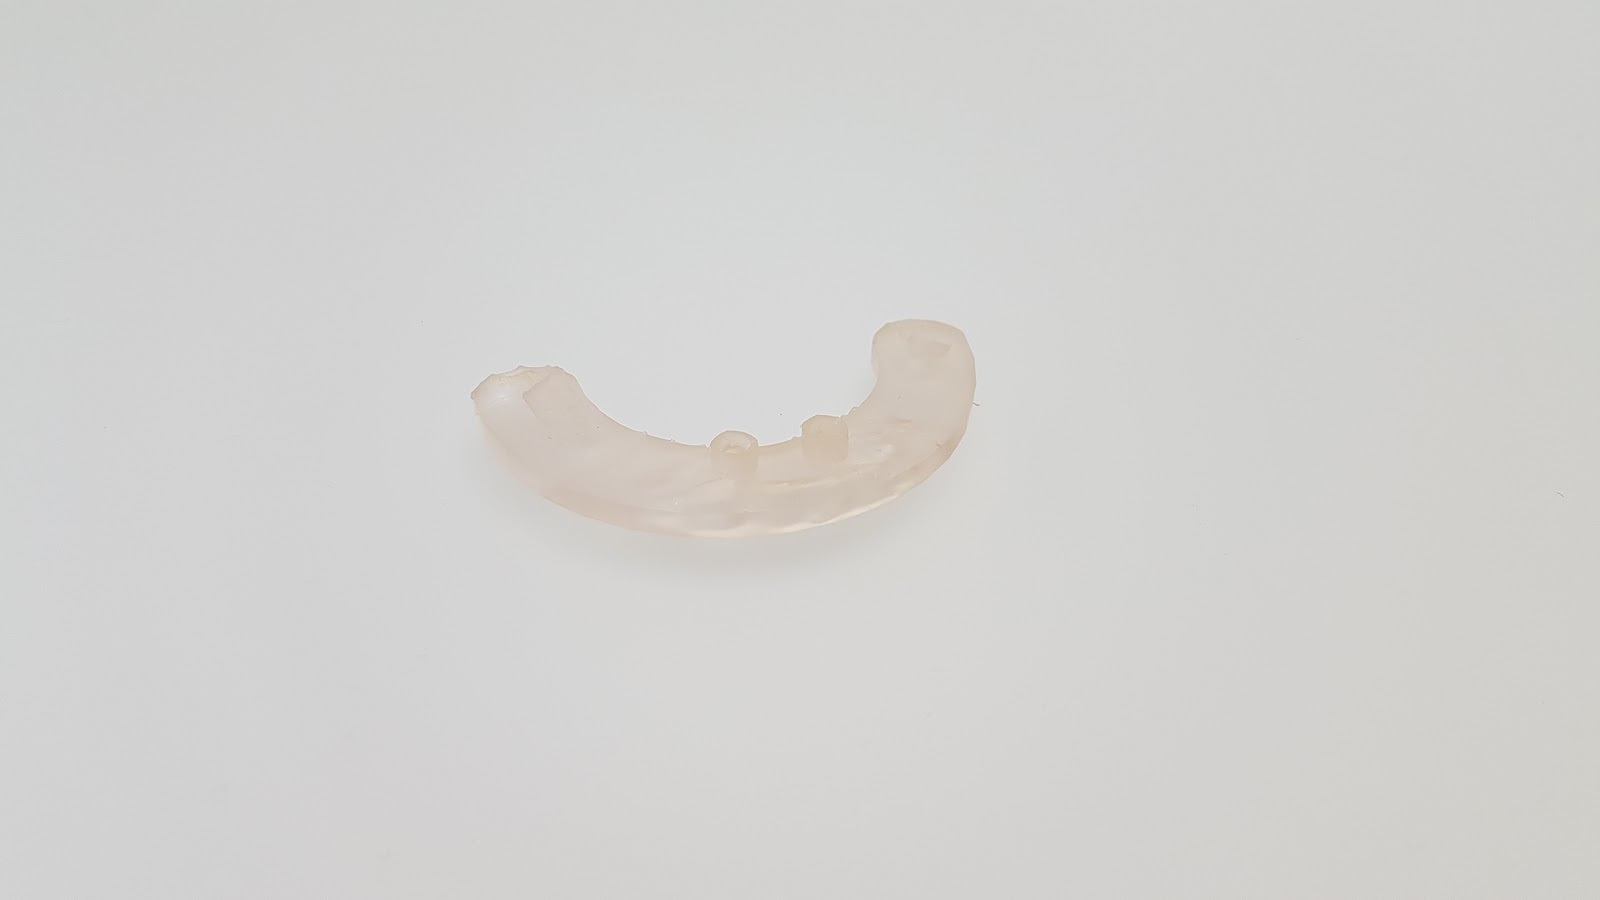
In one further material test, the team applied the Raydent Surgical Guide material to 3D print a tool used for dental operations. Unlike the Raydent Crown and Bridge material, Raydent Surgical Guide is translucent. It is also water-resistant to allow for safe washing and disinfection before intraoral use.
The quality of this printed object was very similar to that observed in other dental models. The printability was very good using the default parameters, and the resin seemed strong under stress. For this reason, supports are a little more difficult to remove that with other test materials.
The Zortrax Inkspire – overall view
The Zortrax Inkspire overall proved itself to be a highly accurate vat polymerization system, catering to a variety of different needs in the industry. The quality of parts made on the machine was virtually faultless, though the company could stand some improvements to the broader material range.
Detailed dental models, intricate prototypes, and jewelry models are well-suited to production on this machine. Low-medium volume manufacturing was also realized, fulfilling another core claim and leaving plenty of potential to maximize machine usage. When using the machine continuously over a long period of time, our recommendations would be to have a supply of replacement FEP films to hand.
A well thought out user experience, from unboxing to setup and general use of the machine makes the system accessible to amateur and professional 3D printer users alike.
In order to test its claims of being 9x more precise and 8x faster than SLA 3D printers, we would require much more unbiased data to provide a comprehensive comparison of the machine. However, in terms of specification, most other DLP machines on the market report similar levels of accuracy.
The machine is currently available to buy from Zotrax and selected retailers for a price of 1843,77 GBP (2122,98 GBP with Ultrasonic Cleaner)/ 1,990 USD (2,289.00 USD with Ultrasonic Cleaner).
Zortrax has also recently released a resin 3D printing guide providing insight into how best to implement the technology into a workflow. The guide covers eight real-life applications of resin 3D printing in industries such as jewelry, dentistry, and electronics. It can be accessed here.
Subscribe to the 3D Printing Industry newsletter for the latest news in additive manufacturing. You can also stay connected by following us on Twitter and liking us on Facebook.
Looking for a career in additive manufacturing? Visit 3D Printing Jobs for a selection of roles in the industry.
Featured image shows Zortrax Inkspire. Image via Zortrax.