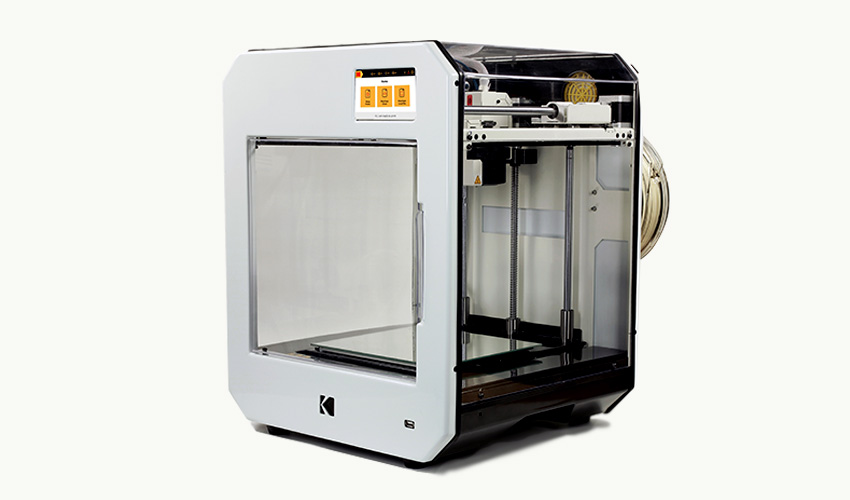
3D Printing Industry reviews the Kodak Portrait 3D printer.
Designed by Smart International and licensed with the Kodak brand, the Portrait 3D printer is a desktop sized professional-grade dual extrusion FFF system. The printer is priced at $3,499 and aimed at engineering and design professionals with a set of precise motors and specialist features such as a filament runout sensor and an in-built camera for remote viewing. The printer is expected to be popular with educational institutions.
The Portrait has a typical build volume of 215 x 210 x 235mm when operating in single extruder mode and 170 x 210 x 235mm when in dual extruder mode. The Portrait’s printhead houses two easily replaceable nozzles, an all-metal nozzle and a PTFE nozzle. With a maximum temperature of 295°C, the all-metal nozzle is capable of extruding tougher engineering thermoplastics such as ABS or PETG. An enclosed build area aids with temperature control.
The Kodak Portrait accepts filaments of diameter 1.75mm and extrudes through 0.4mm nozzles. Layer heights can be varied from 20 – 250 microns and most digital and mechanical functions are controlled through the 5” full color touchscreen on the front of the printer. Connectivity options include Wi-Fi, LAN and a USB port. The Portrait is supported by the Kodak 3D slicer.
Setup and first impressions of the Kodak Portrait
Upon unboxing the Kodak Portrait, the user is greeted with a toolkit and an assortment of accessories. The toolkit contains maintenance items such as an unclogging needle, a calibration card, and lubrication for the threaded rods. The accessory pack includes two spools of PLA filament, filament cases to prevent moisture absorption, and spool holders to mount on the rear of the printer.
While most of the essential components of the Portrait come fully assembled, several items in the accessory pack will need to be secured to the printer with screws and a Phillips screwdriver before use. The instructions for this step are illustrated in the quick start guide found in the box. The setup process takes about ten minutes.
It is clear from handling the Portrait just how robust the body is. A full steel chassis, bounded by plexiglass panels on three sides, makes for reduced shaking while giving users full visual access to the build area. The glass print bed, capable of maintaining 105°C, is attached to the body via four magnets. Consequently, it can be removed very easily for cleaning or replacement. The print head is free to move in the XY plane while the bed elevates to cater to Z axis changes. The Portrait also features a HEPA filter with activated carbon which filters the fan extracted air to reduce fumes and odors. This makes it suitable for long-term indoor use such as in classrooms.
Bed calibration is automatic and as simple as finding the function in the printer’s easy to navigate menus. A deeper dive into the settings will give the user the option to choose from a multitude of languages. Intuitive temperature profiles for the various compatible materials and helpful animations make loading and unloading filaments very simple. However, if the printer is backed up against a wall, the spool feeders on the back plate can be difficult to reach due to the relatively large frame of the Portrait.
The Kodak 3D slicer and Cloud
The Kodak slicer is a repackaging of the well established Cura slicer, with a Kodak themed color scheme. The UI is as intuitive as ever; once the user selects a 3D STL file, it appears in the virtual workspace in the center of the UI. One of four customization modes can then be selected: basic, advanced, expert or custom. The model can be translated, rotated and rescaled as desired, with additional settings for layer height, travel speed, temperature, supports, cooling and, of course, dual extrusion. Once the file is ready to be sliced, the gcode is automatically saved onto whatever USB is plugged into the computer and the estimated print time is displayed in the bottom right corner.
In dual extrusion mode, models to be printed by extruder one are displayed in yellow while those printed by extruder two are displayed in green. Switching between the two extruders is as simple as clicking on the desired extruder at the top. The same orientation settings apply in dual extrusion mode.
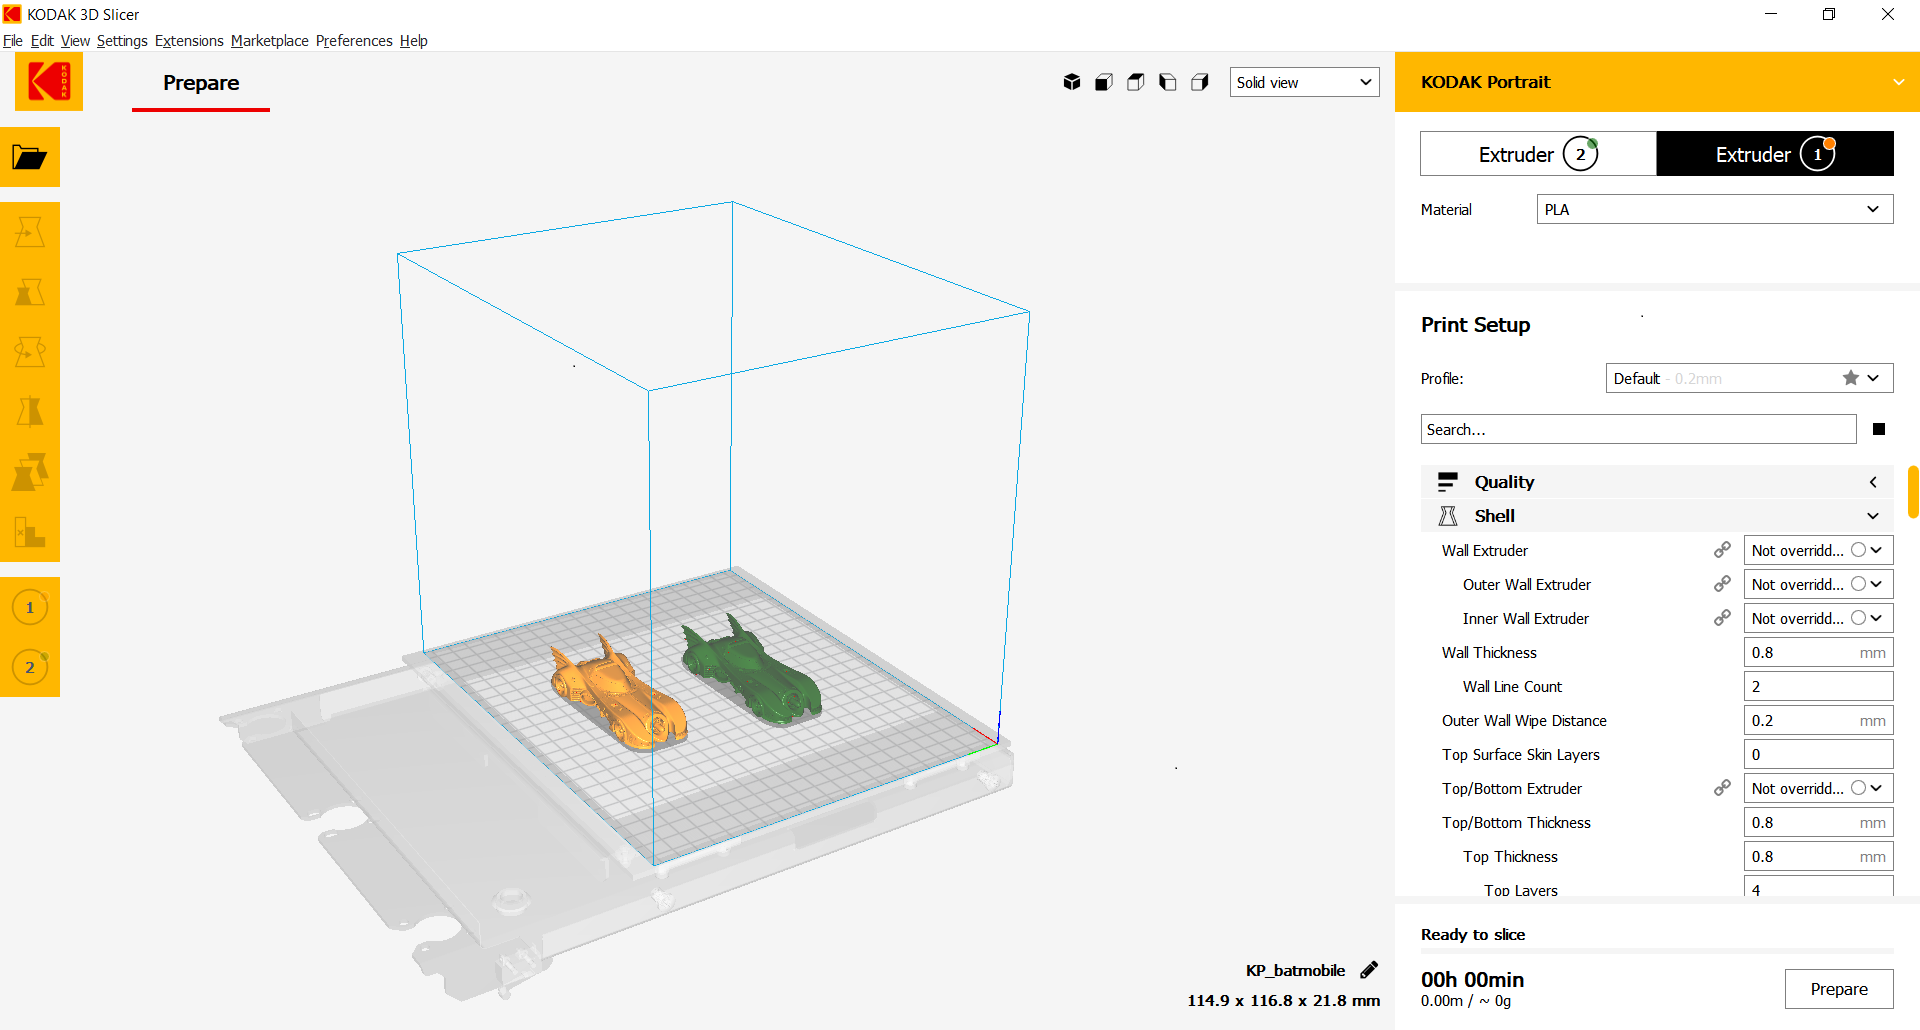
The Kodak slicer overall works very well. If a model is unprintable due to size or orientation, the slicer is quick to tell you so. The only real limitation of the slicer is the lack of an automatic preview stage during the slicing process. Without a preview, it is almost impossible to gauge where the supports will be printed and how much material will be used. To view where the supports will be printed, the user must select layer view in the views dropdown. Most slicers incorporate an automatic preview stage at some point in the file preparation process before slicing.
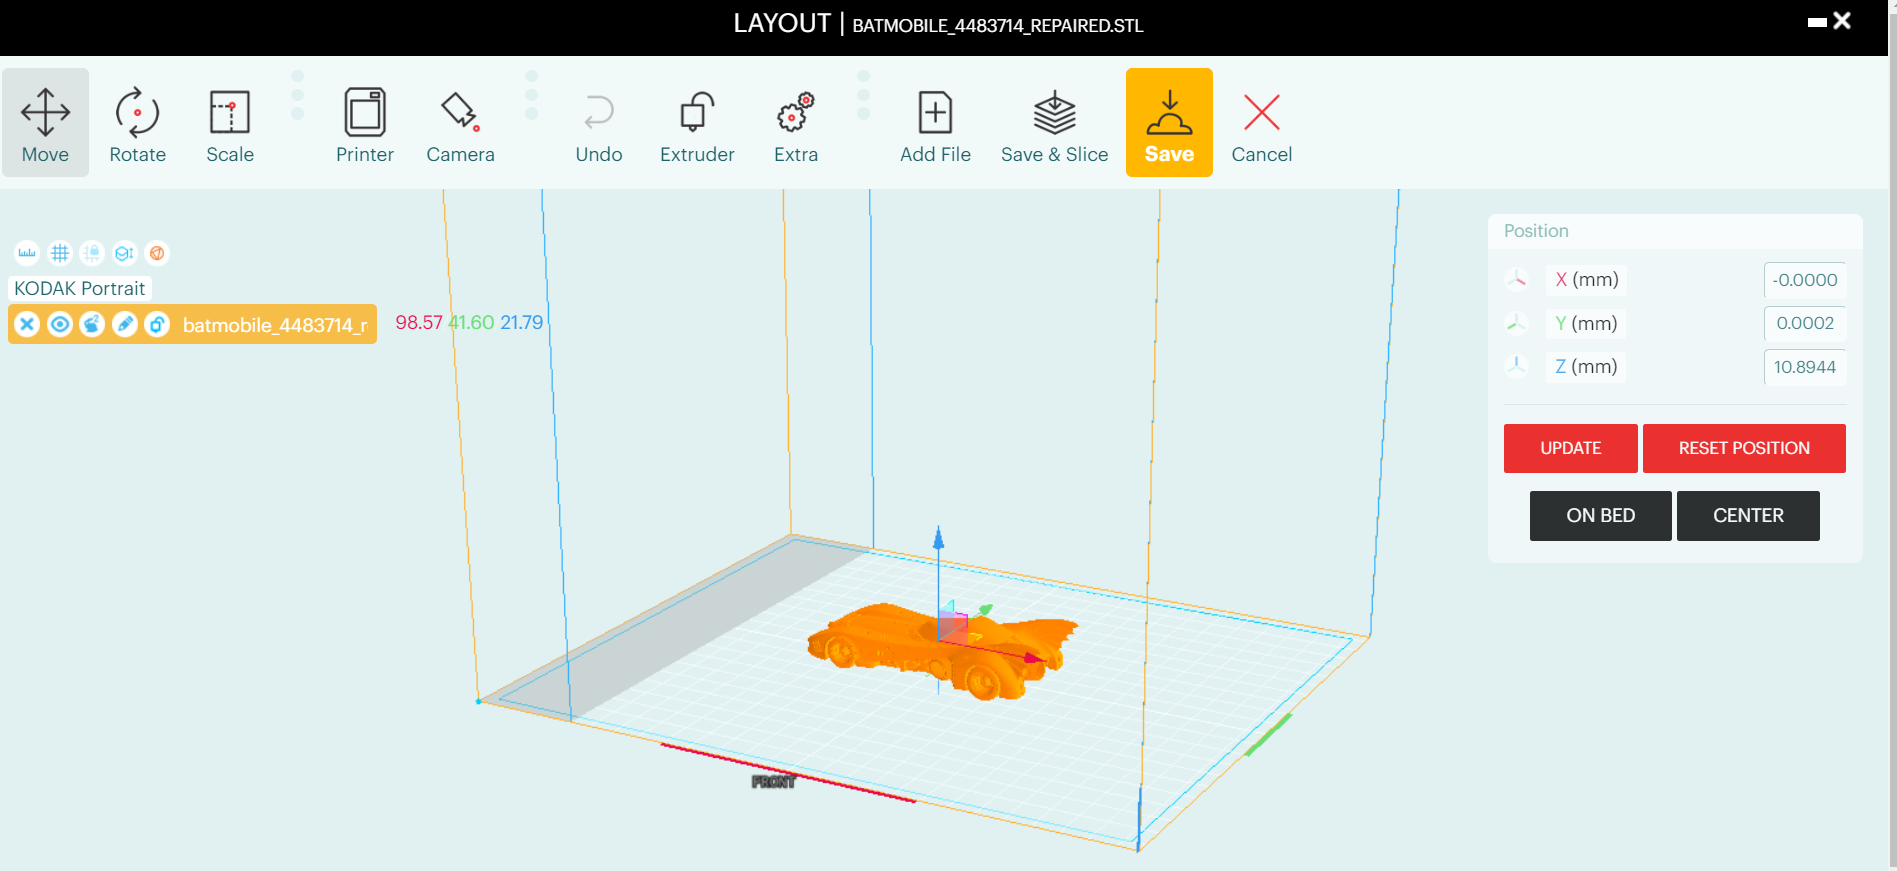
The slicer is not the only file preparation option provided by Kodak. One of the more exciting services that accompany the Portrait is the web browser-based Kodak Cloud. Users can utilize the cloud service for file orientation, slicing, initiating prints and managing the general workflow across several Portrait systems. The history of a Portrait’s prints is accessible in the cloud, alongside useful information such as hours printed, amount of material used and number of failed prints.
The easy to use service allows users to import 3D files locally or through Dropbox or Google. The imported files can then be translated, rotated and rescaled just like the offline slicer. Once the layout is finalized, the sliced gcode is saved to the projects section. Assuming Wi-Fi or LAN connectivity has been set up on the Portrait, the print can then be initiated, paused or canceled remotely. A minor but frustrating flaw of the cloud service is the lack of a flatten by face feature in the file preparation stage. This often makes it difficult to find the optimal placement of a model as it needs to be done manually.
Benchmarking the Kodak Portrait
As with all our printers at 3D Printing Industry, we put the Kodak Portrait through its paces with a plethora of benchmarking tests to see if the system really does live up to its claims. The first print carried out on the Portrait was a standard benchy in PLA+. The benchy model is a jack-of-all-trades benchmarking test due to its abundance of overhangs, circular trajectories, bridges and holes.
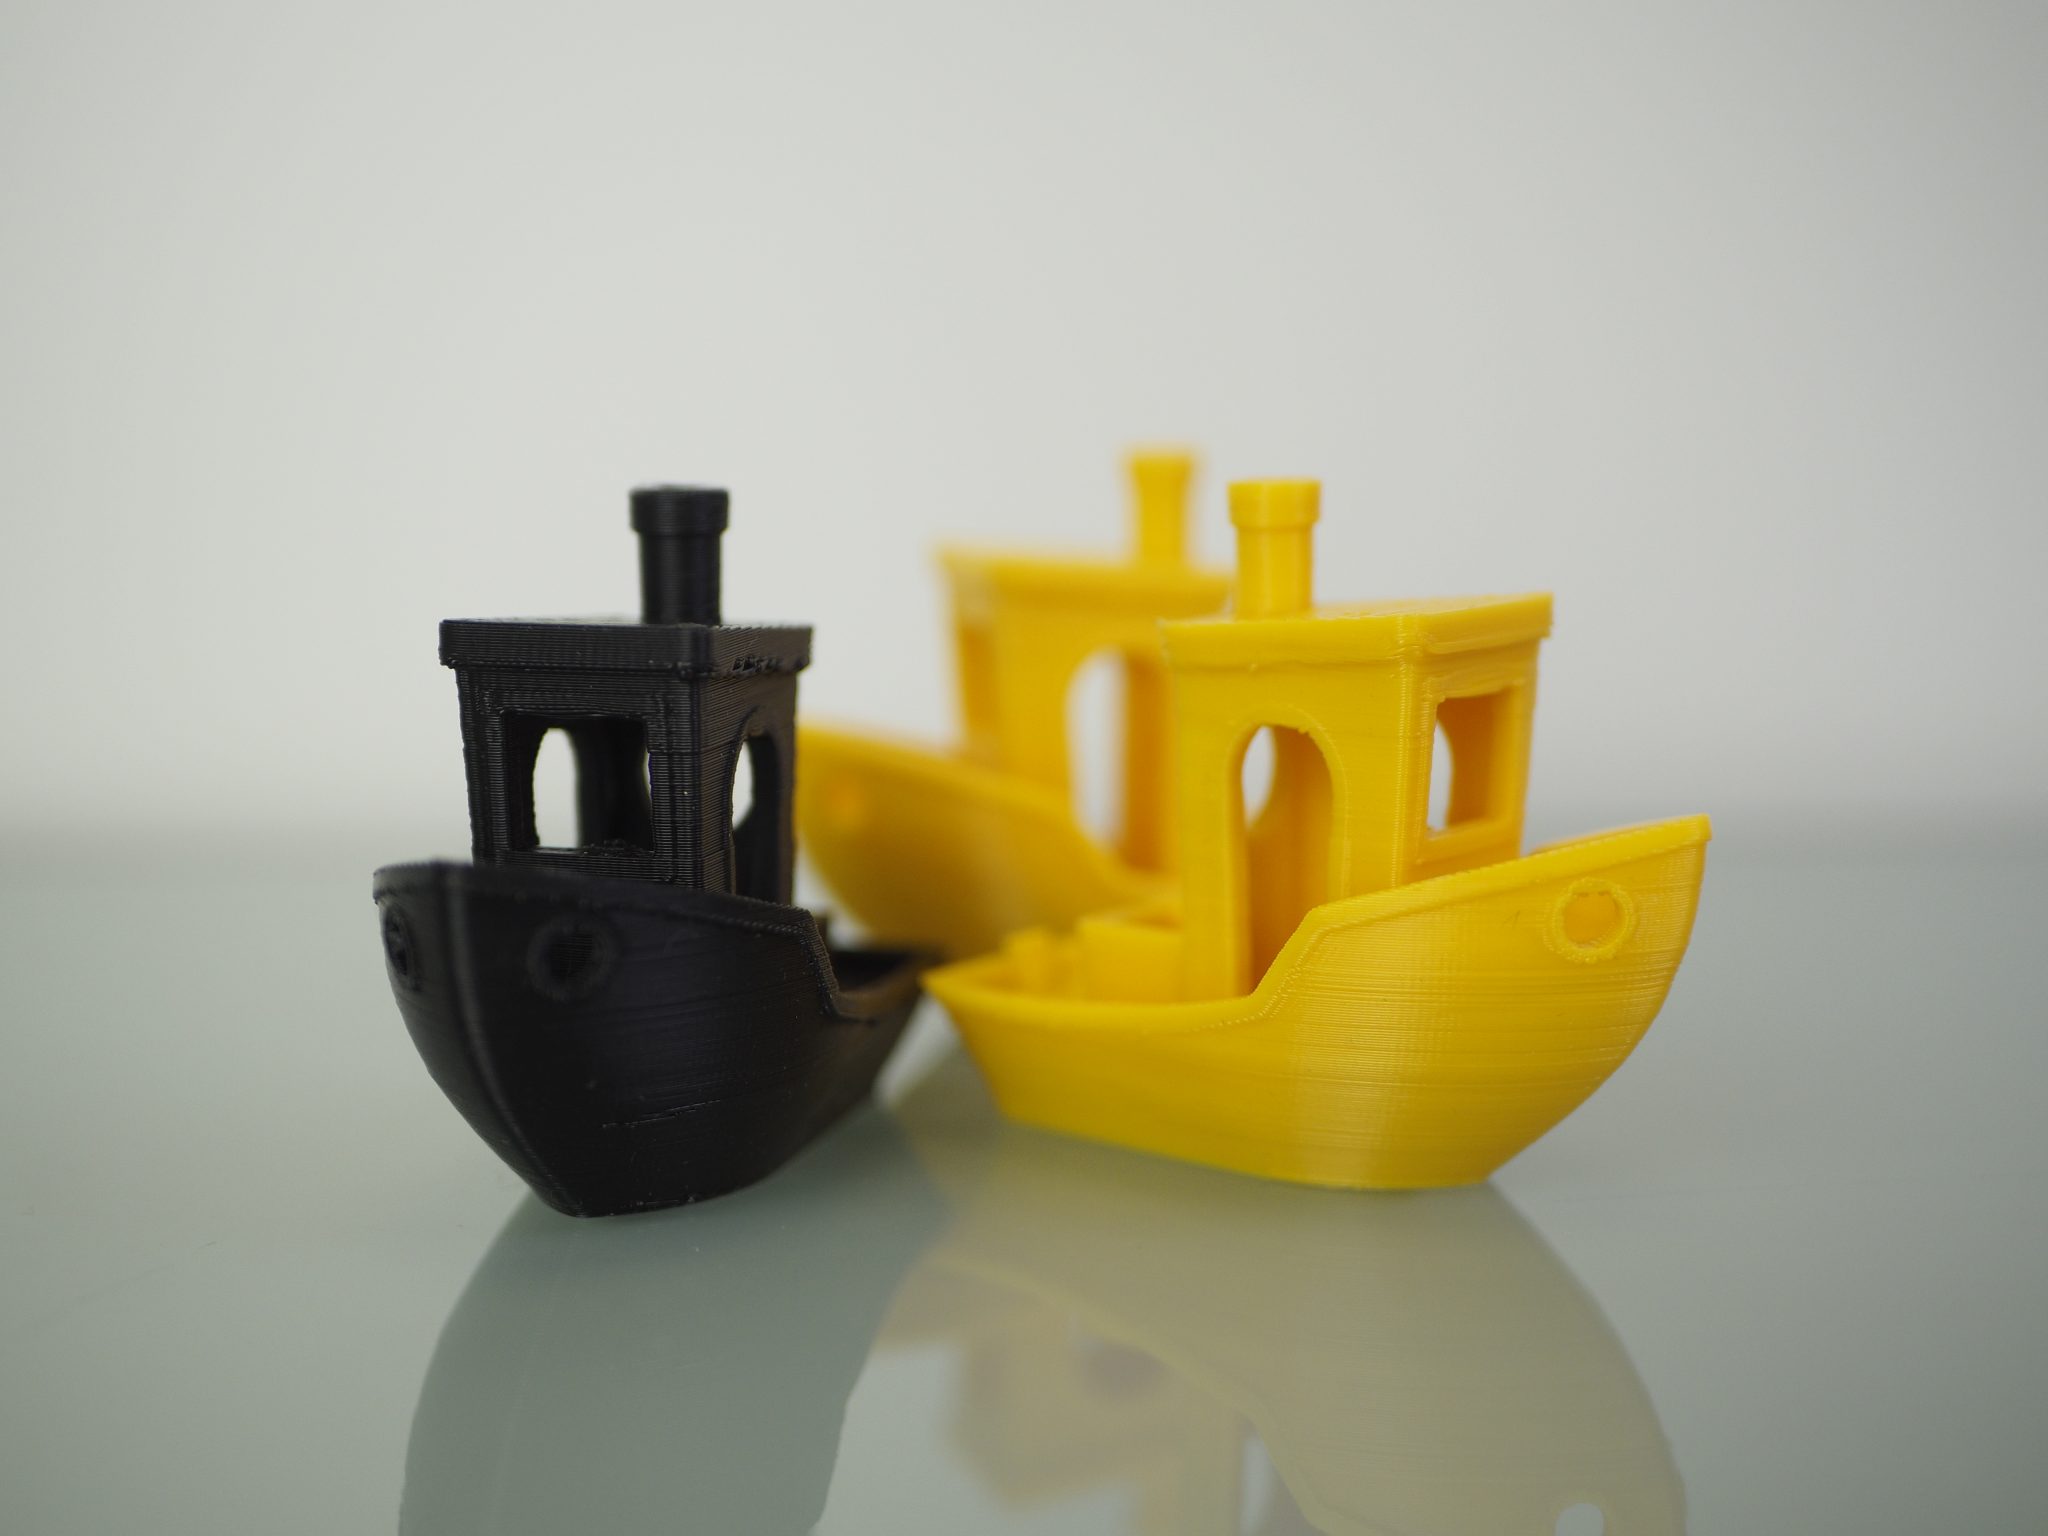
The Kodak Portrait initially had some difficulties with over extrusion and droopiness but a swift tinkering of some of the parameters yielded an outstanding print. Temperatures and print speeds were lowered while fan speeds were increased. Using the optimized settings, the benchy was printed with smooth curvature and no stringing.
Next up was the repeatability test, which tests a printer’s ability to recreate shapes precisely and consistently. The test comprised three different parts which were all printed five times. As the intended dimensions of the models are known, the discrepancy between the original and real dimensions along with the deviation between them can be calculated.
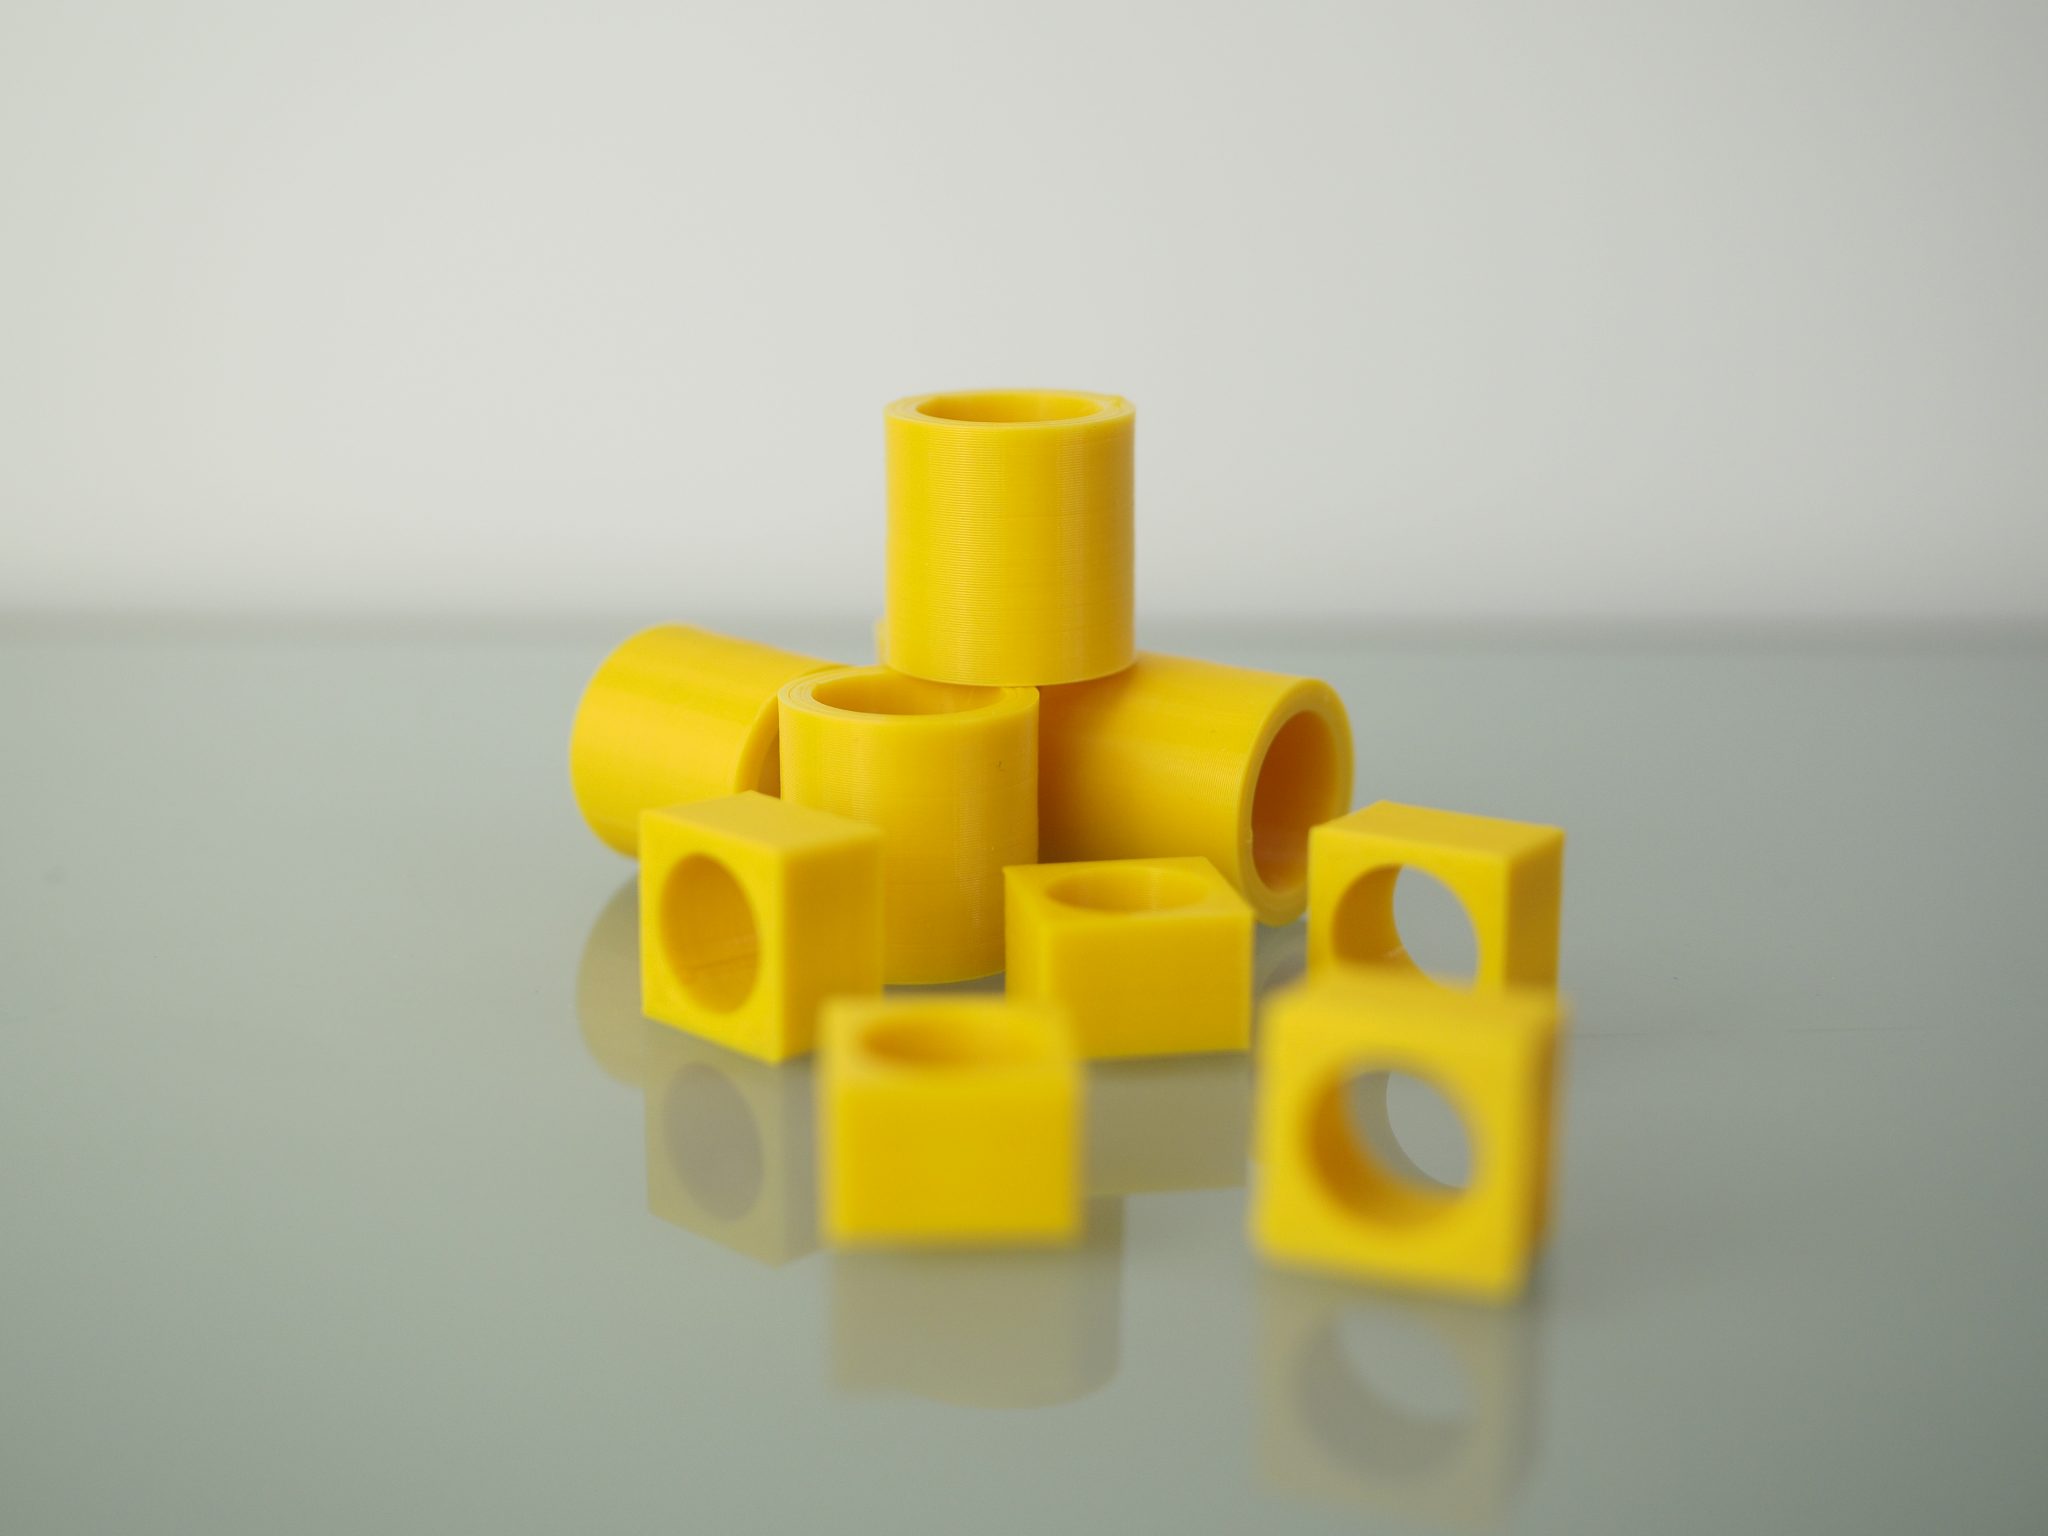
The printed squares saw excellent results. A maximum standard deviation of 0.04 coupled with exterior dimensions almost identical to the intended dimensions resulted in the five squares being almost indistinguishable. The interior diameter was less precise and displayed a greater deviation, however. The hexagons and tubes saw similar results. Incredibly low standard deviations of 0.05 and 0.06 respectively, along with extremely precise exterior dimensions, resulted in the parts being very repeatable. Again, the interior crevices and diameters saw a slight drop in precision. From this test, we can see what gives the Portrait its professional-grade status. Overall, the heights and external shells of all three models fabricated precisely with little deviation between them. However, the discrepancies between the smaller interior dimensions lead us to believe the Portrait struggles with micro-movements in the XY plane.
We then tested the machine’s ability to print tall, thin structures with the 235mm tall tower test. FFF systems tend to have some trouble with taller models due to the vibrations and consequent shaking caused by the stepper motors. This shaking often results in obvious layer lines towards the top of the printed part.
The Portrait, in this instance, held its own admirably. The tower was straight all the way up, fabricated without knocking over, and had minimal layer line visibility. This can be attributed to the machine’s sturdy, steel 24.4kg frame dampening the vibrations caused by XYZ translation.
Difficult-to-print materials
Professional systems should be able to print professional materials, so we investigated the Portrait’s ability to handle some notoriously troublesome filaments. First up was a pair of PETG containers printed at 240°C.
The Portrait handled PETG very well. There were no major issues with the models; some stringing formed on the corners and layer lines were visible upon closer inspection but the surface finish was great with the Kodak filament.
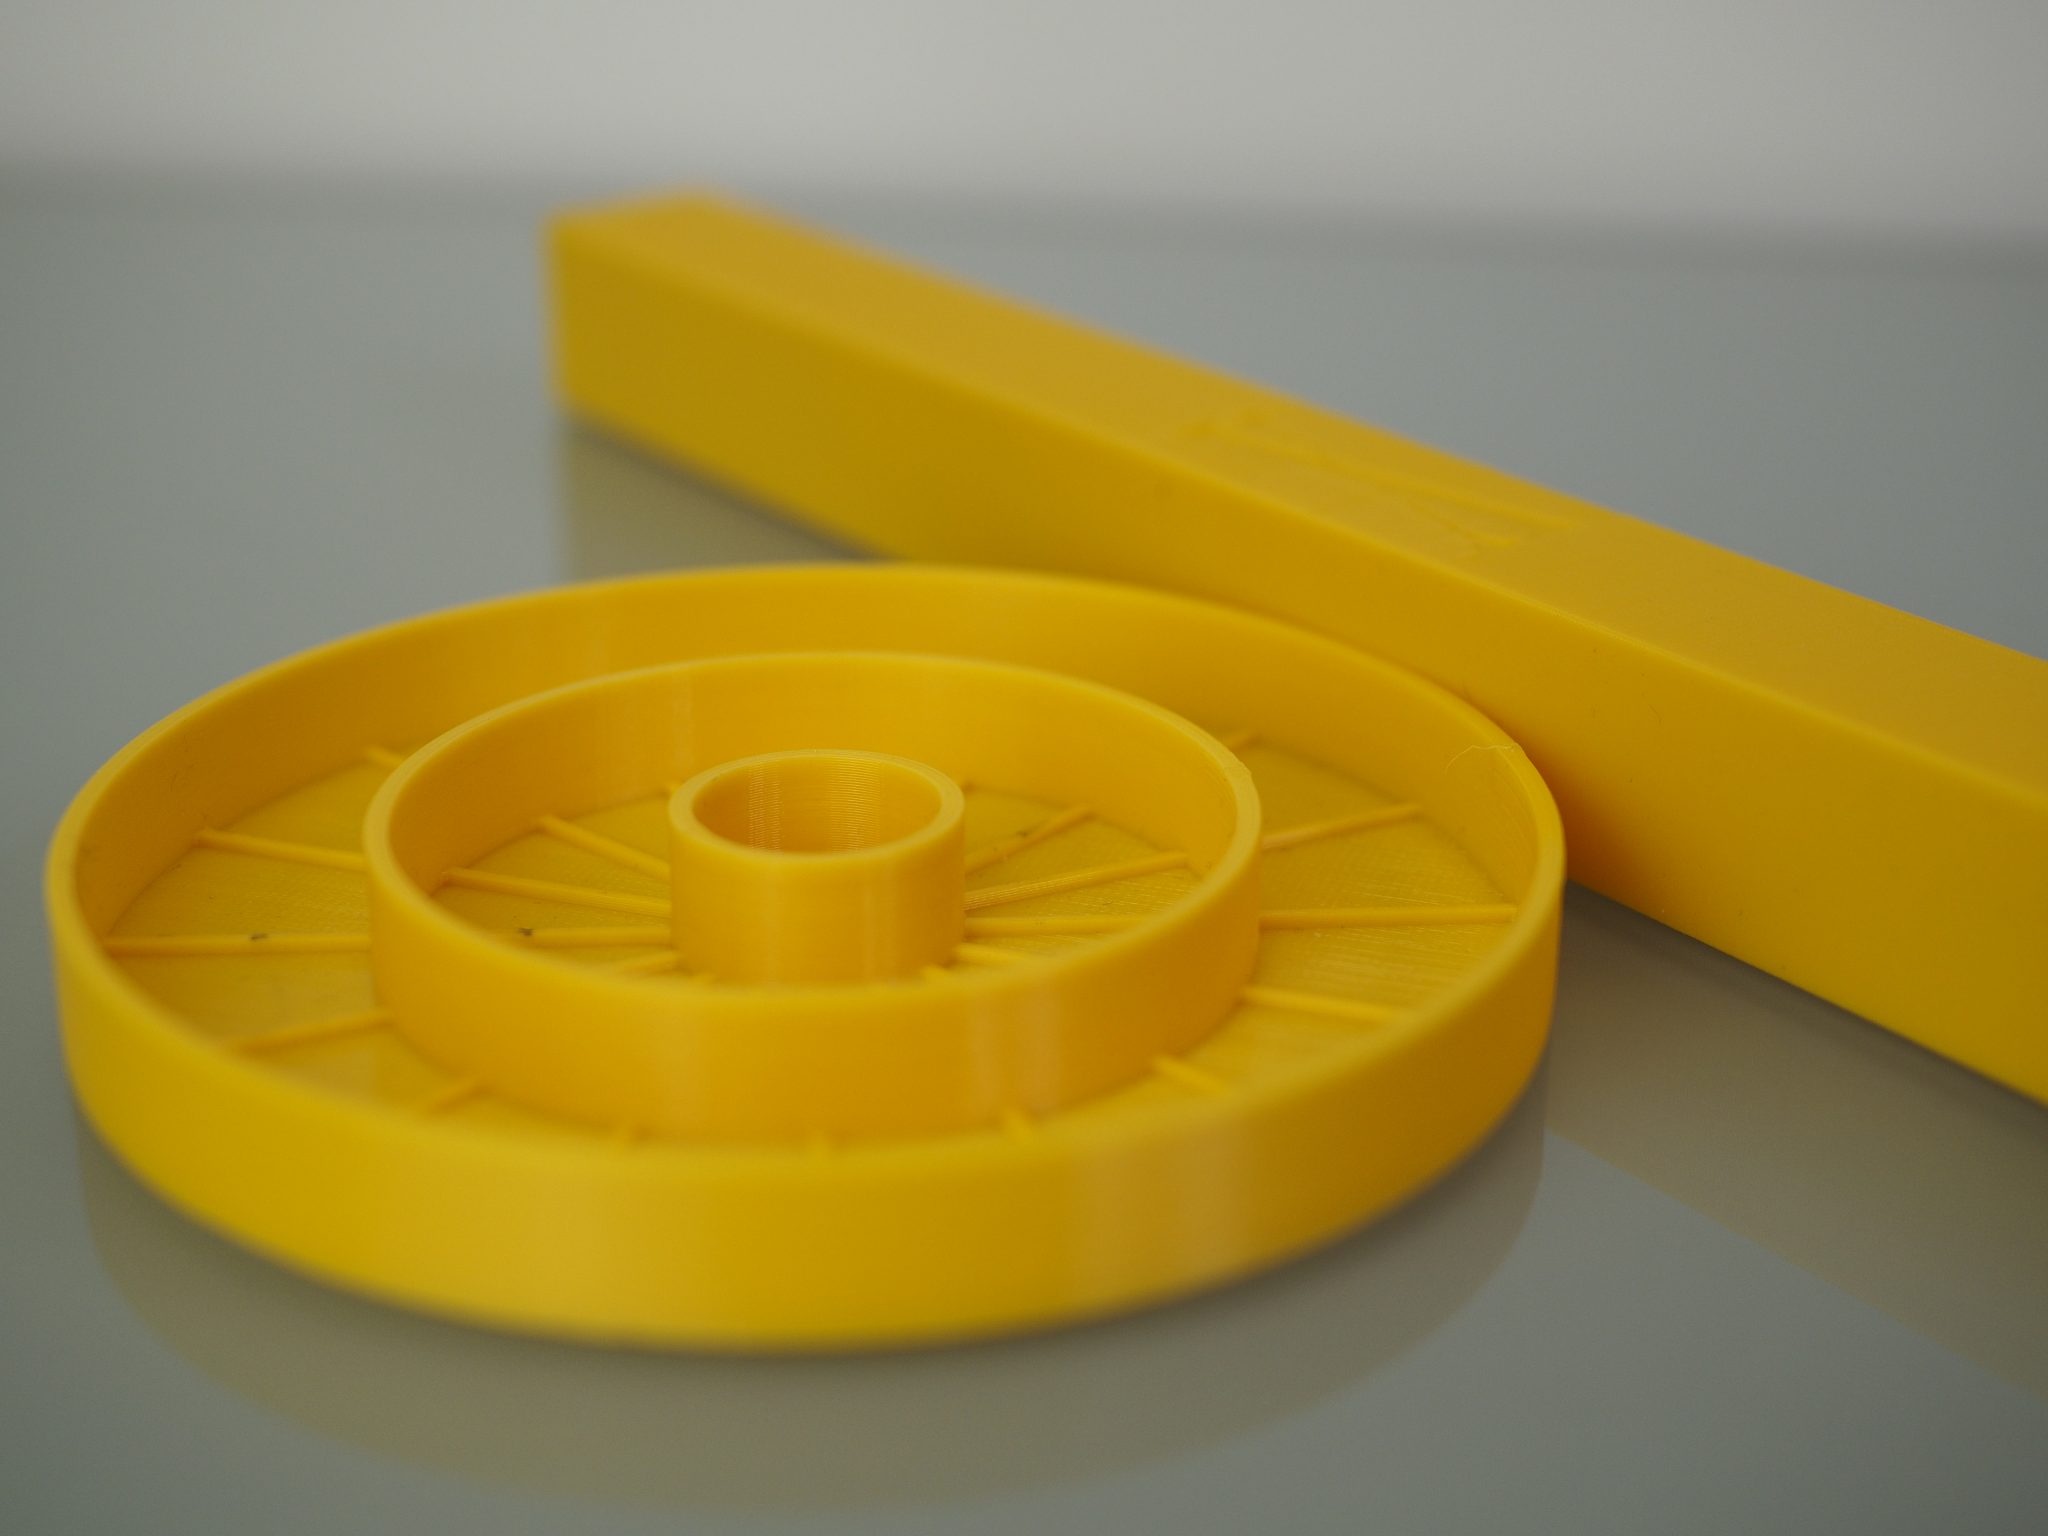
A turbine was then printed in white nylon 6 at 240°C. The general consensus is that nylon filament is not a very cooperative material. It does have extensive industrial applications however, due to its light weight and high tensile strength.
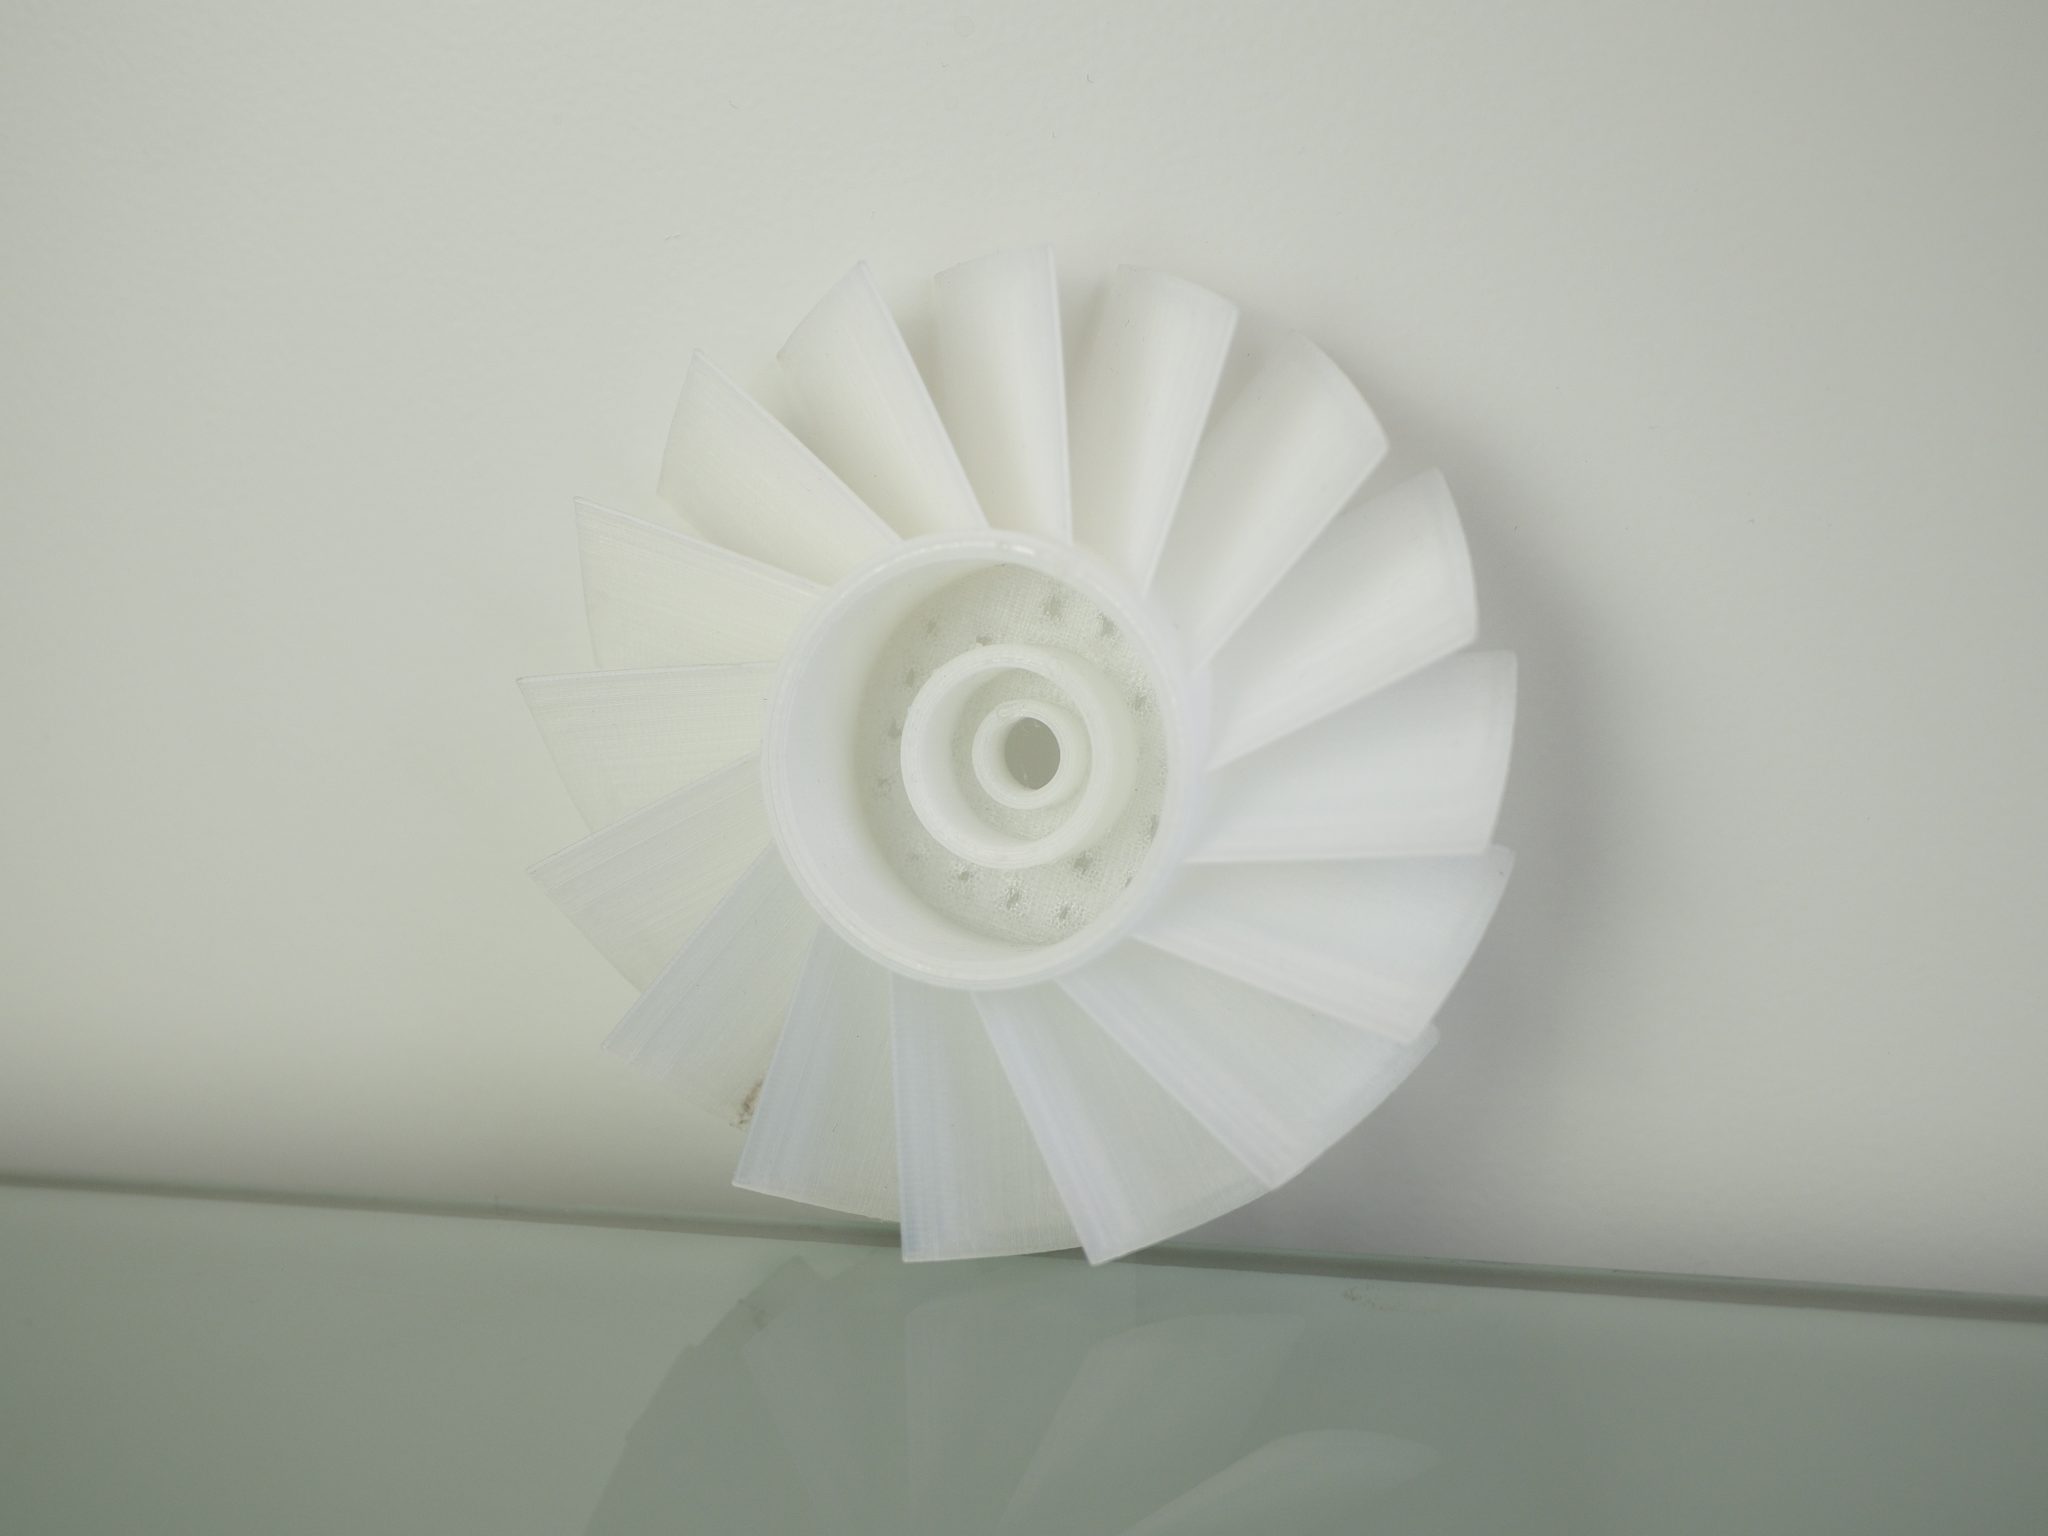
The turbine print materialized very well – it could even be used as a functional part. Apart from the slight under extrusion at the base of the part, the turbine had no other issues and printed true to scale. All the blades were printed without supports so this test also demonstrated the overhang abilities of the Kodak Portrait.
Dual extrusion tests
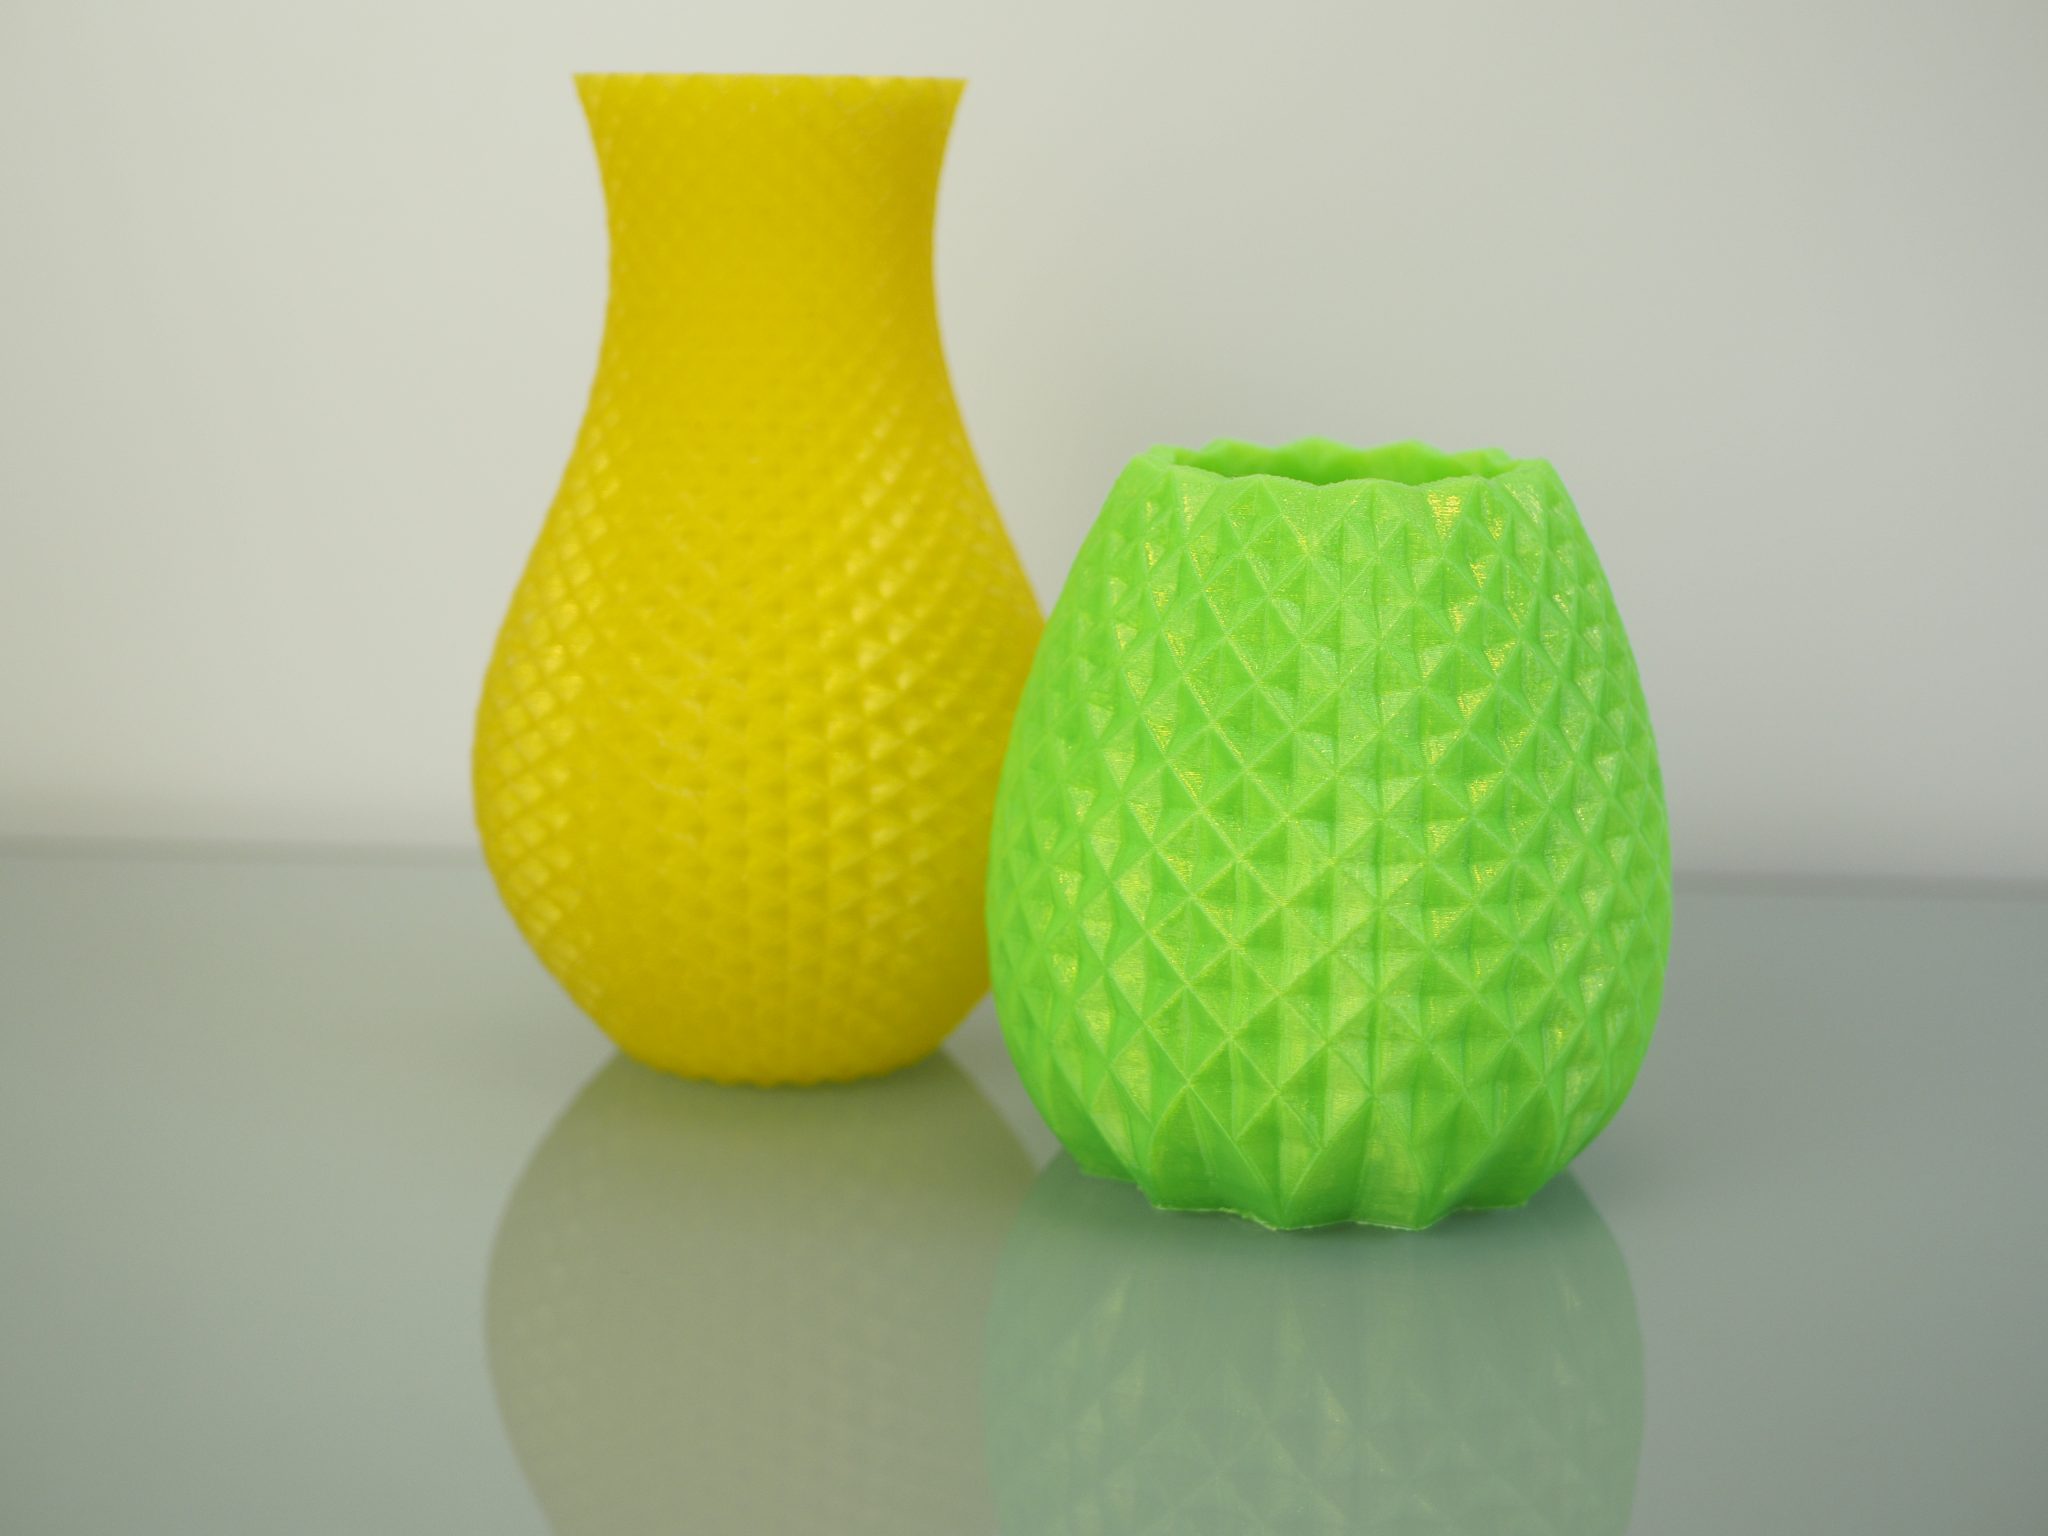
One of key features of the Portrait is its dual nozzle assembly. We put this to test with a vase printed in PLA and ABS. The PLA was extruded at 200°C while the ABS was extruded at 230°C.
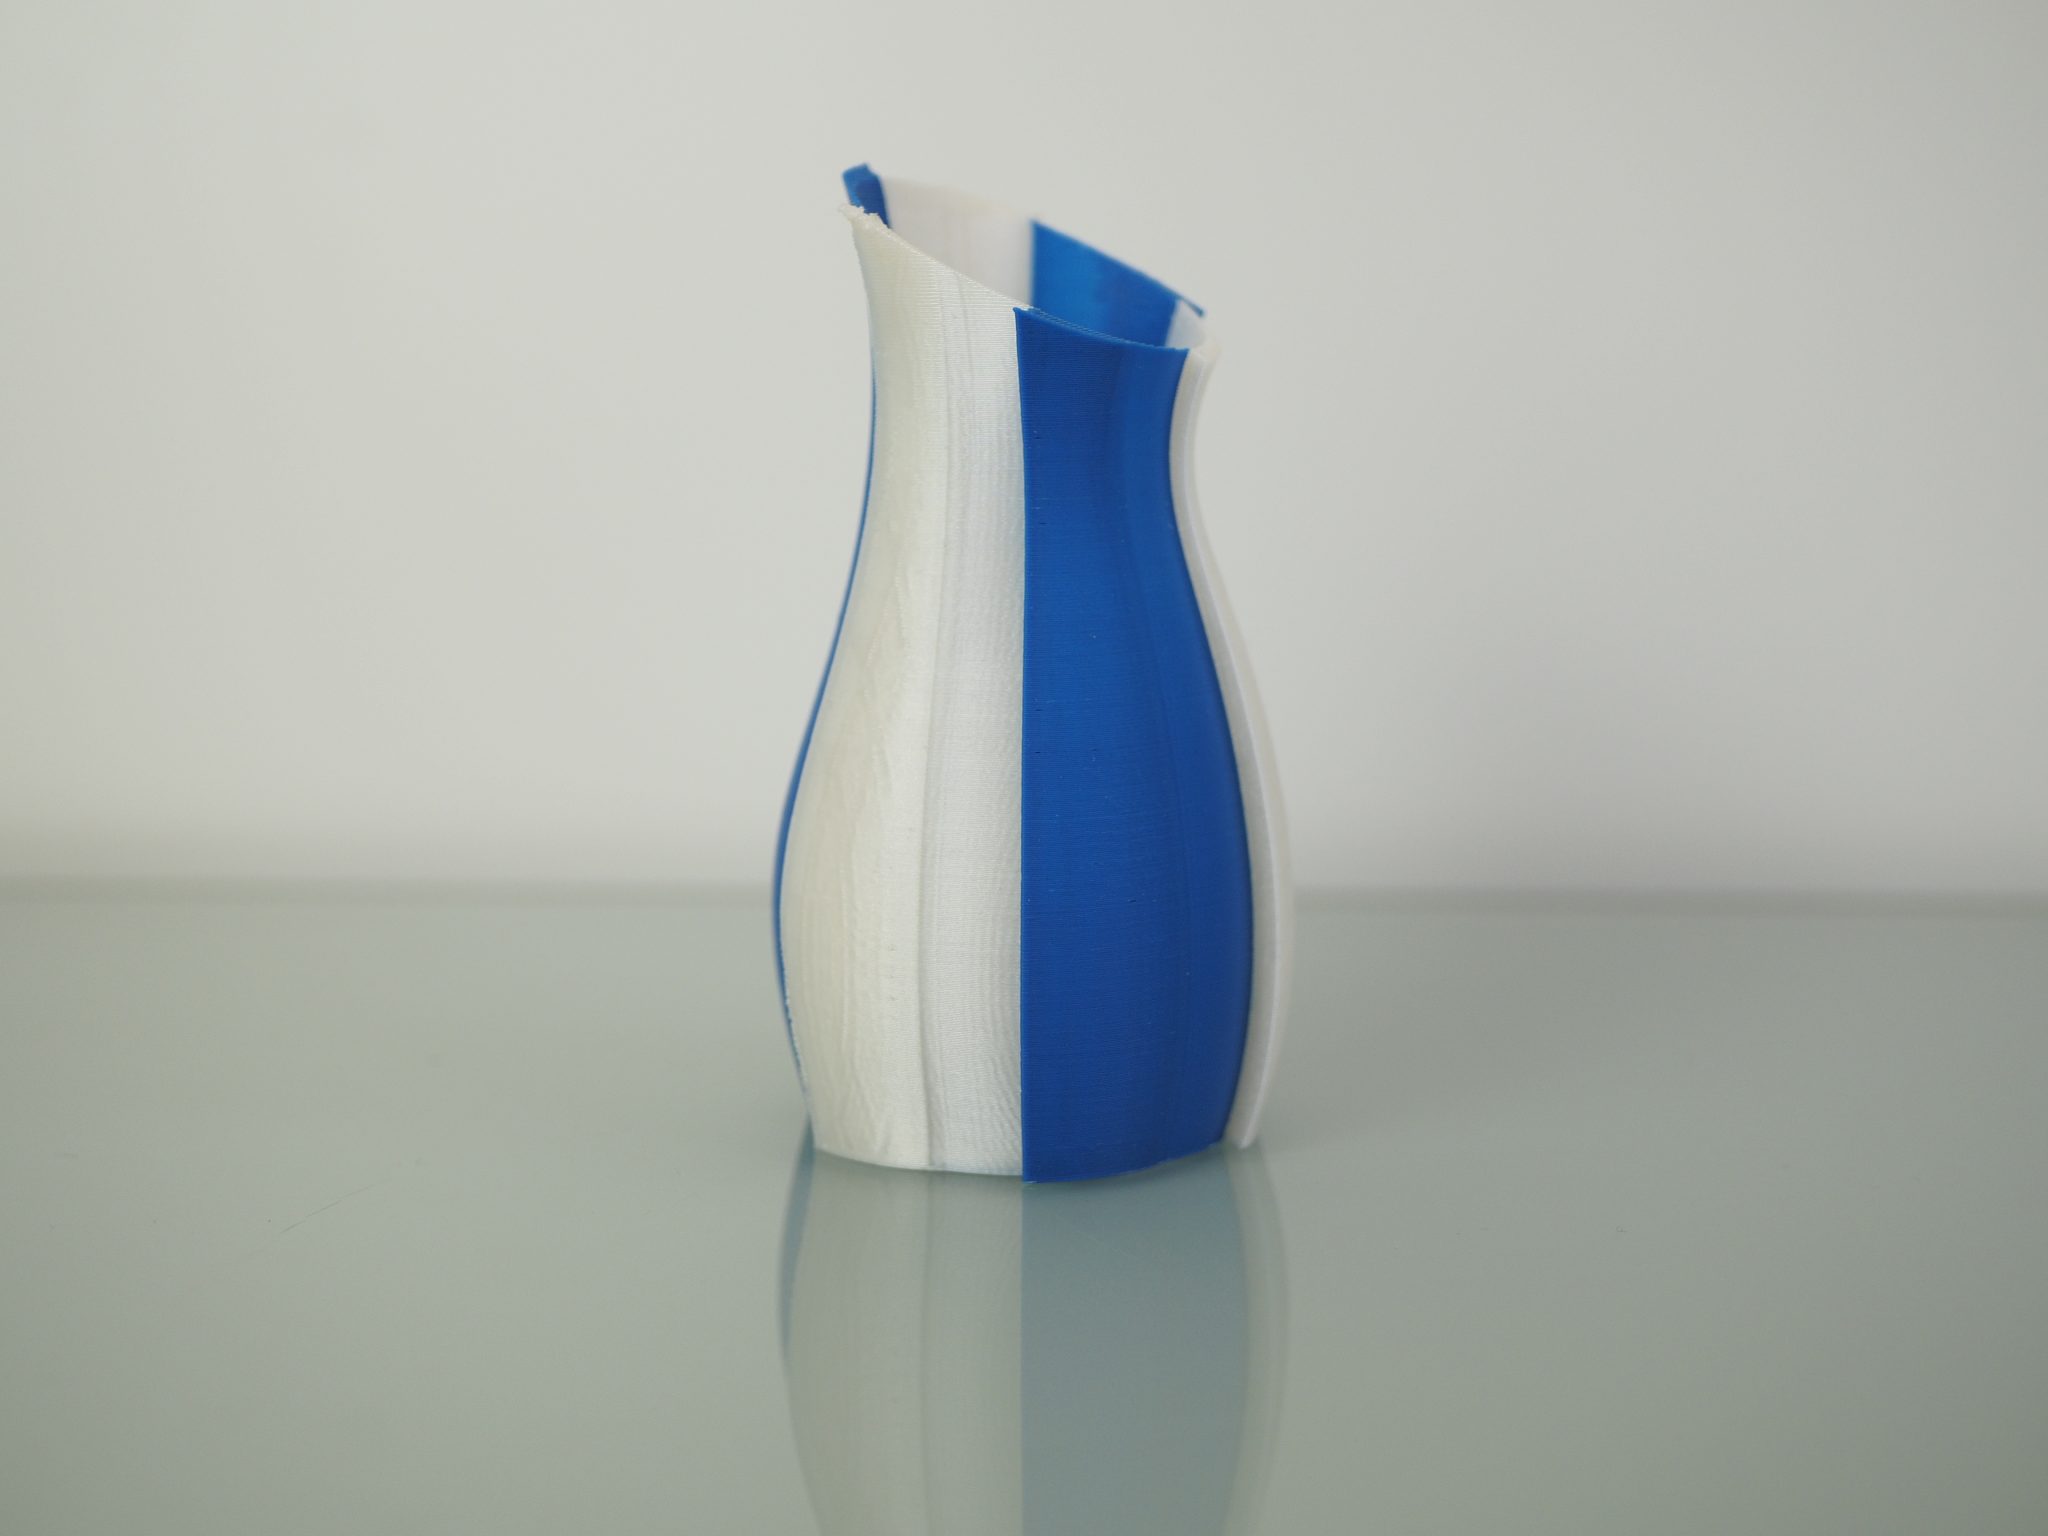
The print quality of the vase was excellent. The Portrait truly delivers on its dual extrusion promises as the interface between the two materials was clear as day while maintaining strength. The machine’s potent dual extrusion capabilities can be extremely valuable to professional designers.
The final print was the ‘ball in a cage’ model printed in PLA and PVA. This fun contraption relies on PVA’s unique water solubility property to properly operate. Once the PVA supports dissolve away, all that’s left is the PLA ball in the PLA cage.
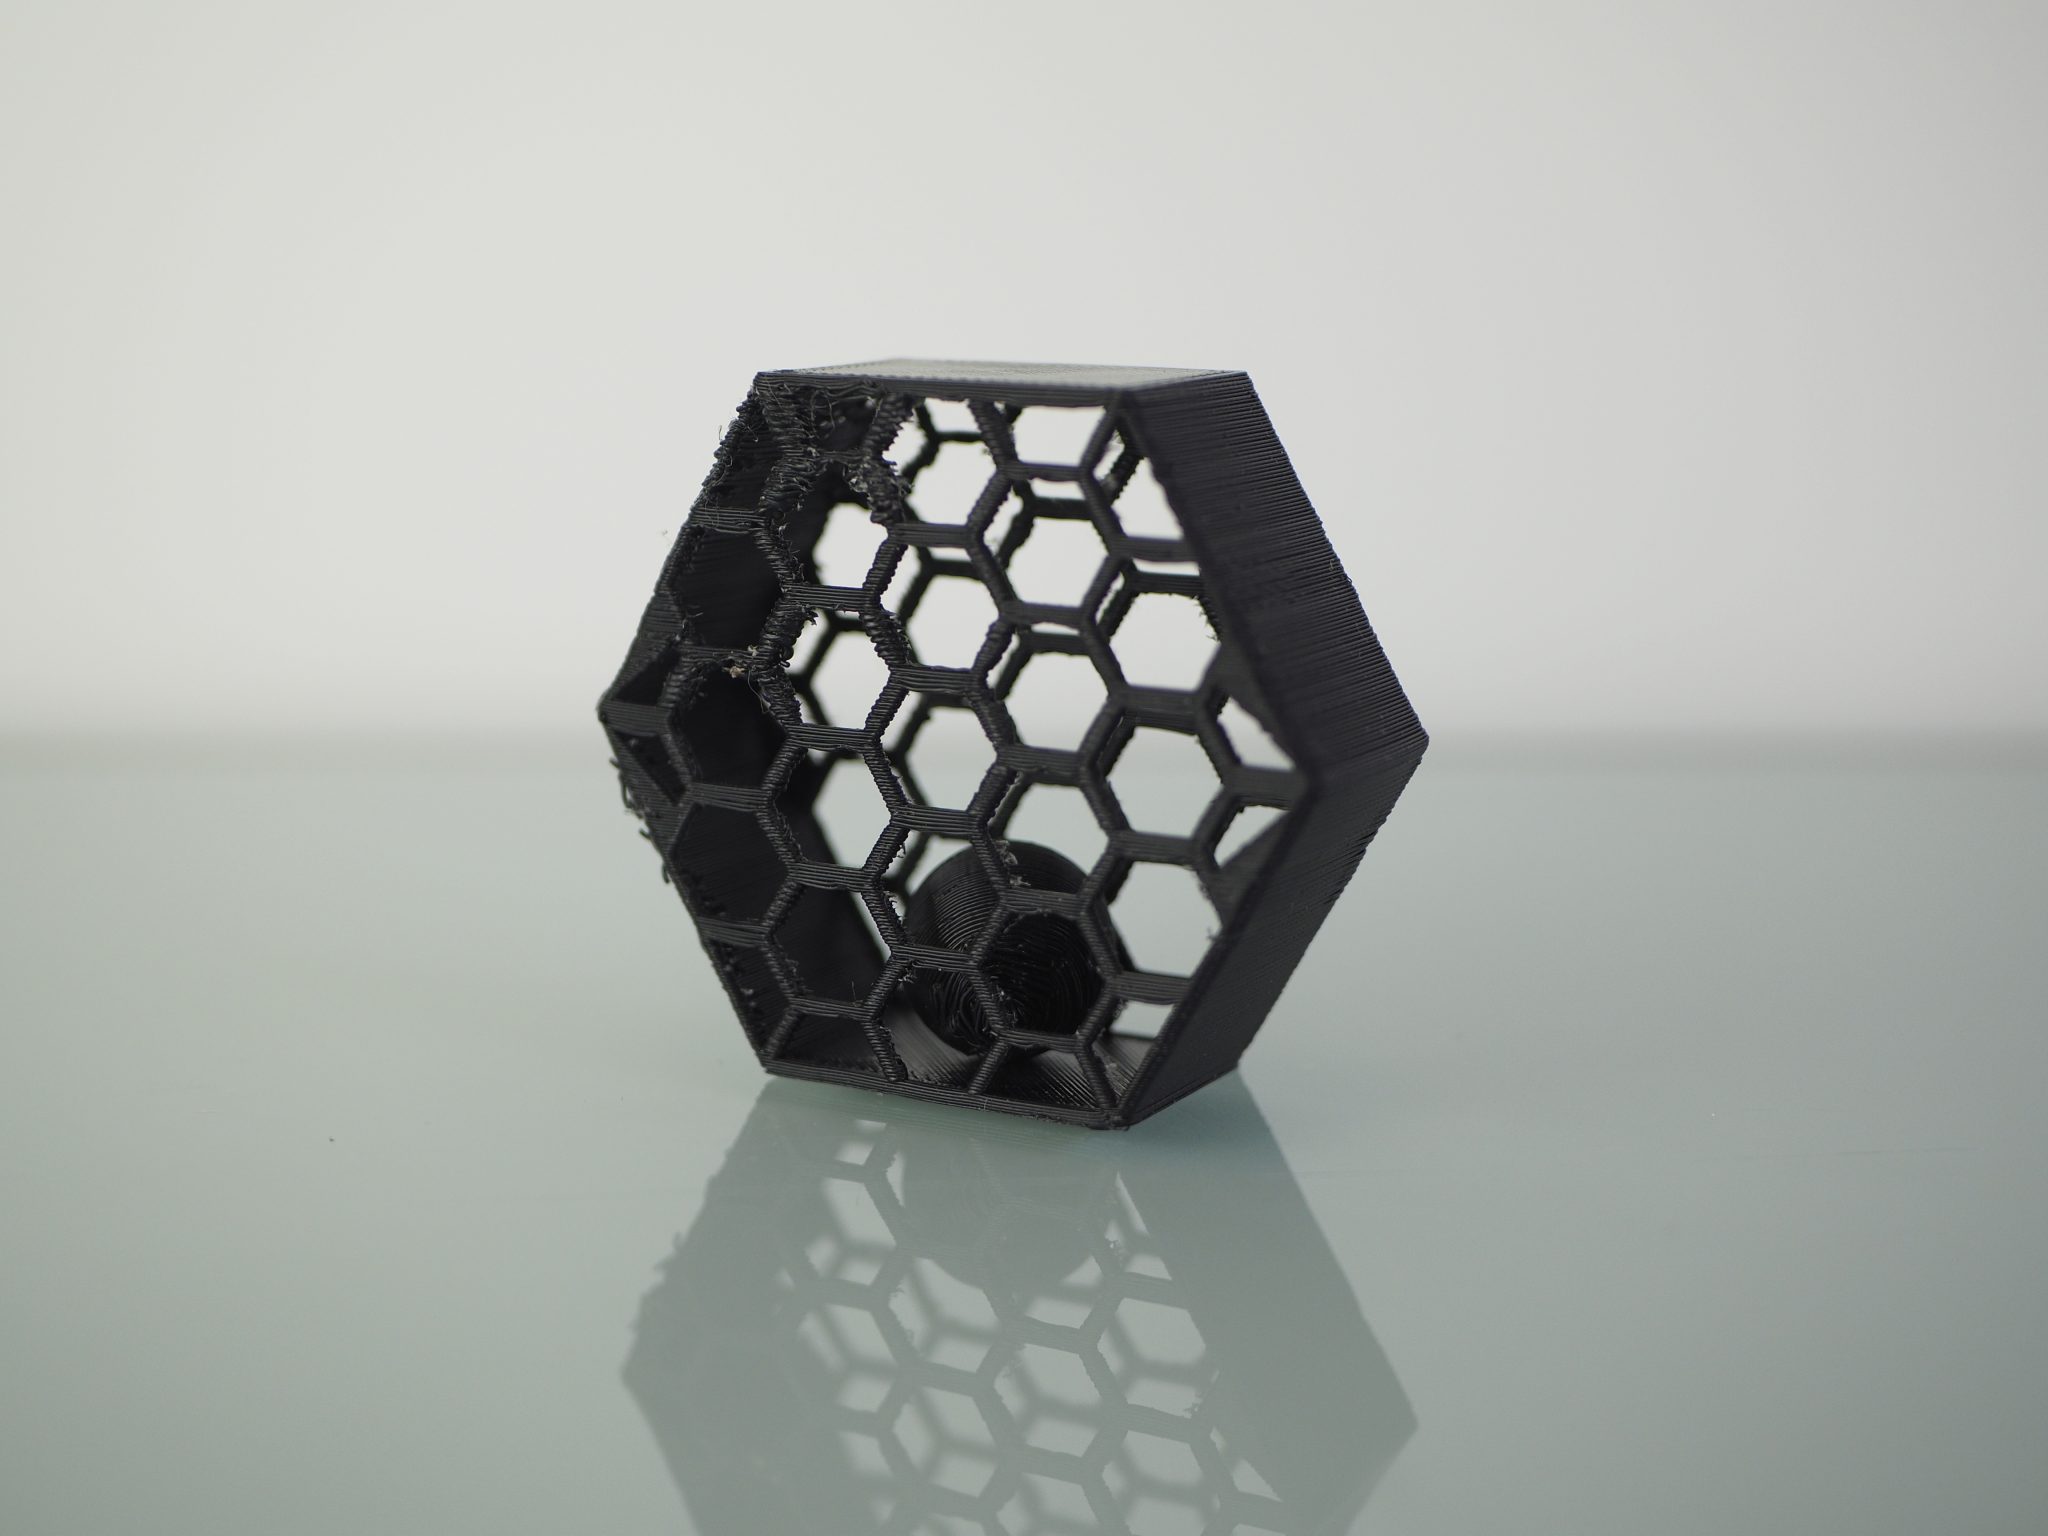
This dual extrusion print added to the list of the Portrait’s successes. Once the PVA was removed, the ball was free to move around in the cage. The fine grid structure on the face of the cage is also a great demonstration of the printer’s use of soluble PVA supports to fabricate fine geometries.
The verdict
After all the trials and tribulations, the Kodak Portrait has earned its professional-grade price tag. With premium features like the filament runout sensor and the in-built camera for remote monitoring and timelapses, the Portrait makes a fine addition to any workbench. Some minor alterations to the default PLA temperature profile along with the ability to change the print parameters once the build has already started would make the machine a first choice for anyone looking to produce high quality functional prints. The cloud service works well, the dual extrusion works even better, and the Kodak Portrait does exactly what it’s supposed to.
The nominations for the 2020 3D Printing Industry Awards are now open. Who do you think should make the shortlists for this year’s show? Have your say now.
Subscribe to the 3D Printing Industry newsletter for the latest news in additive manufacturing. You can also stay connected by following us on Twitter and liking us on Facebook.
Looking for a career in additive manufacturing? Visit 3D Printing Jobs for a selection of roles in the industry.
Featured image shows Kodak Portrait 3D printer. Photo via Kodak.