
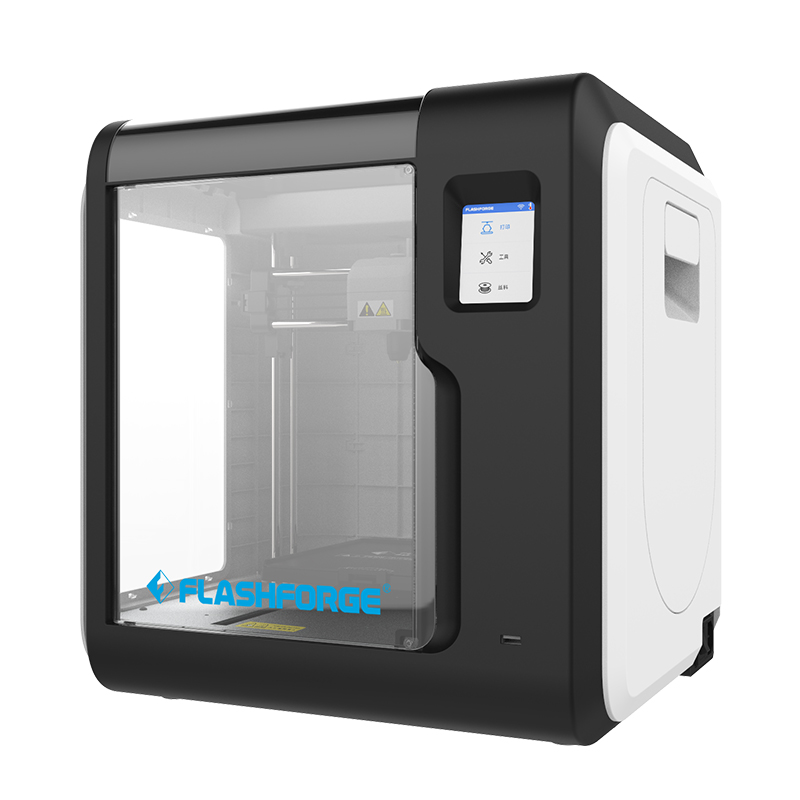
The Adventurer 3 is an FDM/FFF 3D printer from manufacturer FlashForge. The first of the company’s Adventurer series, this compact desktop system was launched at CES 2018 alongside the Creator 3, Inventor IIS, Guider IIS, and Explorer Max 3D printers.
With over a year on the market, the Adventurer 3, which maintains a build size of 150 x 150 x 150mm, has been branded as an affordable, lightweight and user-friendly system suited for both creators and educators. In spite of it being priced at $449, this 3D printer features an integrated 2 Megapixel camera, a removable extruder structure, and cloud-based 3D printing capabilities.
The 3D Printing Industry engineering team conducted an extensive review on the Adventurer 3 to prove several of its core claims. These claims are as follows:
– Large build size in relation to the device’s footprint
– A smart and light 3D printer
– No bed leveling required and easily removable nozzle
– Assisted build plate calibration
– 100-micron resolution capabilities
– An easy-to-use slicer for beginners and experts
– Plug and play
– Integration with a network monitoring system
Adventurer 3 Hardware: Printhead, casing & bed
The Adventurer 3 is composed of a cartesian axis system, more rigid and accurate than a delta or polar configuration. Its enclosed structure resembles the Dremel 3D45 3D printer, which is also manufactured by FlashForge, and its casing is composed of plastic injection molded parts.
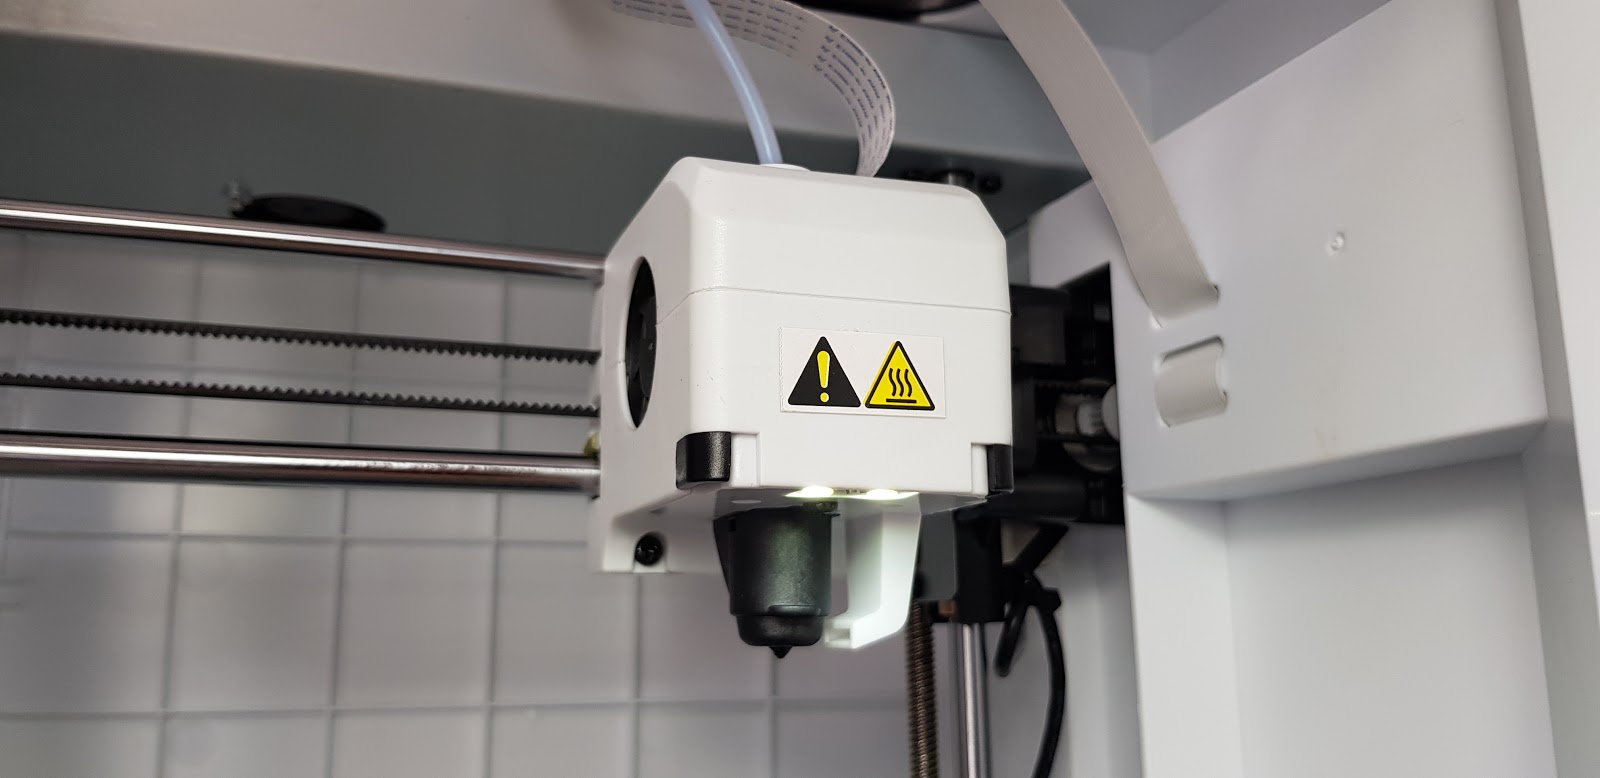
With a transparent front door, left side and top, it is very convenient to monitor prints. The singular printhead of the Adventurer 3 moves on the X and Z axis while the print bed, which is both heated and removable, moves on the Y-axis. According to the engineering team, this configuration can cause defects on objects due to inertia with the print bed. This is increased when the jerk of the machine is too high. However, on smaller machines, like the Adventurer 2, the risk is reduced and inertia is only a minor issue.
A Bowden extrusion system is used as the filament feeding mechanism, meaning the integrated motor is mounted away from the printhead and the material is driven through a PTFE tube to the nozzle in the print head. This enables users to increase print speed and precision, unencumbered by a heavy print head. However, this does reduce the ability to 3D print flexible filaments like TPU.
In addition, the electrical components on this 3D printer include mechanical end-stops to inform the printer when it reached the maximum stroke; an intuitive touchscreen to calibrate the bed, load the filament, and control print jobs; and an in-built camera enabling remote monitoring and control of print jobs via FlashCloud.
Slicer and Set-up
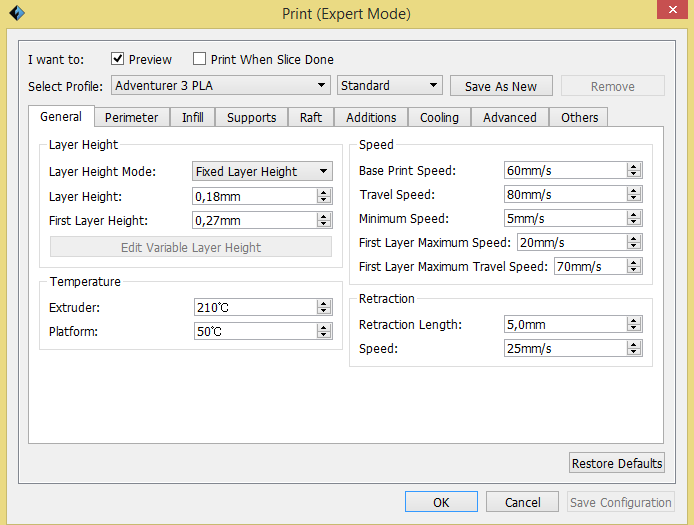
FlashForge provides its own slicing software, FlashPrint, which serves both beginners and advanced users. Through the basic print settings, the user is required to choose the material, print resolution, and whether a raft and supports are necessary on their model. The user can also select the “more options” button for “expert mode” settings such as dimensional compensation and model cutting.
Once the settings are chosen, the user just has to click on the auto support generation which will accommodate for overhangs that are too steep to be printed properly. It is also possible to add and remove supports manually.
Loading and unloading filament from the spool compartment took no longer than 5 minutes. All that’s required is the selection “load/change filament” on the touchscreen which then heats the nozzle and moves the filament for extrusion. On some occasions, the filament was not correctly pushed into the nozzle. The nozzle can be changed in 2 minutes by pressing the black buckles on either side of the extruder.
There is no bed calibration step on the Adventurer 3 due to its small bed size, a welcome feature for both beginners and experienced users. In setup, users can, however, choose the Z-offset. When it is too high, the material won’t stick to the platform. If it is too low, the filament won’t be extruded out of the printer for the first layer. In this case, the user will probably have to do several trials before finding the right offset – though it’s a small request compared to full bed leveling.
Wi-Fi connection to the printer was rather straightforward, taking just 2 minutes. Once completed, the user can easily begin a print job from a computer connected to the network via Flashprint, confirming its plug and play claim. For remote print management, FlashCloud must be downloaded. A USB flash drive or Wi-Fi can be used to send the .stl file to the printer. After the system heats the extruder and the plate, the print job commences and the computer can be disconnected from the Wi-Fi network as a result of the onboard storage.
During the set-up process, the engineers found that the integrated spool holder has difficulties fitting some third party spools. If an external filament is used, the spool has to be stored outside of the printer and the lid on the left has to be kept open. This ultimately affects the build chamber temperature and stability. Overall, getting the system ready for printing took approximately 10 minutes and did not include any major hindrances.
Printing tests with PLA
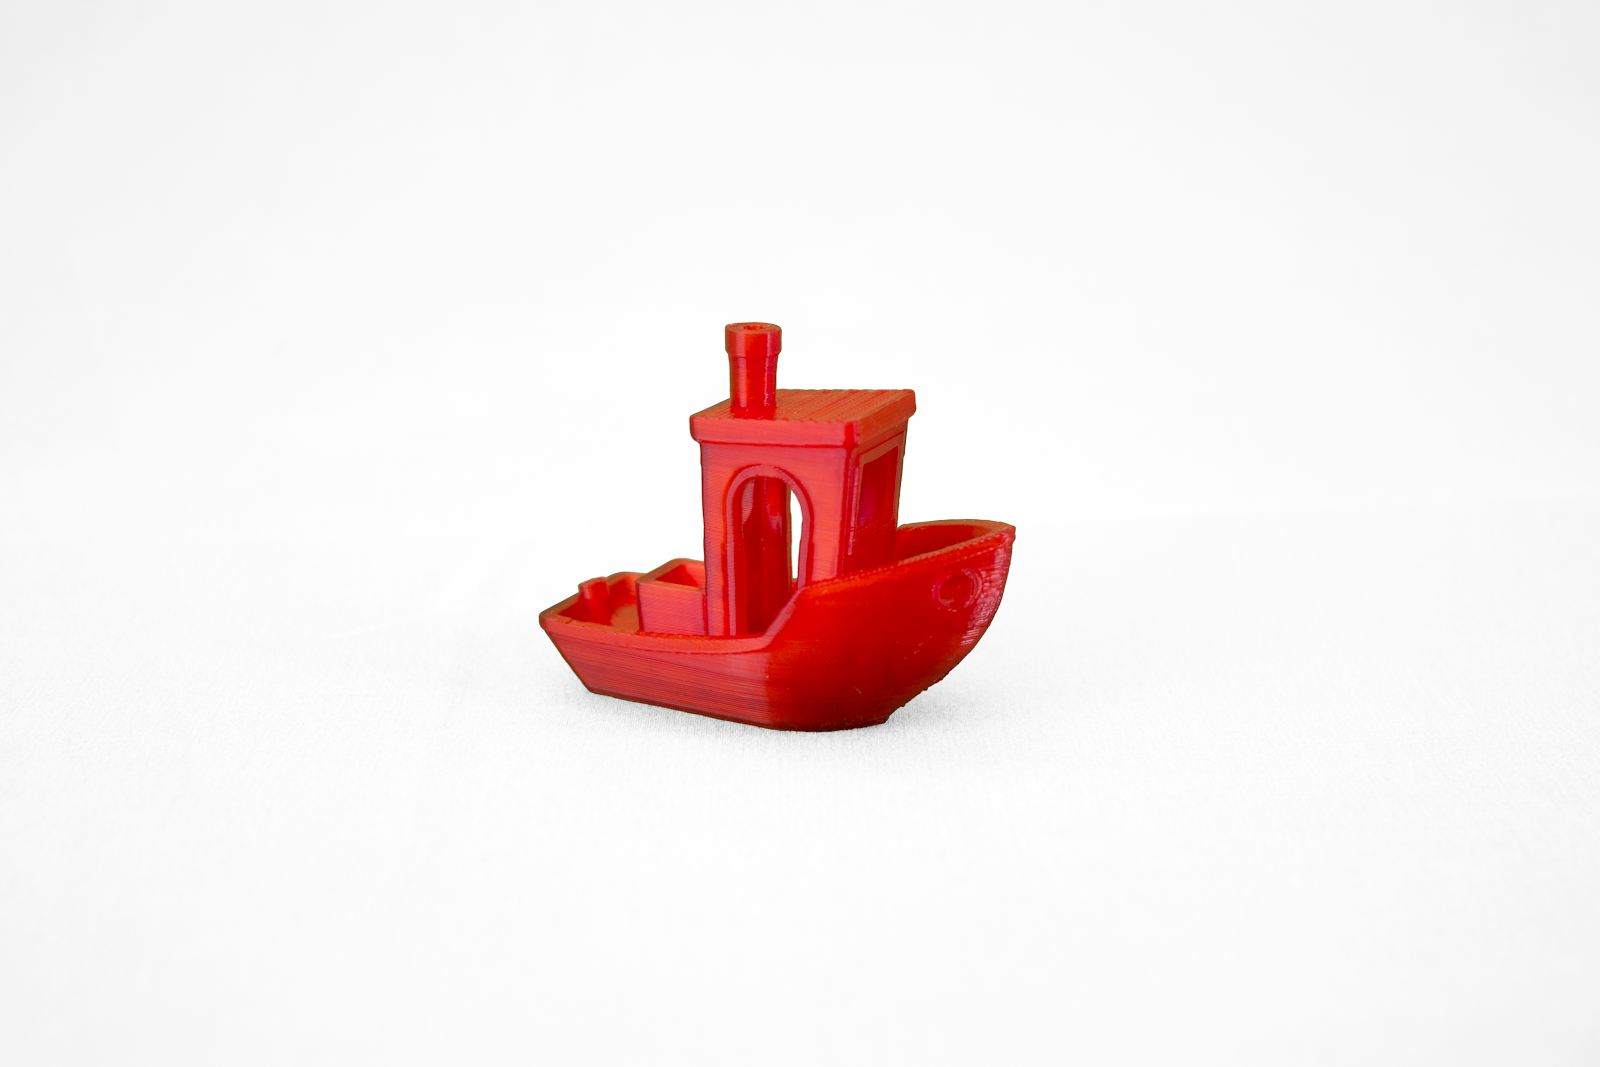
Using PLA, a nozzle temperature of 210° and bed temperature of 50°, several print tests were conducted to understand the performance of the 3D printer. This began with a model of the 3D Benchy benchmark test. From the first print, our engineers were impressed with the quality of the objects. The models experienced no stringing, and layer visibility was noticeably reduced. Also, the roof of the 3D Benchy was sturdy, showing great handling of the layered structures.
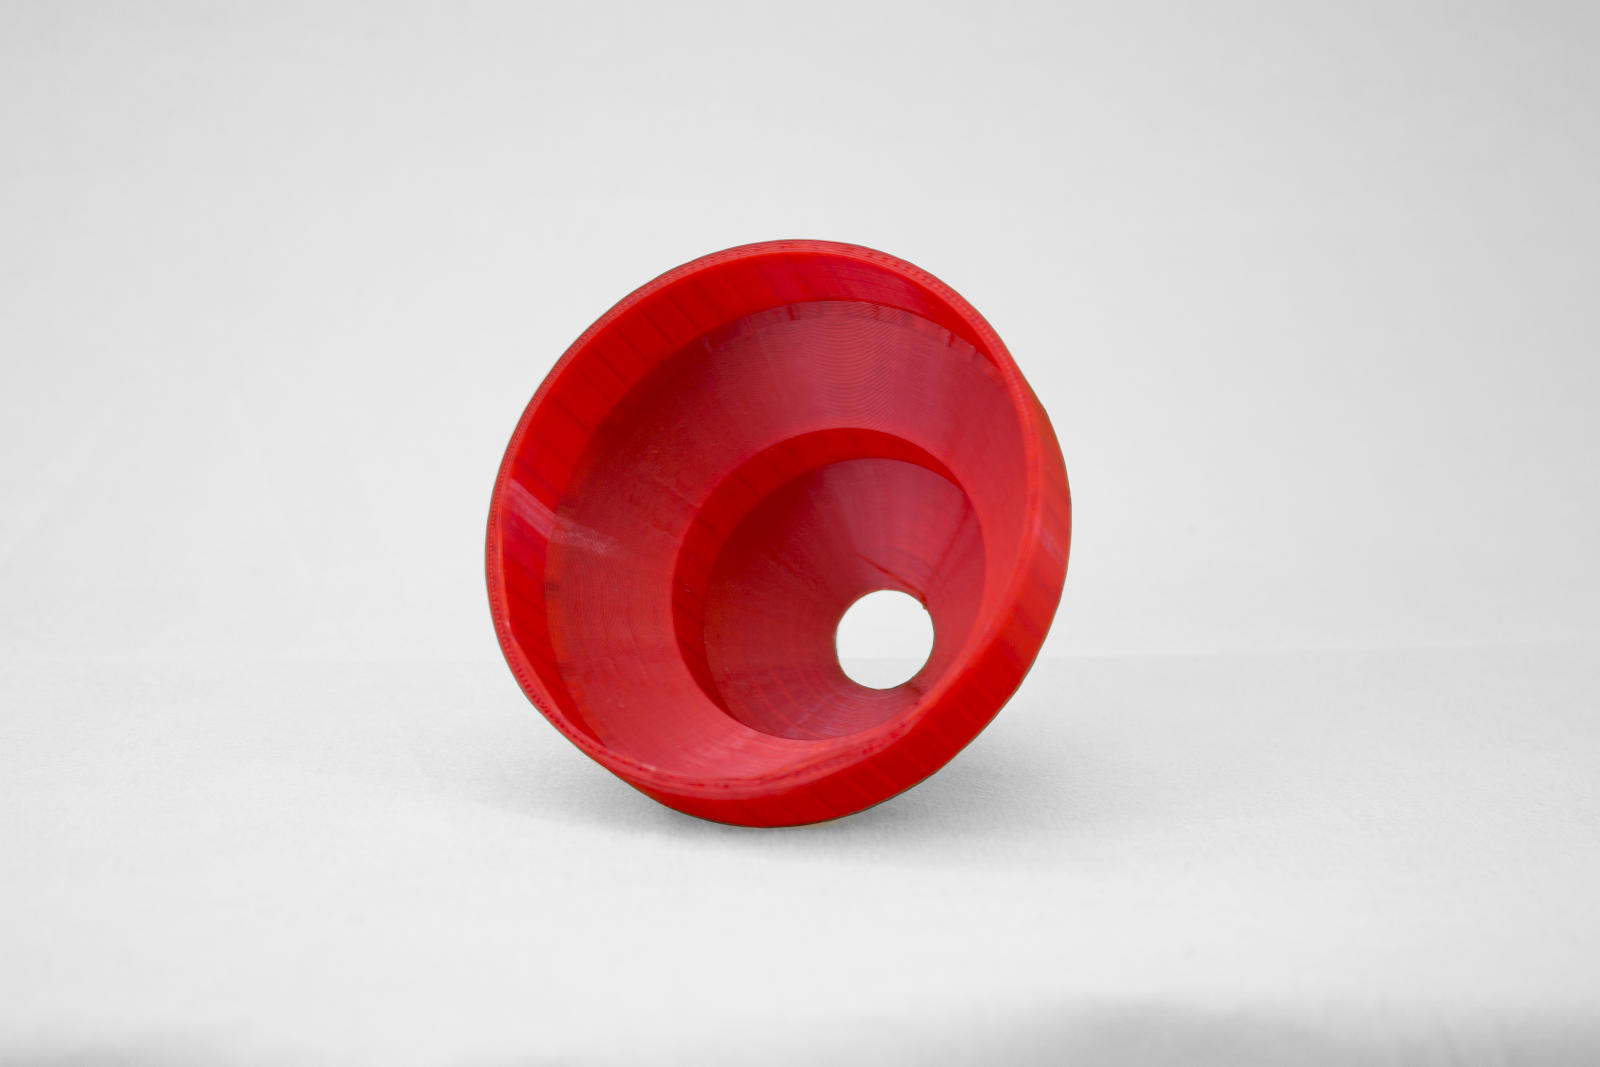
Following this, repeatability tests were conducted. Comprising 3 different models (a square with a hole, a tube, and a hexagon) these samples were 3D printed 5 times. To illustrate differences between the 3D printed models during the repeatability tests, the average or mean of the objects was calculated. The mean of differences shows the variations between the parts measurements and its reference.
A discrepancy of under 0.1mm generally deems a 3D printer to be highly accurate. From the tested parts, a standard deviation of 0.05mm was achieved. However, the overall accuracy of some dimensions was not as high as hoped.
The results on the hexagon models were better with a standard deviation no higher than 0.02mm. The tube models were the least accurate due to the circular shape of the tubes. As the Adventurer 3 is a cartesian 3D printer, circular trajectories are challenging to produce. The machine 3D printed shapes closer to ovals. If the diameter of the tubes is not considered, the height of the model was accurate with a standard deviation of 0.02mm.
In terms of repeatability, the Adventurer 3 performs well with standard deviations under 0.05mm, and at times it can reach 0.02mm.
| Hole φ | Height | Width | Length | |
| Reference | 12 | 10 | 15 | 15 |
| Print 1 | 11.91 | 10.02 | 15.17 | 15.17 |
| Print 2 | 11.84 | 10.12 | 15.19 | 15.16 |
| Print 3 | 11.85 | 10.1 | 15.14 | 15.19 |
| Print 4 | 11.79 | 10.09 | 15.13 | 15.09 |
| Print 5 | 11.91 | 10.1 | 15.17 | 15.12 |
| Mean of differences | 0.14 | 0.09 | 0.16 | 0.15 |
| Mean of real values | 11.86 | 10.09 | 15.16 | 15.15 |
| Standard deviation (σ) | 0.05 | 0.04 | 0.02 | 0.04 |
| Mean + 3 x σ | 12.01 | 10.2 | 15.23 | 15.27 |
| Mean – 3 x σ | 11.71 | 9.97 | 15.09 | 15.02 |
Graph of the Repeatability test of the square model with a hole.
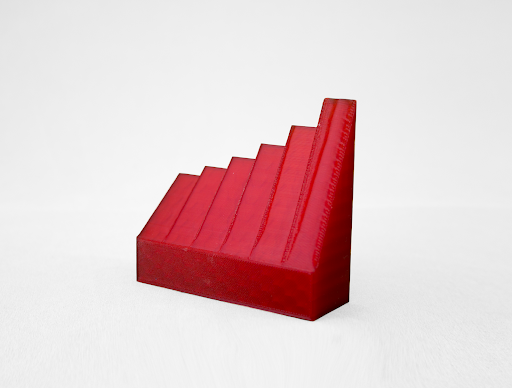
Next, an overhang test was performed to determine the maximum angle possible without supports. The model is composed of 6 walls printed in increasing overhangs. The first overhang angle is 40°, the following overhangs are increased by 5° until a final overhang 65°.
An overhang model was well printed in high resolution. The quality of the surface remained good up until the 55° overhang. The following overhangs showed a decrease in surface quality. The last overhang (65°) was slightly curved but still deemed as a good result considering the angle, and lack of supports.
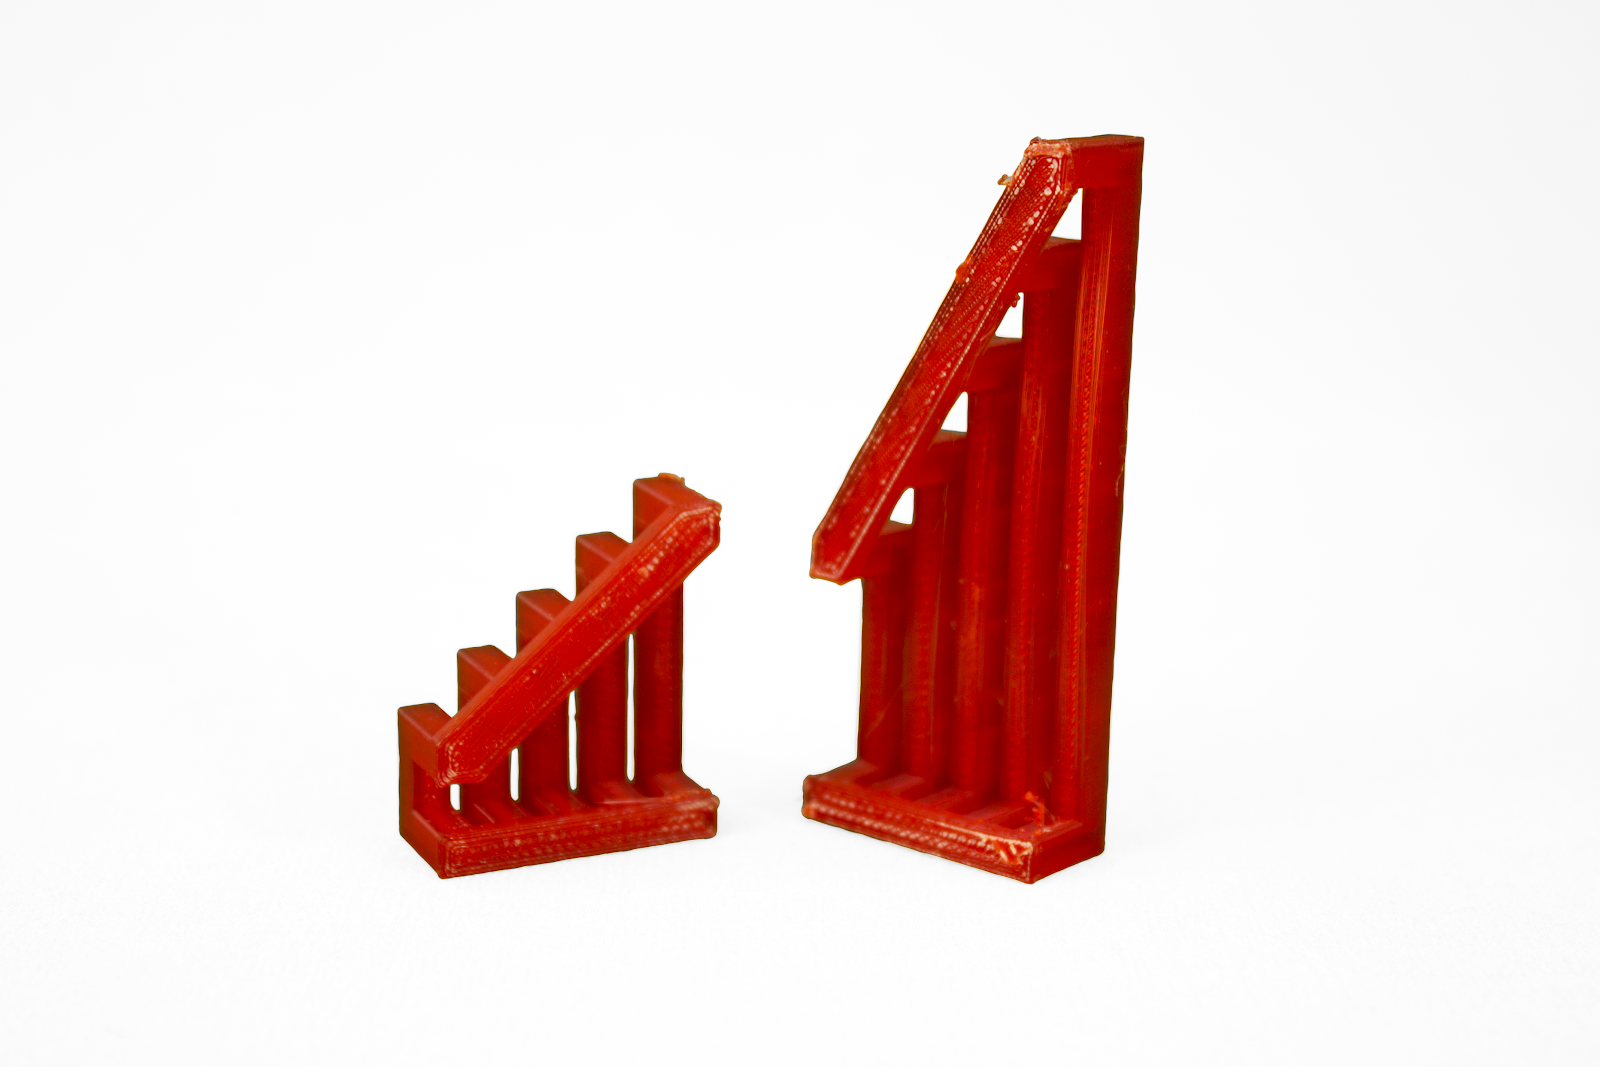
A bridge test ranging from 5mm to 60mm was conducted to evaluate the cooling capacity of the Adventurer 3. All of the bridges were printed successfully and the engineers found that the quality remains good until the 25mm length bridge. After this limit, the bridges curved and the surface underneath had suffered from some sagging.
To evaluate the 3D printer’s ability to realize both tall and thin parts, a tower test was performed. This involves a rectangular-based tower measuring at 20 x 20 x 150mm. Commonly, this test can be an issue for cartesian 3D printers with a moving bed on the Y axis. In spite of the challenge, the quality of the print was very good with no shift between the layers, a smooth surface from top to bottom, and sharp angles on the sides.

The circular trajectory test was done to further evaluate the capability of the system’s ability to print parts with circular sections. The model is composed of 3 circular sections measuring at 100mm, 65mm, and 20mm. The quality of this print was very good as the surface is smooth and the dimensions are accurate. The circular trajectories did not print in an oval shape as seen in the prior repeatability test suggesting that the printer copes better with larger diameters.
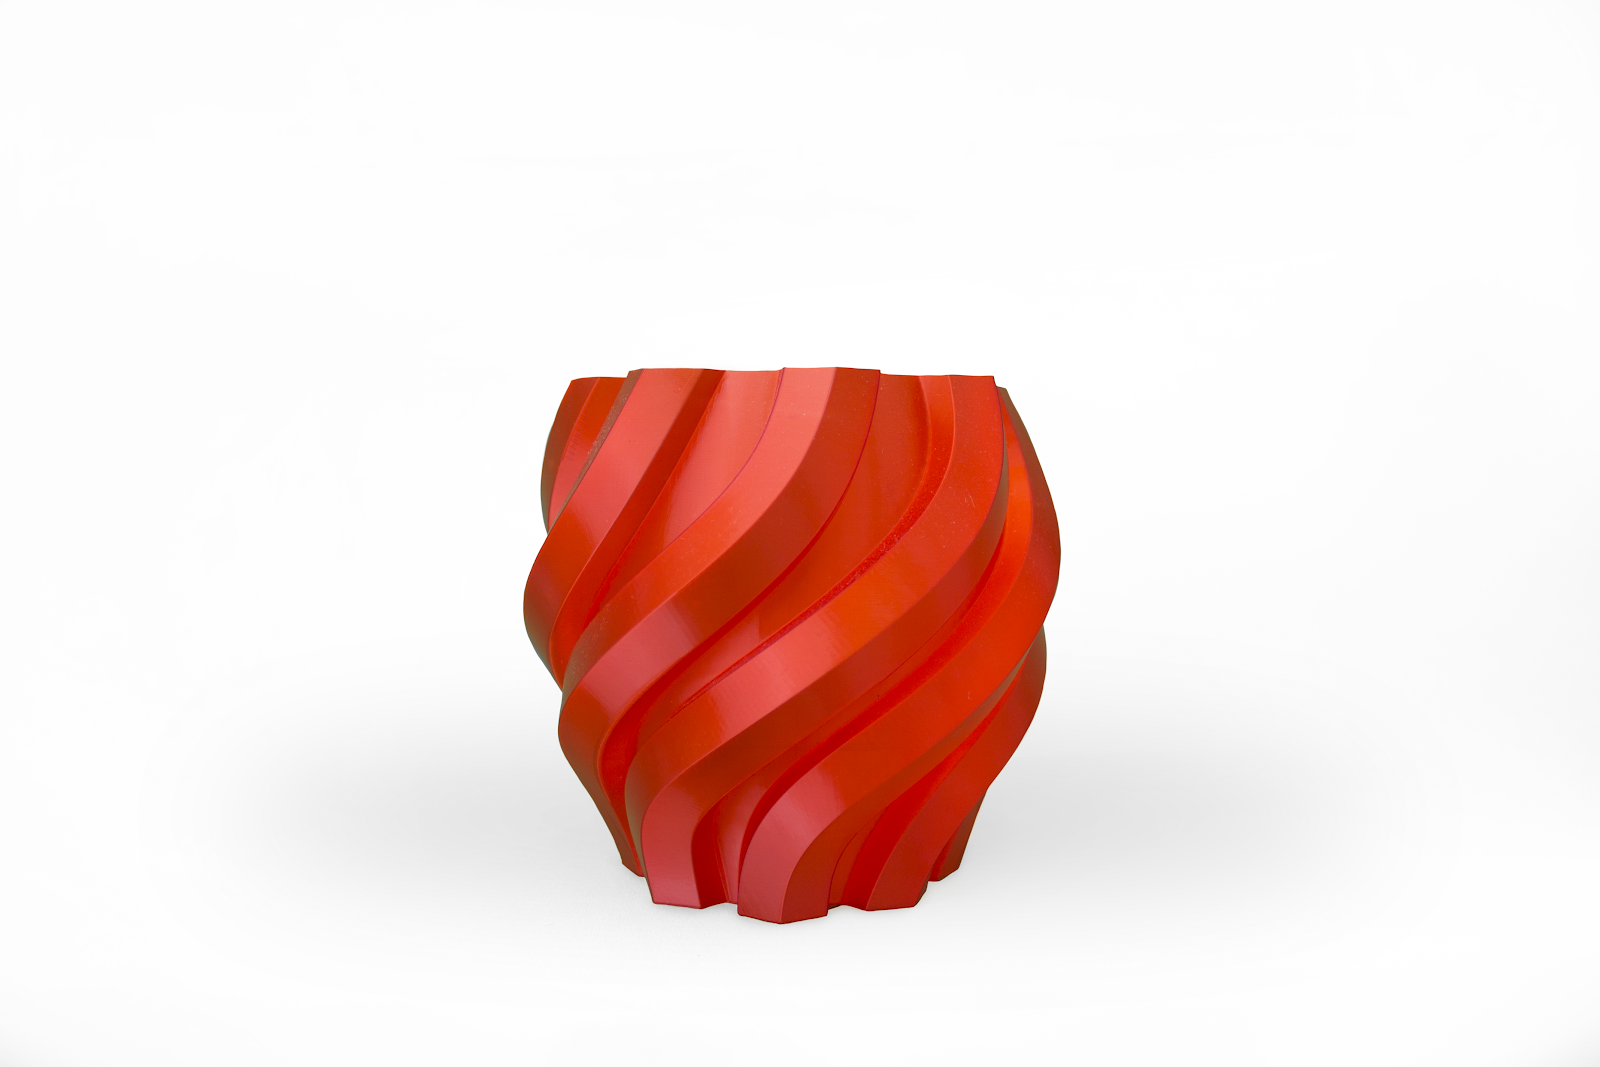
The last of the PLA tests involved a 3D printed twisted vase. This was a larger model which took a longer time to print. Using “vase mode” the model was produced with no defects and good layer adhesion as there were no leaks. A small drawback from this mode was that an extra top was printed on the vase when it was not required.
Printing tests with ABS
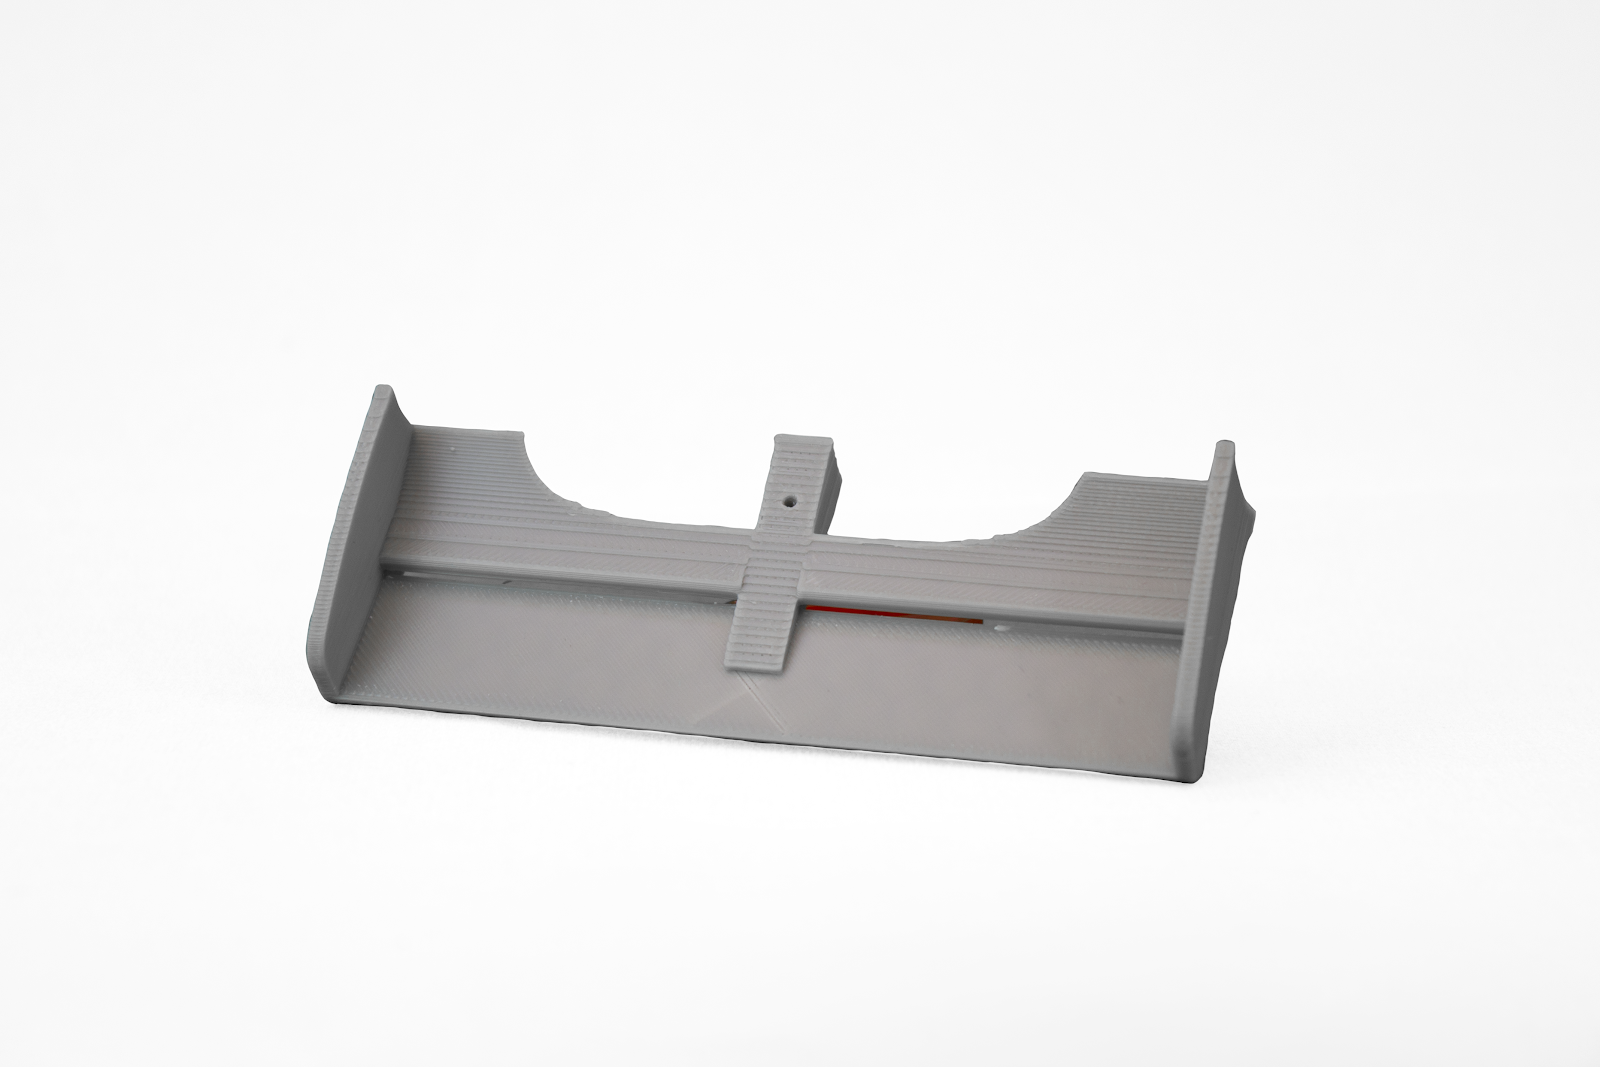
The Adventurer 3’s ability to print with a third party ABS filament was also tested. Due to its high shrinkage rate, ABS can be more challenging to print. Firstly, an RC Formula one front wing was produced. During this test and the following, the spool was stored outside of the printer as it did not fit in the spool holder.
Despite cold air being let into the build chamber the front wing 3D printed incredibly well without warping or delamination issues. However, some adhesion issues were met.
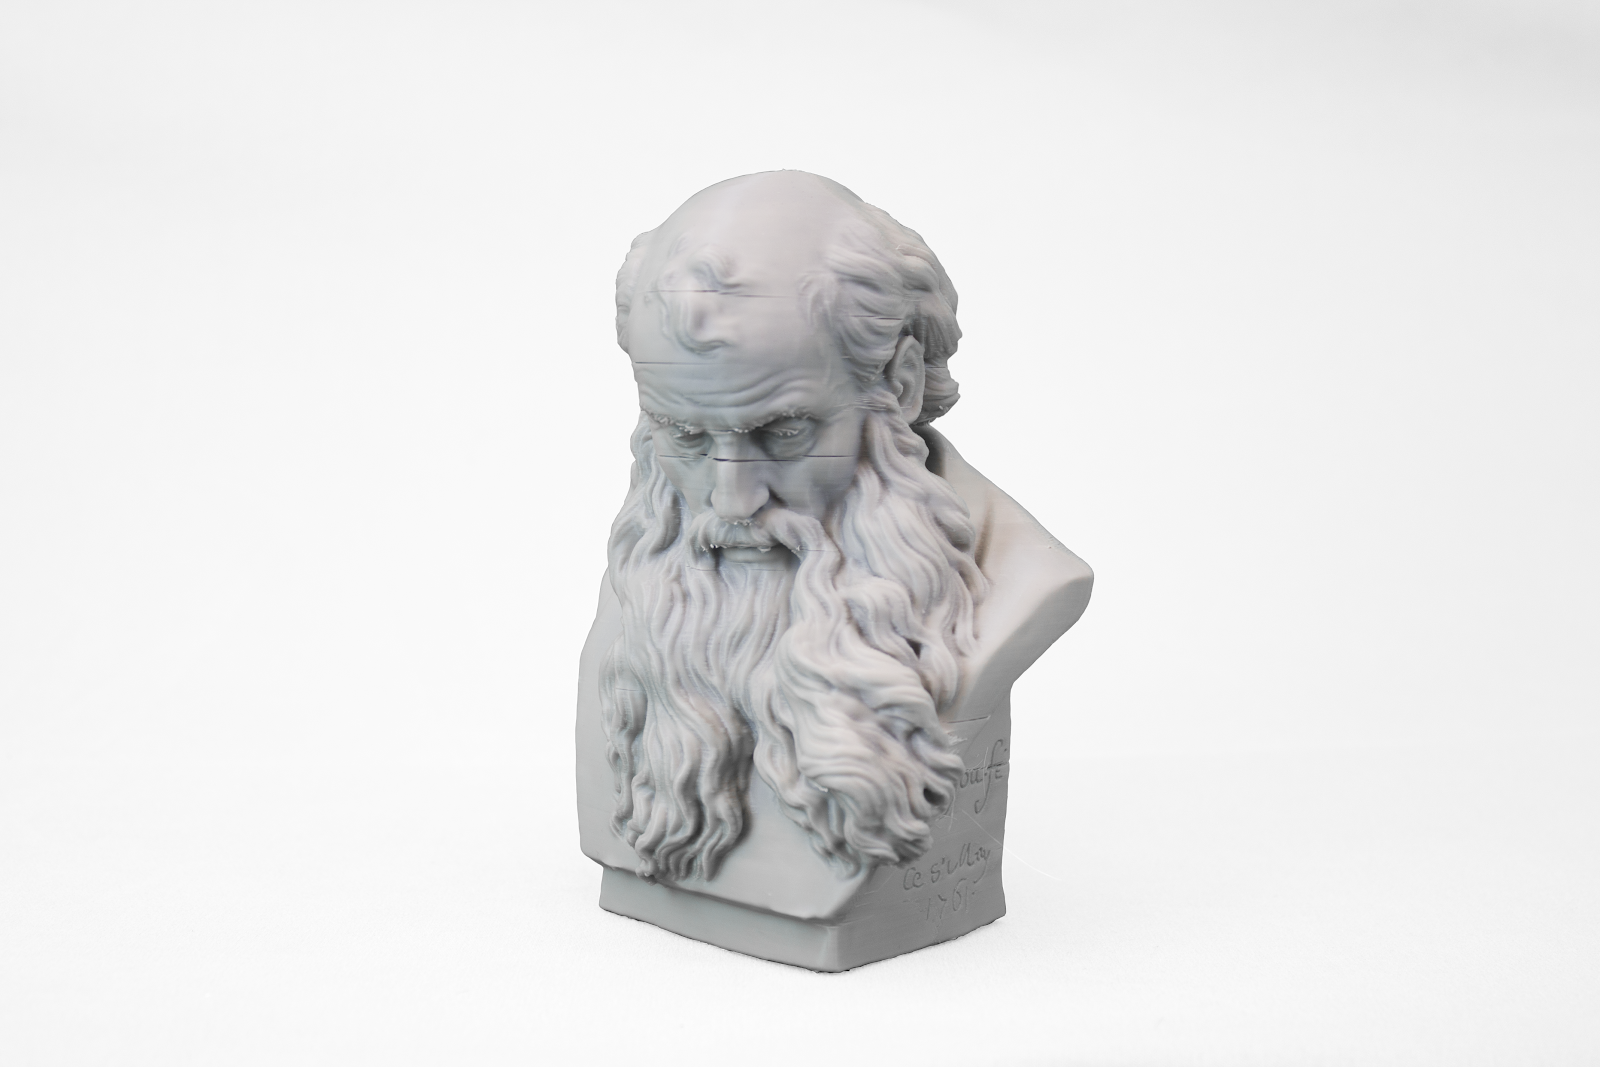
Further delving into this system’s ABS capabilities, a larger bearded man bust model was printed in 10 hours and 48 minutes. The outcome was satisfactory as the layers were not visible and the model kept its original details. Yet, there were small delaminations on the head as well as minor adhesion faults. This is probably due to the fact that the left door was kept open and the printing temperature was not higher than 240°.
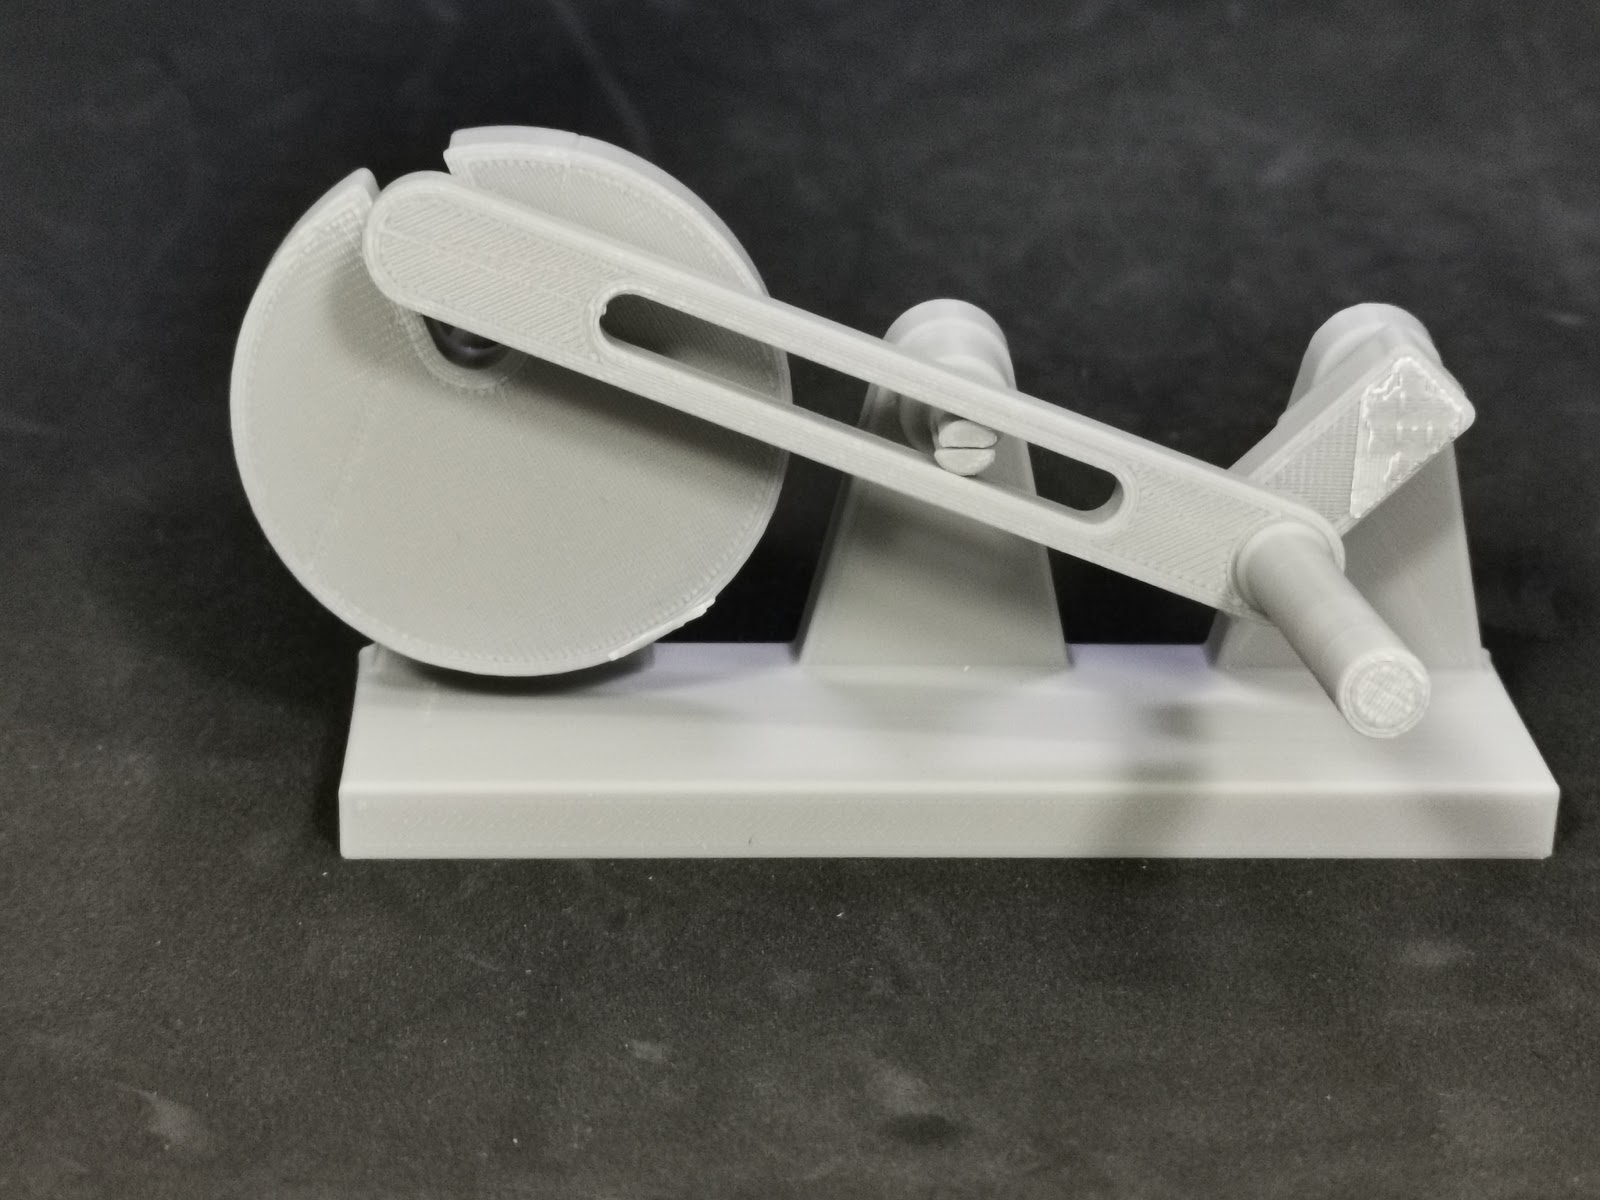
Finally, a crank flywheel model was printed to test the machine’s ability to produce mechanical parts in need of assembly. This model was manufactured successfully in 7 hours with very smooth surface parts which made the mechanism easy to put together.
The Adventurer 3, dependable, compact, and quiet
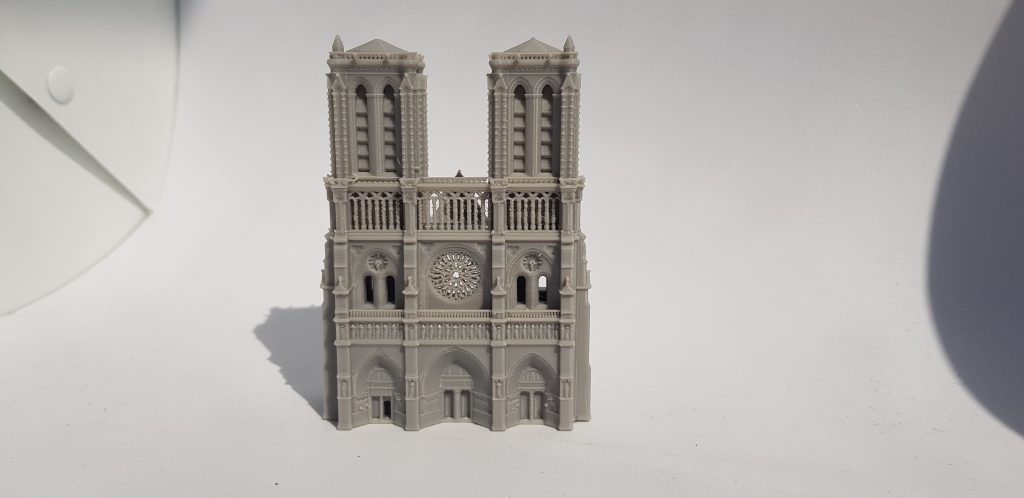
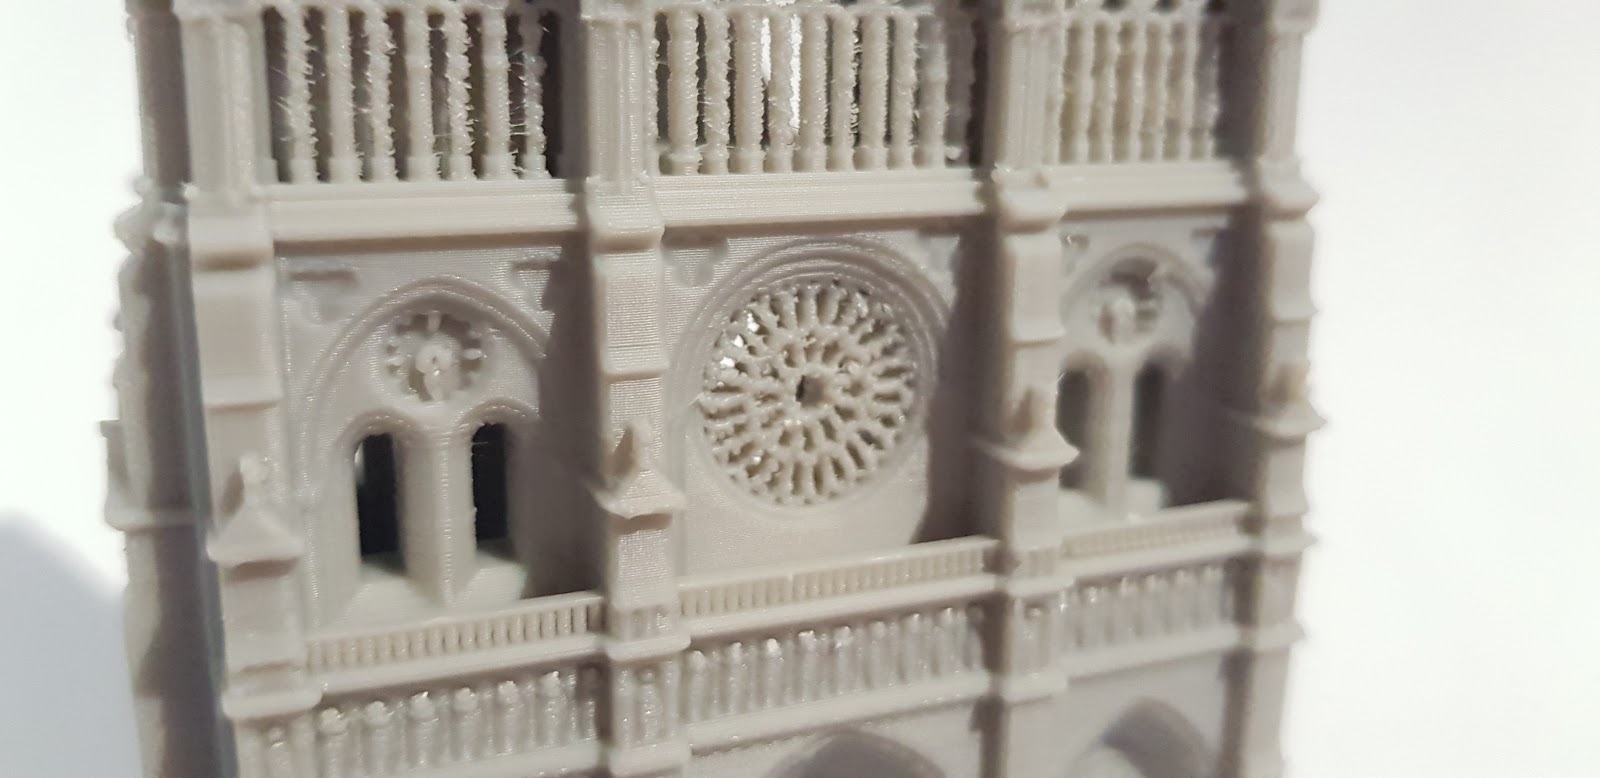
Overall, whether large or small, the Adventurer 3 was capable of printing good quality models. Long print jobs, in particular, are not an issue for this 3D printer, as the ABS Notre Dame model printed over 15 hours with no issue. As observed by team, part quality is excellent when all lids are closed making this a great machine for ABS prints. When working with more challenging materials such as ABS, spool storage outside of the system due to the small spool capacity can be a challenge, but affect on prints is negligible if the airflow is properly contained.
From the rigorous tests, there are some areas identified for improvement in the system. Generally, only low-temperature materials, like PLA can be printed consistently, limiting its versatility. Third-party filaments are also not ideal for use on the Adventurer 3 at present, as most spools are bigger than those from FlashForge and must be set up outside the machine. This drawback, however, could be overcome by an upgrade allowing access from the top to remove the Bowden tube.
Also, the interface of the advanced settings screen on the slicer could be improved by making it a bit easier to read. In terms of the set-up, an auto-leveling step before each print is recommended for a faster set-up process. This will compensate for inconsistencies in the bed shape, which could prompt the user to use shims to adjust the corners.
Nonetheless, throughout testing, the machine printed models reliably, each time without fail. The slicer was user-friendly with a basic or advanced settings mode, to suit both beginners and experts. The software also did not include any unnecessary features. Though the Adventurer 3 may never compete with industrial 3D printers in terms of build size, true to its claims the machine is perfectly suitable in a desktop environment, be it a classroom or studio. It also operates at a suitable, low volume, and its price once again makes it accessible for most to purchase.
For more in-depth reviews and other additive manufacturing news, subscribe to the 3D Printing Industry newsletter, follow us on Twitter, and like us on Facebook.
Also, visit 3D Printing Jobs to find new opportunities in additive manufacturing.
Featured image shows the FlashForge Adventure 3. Image via FlashForge USA.