Those who aren’t all that familiar with the Raspberry Pi may not have a full grasp on exactly what it is and just how powerful it is. As if to illustrate both of these points, Adafruit’s Mini Mac Pi tutorial, from Noe Ruiz, goes through the process of how to create your own Mac Classic with a Raspberry Pi and 3D printing.
Inspired by John Badger’s, from RetroMacCast, own mini Mac project, Noe Ruiz takes you through the steps of building a Mac Classic replica that runs on a Raspberry Pi Model B and enclosed in a 3D printed case. Like all Raspberry Pi projects, this project runs on an SD card carrying the operating system, but the OS for the Mac Pi uses MinivMac, a software emulator that mimics Mac OS 7. As daunting as it may seem to recreate the computer, Ruiz suggests that the project isn’t too difficult, requiring only a small amount of soldering, with most parts simply connecting together. And, once it’s complete, you’ll be satisfied knowing that the little Mac is a pretty satisfactory duplicate, though it only has minor application support, no audio support, can only run Mac 7, lacks networking, and has a reduced screen size.
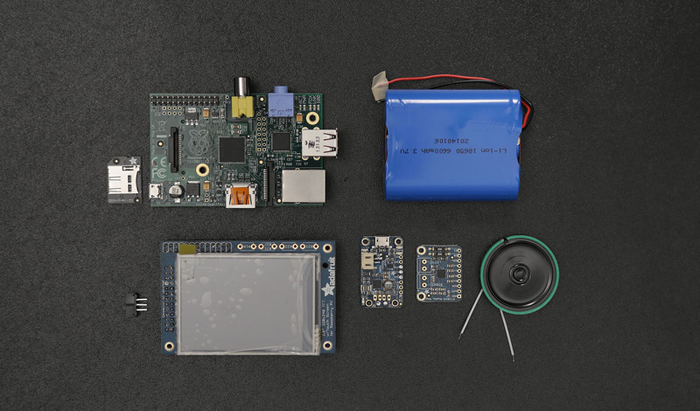
All of the hardware for the job – including the PiTFT 320×240 2.8″ Touchscreen, a Raspberry Pi B, a lithium ion battery, cables, and internal speakers (though vMac doesn’t support audio) – can be purchased from Adafruit and the Mac enclosure can be downloaded for free via Thingiverse. If you’re into building stuff, but lack the 3D printer to put this mini Mac together, you can have the files printed through a service bureau, like Shapeways or i.materialise, or you can have it printed by a local printer through 3D Hubs or makexyz. And, if you want to modify the STL files for the project with your CAD magic, you can do so with free software, like Autodesk’s 123D Design.

Ruiz explains how to set up all of the hardware to run your tiny replica, including how to connect the 6600mAh battery pack that can power the computer for about 15 hours, as well as the PiTFT touch screen that acts as the monitor and the PowerBoost 500, which pushes up the voltage of the battery pack and includes an on/off switch for turning the computer on. After all of the wiring and installing the appropriate software and vMac OS, you can super glue your electronic components to the 3D printed case and close the front and back with magnetic connectors, for easier access.
If you’ve done all that, you should have your own min Mac Classic or Mac Pi or Mini Mac n Cheese or whatever you want to call it. Look how far we’ve come since 1990! Your brand new Mac will only run you about $160, when the original would have cost you $1000 in 1990. Plus, you wouldn’t have had the fun of building it yourself. Isn’t life grand?