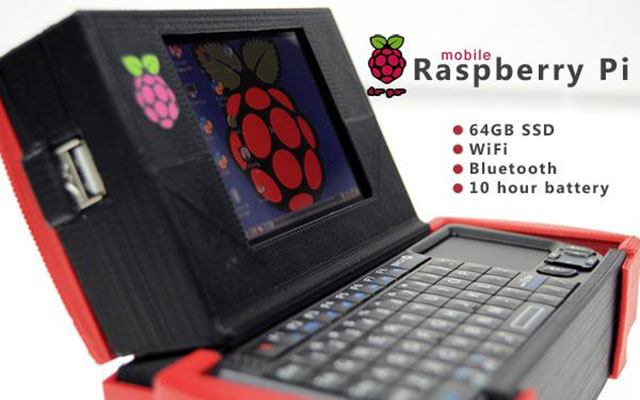
An amazing DIY Handheld Rasberri Pi Computer – with instructions to make one!
The mobile Raspberry Pi Computer is now available as an open source project courtesy of partspeople. Following are step-by-step instructions to produce this amazing home DIY project, including links to the parts to purchase and the .STL files to 3D print your own case!
LCD Screen
The LCD used is from an after market backup camera system that can be installed in a car. The screen is 3.5″ using a 4:3 aspect ratio. It uses a composite input and is able to display a resolution of 640 x 480 pixels.
Battery Pack
First off, be very careful when messing with lithium-ion batteries. Laptop batteries are built in such a way that you cannot just plug something into them and use them for a battery pack. Used here is a battery from a Dell Latitude D600 laptop removed from the Dell battery case – they have a standard Dell 9 pin battery connector. To get power out of this battery, you will need to connect pins 1,2, & 4 together for negative / ground (-) and pins 8 & 9 together for positive (+). Be sure to connect the correct leads.
Charging the battery is easy using an after market laptop battery charger. It connects directly to the battery’s 9 pin connector and also has a battery level indicator built-in.
One major problem with the Raspberry Pi’s current models is a lack of power. The Pi is powered by a micro USB 5v with at least 750ma, 1A is better.
Internal Powered Hub
But the problem is not there, it is that the USB port can only supply in the neighbourhood of 120ma per port, which is not enough to run much.
Five things require power here: a wireless WiFi dongle, a bluetooth dongle, an SSD hard drive, a keyboard/mouse transmitter, and the Raspberry Pi itself.
The power from the battery pack is 11.1 volts and the power required for the USB hub was 5 volts. Connect the battery to the LCD screen which has an input of 9v-13v, the LCD screen has components that require a 5v power source (LED LCD back light for example).
Find the onboard voltage regulator from a device such as a 7 USB adapter and solder on leads across the 5v capacitor and solder those to the 5v input on the powered USB hub. Easy as Pi. Now we have clean regulated power for all of our devices.
Extended Storage
The Raspberry Pi itself has 256MB (model B version 1) or 512MB (model B version 2). If one simply installed a larger SD card and added a large swap file, or swap partition, it would eventually burn out the SD card. SD cards have a very limited number of read/writes and SD cards are slow.
A 64GB Sata II solid state hard drive made by Samsung (model # MMBRE64GHDXP) is a good option for extending the storing. Use an external USB hard drive caddy’s circuit board to connect the SSD sata HDD directly to the internal power USB hub. Setup a 1GB (1,024 MB) Linux swap partition, and have the rest formatted in ext4 for extended storage.
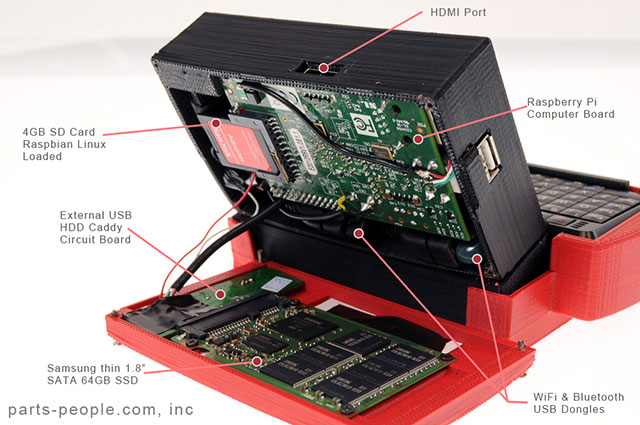
Built-in WiFi & Bluetooth
To build in as many features, and therefore as much potential, as possible, one adds a nano USB WiFi dongle and a nano USB bluetooth dongle. These are also soldered directly to the built-in powered USB hub.
Operating System
This is a Raspbian Linux downloaded from raspberrypi.org. The only tweaks made are to the config.txt file and adding a Linux 1GB swap partition. Modify the config.txt file as below to make the LCD screen display properly and fill the whole screen.
config.txt changes:
overscan_left=8
overscan_right=-40
overscan_top=-30
overscan_bottom=-30
sdtv_mode=2
Keyboard & Touchpad Mouse
The design uses a wireless 2.4Ghz USB keyboard & mouse combo. The keyboard slides in and out via the access door on the left side of the machine. The access door also exposes the on/off switch and mini USB charge port for the keyboard too.
Overall Specs
The Raspberry Pi board used is a model B (revision 1) but it is fine to use the model B (version 2) for this build:
CPU Broadcom BCM2835 ARM11 700Mhz
Memory 256MB (shared with GPU)
Main Storage 4GB SD Card (OS Installed)
Extended Storage 64GB Sata II SSD (1GB linux swap)
WiFi Wireless Built-in B/G/N Card
Bluetooth Built-in Bluetooth 3.0
Peripherals 1 Powered USB Port
Video Output HDMI Port
Keyboard / Mouse QWERTY Keyboard with Touchpad Mouse
3D Printed Case
Created in Google Sketchup, the 3D-printed case has five parts, opensource, as below for your own home 3D Printer:
▪ bottom base (download 3D STL file)
▪ left cover (access door) (download 3D STL file)
▪ right cover (download 3D STL file)
▪ LCD screen assembly (download 3D STL file)
▪ back access door cover (download 3D STL file)
Everything is made to snap together except the back access door is held on by four screws. The back of the case has a Raspberry Pi logo cut into it and it is illuminated when the device is powered on using a back lighting LED and the acrylic strip from the back of a backlit laptop keyboard.
Links to purchase all required parts:
▪ LCD Screen – bought on amazon for $17.95 – here
▪ Raspberry Pi – bought on Newark/Element14 for $35 – here
▪ Mini Keyboard/Mouse – bought on amazon for $29.95 – here
▪ Standalone Battery Charger- bought on amazon for $75.00 – here
▪ Powered 7 Port USB Hub – bought on Parts-People.com for $14.95 – here
▪ 64GB SSD Hard Drive – bought on Parts-People.com for $129.95 – here
• Dell D600 Battery – bought on Parts-People.com for $88.50 – here
Source: Thingiverse