
An in-depth pricing guide for 3D printing business and fabrication shops.
By Mike Moceri – Founder & CEO MakerOS
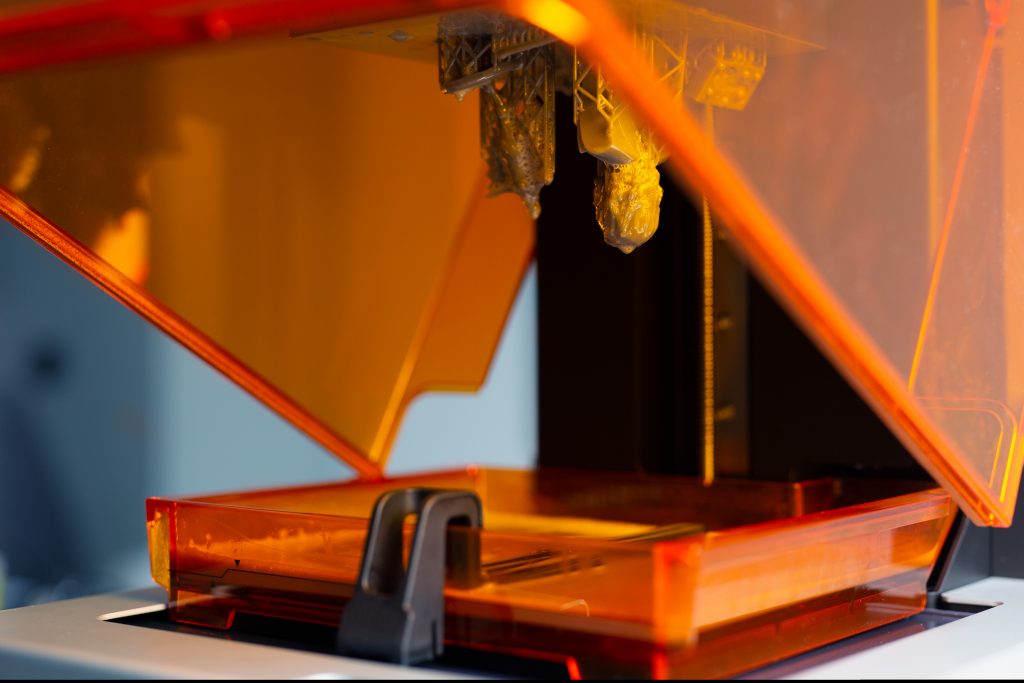
SLA 3D printing, and all of its variations, offers incredible accuracy for highly detailed parts like electronics enclosures and small miniatures. But so much accuracy comes with an equal amount of complexity and cost. I’ve discovered that both small and large shops struggle to understand what their actual cost of fabrication is for SLA machines.
I previously went over how I became so uniquely adept at pricing for 3D printing projects, and specifically how to accurately price for FFF/FDM. Today, I’m providing you an in-depth guide on how to accurately price for SLA projects and ensure you’re maximizing your profits for your 3D printing business.
How to Price for SLA
Let’s start by determining what one-liter of material is worth to your business, and extrapolate from there to determine what you should price your customers for 3D printing services using your SLA 3D printer.
To follow along, you need access to our free 3D printing pricing calculator, and we’ll figure this out together step-by-step. Your parameters might be a little different than what I’m inputting, but I’m willing to bet that the majority of you reading this will have similar inputs to the ones that I’m putting into this calculator.
Now that we have the calculator open, we want to assume a few things. First, this is an SLA 3D printer. Secondly, you’re probably buying your material by the liter, so this might be from the original manufacturer, from a reseller, or from some sort of distributor. The fact of the matter is that most of you are either going to buy this in bulk or you’ll buy it on a per bottle basis, but in this example we’re going to go for a smaller desktop style SLA 3D printer. Please keep that in mind as we go through all these other inputs.
Calculate Material Cost for SLA
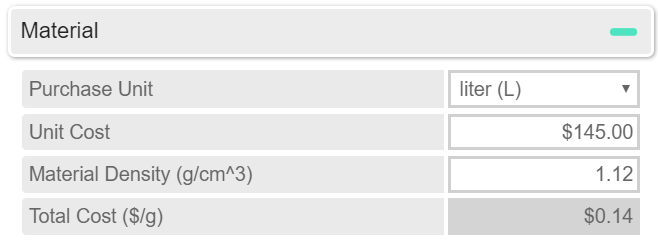
Looking at the calculator, I’m going to choose the purchase unit that I’m buying this material by the liter. What I know from researching different resellers and manufacturers the average price of a bottle of white standard SLA resin is anywhere between $90.00 per liter, all the way up to $200.00 depending on who you’re buying it from, the quality of the resin, etc. Let’s go for the middle-of-the-road, let’s assume $145.00 for one liter of material.
Now, what you should do is look at the material datasheet of any material that you’re going through and look at the density of the material when it’s 3D printed and cured. What you’ll find is typical for this type of material is 1.12g/cm³ pretty much on the money for the density of this type of material. From here, you can see the calculated cost of material is $0.14/g.
Calculate Machine Cost for SLA
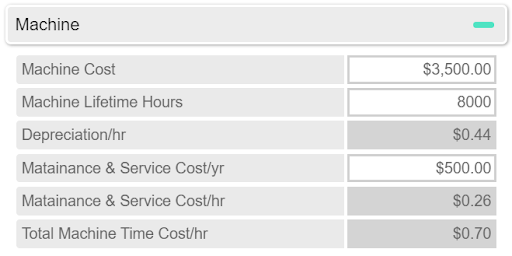
Next, we want to look at the machine cost, the lifetime hours of that machine, and the maintenance and service costs per year. For today, we’re going to say it’s $3,500 to purchase the machine and that the machine itself has roughly 8,000 operational lifetime hours.
Think about this for a second, it’s not just about the usage of the machine. It’s also how many times you’re actually going to use this machine, its utilization over an annual period, and then forecast that into the future. If that’s X amount of years of usage, you can reverse calculate how many lifetime hours that is until the machine depreciates down to zero, because that is a real cost. As you can see below here if I have 8,000 operational hours of that machine, it’s going to cost about $0.44/hr.
There are really two ways to look at the maintenance and service costs. A lot of people in the hobbyist community are do-it-yourselfers. They want to maintain the machine themselves, take it apart, etc. You really need to compensate for your time if you’re not buying a service or maintenance package from the OEM, the manufacturer, or reseller; you need to account for your time. To do that, consider what you’re charging per hour for other services and calculate how many hours annually you’re going into maintaining that machine.
Usually, it actually comes out cheaper if you pay the maintenance and service cost from the OEM/reseller. You’d be surprised how much time and money that you save by buying these packages. It may seem like a large upfront cost, but it gives you security and peace of mind if anything would go wrong with your machine it could save you a lot of money and time in the future.
With all that said, we are going to assume we purchased a maintenance package for $500/year. It will add an additional $0.26 per hour, so we’re looking at a total hourly cost of $0.70.
Calculate Material Fabrication Rate for SLA
Now, let’s look at the fabricated material tab. In our previous post, we looked at FDM/FFF 3D printing and how you should price for that process. Generally, calculating the costs for SLA is a bit more complex, because we’re not necessarily dealing with material deposition rates.
Instead, we want to figure out the Z build height per hour for this machine. It’s essentially how many layers per hour (with a given layer height) we can fabricate with this machine.
For this example machine, you may have a heat up time to get the resin to an ambient temperature for fabrication. This is especially true for some of the larger industrial machines and might even be true for some of the desktop models that came out recently. Therefore, let’s give ourselves a buffer in here to when you send the file to the machine for it to process the file and get ready to print. Let’s go ahead and assume here at the lower end it takes 20 minutes to get the resin to ambient temperature and complete all the other machine operations before we’re ready to 3D print.
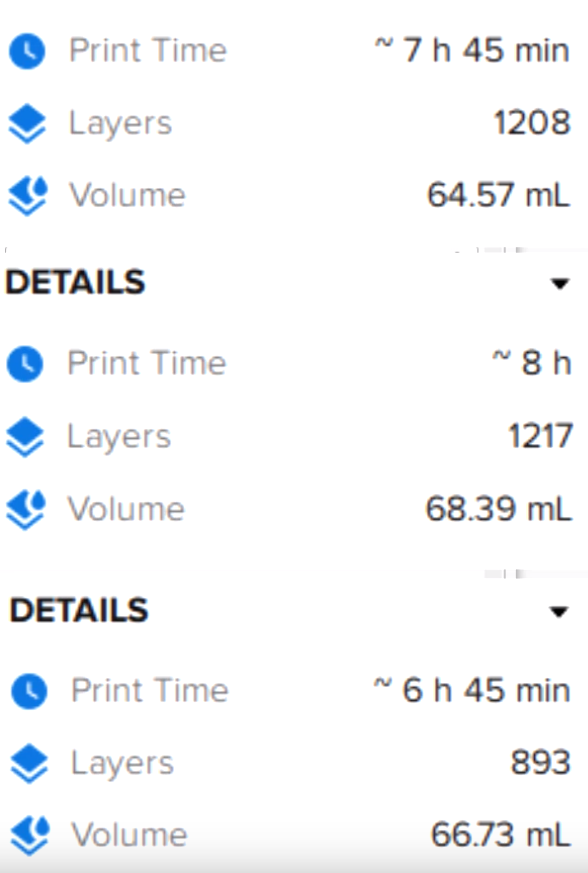
Looking at the layer print time per second field, there’s a couple of ways to calculate this. One way is with the slicer. The image here shows you the projected time in the slicer that it’s going to take to produce a given object. That varies wildly of course, given your orientation of the part. If you’re optimizing for time, you’re going to be printing it with a lower Z height. However, if you print it more vertically, you will get a higher surface quality of the part, but may increase print time.
Regardless of how you orient the part, whether you do this with one or a few objects, go into the slicer and calculate how many seconds it’s going to take to fabricate that part, and then divide it by the number of layers. That’ll give you the layer print time in seconds. On a typical desktop SLA printer you’ll get anywhere between 45 seconds to maybe a little over a minute. Other major factors to consider are the machine operations after the layer is “cured” including the peel, wiping of the build area (if your machine does this), and the Z axis hop. Essentially, compensate for the time between layers because they do not start one immediate after another and some slicers do not include this in their time estimations.
For this example, let’s shoot for 60 seconds and see what this gets us down the line. We’re also going to assume that we’re printing at 0.1mm for the layer height, which means it’s a very simple calculation for this example. It equates to 60 seconds x layer height of 0.1mm, which gives us 60 layers/hour. That means our Z height/hour is 6mm. Looking at the next line, we see the material and print time cost for a 1cm^3 cube. The cube is 10mm in the z axis which means it will take 100 minutes to print given our print time calculation above and also equates to $1.32 for time and materials cost.
Next, let’s talk about the support equipment cost, which will include your cleaning station and the UV station. Typically, you’re going to buy this from the manufacturer. You can build one on your own, but in this example let’s say we bought it from the manufacturer and it cost $1,200.00. Let’s also assume that’s going to be about four years usage out of both of those things, which will be an additional $0.15 cents for the depreciation per hour on that equipment.
Next, what we want to look at is the build area of the machine. You’ll notice that Z height is missing from the calculator. The reason for this is we can already calculate in a Z height per hour, how many layers per hour or how many millimeters per hour you can print, but you want to figure out what is the maximum surface area of any given layer that you print.
So, I’m entering 145mm x 145mm. What we’re also assuming is that, on average, only 10% of that surface area is going to be taken up by a printed object’s layer. Enter the value that makes most sense for the parts that you print, but you’re most likely not going to go any more than 20%. I’m pretty confident about that, due to the fact that larger surface areas per layer result in more failed prints due to peel forces and general layer adhesion issues.
Of course, there are newer model machines that are better at printing larger surface areas, so you can increase the max packing density, but typically most machines have a peel force that lifts to one side, or just goes straight up and down. You want to be careful of that. Depending on the style of machine, it can be higher or lower. Look at the manufacturer’s recommendation for that calculation. You can be smart and look at your own parts and do a rough estimation. If you want to do an exact estimation, you can look at the cross section of the layers, and calculate the amount of surface area per layer that those parts are taking up.
Moving on, we’re going to assume you know the 145mm x 145mm surface area and a max packing density of 10%. We can confidently say that 21 one cubic centimeter boxes can fit within that surface area, which means the print time for those 21 cubes is going to be 100 minutes. We can assume we know the density of the material and how many boxes we can print, that means that it’s going to be 23.55g printed in those boxes. The amount of material per hour is 14.13g/hr. Matched with the layer height of 0.1mm and 60 layers per hour. That gives you an approximation of how much material you can print within an hour.
Facility Costs
Let’s look at your monthly rent. There’s a few schools of thought here. One is to think about when a customer is basically ordering a part from you, they are renting not just your machine time, they are renting your business. They’re renting your office, they’re renting all your utilities and everything else that goes into it. If a client were to do that, they would basically have that part at their own cost. So, you can look at it that way. You can have the full load of rent and utilities cost as part of this calculation. If you have multiple machines, you could do the same thing, but divide it by how many machines that you have.
The third way is basically looking at the square footage of your 3D printers, so the whole area of where your machines are sitting, along with where your people sit within your office, your team or yourself. Calculate the price per square footage and then add that into the monthly rent. For utilities, I’ve seen some calculators that look at the machine’s wattage and the power usage, and that gets really too far down the rabbit hole and is not a complete picture of your business. Look at your internet costs, electric bill, heating bill, and all the other things that are a monthly recurring expense. Take the average of the last 12 months and enter that into the monthly utilities field.
For our example let’s just assume a relatively low rent. If we have only 1 SLA machine, we’re going to do the fully-loaded cost model for this. We’re going to say our rent is about $2,000.00/month and $300.00/month in utilities. The facility cost per hour for rent and utilities is $3.19.
Calculate Human Costs
Moving on to the humans portion, obviously we mean your team, yourself, whoever is in charge of slicing the file, loading the files onto the machine, removing the prints from the machine, and ultimately handling that entire process. This may be multiple people or it might be one person. I’m willing to bet for an operation like this with a desktop machine it’ll be one person. Enter the hourly pay rate for the person running this machine and process. Let’s assume in this example $40.00/hr (enter what value makes sense for you). We’re going to say that it typically takes 30 minutes to prep the file, put it in the slicer, orient it, take the part out, support removal, etc. If it takes 30 minutes it’ll take $20.00 worth of setup and teardown cost per print job.
Software Costs
After talking to so many different shops, it seems that most forget this next step. The software that you’re using is critical to your operation, so include this part of your costing model for your business, and what you ultimately price for your service. If you’re using a typical industry standard CAD solid modeling program, you’re probably paying $4,000.00/ seat annually. There may be a maintenance cost to that, annualize it and include it in the CAD line. Add your cam, slicer, or your ERP system. Look at all the other different software that you use including Gmail, your website builder/hosting… all those things go into running your business and are for the purpose of you offering services in the first place, so you should include them as costs.
Taking all of these into account, it’s very typical for a shop like our example to have $8,400.00/yr in software costs, which equates to about $4.04/hr.
Calculating Total Costs for SLA 3D Printing
You’re probably looking at the right-hand side of the calculator at the cost per hour. This is going to scare some people. Don’t be scared. This is actually pretty typical, it’s normal and we’re going to find how to make up for your hourly cost. If we look at all of those things on the right-hand side, we figure that our total hourly cost is $9.40.
Let’s go back to the very beginning and figure out what it costs to fabricate one liter of SLA material. For now just zero out the “how many jobs projected per unit” field. You will see the cost of fabrication for one liter of material is $691.85. This is calculated by how many hours it’s going to take to fabricate that one liter of material, which here we’re saying is about 73.61 hours, because we did that whole calculation in the fabricated material tab.
We’re basically saying that our grams per hour is 14.13 and we divided 1,040 by that, and how many hours it takes to fabricate all of this, it’ll be 73.61 hours multiplied by the $9.40/hour cost, which gets you the $691.85, but we’re not done yet. We have to figure out how many print jobs are typical for one liter of material. The best way to go about this is to either physically measure your past ten jobs with the support material in it. Take those past ten jobs and weigh them to find how many grams were used. Say each is about 100g to build a typical print job with that machine, that means you can get approximately 10 jobs out of that one liter of material.
Let’s use that as an example for printing small to medium parts. We have 10 jobs here multiplied by the human cost, which is $20.00 per print job, as an additional $200.00, which brings a grand total cost to fabricate that 1 liter of material at $894.17. It seems like a lot, but again that is very typical. I want to be really reassuring here, this is very normal, so let’s figure out what we should charge.
How to Determine Markup
Let’s get philosophical here for a second about your markup/margin. I’ll zero out the markup and let’s look at your breakeven costs. We already know that the total cost to fabricate is $894.00, so the cost is $0.86/g and it’s $0.96/cm³, or $12.15/hr.
Now, think about that for a second. If you are pricing anything below the above break even costs, you’re losing money. So how do we make money? Let’s think of it in a couple of different ways. Let’s assume that you’re a smaller shop and are consultative with your clients, so you’re adding much more value beyond the print itself. If the client were to do this themselves how much time, energy, expertise, and years of training would they need in order to execute on this part? Another consideration is to look out into the market and test what your competitors are pricing at – what you’ll find is that there really isn’t a standard for pricing SLA, FDM, or any other process.
Pricing ranges wildly and the biggest reason why is because no business is the same with their costs or even the value that they add. I am of the perspective that a business should be really hands-on with their clients to add more value beyond the fabricated part. You’re helping to guide them to the right solution for their application. That said, it’s really not out of the realm to price more than about 200% margin for printing in SLA like this. Think about it. Pricing in this range for a very high quality part, that can sometimes out-compete FDM or even SLS, depending on what the application is in the sweet spot at this level.
I’m suggesting to price based on the high quality, high tolerance, high touch point type of service you provide. This is really attainable. Do not be afraid to price a little higher than maybe what you’re used to. And another thing is that it’s much easier to come down in price than it is to increase price after the fact. Especially, if you’re doing high-value type of printing and you have a whole bunch of clients. If you’re working for clients that do more engineering type of projects that need that high quality, they’re going to appreciate the level of service and quality that you’re able to provide for them. Do not shy from a price point like this.
Determining Your Final Price
Let’s take a step back for a second and look at what we just did. We figured out what it costs to fabricate 1 liter of material for your SLA machine, and that number is $894.17. Given all those things I mentioned about markup and value, we can have a 200% markup, which means that the actual value of that 1 liter of material, is actually $2,682.51. Let that sink in.
That breaks down into $2.58 per gram, $2.89 per cubic centimeter, or $36.44 per hour.
Here’s one scenario: a client orders a small part that’s only going to be a few millimeters in height. What should you charge for that?
Assume it’s a one-hour print, given everything that we mentioned above. What we’re looking at is the total hourly cost from above, which is $9.40, the added human time for that print job is $20.00, and then your markup of 200% means $93.60 for a one-hour print.
And there you have it, that’s your final price. Now, you can quote anyone interested in an SLA 3D printed project.
Going Beyond the Quote
What do you do after you’ve provided a quote? How do you turn potential customers into dedicated clients? How do you bridge the gap between the RFP and the completed project?
In my years of experience running multiple 3D printing service bureaus, I ran into many issues bridging that gap – countless back and forth, incorrect or lost files, poorly communicated instructions – and after speaking with hundreds of other 3D printing business owners, I realized that I wasn’t alone. And so I decided to do something about it and build a solution, and that’s why I founded MakerOS.
MakerOS is a web-based collaboration platform designed for digital fabrication and 3D printing companies and their clients. We bridge the gap between sales and engineering for 3D printing companies by enabling better collaboration and optimized workflows.
You’re in the business of completing projects, you’re not in the business of providing quotes. At MakerOS, we go beyond quoting and enable you to complete projects.
If you’re interested in going beyond the quote, request a free demonstration of the MakerOS collaboration platform. Ask us about our 30-day free trial so that you can experience first-hand how much easier it is to operate your 3D printing business.
Or, if you enjoyed this pricing guide and have any questions or comments, request a demo, ask for me and we can connect to talk shop (I love talking shop).
The nominations for the 2020 3D Printing Industry Awards are now open. Who do you think should make the shortlists for this year’s show? Have your say now.
Subscribe to the 3D Printing Industry newsletter for the latest news in additive manufacturing. You can also stay connected by following us on Twitter and liking us on Facebook.
Looking for a career in additive manufacturing? Visit 3D Printing Jobs for a selection of roles in the industry.
