3D Printing Industry reviews the peel 2-S 3D scanner.
Leveraging over ten years of R&D experience in 3D scanning, peel 3D once again targets the mid-range market with its latest handheld, full-color 3D scanner – the peel 2-S. Based on the company’s previously launched peel 2, which we reviewed just a few months ago, the peel 2-S has been revamped to optimize it for small and intricate part scanning, with a smaller field of view and resolutions of up to 0.1mm. Yes, the S stands for ‘small’.
Priced at a relatively affordable $7,890 ($8,090 from October 1st), the professional-grade 3D scanner is aimed at artists, designers, engineers, educational institutions, and anyone else looking to bridge cost-efficiency and performance in their 3D scanning projects. Much like the rest of peel 3D’s product portfolio, including the original peel 1, the peel 2-S is powered by electronics provider AMETEK and metrology specialist Creaform (peel 3D’s parent company).
It’s worth noting that there’s also a higher-performance version of the device called the peel 2 CAD-S ($10,090), which is more suited to hardcore reverse engineering projects. Designed to be fully compatible with most commonly available engineering CAD software, the CAD-S version enables users to export scans directly to various 3D environments without first requiring a third-party conversion program. For this review, we’ll be working with the base peel 2-S.
White light, black body
Straight out the box, the peel 2-S’ striking new matte black skin is what catches the eye. To date, the firm has exclusively developed its 3D scanners with white-grey bodies, so the visual change is a welcome one that adds a certain flair to the otherwise monotonous product lineup.
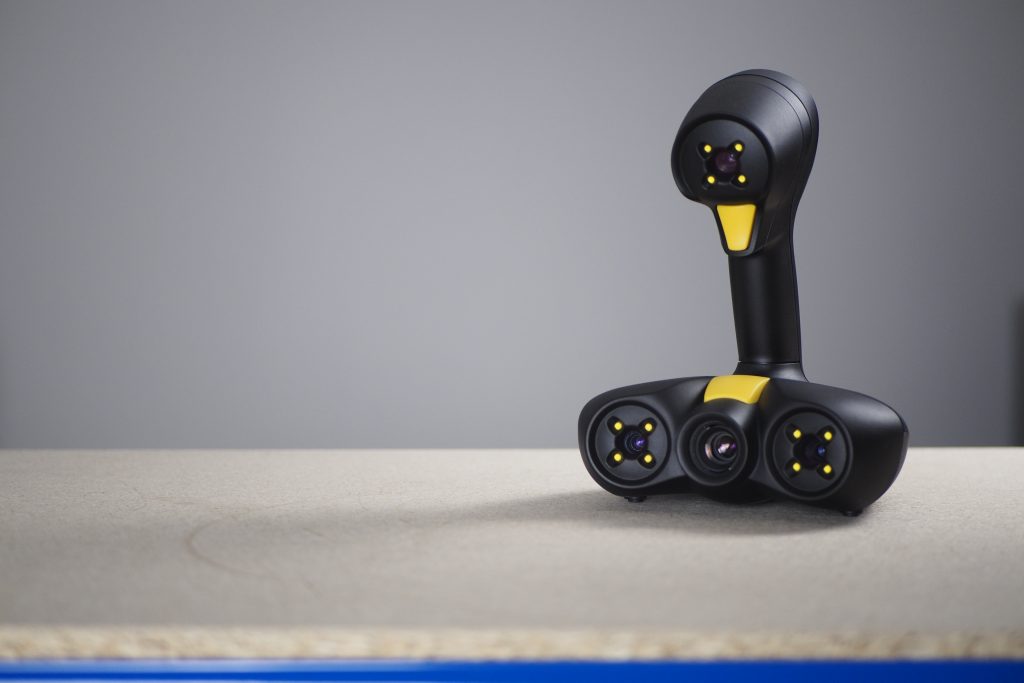
What hasn’t changed is peel 3D’s focus on ergonomics and ease-of-use. Just like its older siblings, the peel 2-S feels at home in the hands of the user, with an intuitive point-and-scan workflow that makes it a breeze to handle for longer and more tedious scanning sessions. The company has even managed to shave an additional 20g off the peel 2-S (930g) when compared to the original peel 2 (950g). The scanner itself measures 154 x 178 x 235mm.
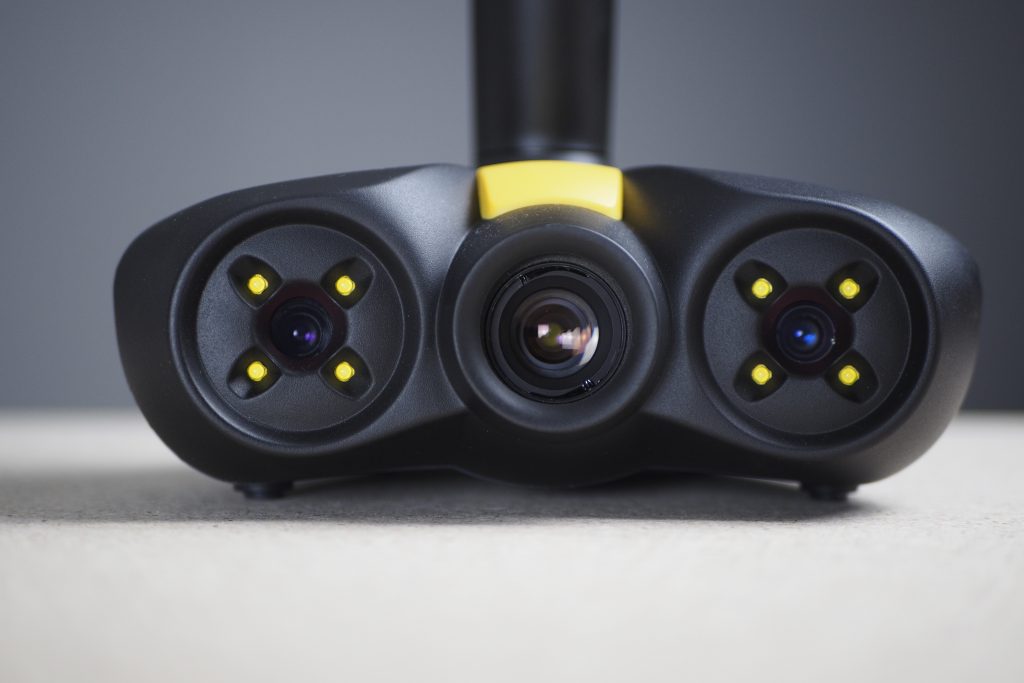
All of peel 3D’s scanners so far have featured the company’s signature structured white light technology, and the peel 2-S is no different. Unlike laser-based scanning technologies, white LEDs are safe for the human eye and work by projecting visible light patterns onto the object being scanned. The scanner’s cameras then determine the exact positioning of the projected patterns in real-time, which enables the system to generate a textured 3D model. The peel 2-S, in particular, has three cameras, each surrounded by a set of four white LEDs and an additional white light projector.
The device is designed to work well with objects on the smaller side, with a recommended part size of 0.05 – 0.5m (the scanning area is 143 x 108mm). As for material compatibility, the peel 2-S should have no problems scanning metal castings, polymers, and clay-based ceramics. peel 3D’s white light technology is also suitable for full-color human scans but may have some trouble with hair and fur.
Pitch black and mirrored surfaces can also be a little tricky to capture, but this is to be expected since these surfaces are either overly absorptive or reflective. To combat this, it’s not uncommon to coat the part being scanned in a material that is lighter or less reflective. We recommend primer spray or even a dedicated powder-coating spray designed specifically for 3D scanning applications.
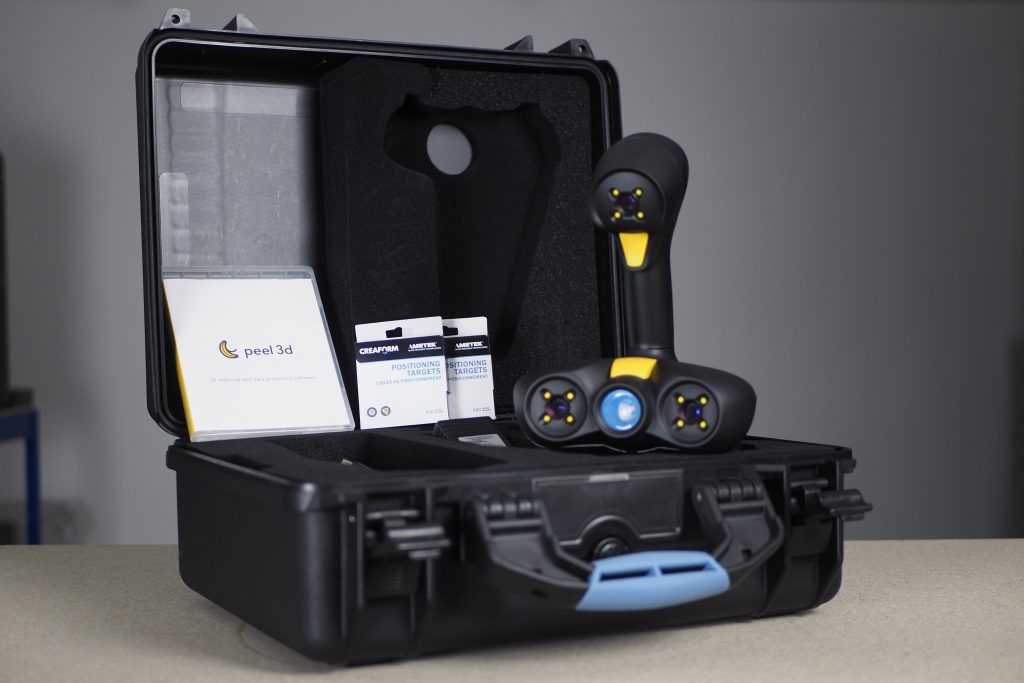
If the peel 2-S is still having difficulty with part tracking – perhaps the surface is too large or too flat – there’s always the option to use the positioning targets included in the box. The targets are small, reflective, adhesive dots used to help the scanner maintain its bearings and track its movement relative to the object. We found these worked best when we had at least three or four targets visible to the scanner at all times.
The calibration and setup process
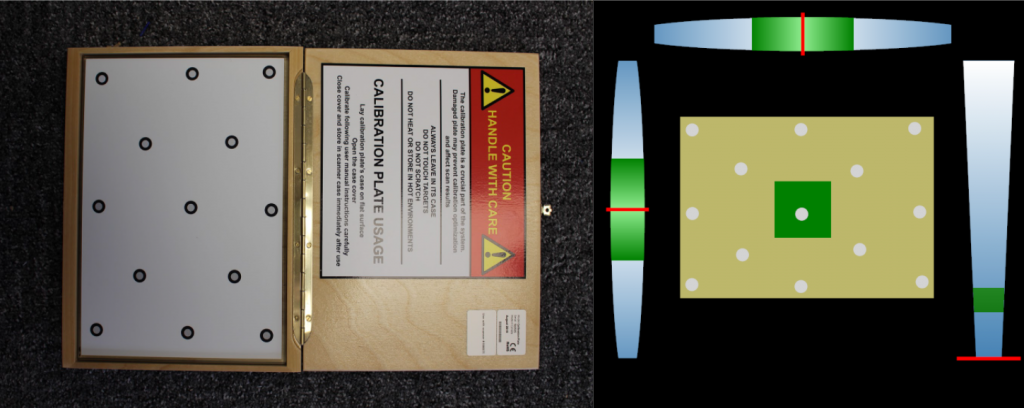
So just how user-friendly is the peel 2-S? As it turns out: very. Everything you need to start 3D scanning is included right in the box, including the calibration plate and a USB key containing the user manual and software installer.
The calibration process is identical to that of the peel 2, meaning getting started is as easy as ever. Although it isn’t essential, scanner calibration is recommended before every object scan – this ensures the best results.
To calibrate the peel 2-S, simply place the dotted calibration plate on a flat horizontal surface such as a table and scan it in the ten different positions specified by the peel 3D software. Starting at a perpendicular angle and a distance of approximately 20cm, slowly move the scanner away from the plate until it’s able to scan the whole thing, taking the necessary snapshots along the way. This only takes around two minutes to complete and is intuitive enough, even for first-timers.
The peel 3D software found on the USB key is also effortless to pick up, provided the user isn’t completely tech-illiterate. Sporting its signature banana-colored UI, the program features a ‘Basic Guided Workflow’ on how to obtain a quality scan, allowing beginners to quickly choose the best parameters for their projects.
Furthermore, the peel 3D software also does a great job of guiding users through the post-processing stage, which is arguably just as important as the scanning itself. The program enables users to remove unwanted background elements, plug up holes, and align and merge multiple scans in an assembly. We thought the video explaining the basics of how to clean a mesh was especially helpful.
Benchmarking the peel 2-S
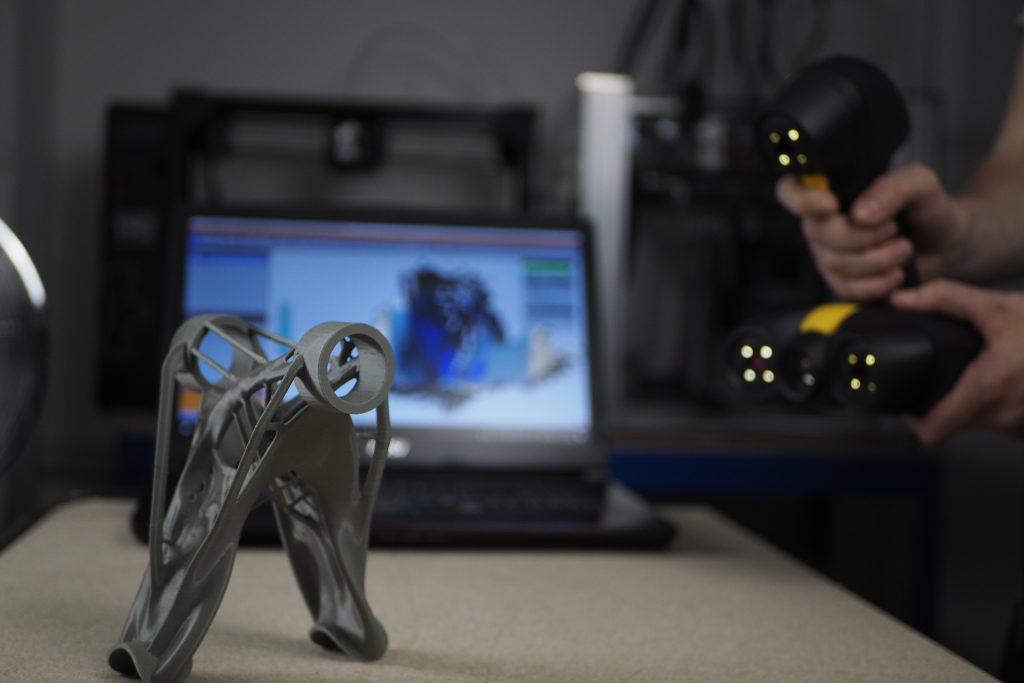
It’s time to put the peel 2-S through its paces with 3D Printing Industry’s comprehensive 3D scanner testing regime. Much like we do with our 3D printer reviews, we took the time to evaluate the scanner’s performance with a wide variety of parts and 3D printed models, ranging from artistic pieces to functional components. It should be noted that our printers are, on average, precise to around ±0.05mm so the parts we scan may have a margin of error to them.
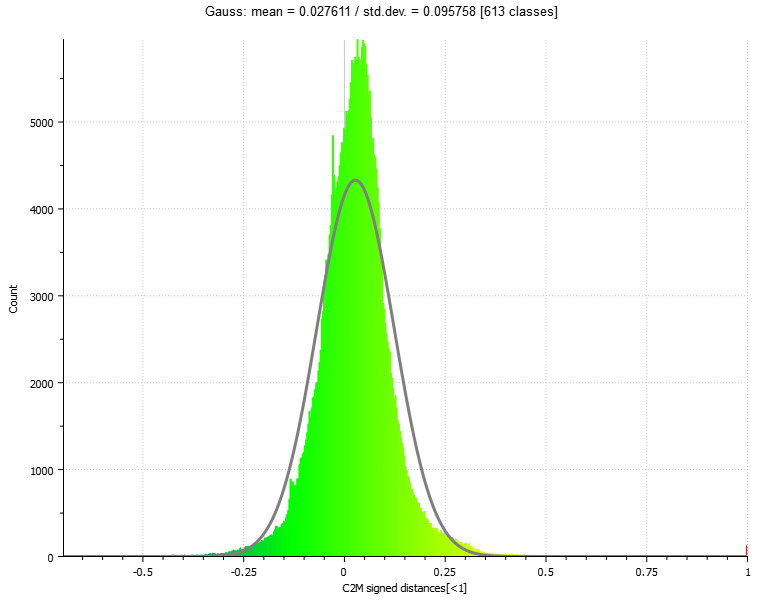
Each of the tests was performed several times with varying resolutions (2mm, 1mm, 0.5mm, 0.2mm, 0.1mm) in an open office space with ample lighting for consistent results. We also calculated the offset of the scans from the original STLs of the 3D printed parts to test the scanner’s dimensional precision – this is what the 3D heat maps and bell curves depict.
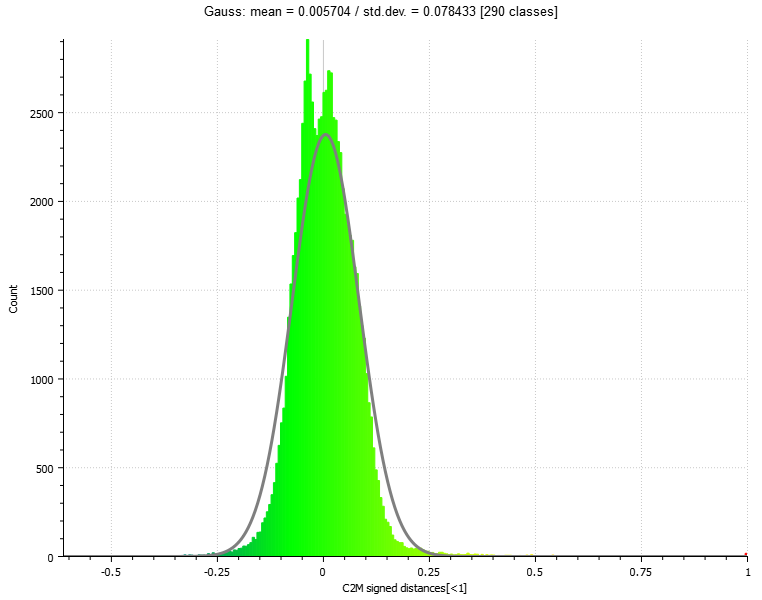
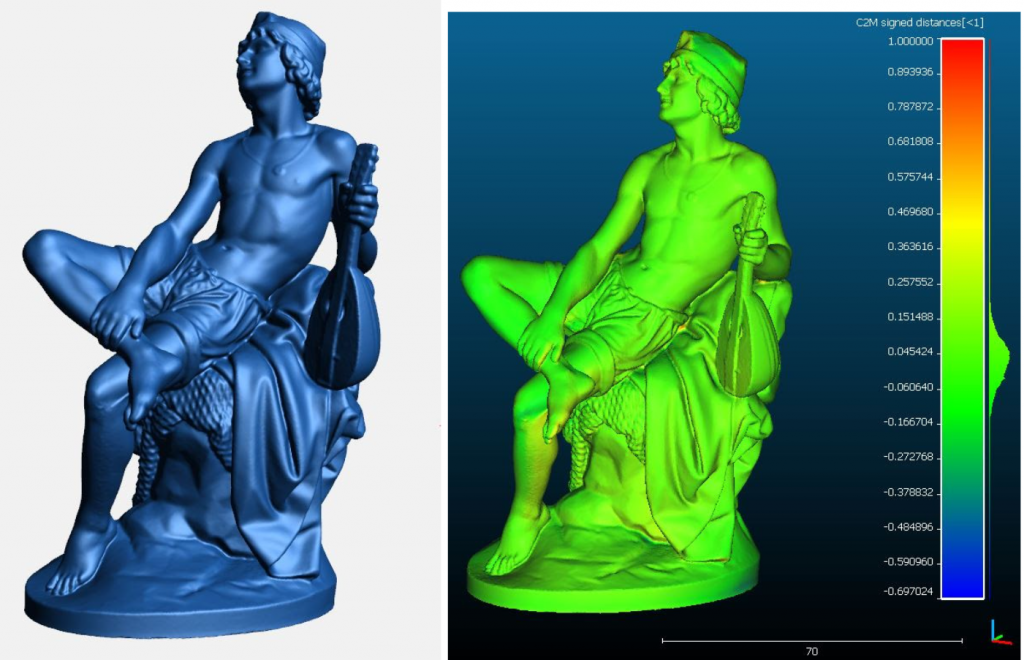
First up was a white PLA print of the Statue of Hygieia, which is located in the park of Schönbrunn Palace, Vienna. The model was chosen for its high surface detail and abundance of crevices and overhangs.

For a first scan, we were quite impressed with how the peel 2-S handled itself. The fine feature details of the physical model were preserved artfully, and the device was as easy to use as its predecessor. We noticed that the number of faces increased considerably with the scan resolution: 168,150 faces at 1mm, 2,461,746 faces at 0.5mm, and 14,086,457 faces at 0.2mm. It follows that scan time and post-processing time also increased with resolution.
Unsurprisingly, we found that the speed at which the 2-S scanned the model was slightly slower than the original peel 2, owing to the increased focus on small parts. Still, the scans were completed in one run and our scan times clocked in at only 8 – 13 mins, with a further 5 – 12 mins of post-processing.
Looking at the dimensional precision of the scans, the average offset of the vertices between the scanned model and the original STL (which is what we want to emulate) was just 0.005mm with a standard deviation of 0.075mm. Excellent results.
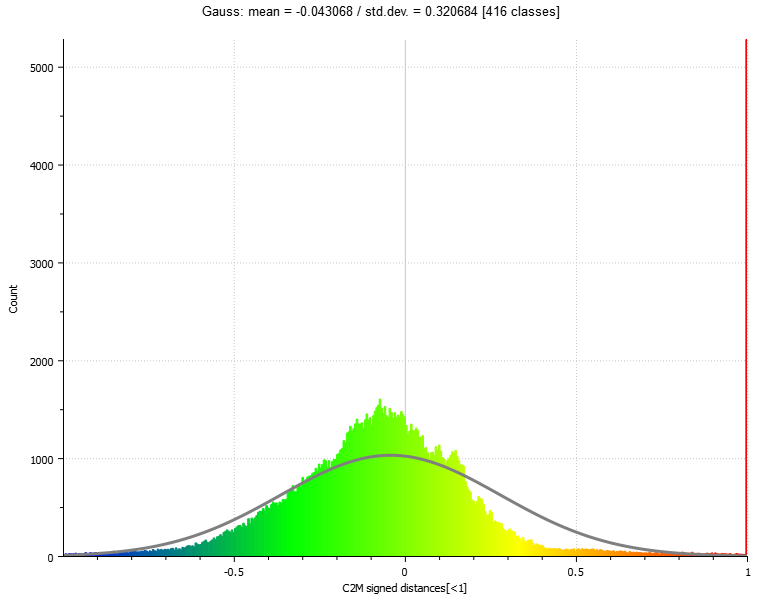
The next scan test was a 3D printed version of ‘Still Water’, a bronze sculpture located at Marble Arch, London. The model we worked with was spray-painted in silver and stood about 30cm high.
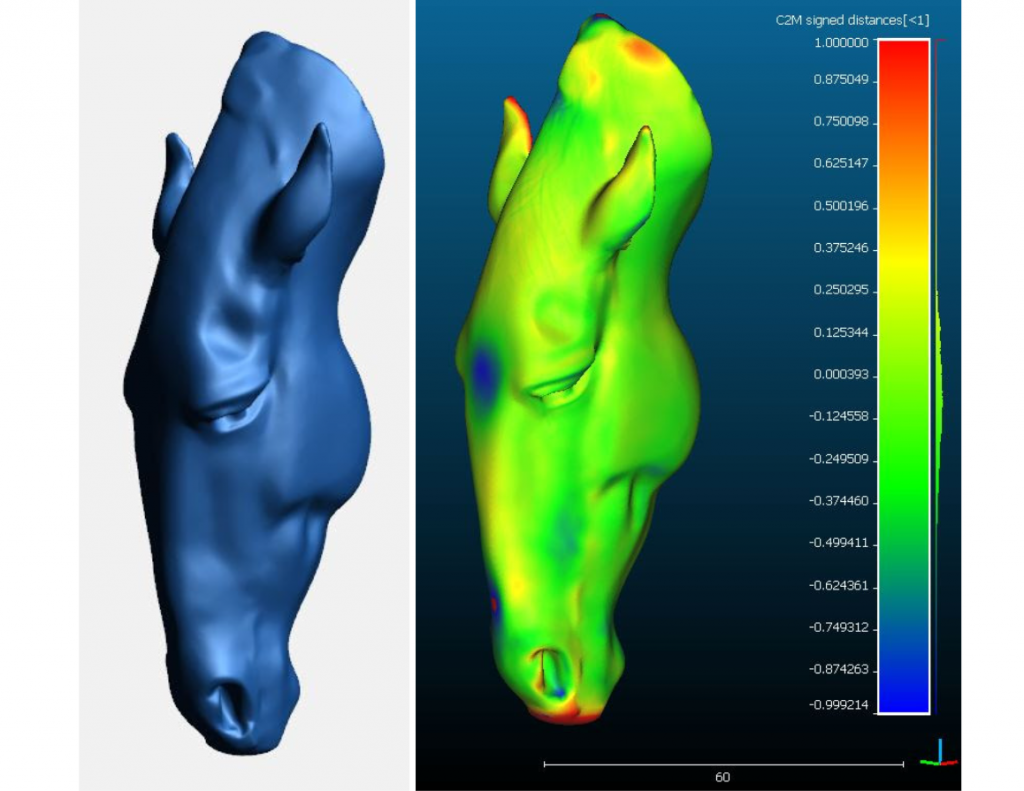
Again, the peel 2-S performed admirably here, capturing the likeness of the horse’s head as expected. Geometrically, Still Water is significantly simpler than the Statue of Hygieia, and this was evident in the scanning times. This scan run only took 4 – 12 mins and required an extra 3 – 8 mins of post-processing.
The average vertex offset of the Still Water scans came in at 0.043mm with a standard deviation of 0.321mm – another fantastic result.
Moving on, we scanned a 3D printed Neapolitan Fisherman model. The original marble sculpture was designed by Swedish sculptor Carl Gustaf Qvarnström in the 19th century, but our slightly less impressive version is made of white PLA and stands about 50cm high, which is about the part size limit of the peel 2-S.

This scan run was our most difficult yet, due to the sheer size and complexity of the sculpture. While the 1mm and 0.5mm scans were completed without much hassle, our high-resolution 0.2mm attempt wasn’t successful at all as the peel 2-S constantly lost its positioning and it proved extremely tedious to scan the entire model in one sitting.
For the attempts that were successful, the scan time clocked in at 9 – 13 mins, while the post-processing time took a further 12 – 15 minutes. Since we maxed out the recommended part size on this test, you can expect these time ranges to be the approximate limits of a scanning session with the peel 2-S.
As for the actual quality of the scans: fantastic. The average offset between the scanned models and the original STL file was just 0.061mm with a standard deviation of 0.158mm. Our 1mm resolution scan was particularly impressive, as the peel 2-S managed to capture the entire model within ±0.20mm of the intended geometry.
Of course, we also had to try our hand at some functional scan tests too, to see how the 2-S might fare in a more industrial or workshop environment. First up was the triple clamp.
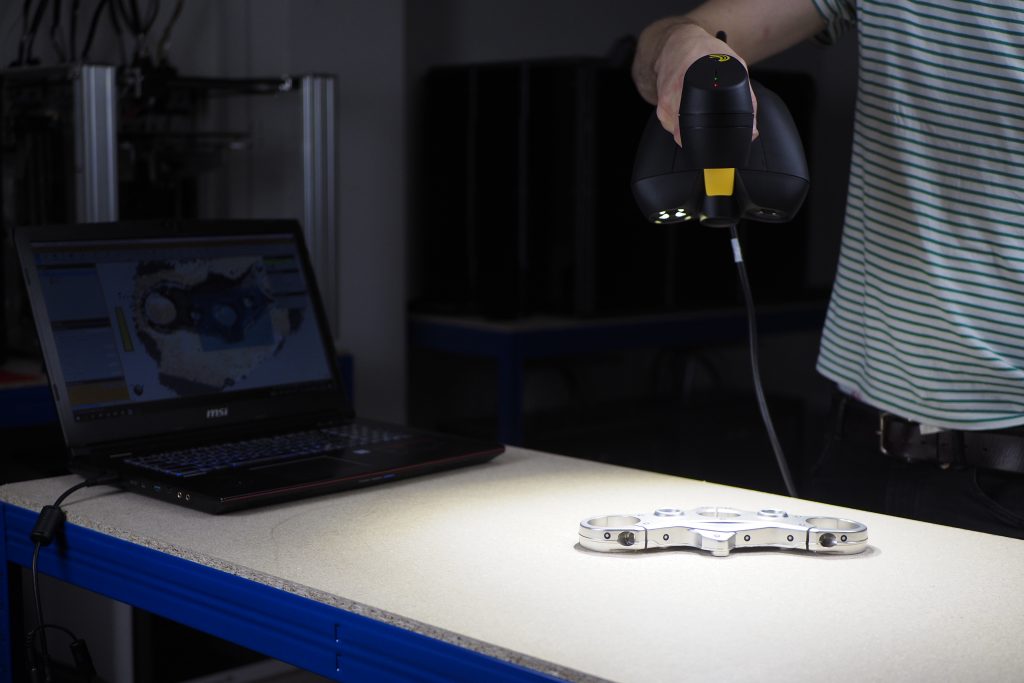
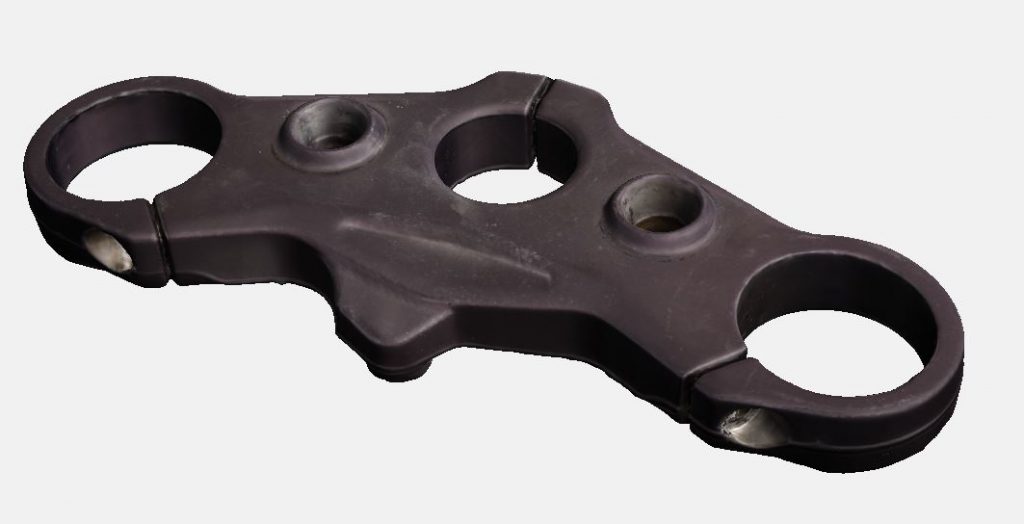
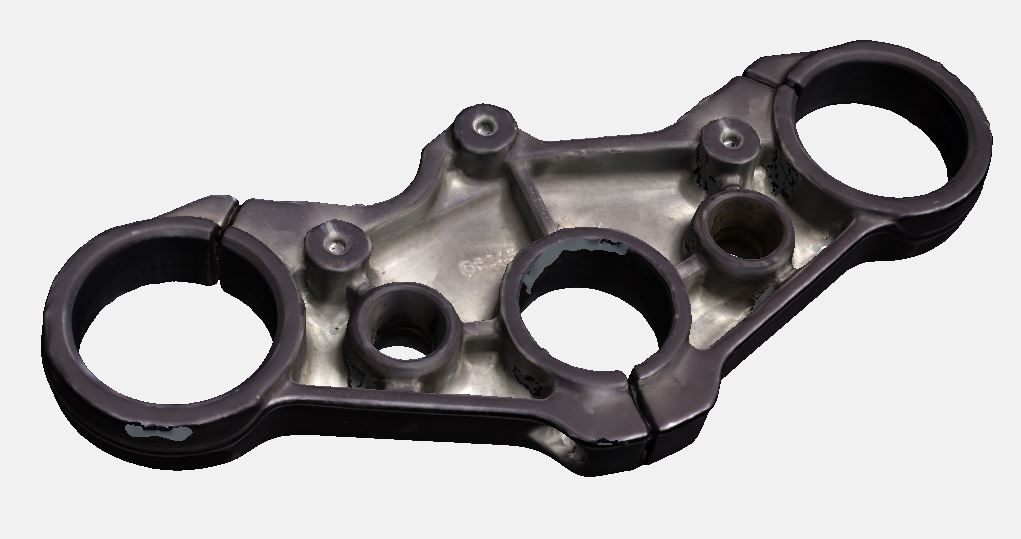
The scan came out extremely clean with many of the part’s minute details captured accurately. The texture was true-to-life and we could even read the part number etched on one of the faces. While the scan did lose its tracking quite a few times, the post-processing step was quick and only involved mesh alignment and the removal of a few unwanted background elements. The scanned triple clamp model is precise enough to use in the design of, say, a custom set of motorcycle speed-o-meters for a workshop project.
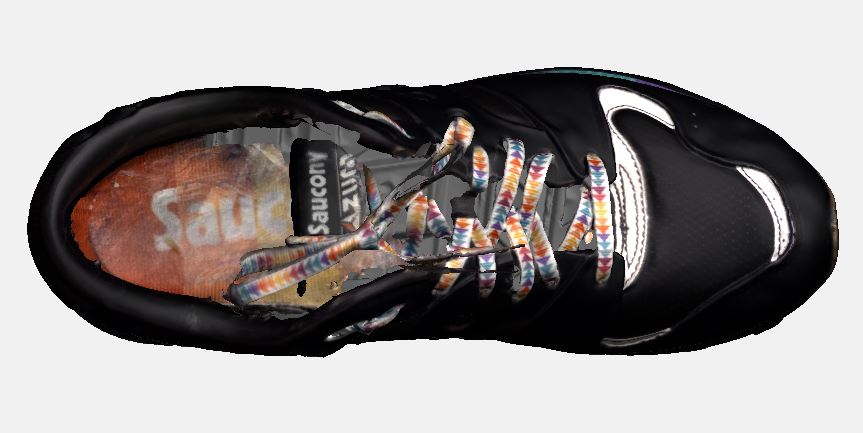
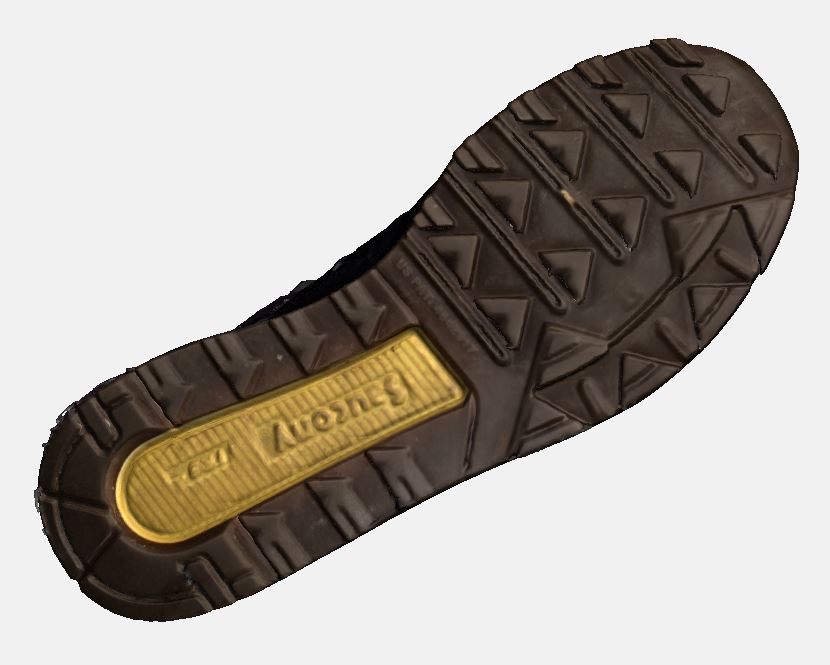
We then scanned a full-color model of a shoe. The scan was easy as pie, even with the abundance of black material. The only real flaws were on the inside of the shoe and the laces, which moved around. Even still, we were elated with the quality of the scan as the colors and textures were virtually identical to the real thing.

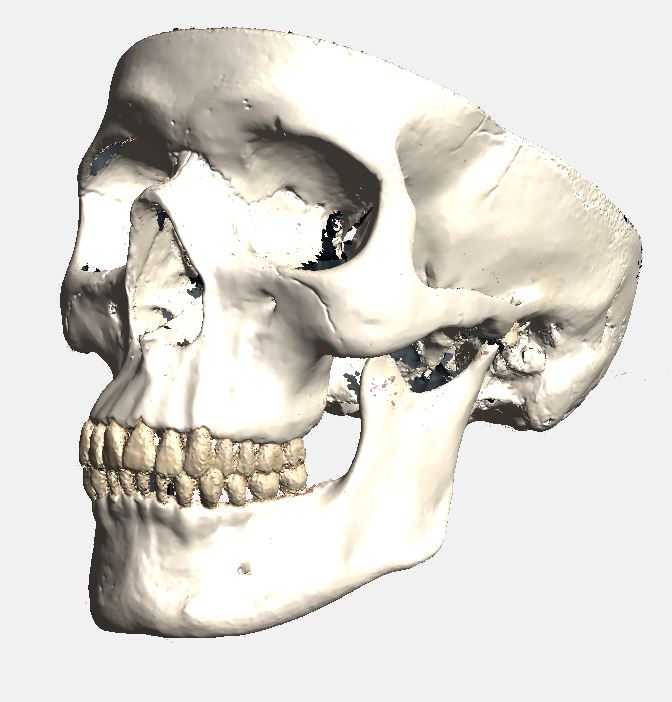
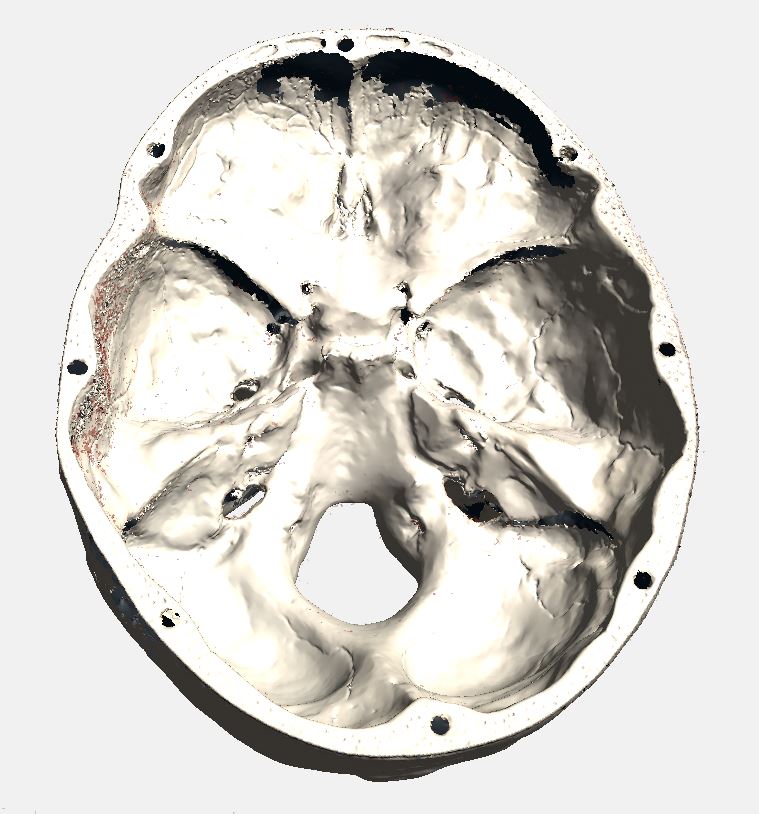
Next in line for the peel 2-S was an anatomical model of a skull. It’s not a stretch to say this was one of the most immaculate scans we’ve ever produced at 3D Printing Industry. The scanner managed to capture the finest of details and the textures were accurate down to the smallest cavities. The scan itself was done in just one shot and the post-processing stage yielded a complete mesh after just a few clicks. Our digital skull could quite easily be used for medical training and educational purposes.

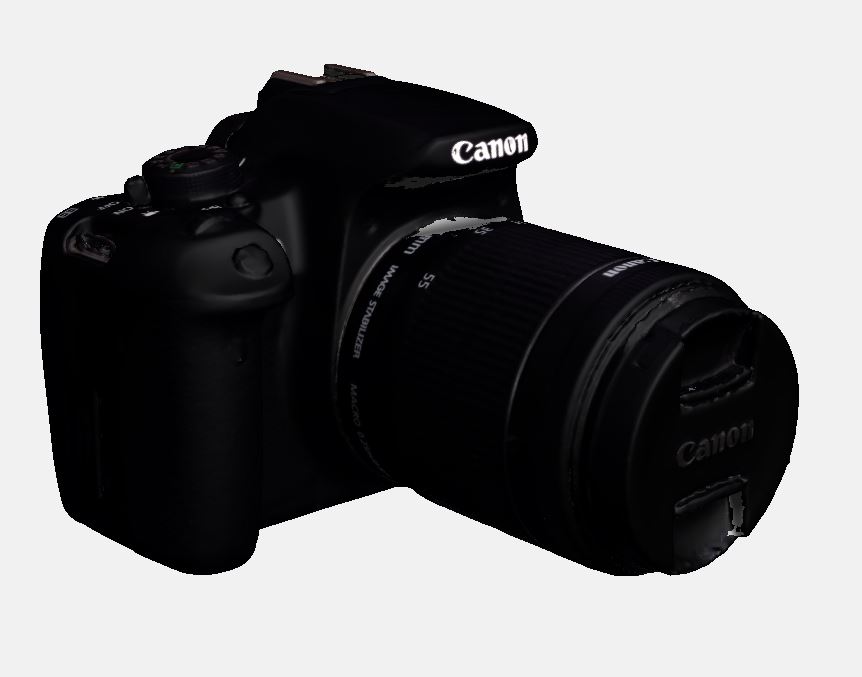
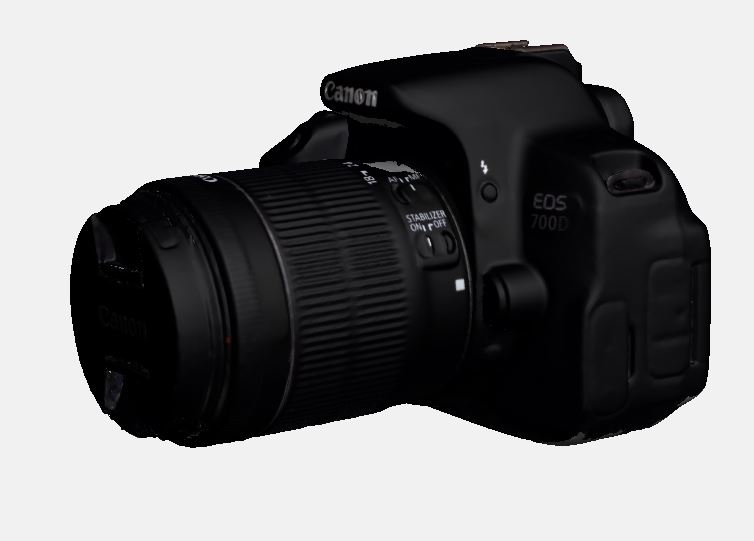
Finally, we scanned a Canon EOS 700D digital camera. By this point, we’d come to expect great things from the peel 2-S, and it certainly delivered. Despite the overwhelmingly black casing of the camera, the 3D model was as clean as ever. The textures were lifelike and it was possible to read all of the writing on the Canon. Post-processing was also a breeze, as it was enough to remove the background of each scan and align them to obtain the final, complete mesh.
The verdict
In true peel 3D fashion, the peel 2-S once again combines cost-effectiveness, performance, and accessibility in one very ergonomic package. We didn’t experience a single bug in our time testing this scanner, and it passed the majority of our tests with flying colors. The peel 3D software is as user-friendly as ever, and the new black skin makes it look like something out of a Dark Knight movie.
The peel 2-S certainly feels different from its predecessors. It’s more precise than the peel 2 and has a much easier time tracking smaller-scale parts. On the flip side, this also means it struggles to track larger parts and the scans themselves tend to take a couple of minutes longer. Unless you live every facet of your life on a tight schedule, however, you shouldn’t let this discourage you.
One thing that’s particularly noteworthy is the peel 2-S’ ability to scan black surfaces, despite the disclaimer stating otherwise. We threw black polymers and fabrics at this scanner, and it captured them without a hitch. We’re starting to think the only way to trip the peel up is with an object coated in Vantablack.
Ultimately, if you’re in the market for professional-grade, full-color 3D scanning (and you don’t have $15,000+ to spend on the pricier industrial devices), you’d have a hard time going wrong with the peel 2-S.
Technical specifications
| Recommended part size | 0.05 – 0.5m |
| Accuracy | Up to 0.1mm |
| Mesh resolution | 0.1mm |
| Measurement rate | 550,000 scans/s |
| Volumetric accuracy | 0.5mm/m |
| Scanning area | 143 x 108mm |
| Stand-off distance | 380mm |
| Depth of field | 100mm |
| Light source | White LED |
| Texture resolution | 50 to 250 DPI |
| Device Dimensions | 154 x 178 x 235mm (930g) |
Buy the peel 2-S 3D scanner here. The device is available to order now for $7,890 ($8,090 from October 1st).
Subscribe to the 3D Printing Industry newsletter for the latest news in additive manufacturing. You can also stay connected by following us on Twitter, liking us on Facebook, and tuning into the 3D Printing Industry YouTube Channel.
Looking for a career in additive manufacturing? Visit 3D Printing Jobs for a selection of roles in the industry.
Featured image shows the peel 2-S 3D scanner. Photo by 3D Printing Industry.