3D Printing Industry reviews the Markforged Mark Two 3D printer.
Based in Watertown, Massachusetts, and founded in 2013, Markforged is well-known in the 3D printing community for its ever-growing portfolio of high-performance FFF 3D printers. The firm’s impressive product lineup includes the pioneering Metal X, industrial carbon fiber systems such as the FX20 and X7, and desktop composite machines like the Onyx One and Onyx Pro.
Markforged’s flagship desktop composite 3D printer is the dual extrusion Mark Two. Operating on the firm’s Continuous Fiber Reinforcement (CFR) technology, the system is defined by its ability to integrate continuous fiber reinforcements into polymer parts, resulting in builds that are stronger and more impact resistant than conventional FFF.
Aimed primarily at engineering professionals and manufacturing enterprises, the Mark Two is priced at a hearty $19,990 but we’ll soon see just how much bang you get for that buck.

Carrying the Markforged banner
In the box, you’ll find everything you need to embark on your composite 3D printing journey. The turnkey package includes the printer itself, a set of hand tools, a filament storage box, a spool of Onyx filament (PA6-CF), and five additional spools of fiber reinforcement filaments: 2x Carbon Fiber, 1x Fiberglass, 1x High Strength High Temperature fiber, and 1x Kevlar.
Upon unboxing the system, it’s more than apparent just how much effort has gone into the build quality of the Mark Two. The sleek aluminum chassis is minimalist, has an extremely robust feel to it, and simply looks like a premium piece of kit. Weighing in at just 16kg, we can’t help but feel the system would make a great visual addition to any workbench. This is the kind of craftsmanship we expect from an NYSE-listed 3D printer manufacturer.
Looking inside, we see that the printer is based on the T-Belt axis system, a configuration developed and used exclusively by Markforged. Compared to a standard cartesian setup, the system is more rigid, faster, and more accurate. Specifically, the belt configuration is purpose-built to minimize torque on the gantry while still allowing for rapid printhead motion, and the linear rails are precision machined to maximize accuracy.
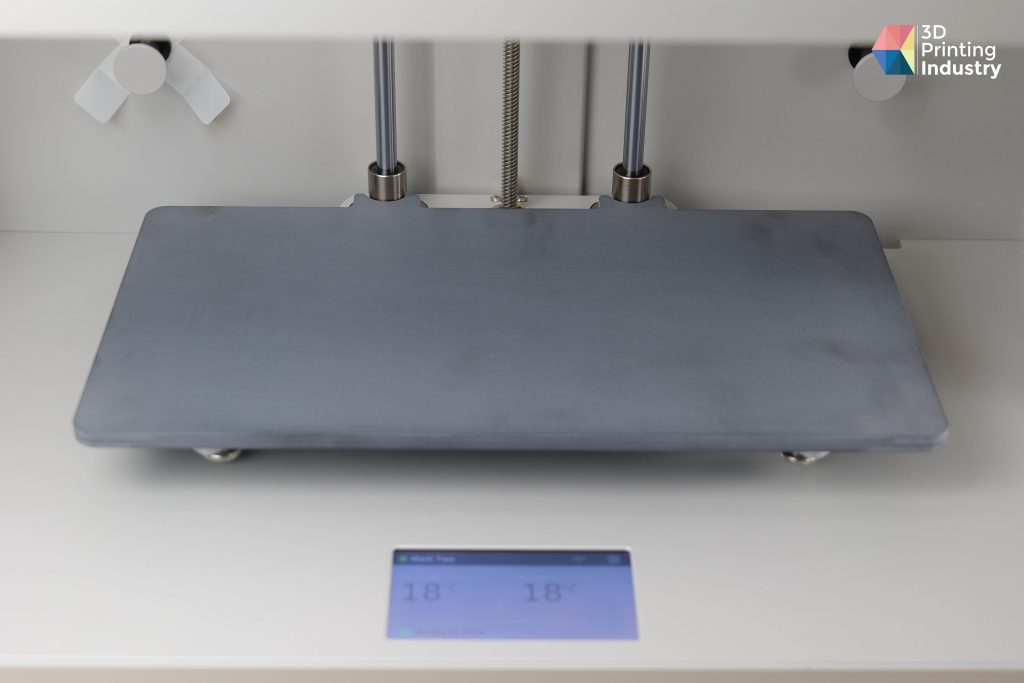
The Mark Two sports a build volume of up to 320 x 152 x 154mm, which isn’t large by any means but provides enough workspace for most medium part applications. Although the bed isn’t heated, the frame is fully enclosed to ensure the chamber is always warmer than the ambient conditions outside the printer. This is crucial for higher temperature filaments such as Nylon as it helps avoid the delamination and warping issues that occur when a part shrinks due to cold airflow. As a bonus, the magnetic print bed is also removable, making part reclamation simple and easy.
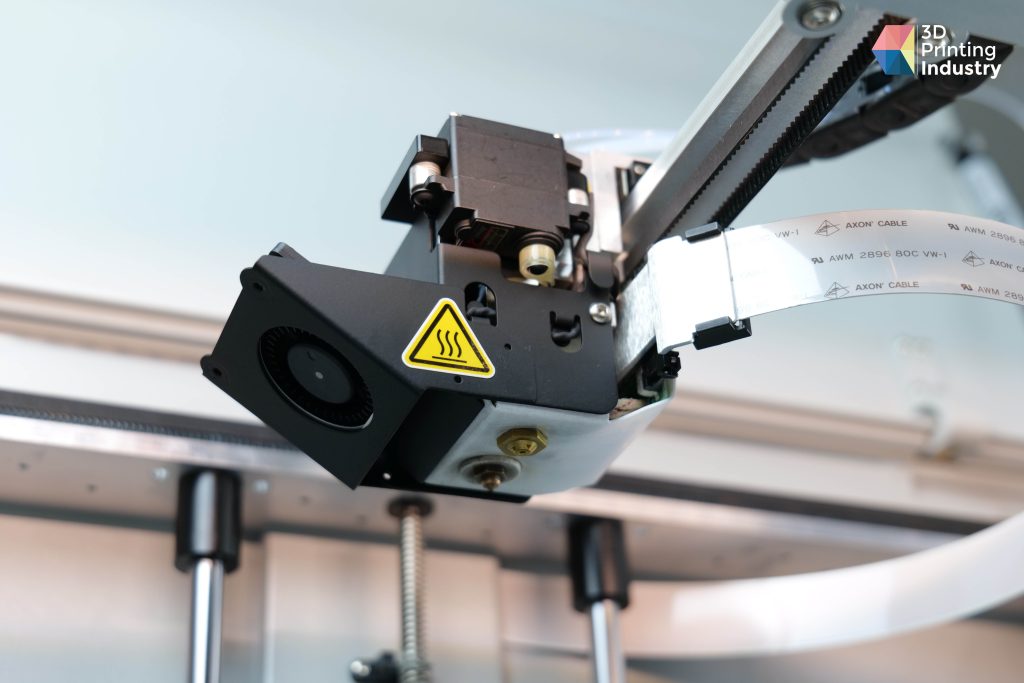
When it comes to the printer’s extrusion capabilities, the Mark Two features a single printhead housing a dual nozzle assembly. Compared to an IDEX configuration, the standard dual extruder will be heavier and less accurate on the X-axis but lighter and more accurate on the Y-axis.
The maximum hotend temperature clocks in at a potent 300°C, enabling the machine to print with Onyx filament, and Nylon, Carbon Fiber, Fiberglass, Kevlar and HSHT Fiberglass continuous fiber reinforcement. Both nozzles are backed by Bowden extrusion systems rather than direct-drive extruders, but Markforged has still been able to print flexible TPU filament with great repeatability in an R&D environment.
A pleasant 3D printing workflow
As far as quality of life features go, the Mark Two sports a 4” full-color touchscreen with a clean and refined UI. Supporting multiple language options, the control center allows users to calibrate the bed, load up filaments, and initiate and stop print jobs. Markforged has chosen to opt for a Linux-based interface which we found to be extremely smooth and lag-free, so big win there. Naturally, at this price point, users also have access to Wi-Fi connectivity.
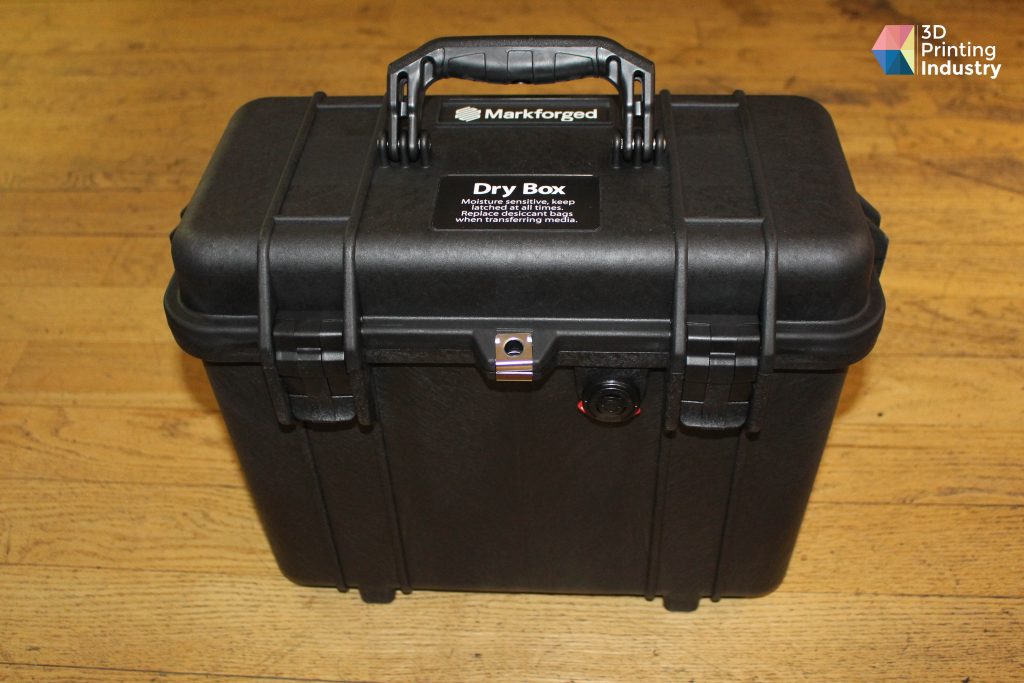
One noteworthy feature of the Mark Two is the external spool holder included with the system. The device is a simple briefcase-like dry box but works well to keep the active filament in a humid-free environment, ensuring safe long-term storage for optimal filament performance.
The Markforged has only one method of leveling the bed and it’s an entirely manual one as there are no sensors integrated into the printhead. The approach is fairly basic, whereby the machine will place the printhead at three different points on the print bed and prompt the user to adjust the height of the bed using the three thumbscrews underneath. Although we would’ve preferred to see a fully automated method, the current implementation only takes about ten minutes and is guided from start to finish so no major complaints there.
Eiger slicing software
Like many 3D printer manufacturers, Markforged provides its own slicing software for use with the Mark Two: Eiger. Donning a simple black and grey color scheme, the program operates quite similarly to any other FFF slicer with basic and easy-to-use model manipulation functionality. The UI is also clean and refined with a print summary on the left side, the virtual workspace in the center, and a few modifiable parameters on the right.
A striking feature of Eiger is the level of hand-holding Markforged has implemented. The software only allows users to modify the most basic of print settings, leaving very little room for human error. While some users may prefer access to the full range of settings, this is still a net positive as the pre-set slicing algorithms are extremely effective at delivering successful print jobs. The customizable parameters include material choice, layer height, infill pattern, infill density, and wall thickness.
Naturally, Eiger also allows users to modify the fiber reinforcements of their builds with options for fiber fill type, fiber location, fiber angles, and more. All in all, the workflow is streamlined enough for anyone to learn but provides enough depth to sufficiently control the outcome of a print run.
On the technical performance side, we encountered a grand total of zero bugs while testing the slicer and we’re happy to report moving between the various menus is lightning fast. Ultimately, Eiger is probably one of the stronger slicers we’ve had the pleasure of using, which is to be expected from a company like Markforged.
Benchmarking the Mark Two: 79/100
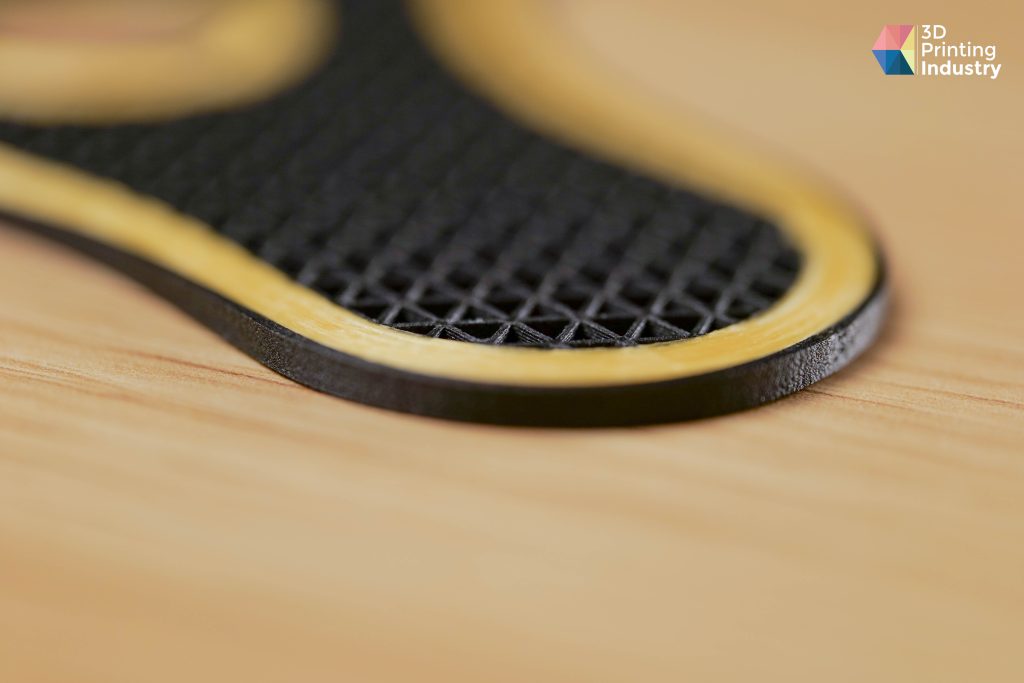
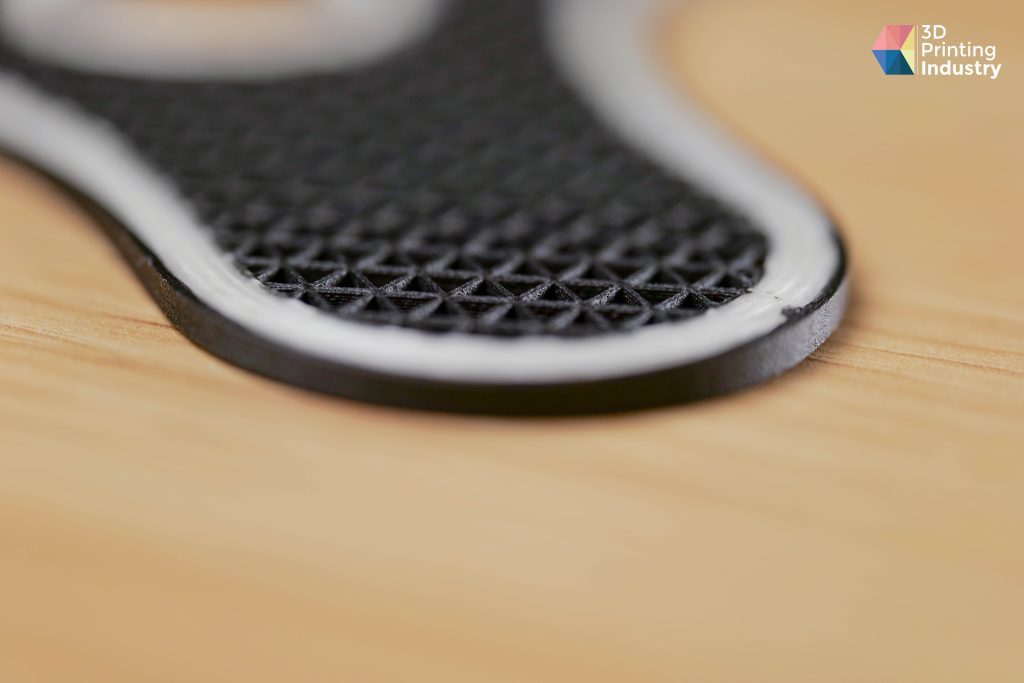
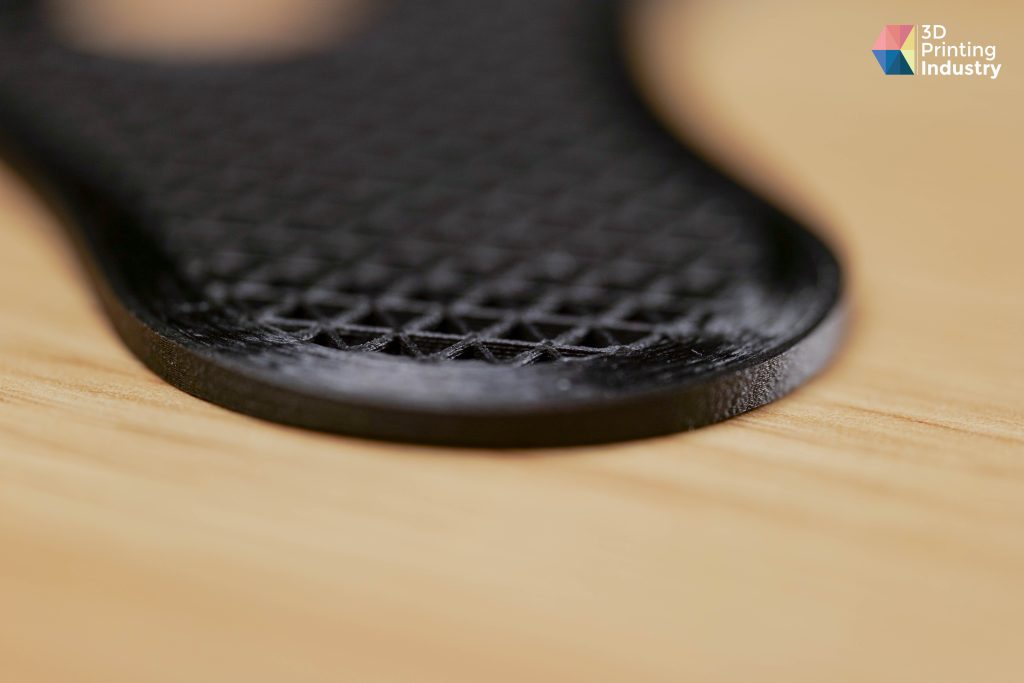
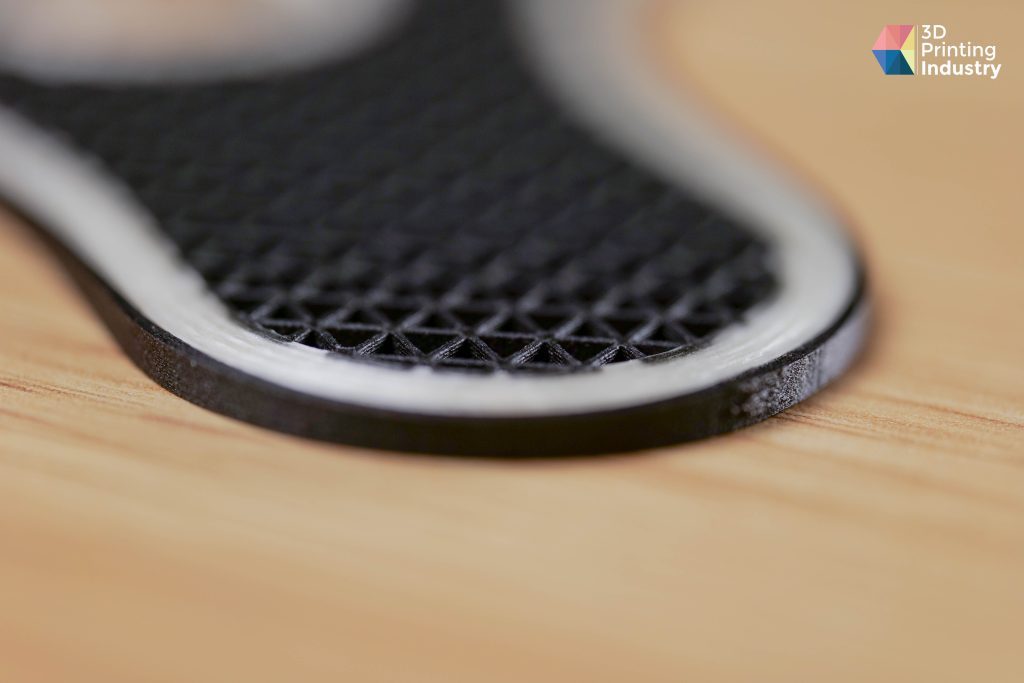
So how did the Markforged Mark Two 3D printer do in our benchmarking tests? We start off with 3D Printing Industry’s own benchmarking model printed in Onyx, which consolidates many of our smaller print tests into one comprehensive part. We assign each of the individual sections a weighted score based on factors such as dimensional precision, surface quality, and structural integrity. The Mark Two earned an overall 3D Printing Industry score of 79/100 – a good professional-grade 3D printer is a 60+.
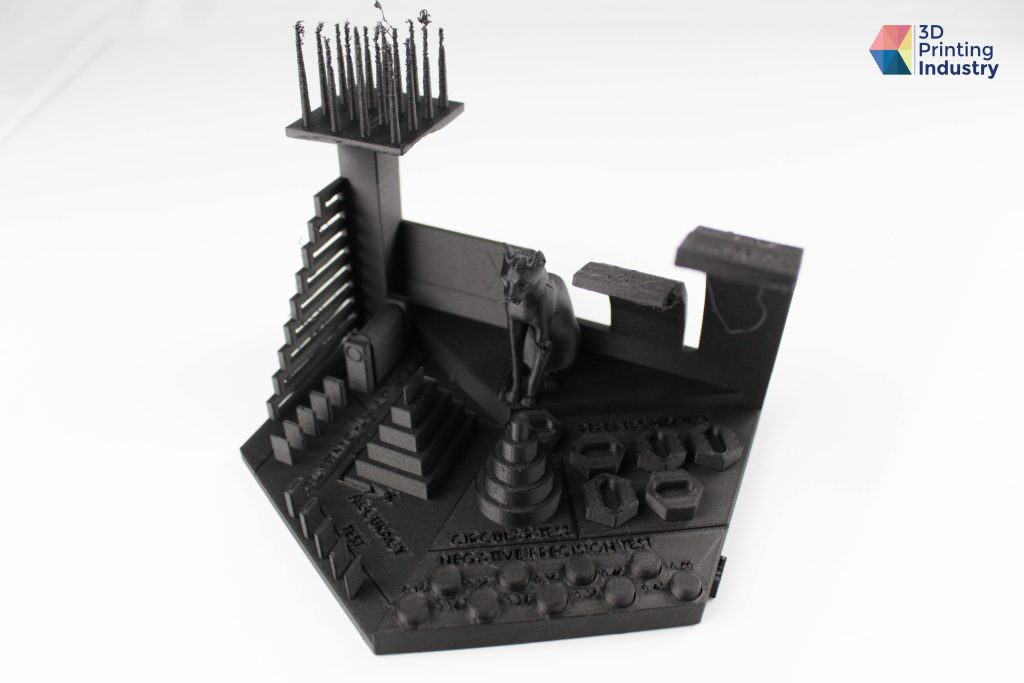
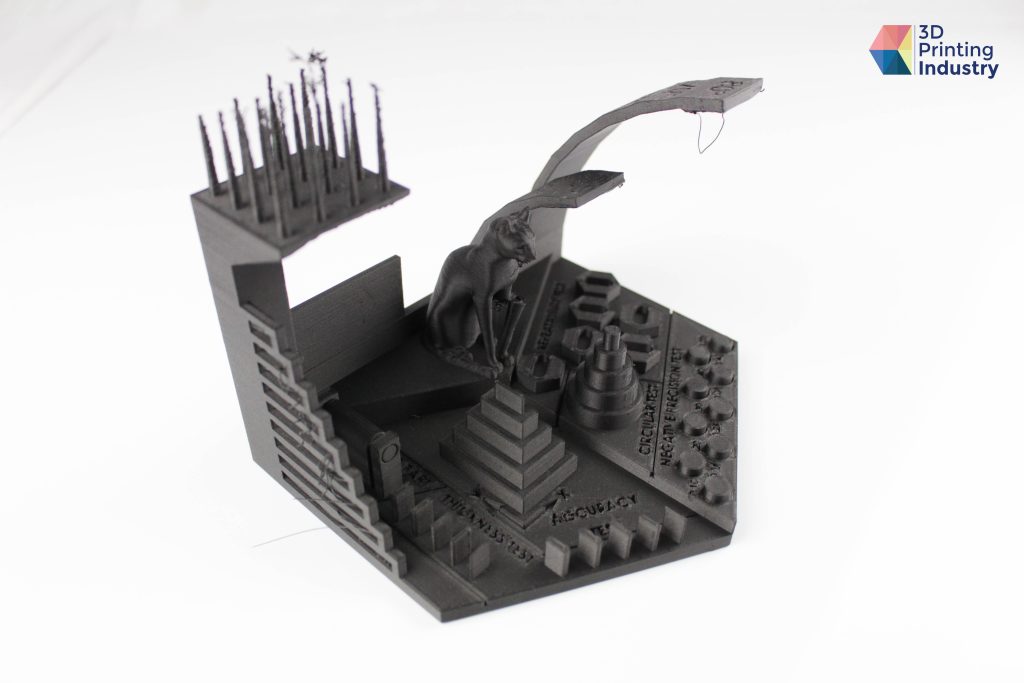
Overall, the benchmarking model was definitively impressive. Firstly, the overhang portion of the test is designed to determine the angles at which the system is able to print without the use of support structures. The Mark Two managed to print at up to 60° without any problems, which is a phenomenal result for a composite filament.
Similarly, the bridging test is intended to determine a system’s horizontal printing capabilities. The Mark Two managed to reach the 20mm bridge length successfully, which is a respectable result, especially considering the difficult-to-process nature of Onyx.
Finally, we look at the retraction test, which gives us a qualitative method of evaluating the 3D printer’s extruder capabilities. This is where the Mark Two slipped up somewhat, as the printed spike array suffered from significant artifacting and short spike lengths. This can again largely be attributed to the complexity of processing composite filaments, especially when it comes to thin and fine structures like spikes.
Tensile strength tests
What good is a composite 3D printer if it can’t produce high-strength parts? To evaluate the impact of the Mark Two’s continuous fiber reinforcements, we put the machine through its paces with a series of tensile tests in accordance with the ISO 527-2 standard. The testing was conducted by our engineers at the Mechanics and Technology Department of the Université de Rennes 1 in France.
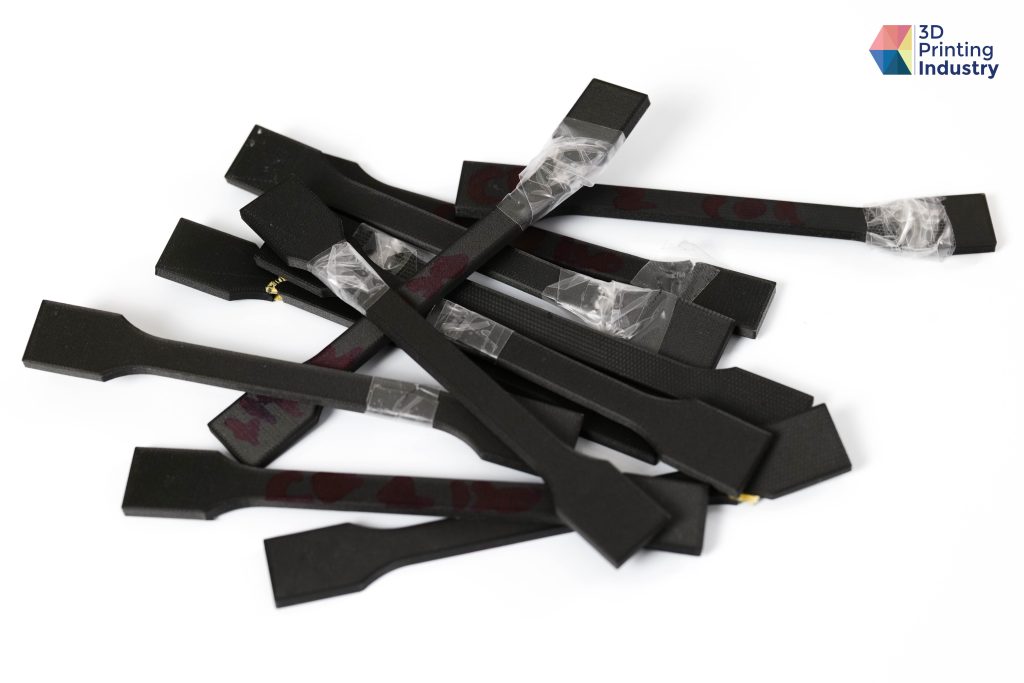
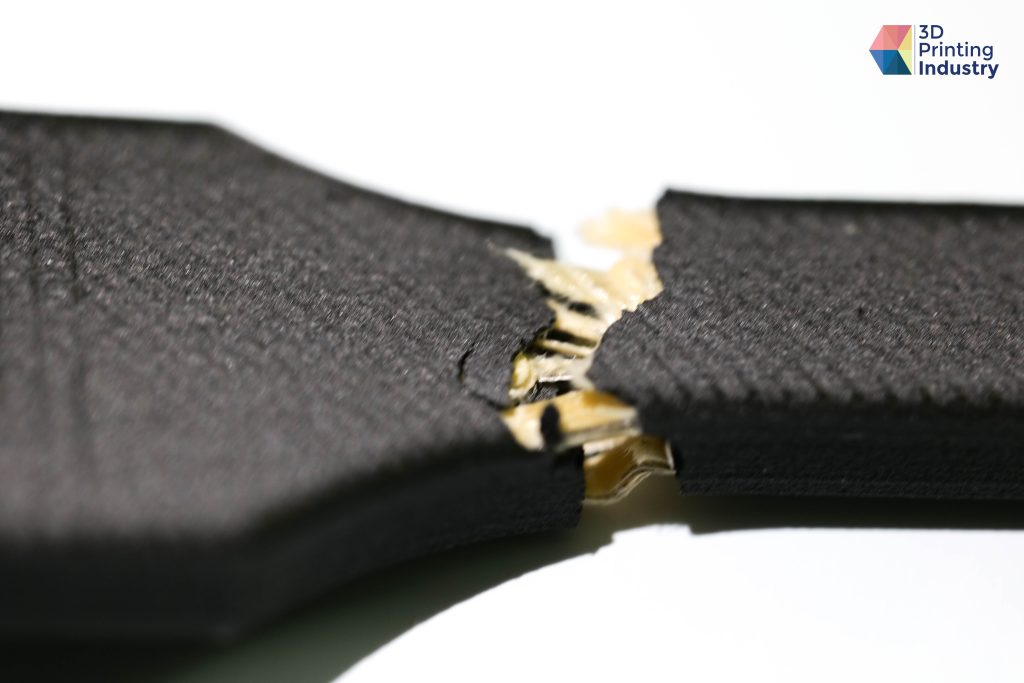

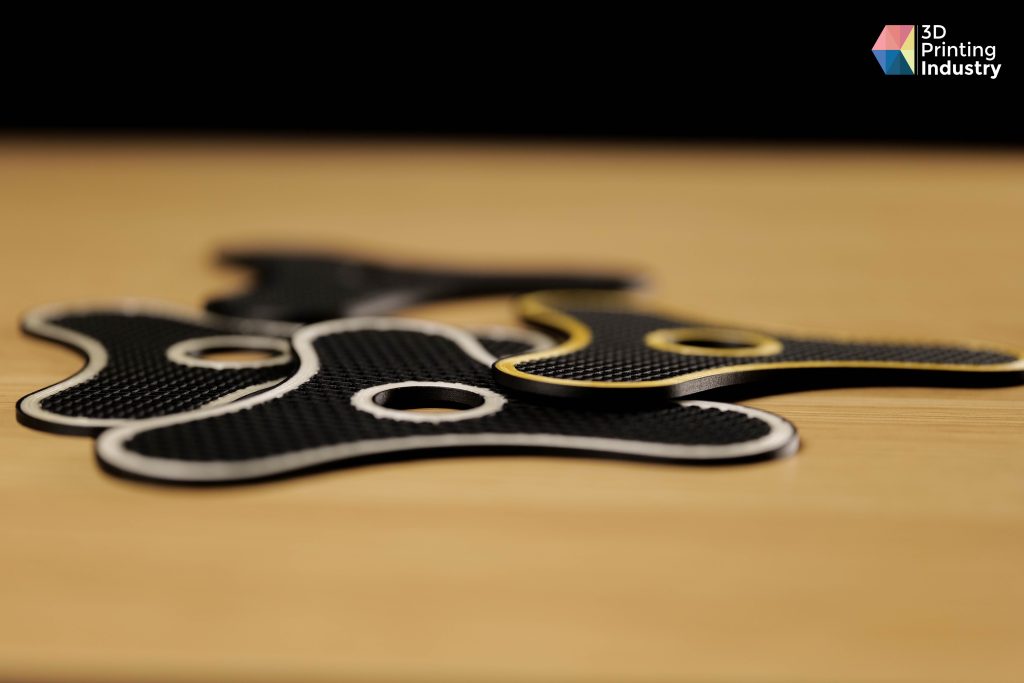
We 3D printed a total of ten composite dogbone samples using Onyx filament, each with its own unique fiber reinforcement profile. The samples were then tested on a Lloyd LR50K tensile testing machine capable of pulling up to 50kN:
– No Fiber: No continuous fiber reinforcements
– CF1ISO: Five isotropic carbon fiber layers
– CF2ISO: Ten isotropic carbon fiber layers
– CF2CON: Ten concentric carbon fiber layers
– FG1ISO: Five isotropic fiberglass layers
– FG2ISO: Ten isotropic fiberglass layers
– HT1ISO: Five isotropic HSHT fiberglass layers
– HT2ISO: Ten isotropic HSHT fiberglass layers
– KV1ISO: Five isotropic kevlar layers
– KV2ISO: Ten isotropic kevlar layers
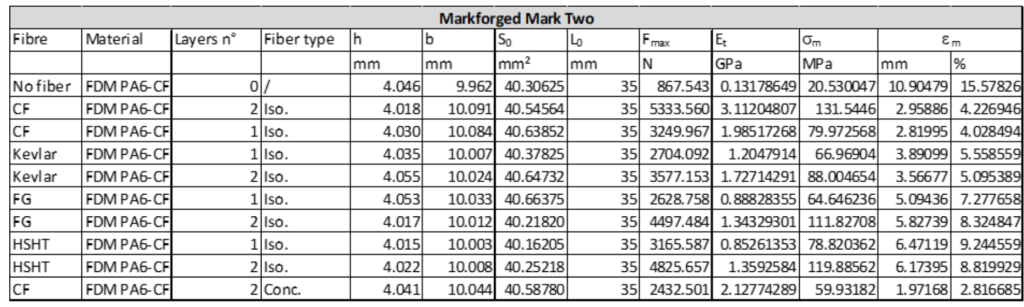
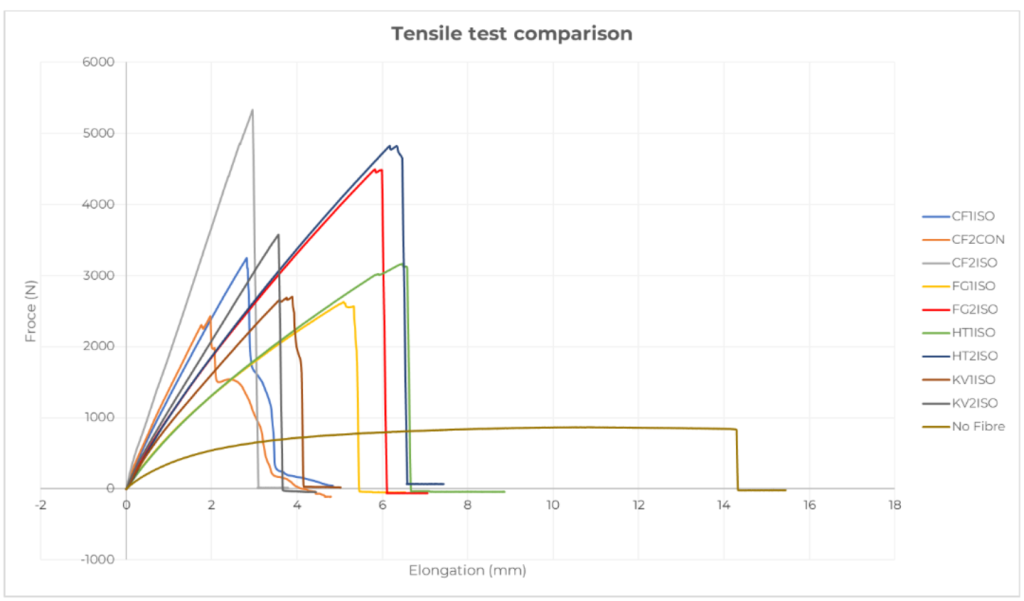
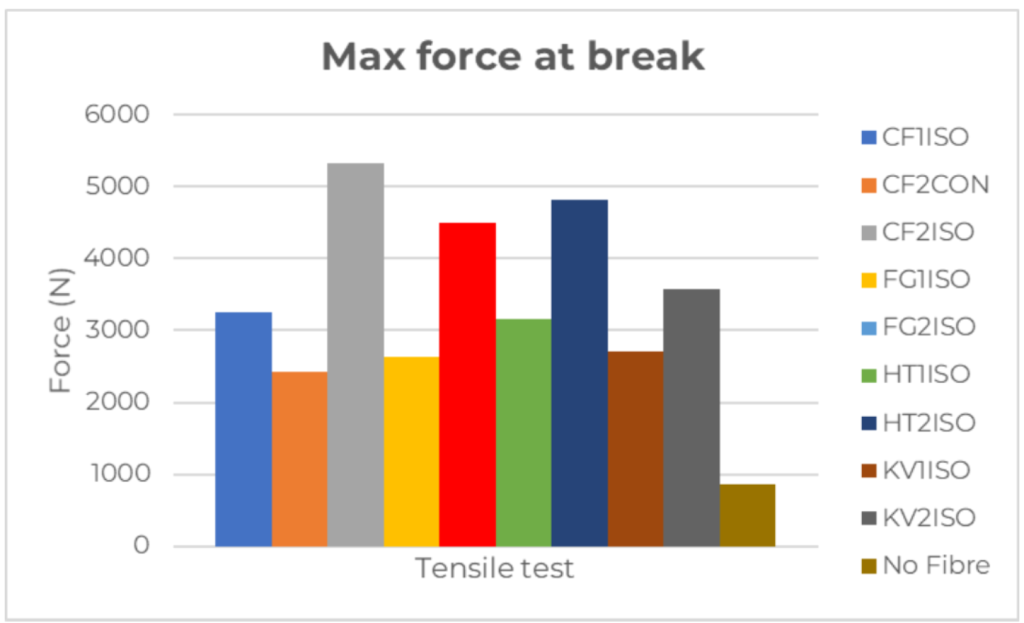
Looking at the results, it’s clear that the greatest tensile strength increase came from ten layers of isotropic carbon fiber reinforcements (CF2ISO). The unreinforced specimen (No Fiber) fractured when the applied force reached 867.54N, while CF2ISO broke once the applied force hit 5333.56N – a 6.15x increase in strength.
It’s also interesting to note that the same specimen (CF2ISO) yielded the largest increase in Young’s Modulus (E), which is a measure of tensile stiffness. A higher E value corresponds to a stiffer material that deforms less under elastic loads, whereas a lower E means a material is more elastic and flexible under load. The unreinforced specimen only offered an E value of 0.131GPa, while ten layers of isotropic carbon fiber delivered 3.112GPa: a 23.8x improvement in stiffness.
Finally, we look at the elongation at break, which is a measure of ductility. The measurement shows how much a specimen can be stretched, as a percentage of its original length, before it fractures. The unreinforced dogbone was the most ductile at 15.6%, while the part reinforced with ten concentric carbon fiber layers (CF2CON) proved to be the least ductile at 2.8%.
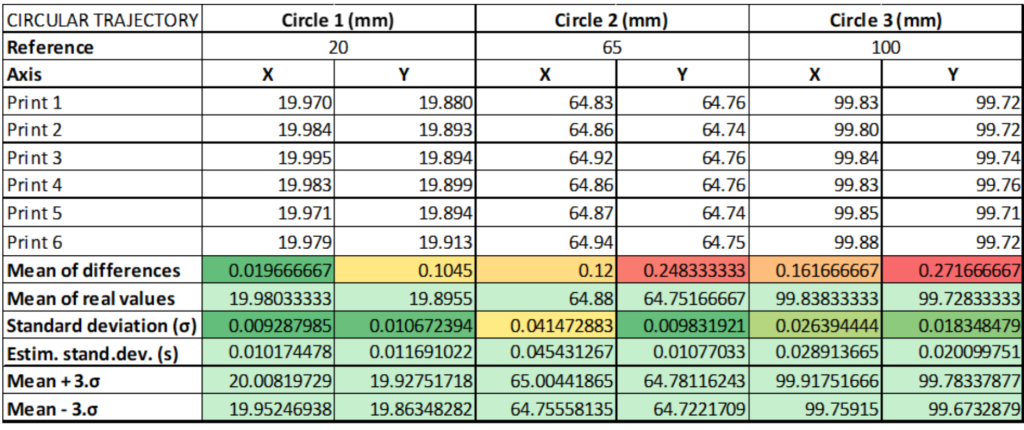
Circular trajectory test
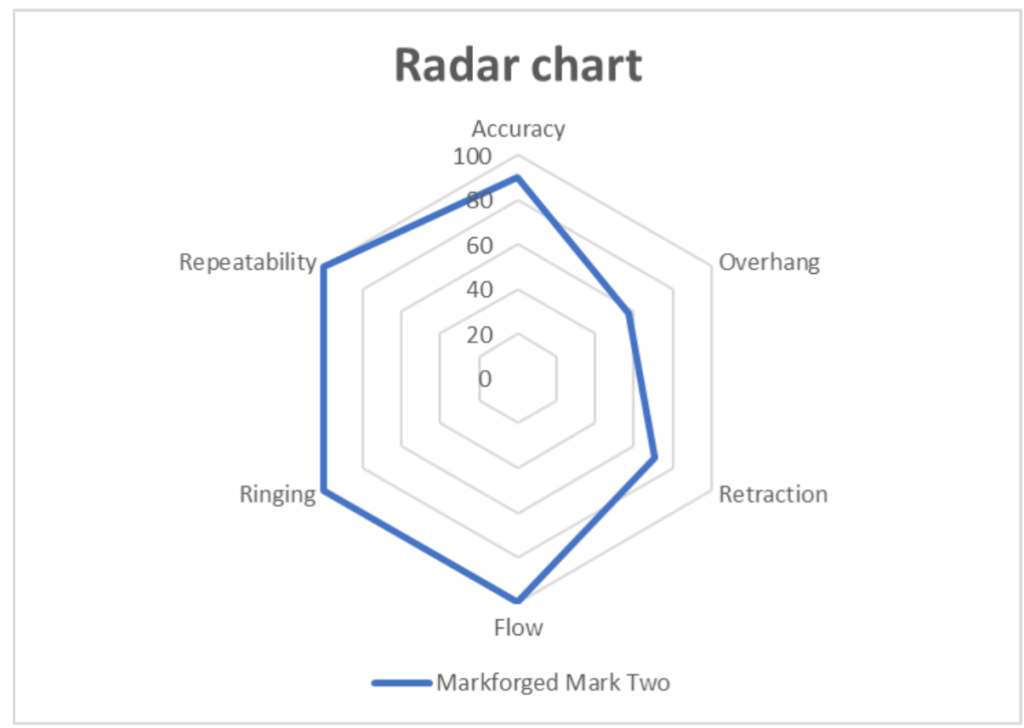
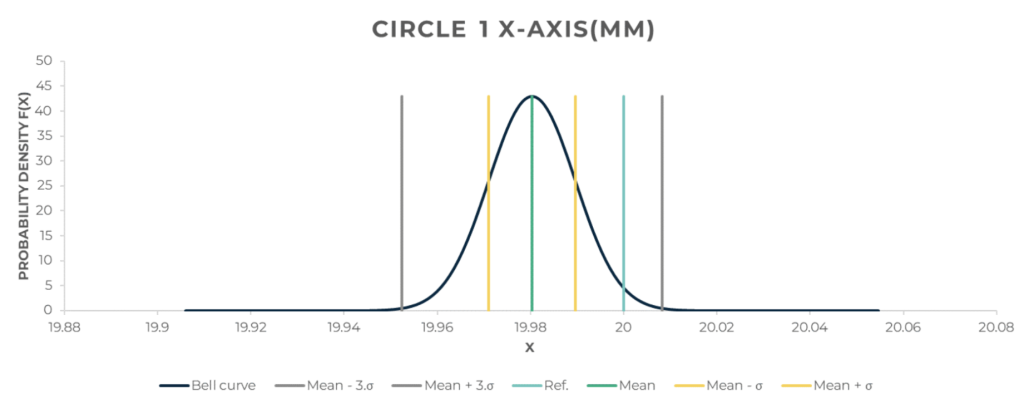
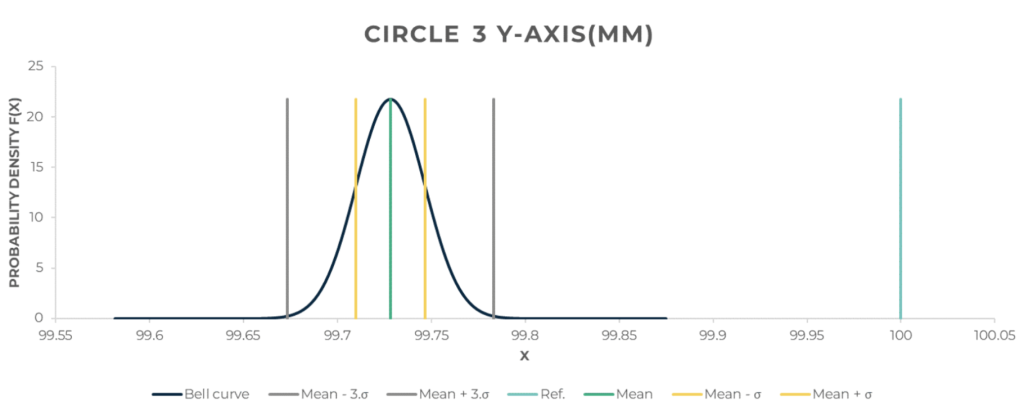
We then 3D printed a set of circular trajectory tests to evaluate the Mark Two’s repeatability profile. By studying the normal distribution of the concentric circles’ diameters, we can say that the printer offers sufficient repeatability when the average imprecision is under 0.1mm and the standard deviation is under 0.05mm. Our measurement devices are accurate to ±0.015mm.
The system showcased decent repeatability here, with an average imprecision of 0.1004mm for the X-axis and 0.2082mm for the Y-axis, resulting in an average of 0.1543mm for all axes. Although the mean is a little high, the average standard deviation came in at just 0.0193mm, which is far better than the vast majority of 3D printers we’ve ever reviewed.
It’s worth noting here that the X-axis is significantly more precise than the Y-axis as the former is driven by two stepper motors while the latter is only powered by one. Therefore, we recommend printing along the X-axis when part requirements involve tight tolerances. It’s also clear that the larger the dimensions (the bigger the circles), the less accurate the Markforged is.
Below you’ll find the bell curves for the best and worst circles in the test – Circle one for the X-axis and Circle three for the Y-axis. In the best case, 99.6% of the 20mm circles manufactured by this 3D printer will be between 19.95mm and 20.01mm. In the worst case, 99.6% of the 100mm circles fabricated by this 3D printer will be between 99.67mm and 99.78mm.
Real-world application tests
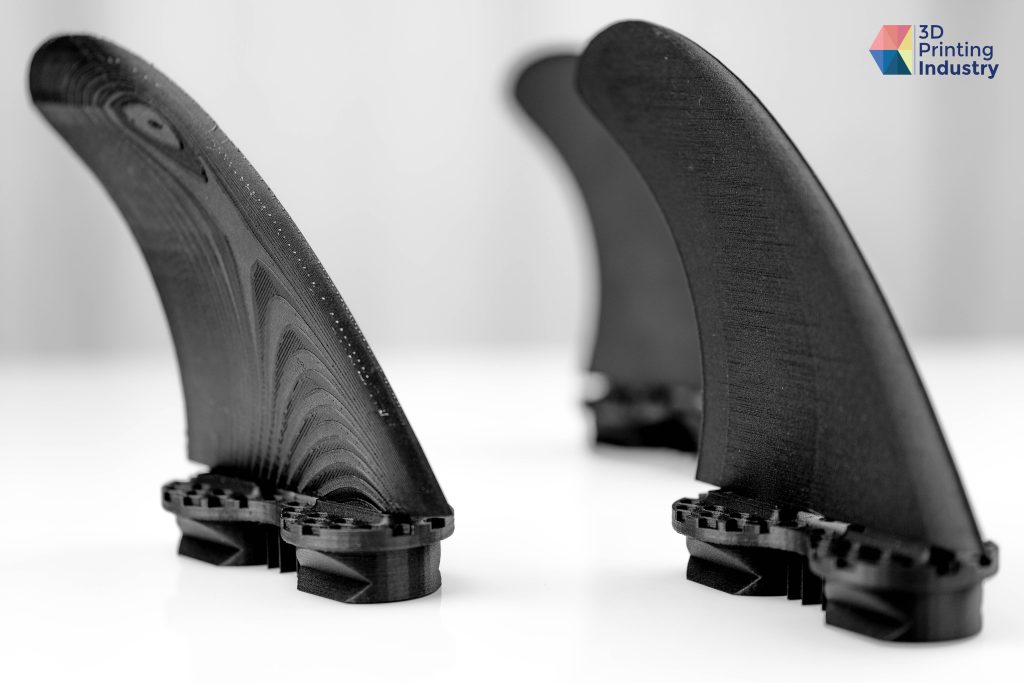
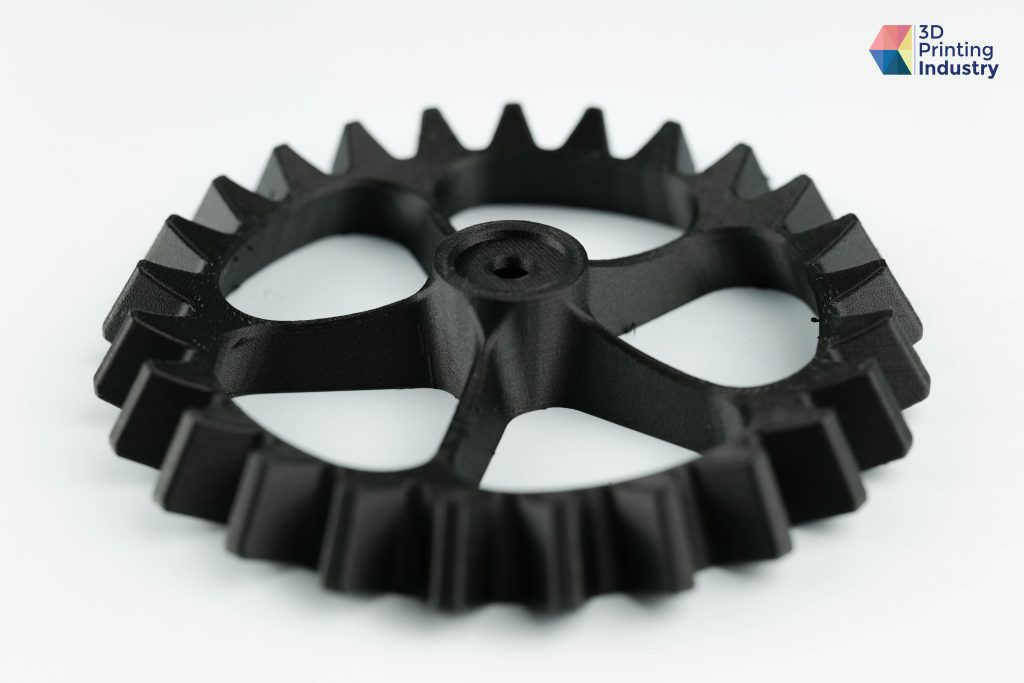
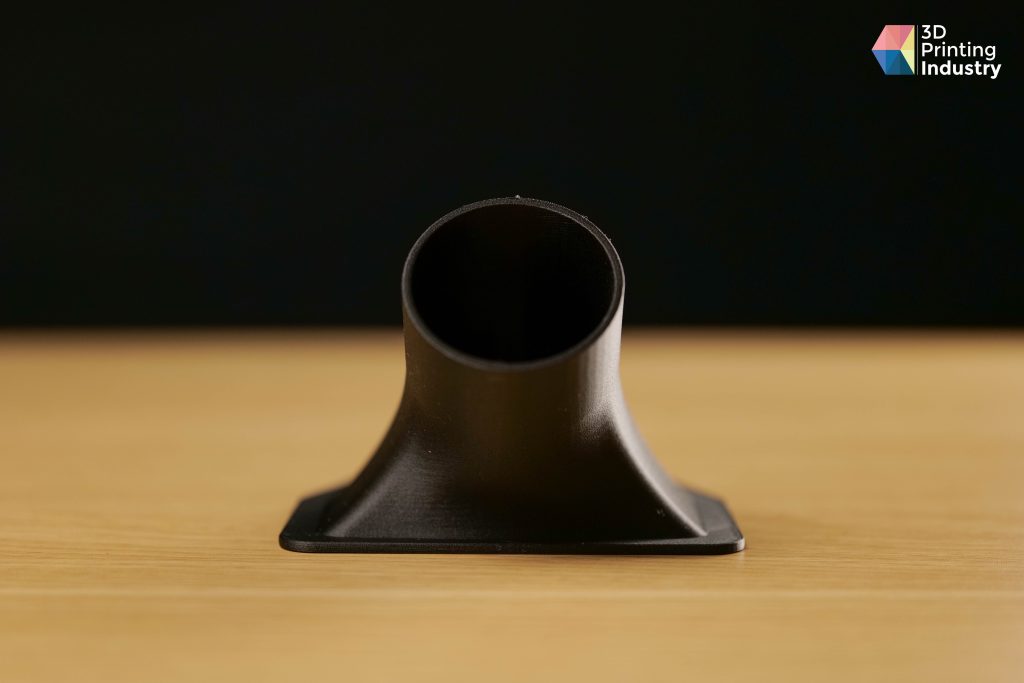
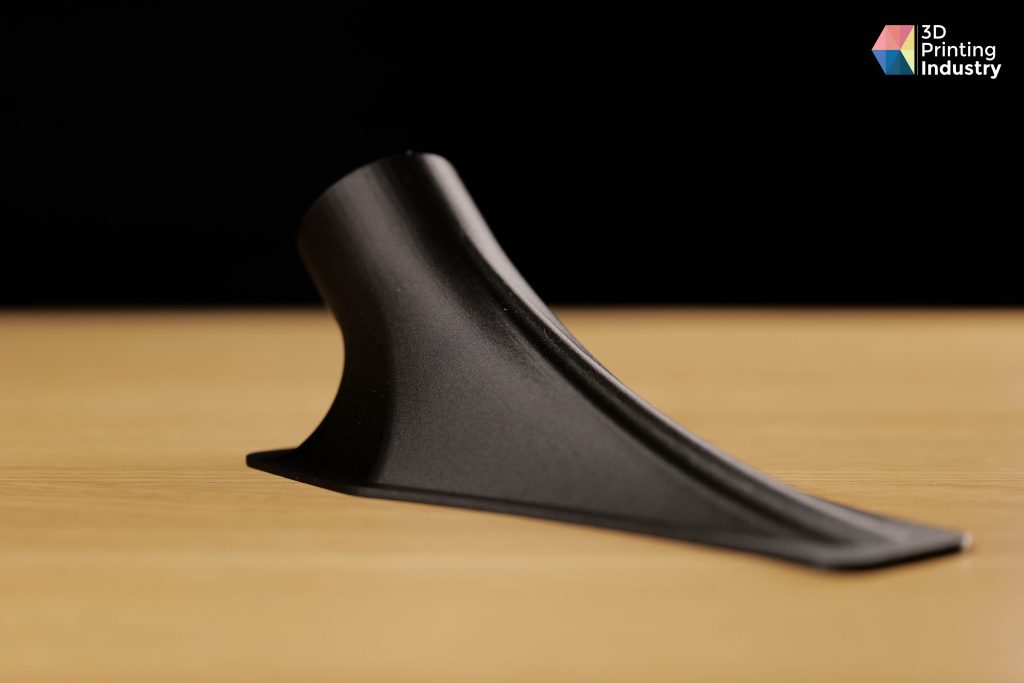
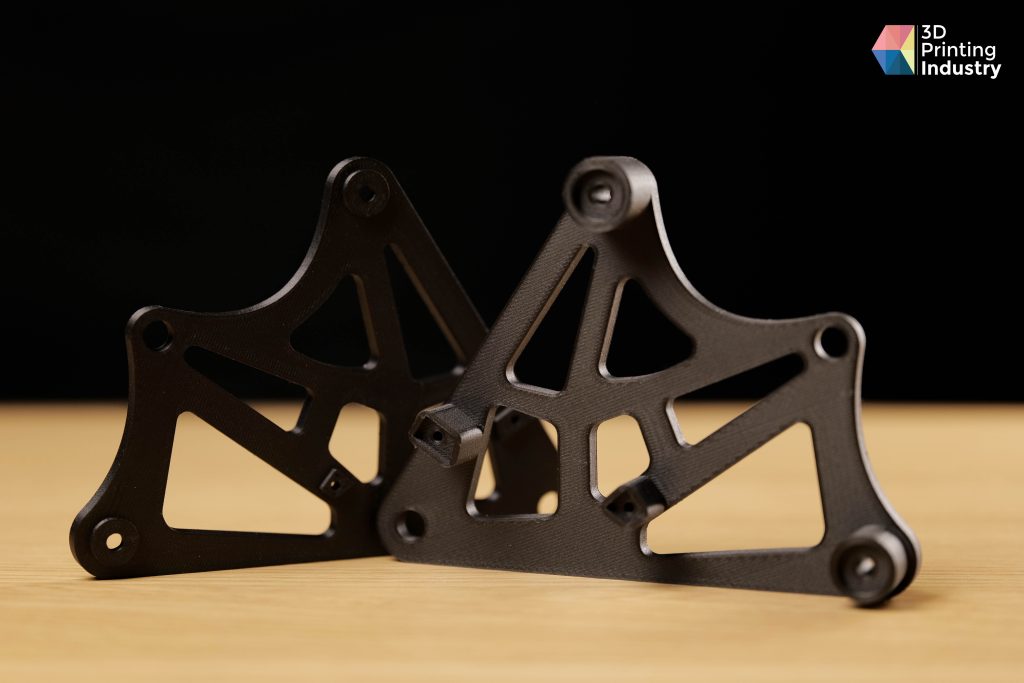
We concluded our testing with three sets of real-world applications that a typical Markforged user might 3D print on a day-to-day basis. The first set comprised four builds, each made using Onyx reinforced with carbon fiber: a motorbike brake lever, a jaw for a tensile testing machine, plugs and fins for a surfboard, and a gear.

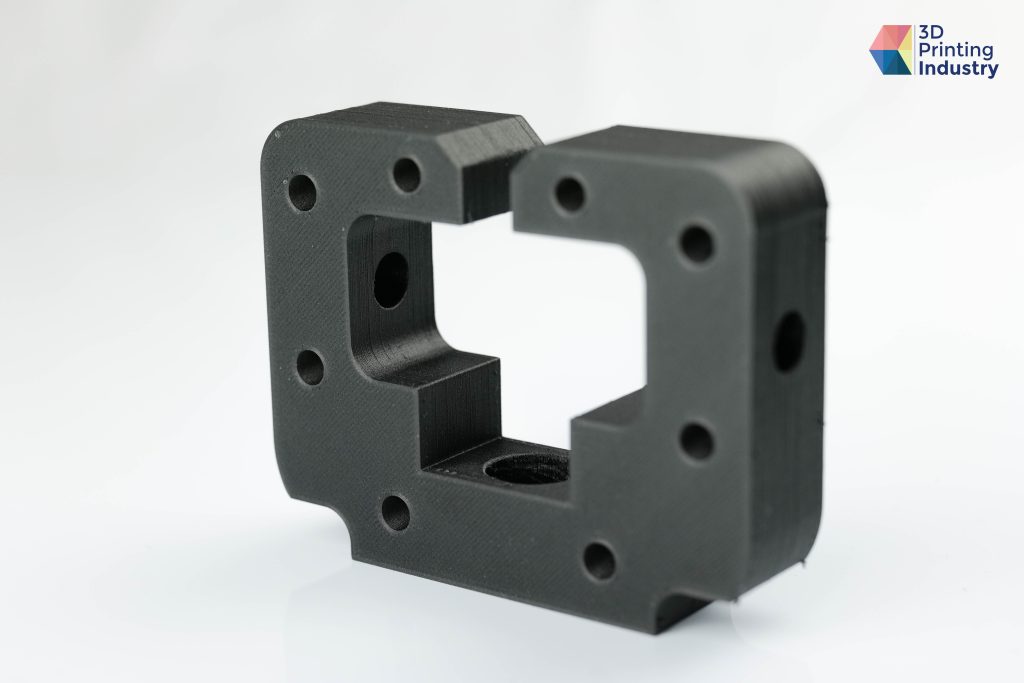
The Mark Two handled all of the carbon fiber print tests beautifully, to say the least, as the surface quality of all four builds was excellent with a distinct lack of defects. The brake lever and jaw were effectively flawless and didn’t require any post-processing – they could certainly be used as end-use parts for their respective applications.
The sheer strength of the surfboard fins was also noteworthy, as they’d have to withstand high stresses if actually integrated into a surfboard. We tried and tried but didn’t even come close to snapping them, which is a testament to the performance improvements enabled by continuous fiber reinforcements. Likewise, the 3D printed gear was hugely successful and could certainly be used as part of a wider dynamic assembly.
The next set of parts was printed using Onyx reinforced with Kevlar fibers: a Markforged branded case and an iPhone case. Often used in protective bulletproof vests, Kevlar is a great way to make a part more impact-resistant.
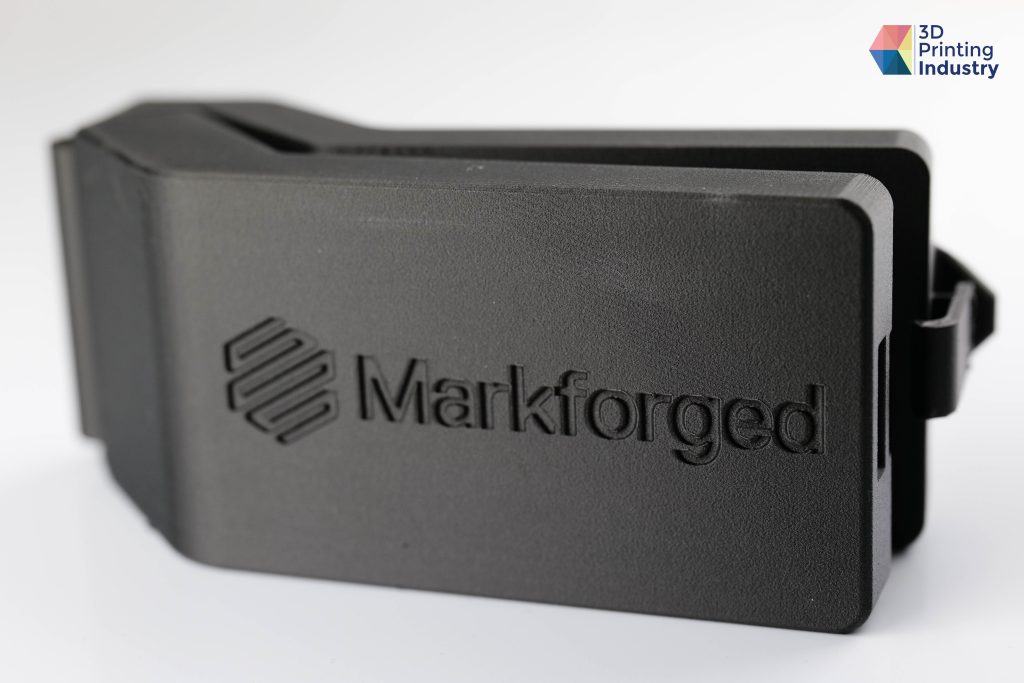
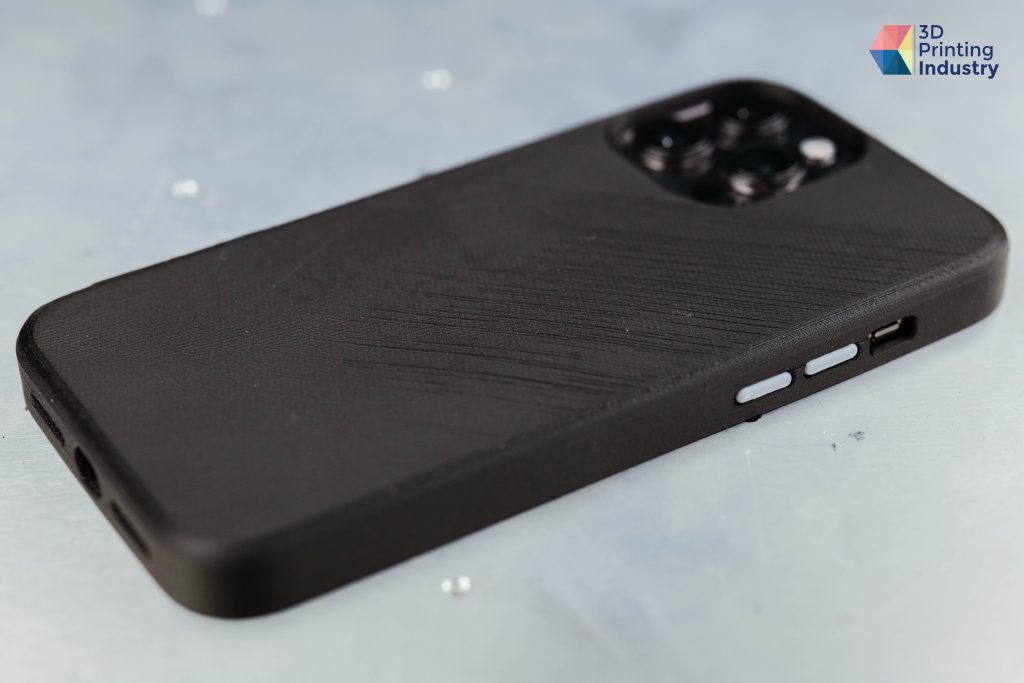
Both casings were printed successfully with incredible surface quality and structural integrity. In the case of the overengineered iPhone shell, we thought the material was far too rigid to actually serve its purpose effectively but it still makes for a fantastic proof-of-concept to showcase the capabilities of the Mark Two.
Finally, we 3D printed an injection mold using Onyx reinforced with HSHT fibers. Although not as strong or stiff as carbon fiber, HSHT can make a component resistant to both low and high temperatures. As such, it’s best suited for parts used in extreme conditions such as molds and autoclaves.
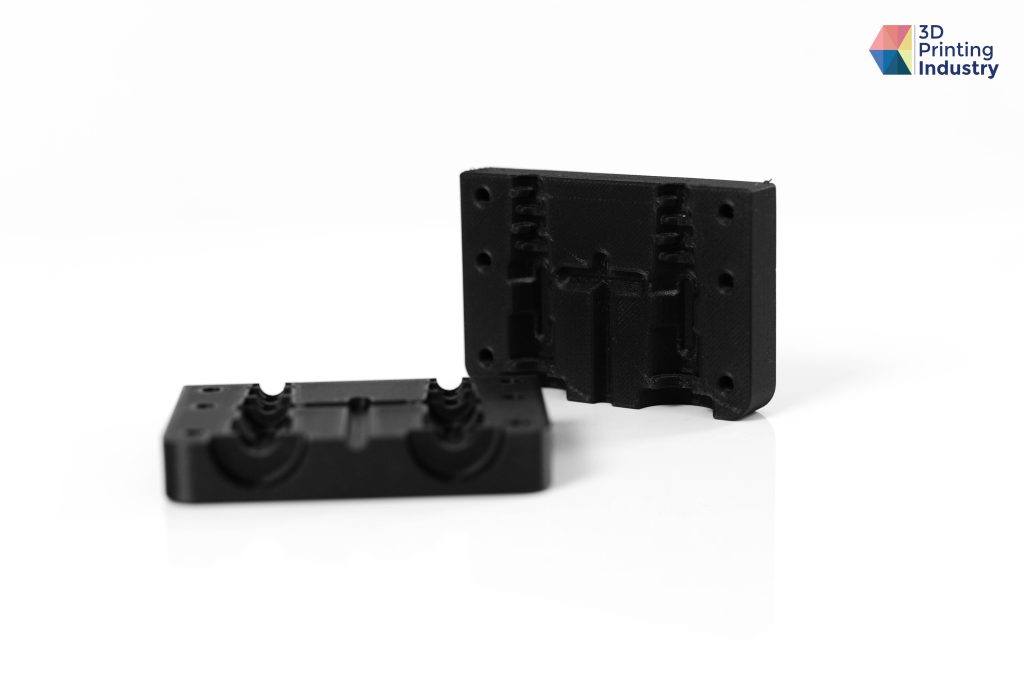
Our final print test required a completely different reinforcement strategy than the rest of the parts. The aim was not to make the mold stronger, but more rigid so it would deform less under high temperatures. As such, we integrated the HSHT fibers in concentric mode rather than isotropic mode, which made it possible to reinforce all the contours that would be most susceptible to heat-induced deformation. It’s not a stretch to say the mold turned out perfectly – a strong finish for the Markforged.
The verdict
Markforged has done something very special with the Mark Two. The 3D printer has just about everything you could ask for in a desktop composite system, with its robust set of well-designed mechanical components, excellent performance, and graceful aesthetics.
To complement the hardware, Markforged has crafted the Eiger slicer to be as accessible as possible, regardless of the user’s experience level. The program is carefully designed to make the composite 3D printing workflow stress-free, ensuring users can go from design to production without getting caught up in the technical details. The only real way Eiger can be improved is if users are given the option to access the full range of print parameters, as this could be useful in certain edge cases.
On the print performance front, the Mark Two absolutely shines. Although precision did drop on the bigger parts, it’s not often we come across a 3D printer that doesn’t fail a single one of our print tests, but the machine passed every single one with flying colors. This includes our benchmarking model and a wide variety of real application tests. The surface quality as a whole is remarkable and the continuous fiber reinforcements truly pack a punch when it comes to mechanical performance, as demonstrated by the tensile results.
Ultimately, the Markforged system has proven itself to be a prime contender in the composites arena – the machine is a great choice for those seeking a reliable method of printing continuous fiber-reinforced parts. If you have $19,990 to shell out on a capable piece of kit, we strongly recommend the Mark Two.
Technical specifications
| Build volume | 320 x 152 x 154mm |
| Dimensions | 584 x 330 x 335mm |
| Weight | 16kg |
| Max nozzle temperature | 300°C |
| Extruders | Two |
| Touchscreen | 4″ |
| Z-resolution | 100 – 200 microns |
Buy the Markforged Mark Two 3D printer here.
Subscribe to the 3D Printing Industry newsletter for the latest news in additive manufacturing. You can also stay connected by following us on Twitter, liking us on Facebook, and tuning into the 3D Printing Industry YouTube Channel.
Looking for a career in additive manufacturing? Visit 3D Printing Jobs for a selection of roles in the industry.
Featured image shows the Markforged Mark Two. Photo by 3D Printing Industry.