3D Printing Industry reviews the Formlabs Fuse 1 3D printer and Fuse Sift post-processing system.
Based in Somerville, Massachusetts, Formlabs is undoubtedly one of the biggest names in professional-grade SLA 3D printing. Having debuted its original Form 1 system almost a decade ago, the firm has since packed out an extensive portfolio of resin-based 3D printers such as the Form 3+, Form 3B+, Form 3L, and Form 3BL.
Just last year, however, Formlabs expanded into a new market with the launch of the Fuse 1, the company’s first Selective Laser Sintering (SLS) 3D printer. Backed by over seven years of research and development, the Fuse 1 was marketed as the world’s first industrial-grade benchtop SLS machine, combining high-performance with a compact footprint.
The system is intended as an accessible offering for engineers, designers, and manufacturers seeking both functional prototyping and end-use polymer production – all at a fraction of the cost of traditional SLS competitors.
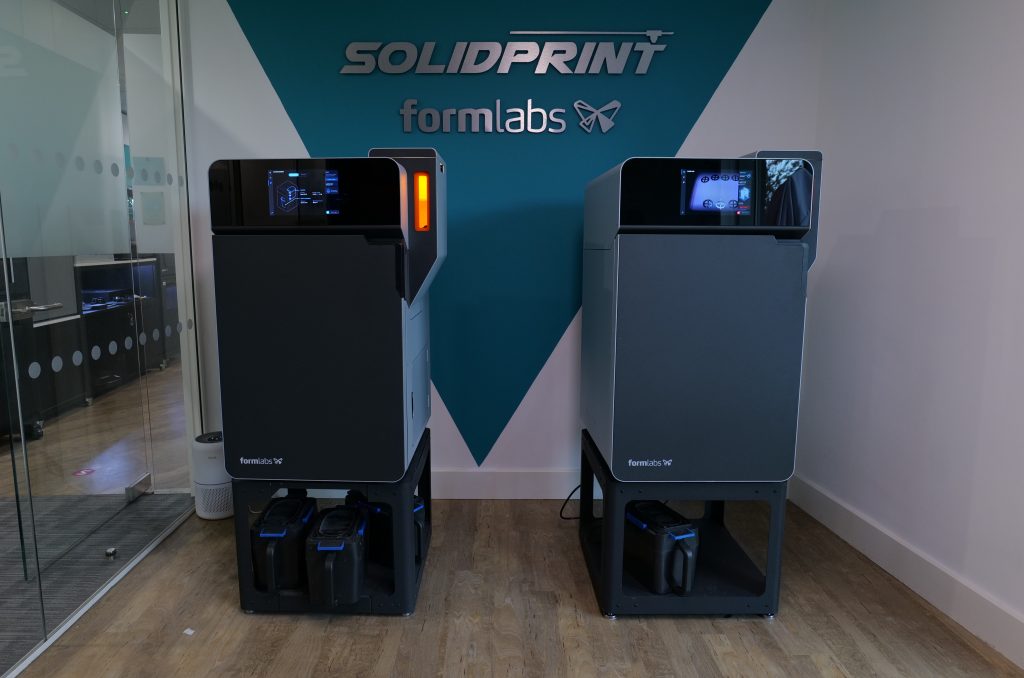
To complement the 3D printer, Formlabs also launched the Fuse Sift, a post-processing system for use with the Fuse 1. We visited the offices of UK-based 3D printer supplier Solid Print3D to review both of these devices.
Prefer to watch a video of this review? Click here for the 3D Printing Industry review of the Formlabs Fuse 1.
The Fuse 1 – scaling down SLS 3D printing
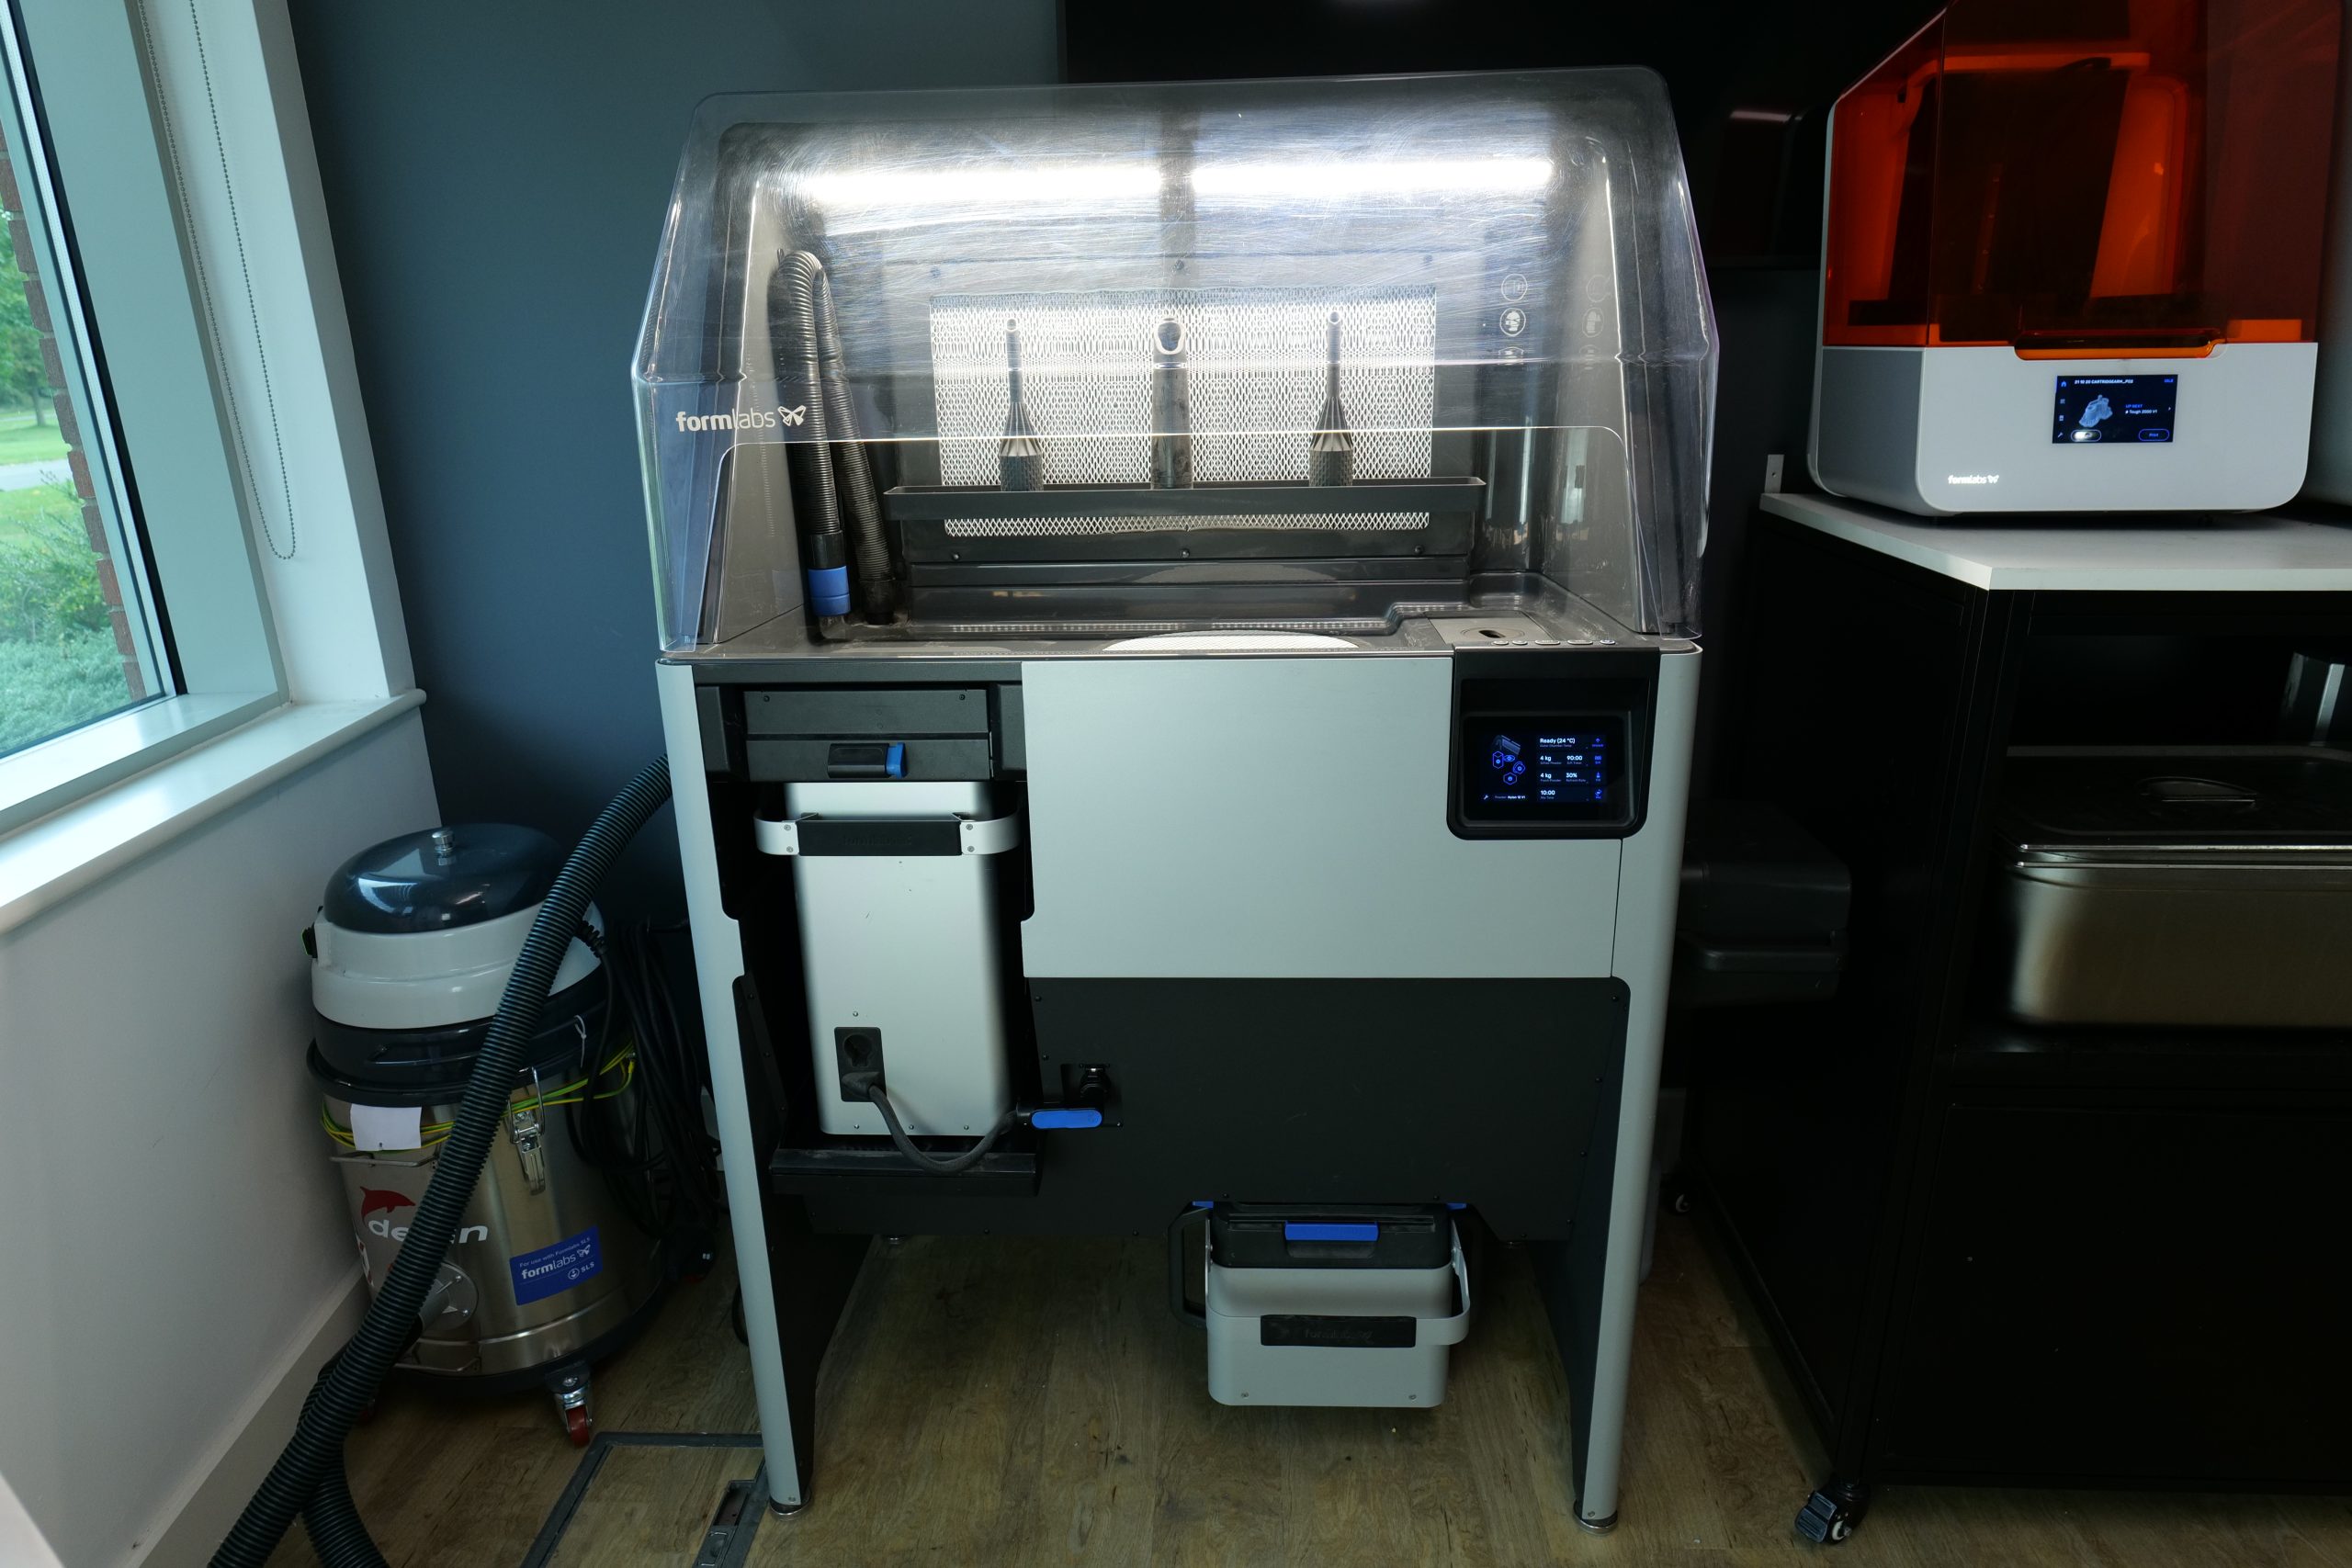
One of the most striking things about the Fuse 1 is its compact frame. Compared to other SLS 3D printers, the system is highly space-efficient, measuring just 645 x 685 x 1070mm (1655mm tall with the stand). It’s also relatively light, weighing in at 114kg without the build chamber or any powder. As a result, the Fuse 1 is likely to feel at home in just about any crammed workshop and is portable enough to wheel around without much effort.
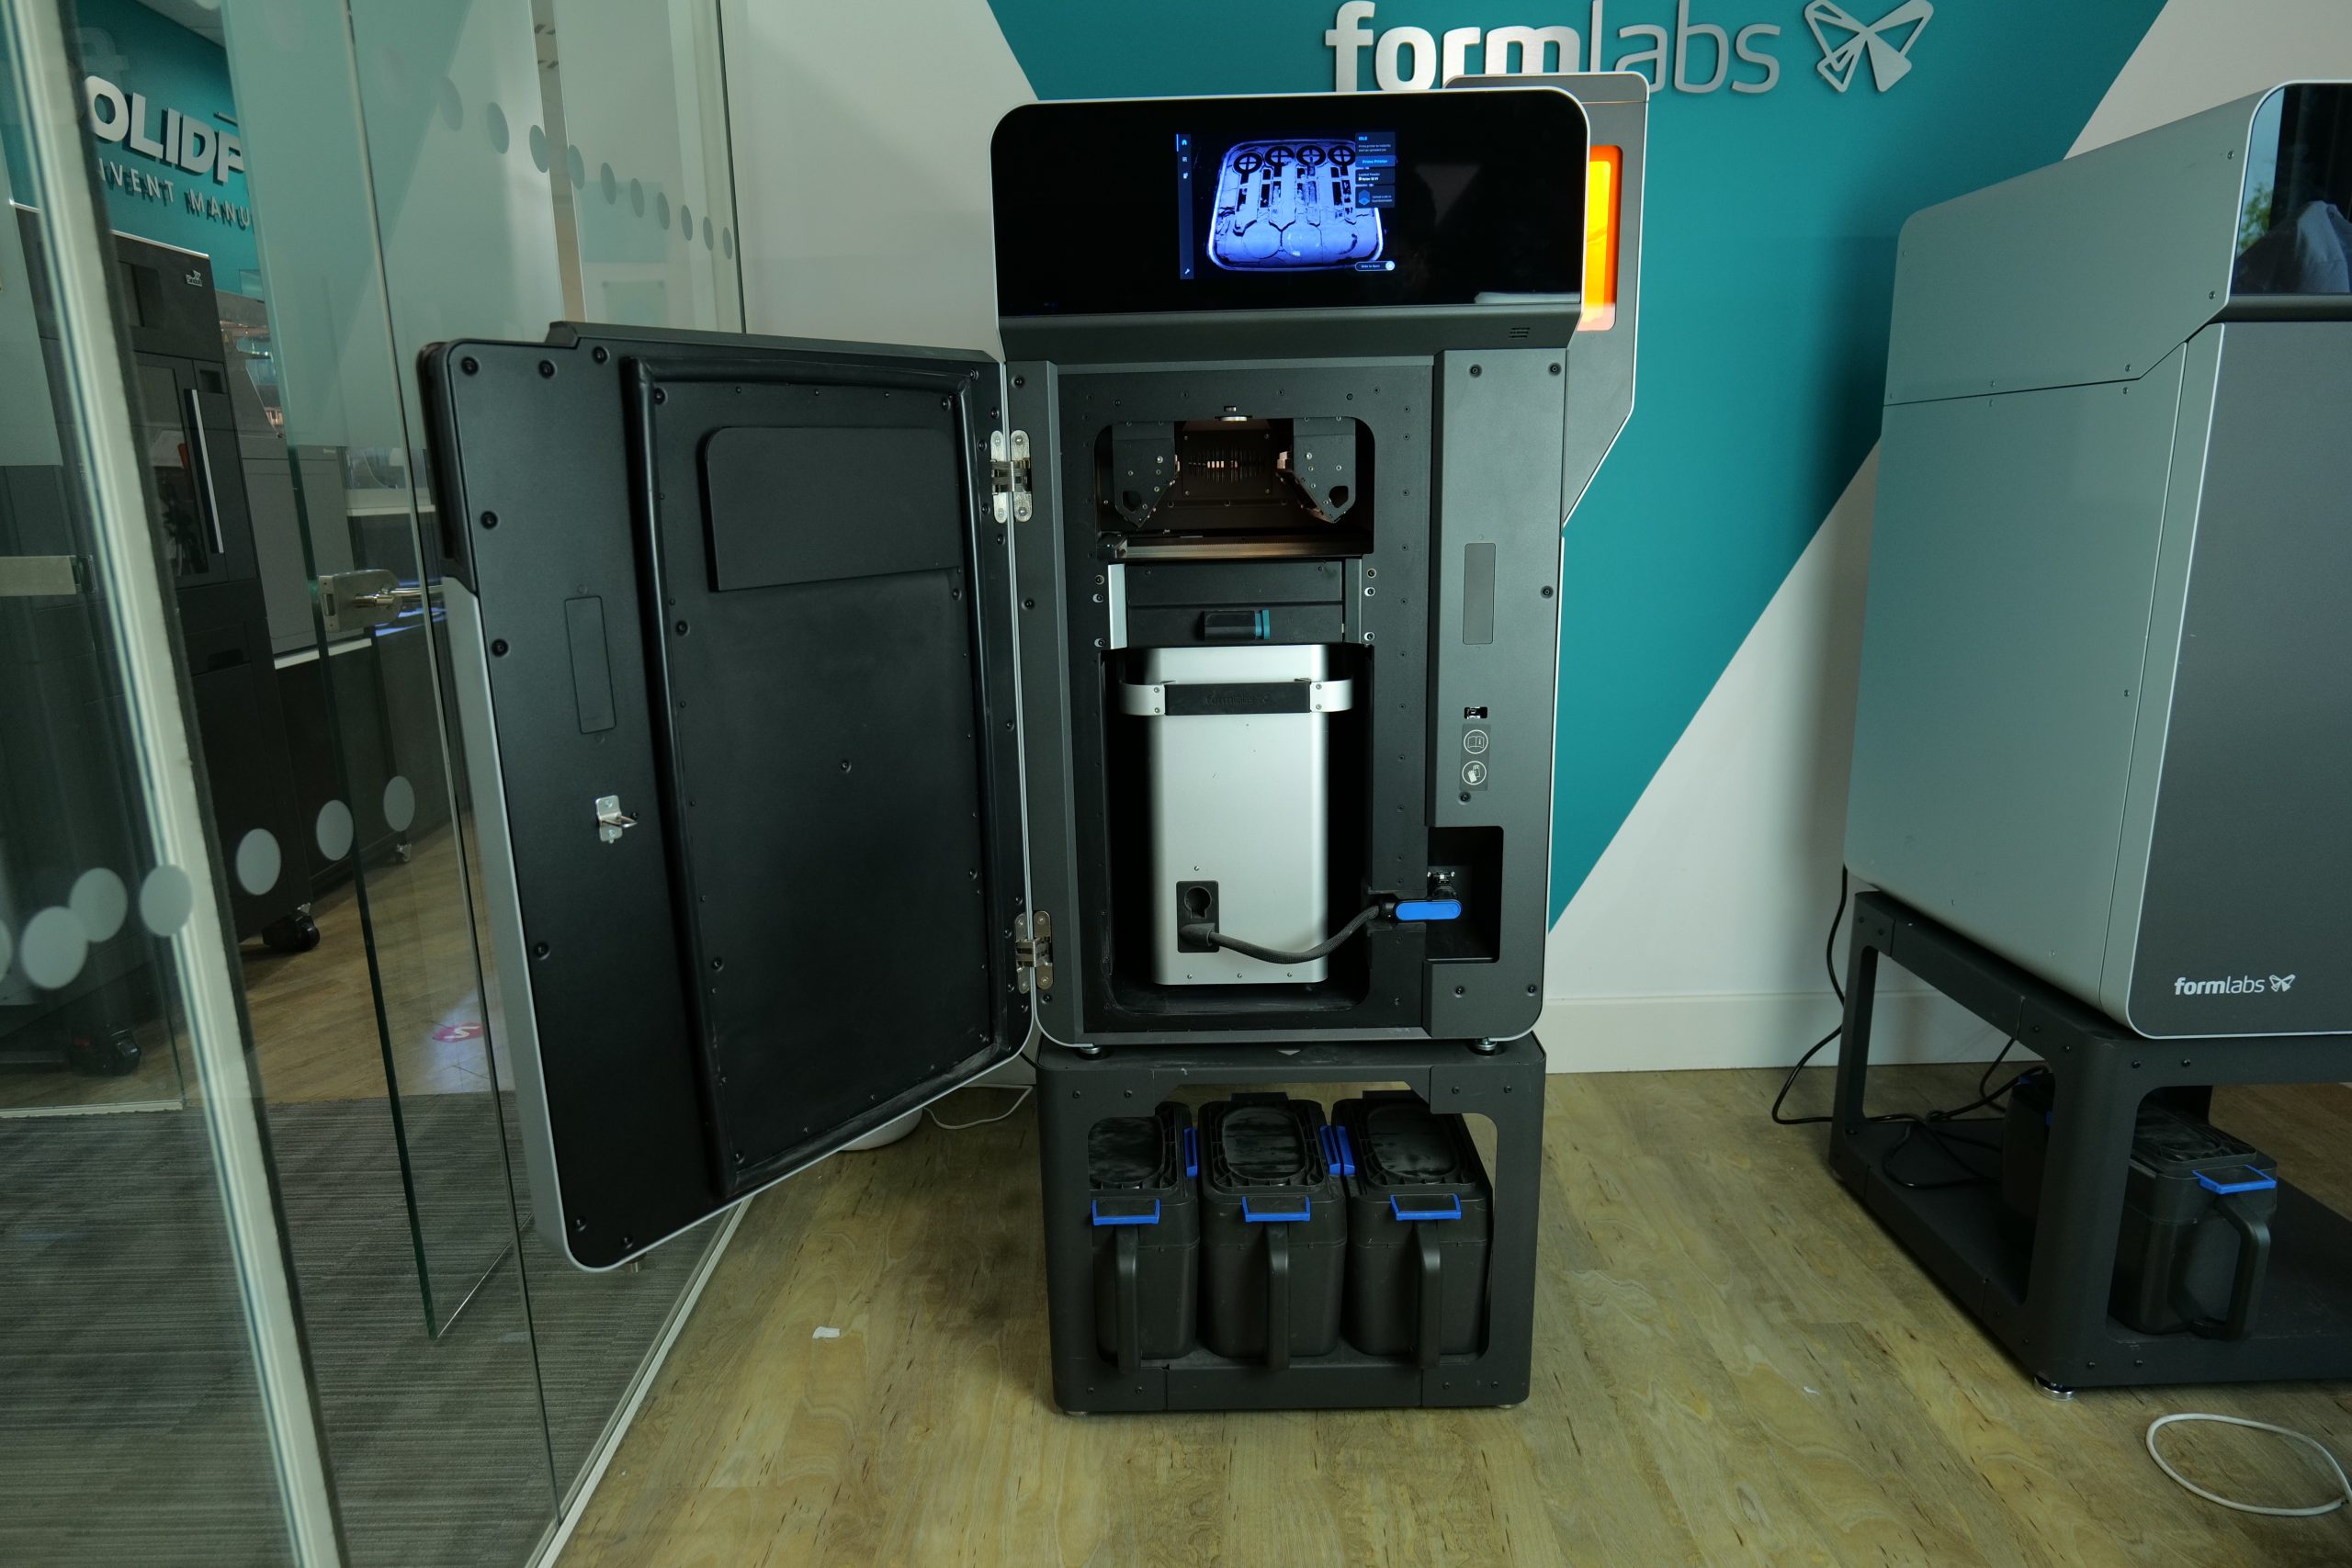
The machine features a full metal chassis with one door at the front providing access to the build area. The enclosed build chamber can be heated to 200°C and even features a replaceable active carbon HEPA filter for safe indoor operation. In this case, having a heated build chamber is crucial when it comes to avoiding material contraction issues, ensuring parts don’t warp as they’re printed.
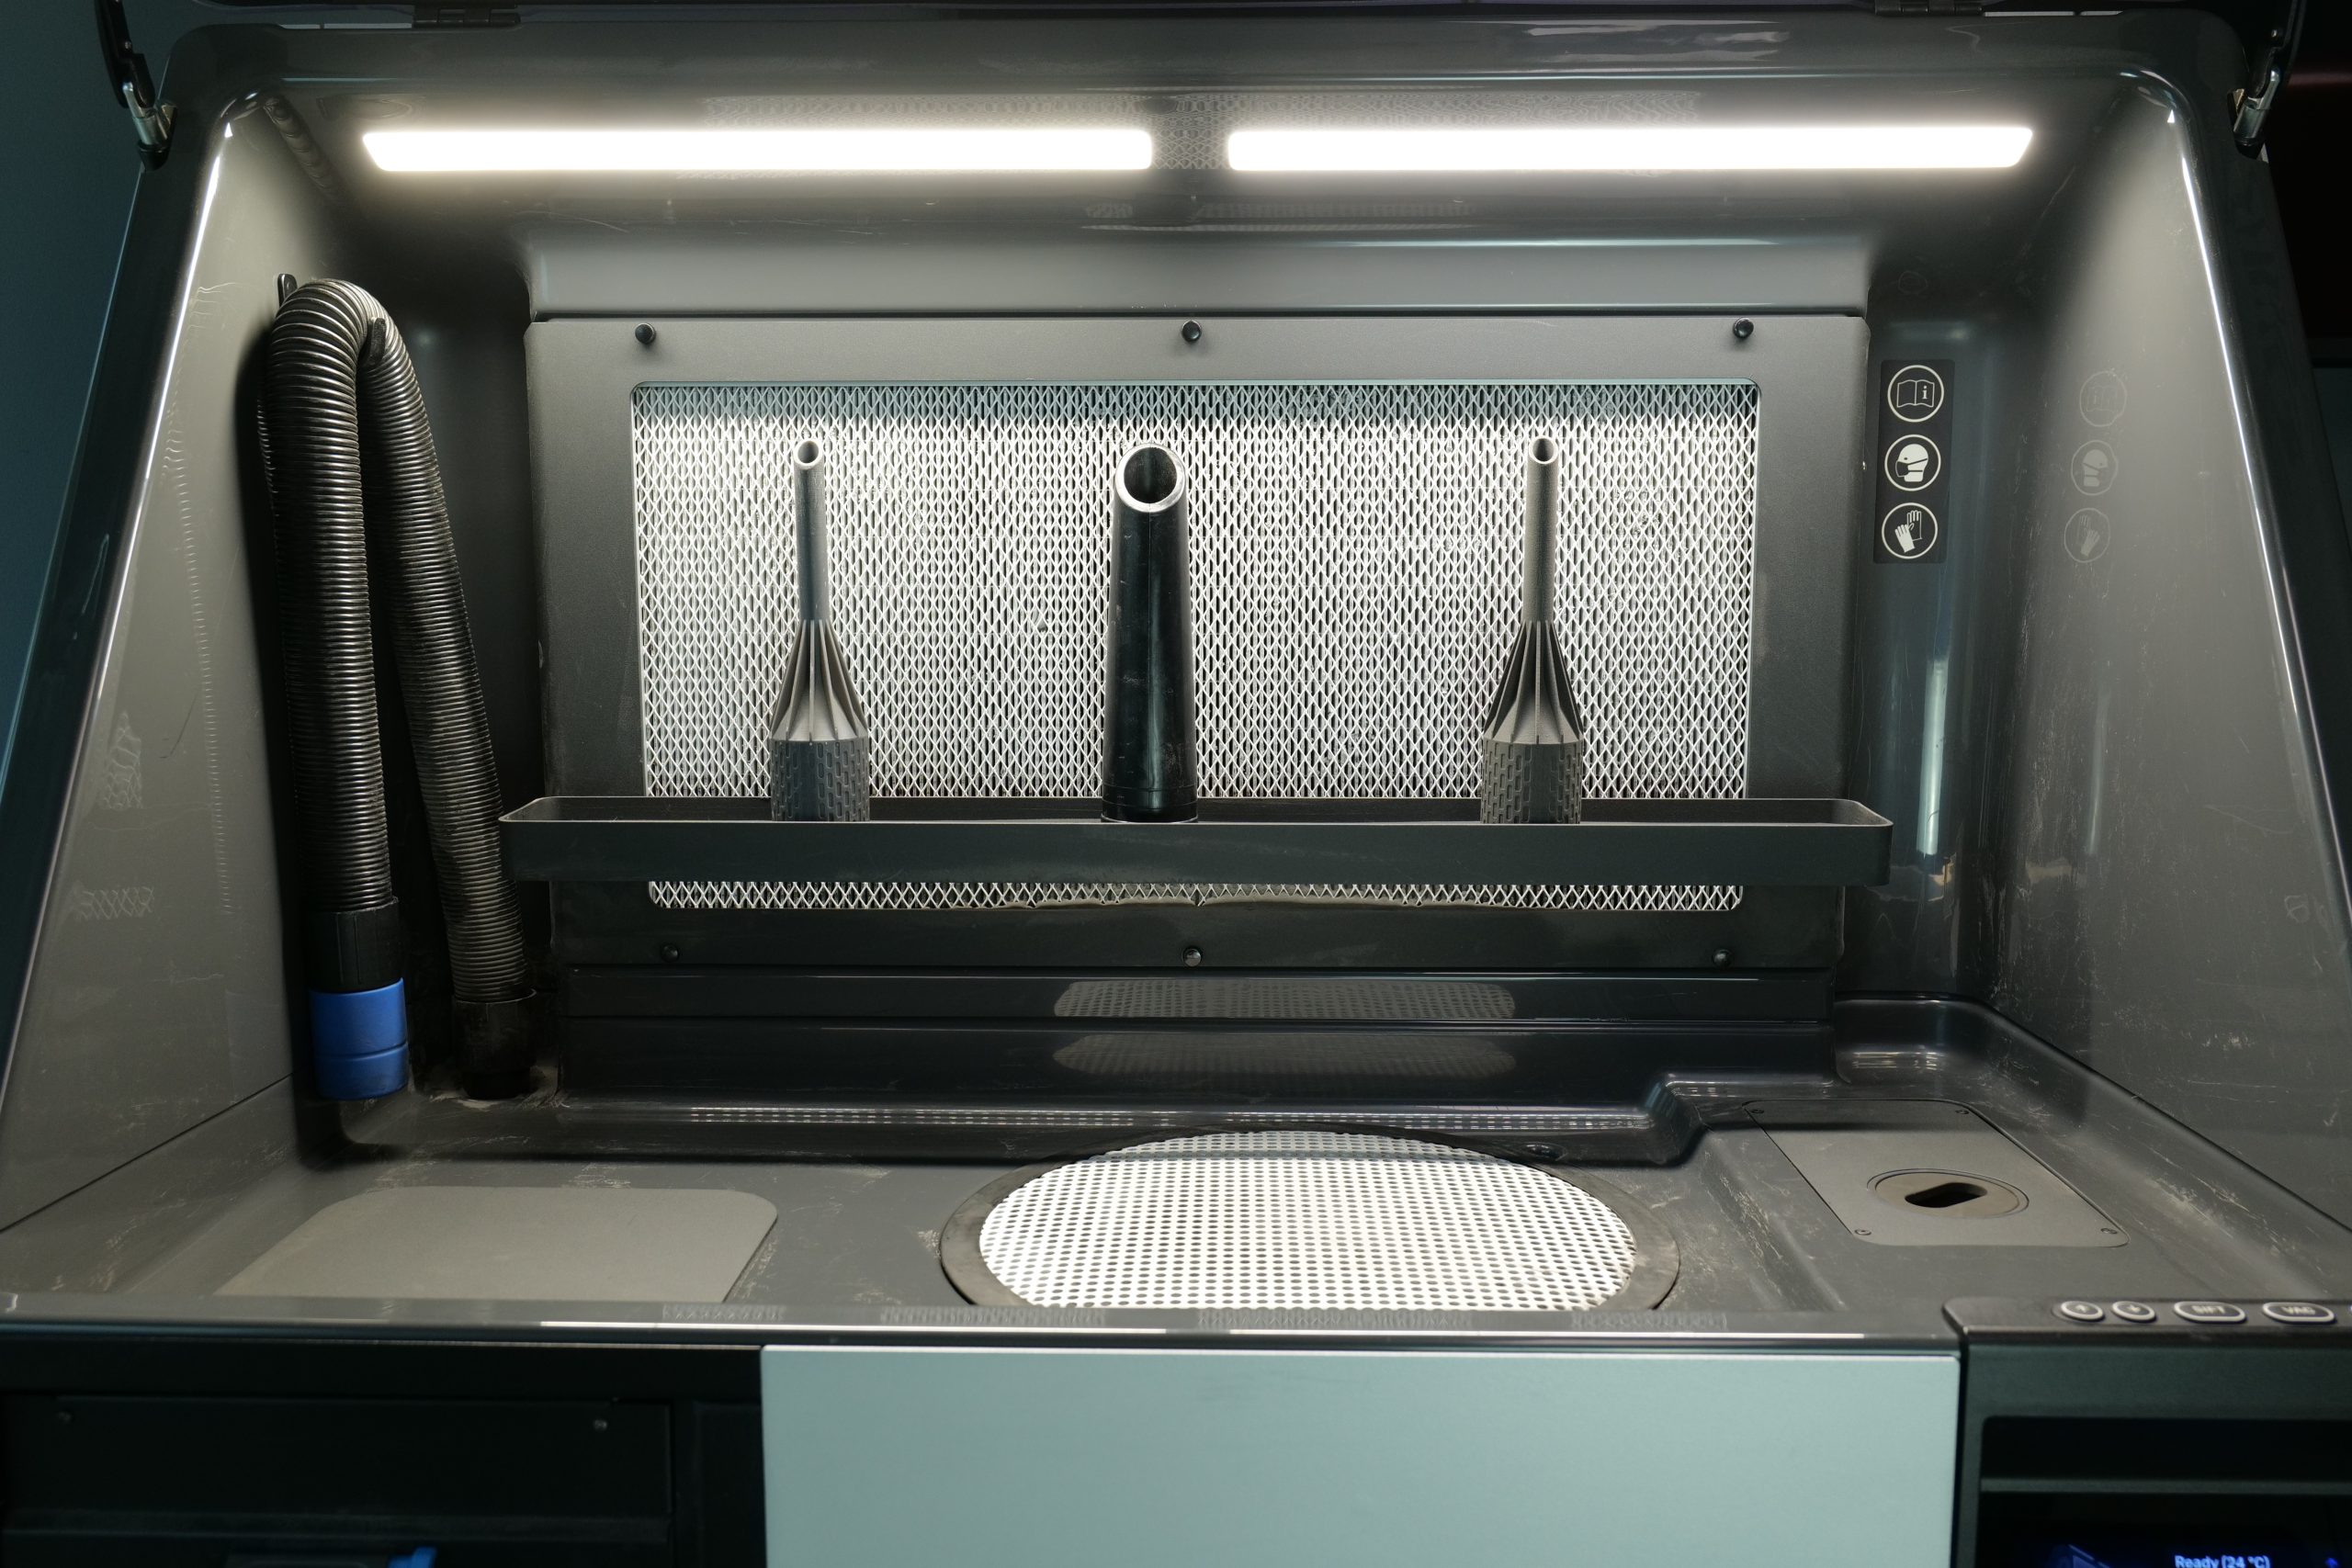
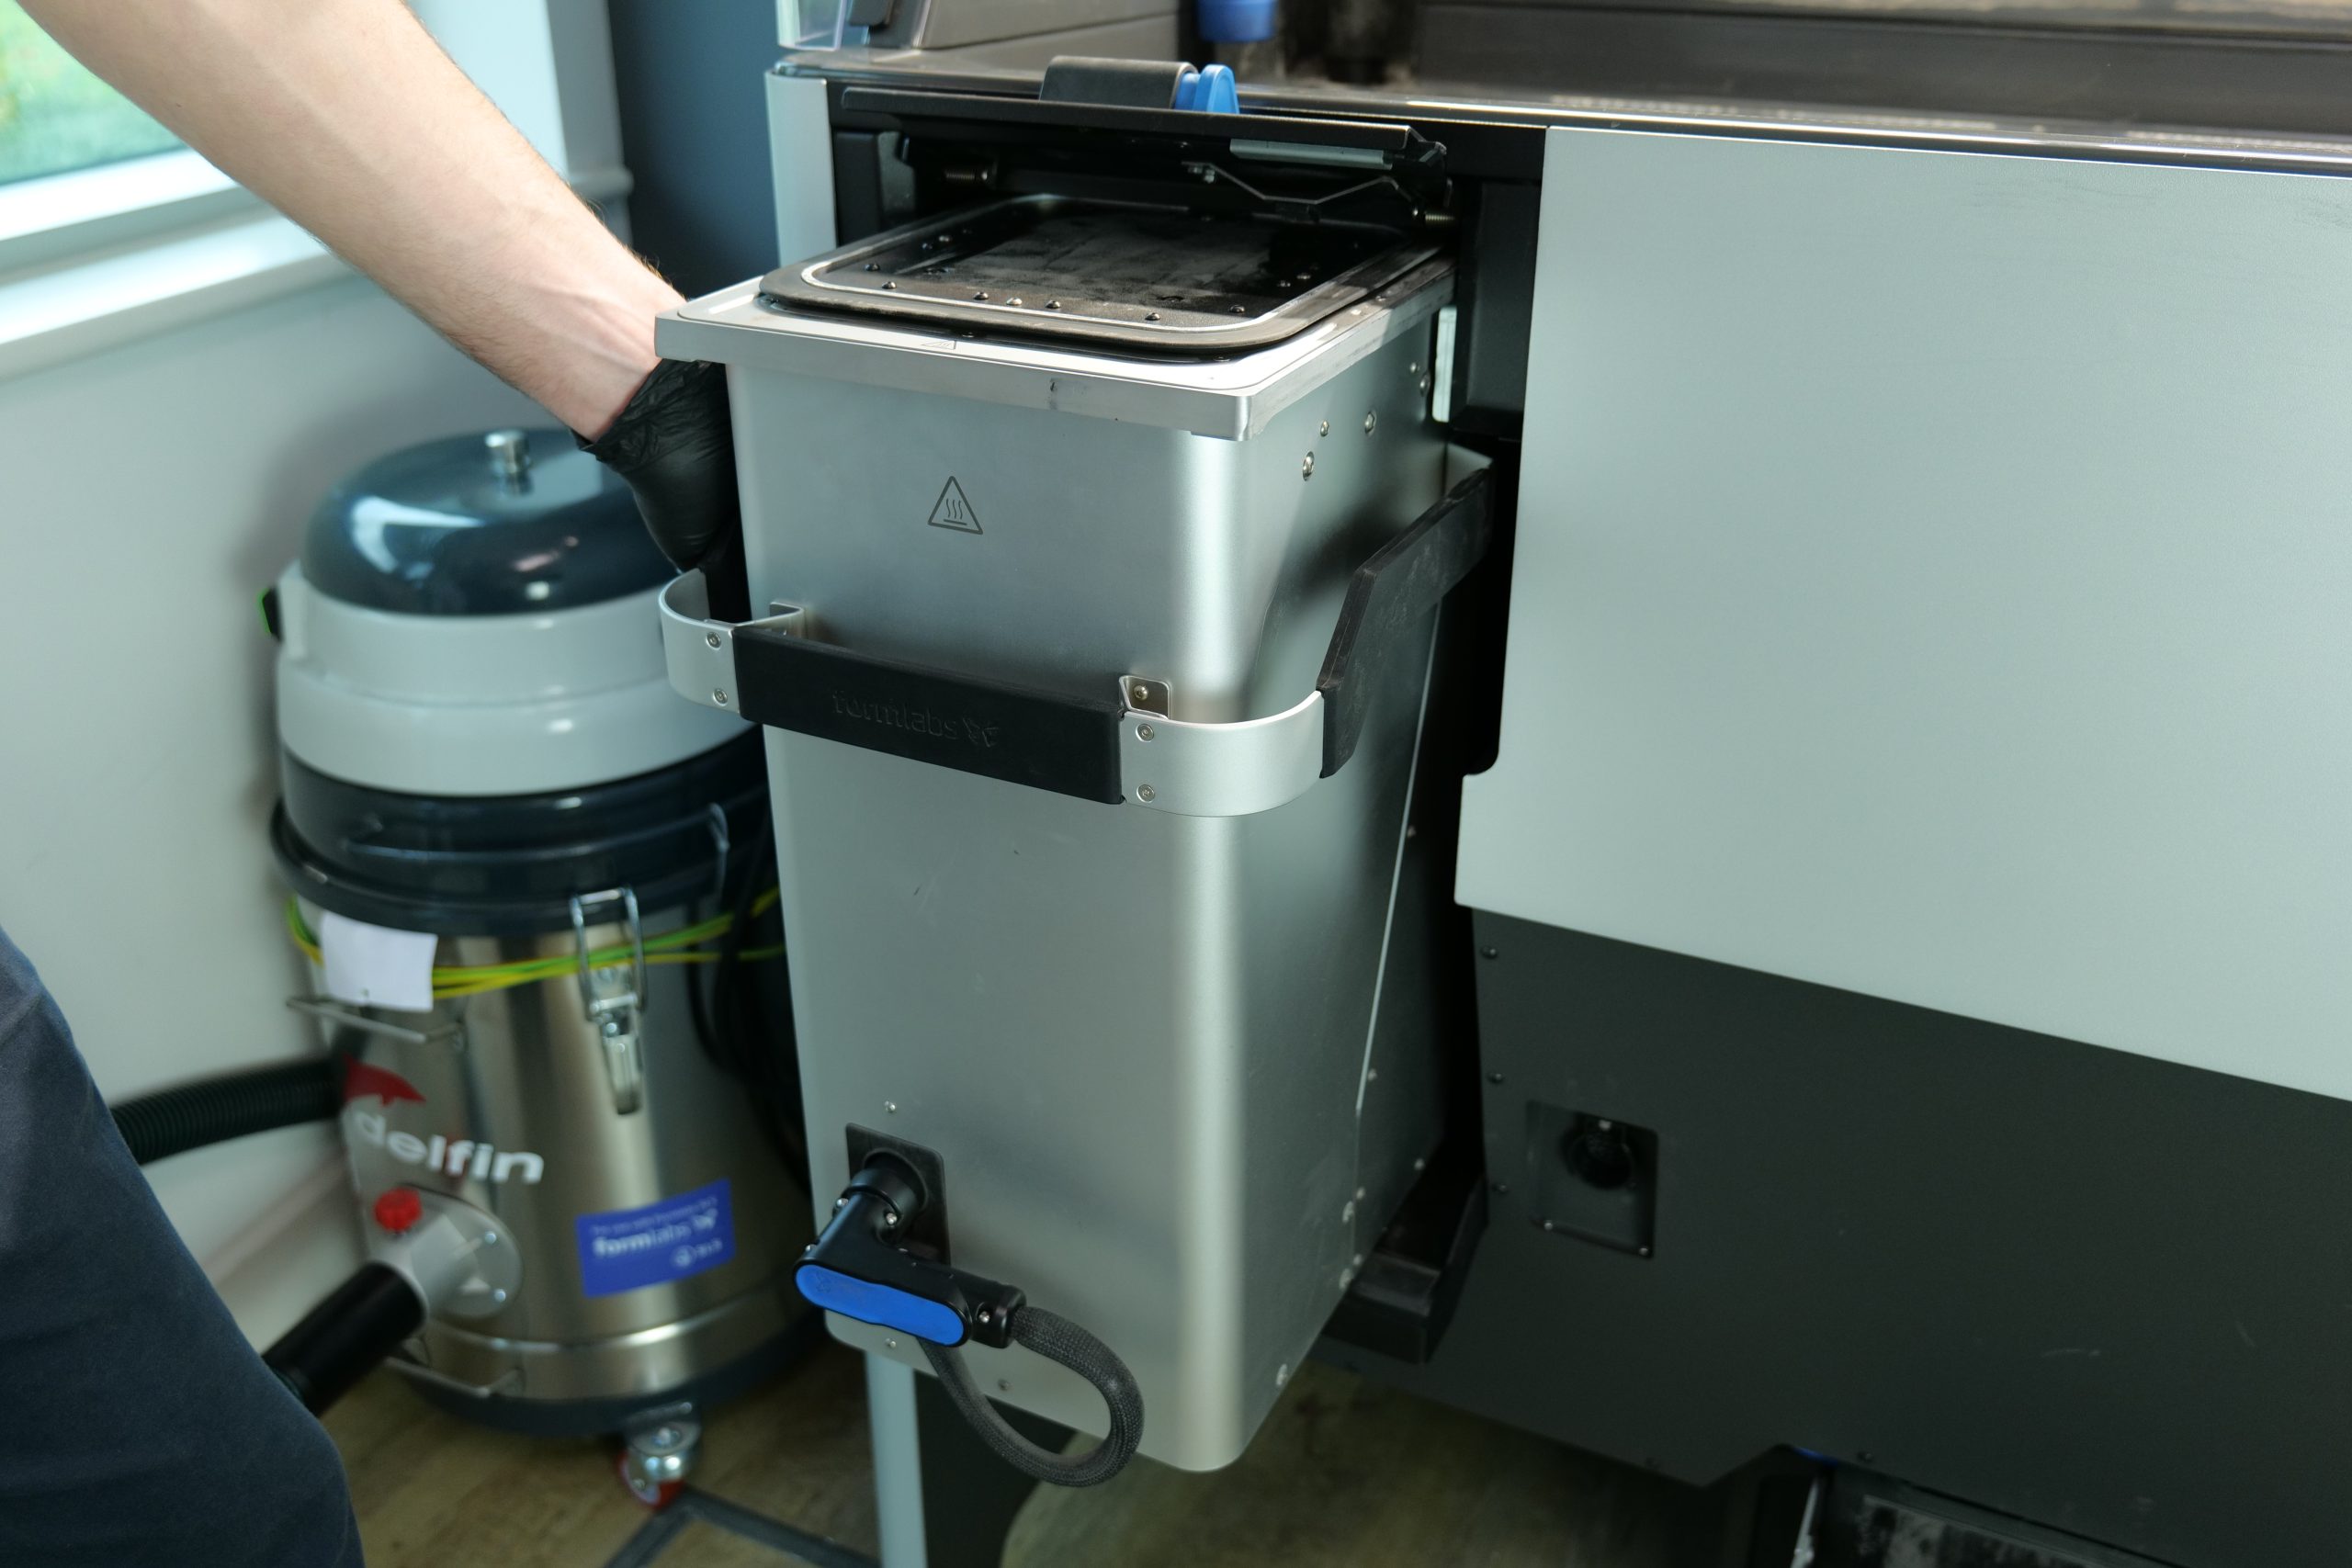
Formlabs has equipped the Fuse 1 with a 165 x 165 x 300mm build volume, meaning users have 8.17L of workspace to play around with. The powder tank, or hopper, has a maximum load of 8.5kg, which is ample powder capacity for the build volume provided. Additionally, the build chamber is modular in that it can be removed in its entirety. This enables users to transfer the build chamber to the Sift post-processing station without even seeing the printed part, making powder removal and recycling a breeze. More on this later.
In terms of energy source, the Fuse 1 features one ytterbium fiber 10W laser diode with a wavelength of 1065nm, a beam divergence of 4.01mrad, and a spot size of 200 microns. As it stands, the system is able to 3D print two different polymer materials (Nylon 11 and Nylon 12) and Formlabs is working hard to expand the range of compatible powders.
Looking at the control system, the firm has implemented its own set of custom galvanometers operating on a polar coordinate system. As such, the laser moves on the X and Y axes, whereas the bed moves on the Z-axis. The system uses a roller to deposit a fresh coat of powder on the powder bed after each layer is printed, as opposed to using a static blade. The use of the roller allows for improved powder packing and a more uniform powder distribution, which is crucial for achieving high part qualities.
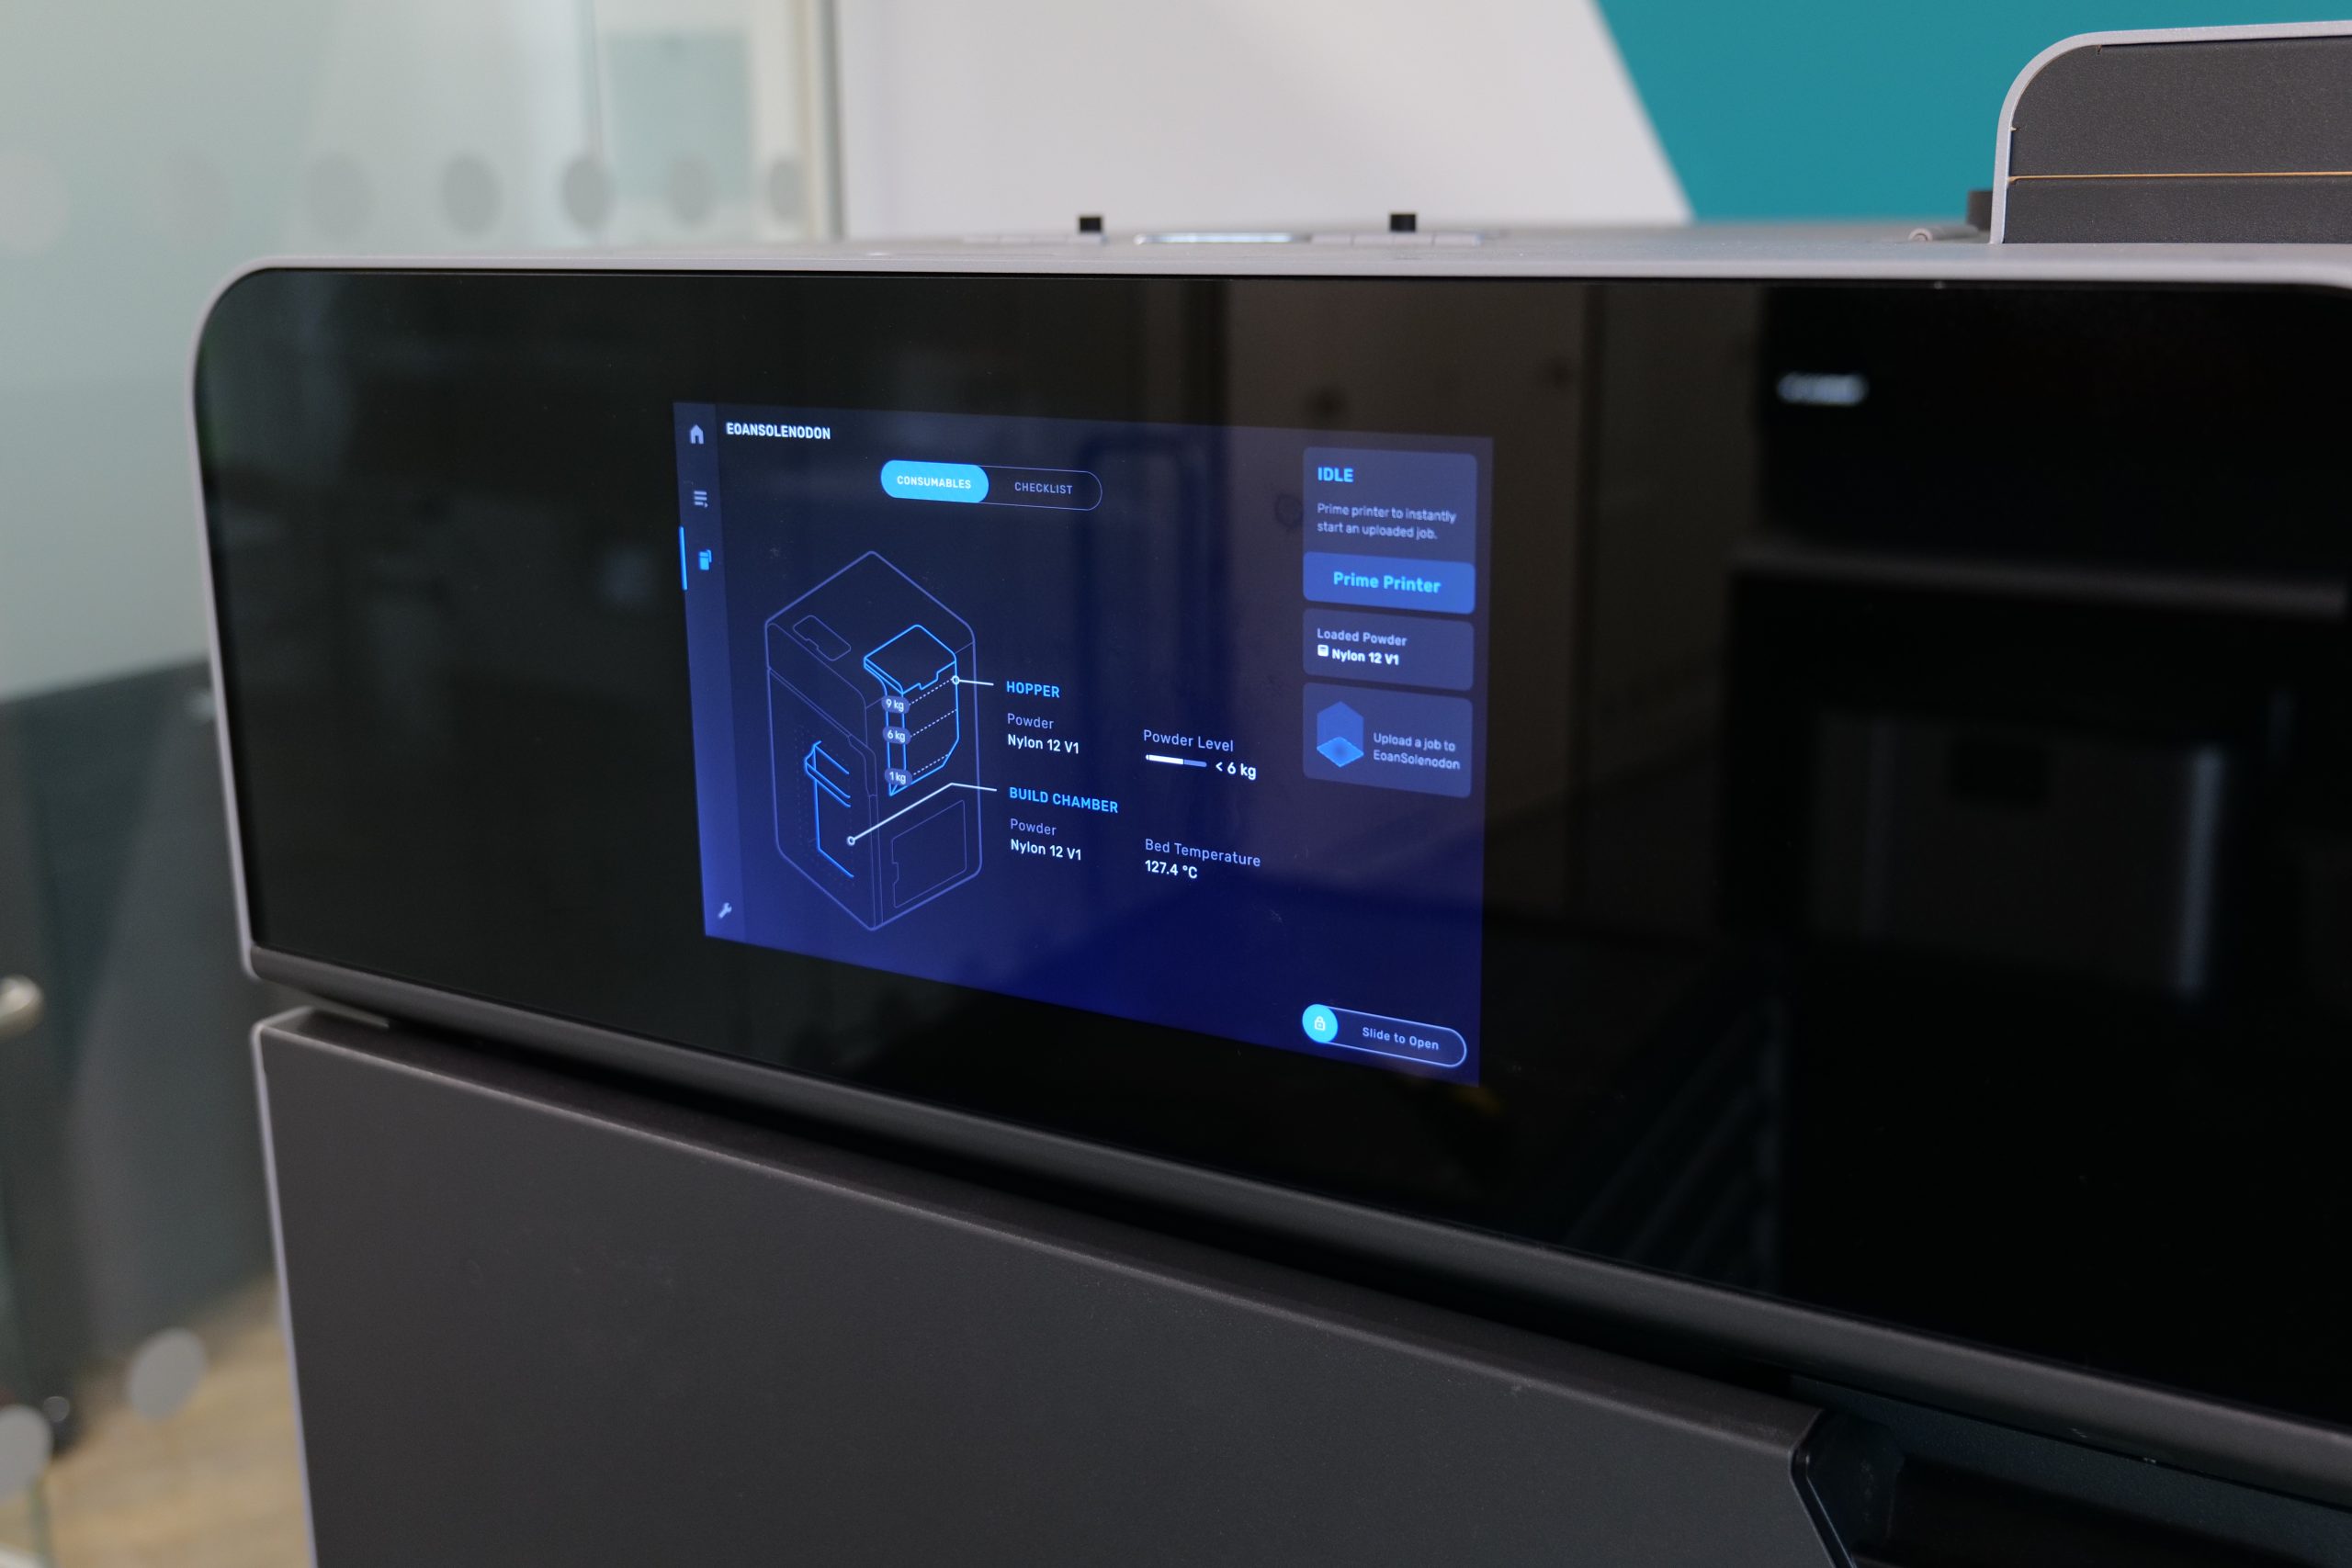
On the electronics side, the Fuse 1 has a 10.1” full-color touchscreen on the front (1280 x 800 resolution). As well as housing all of the printer’s core functionality, including printer calibration, file management, and build management, the touchscreen is used as a live video feed to monitor the inside of the build chamber while a part is being printed. We found the user interface to be highly refined and easy to navigate with minimal latency – nothing to criticize here. Connectivity options include USB, Wi-Fi, and ethernet, so feel free to take your pick.
The Fuse Sift – stress-free post-processing
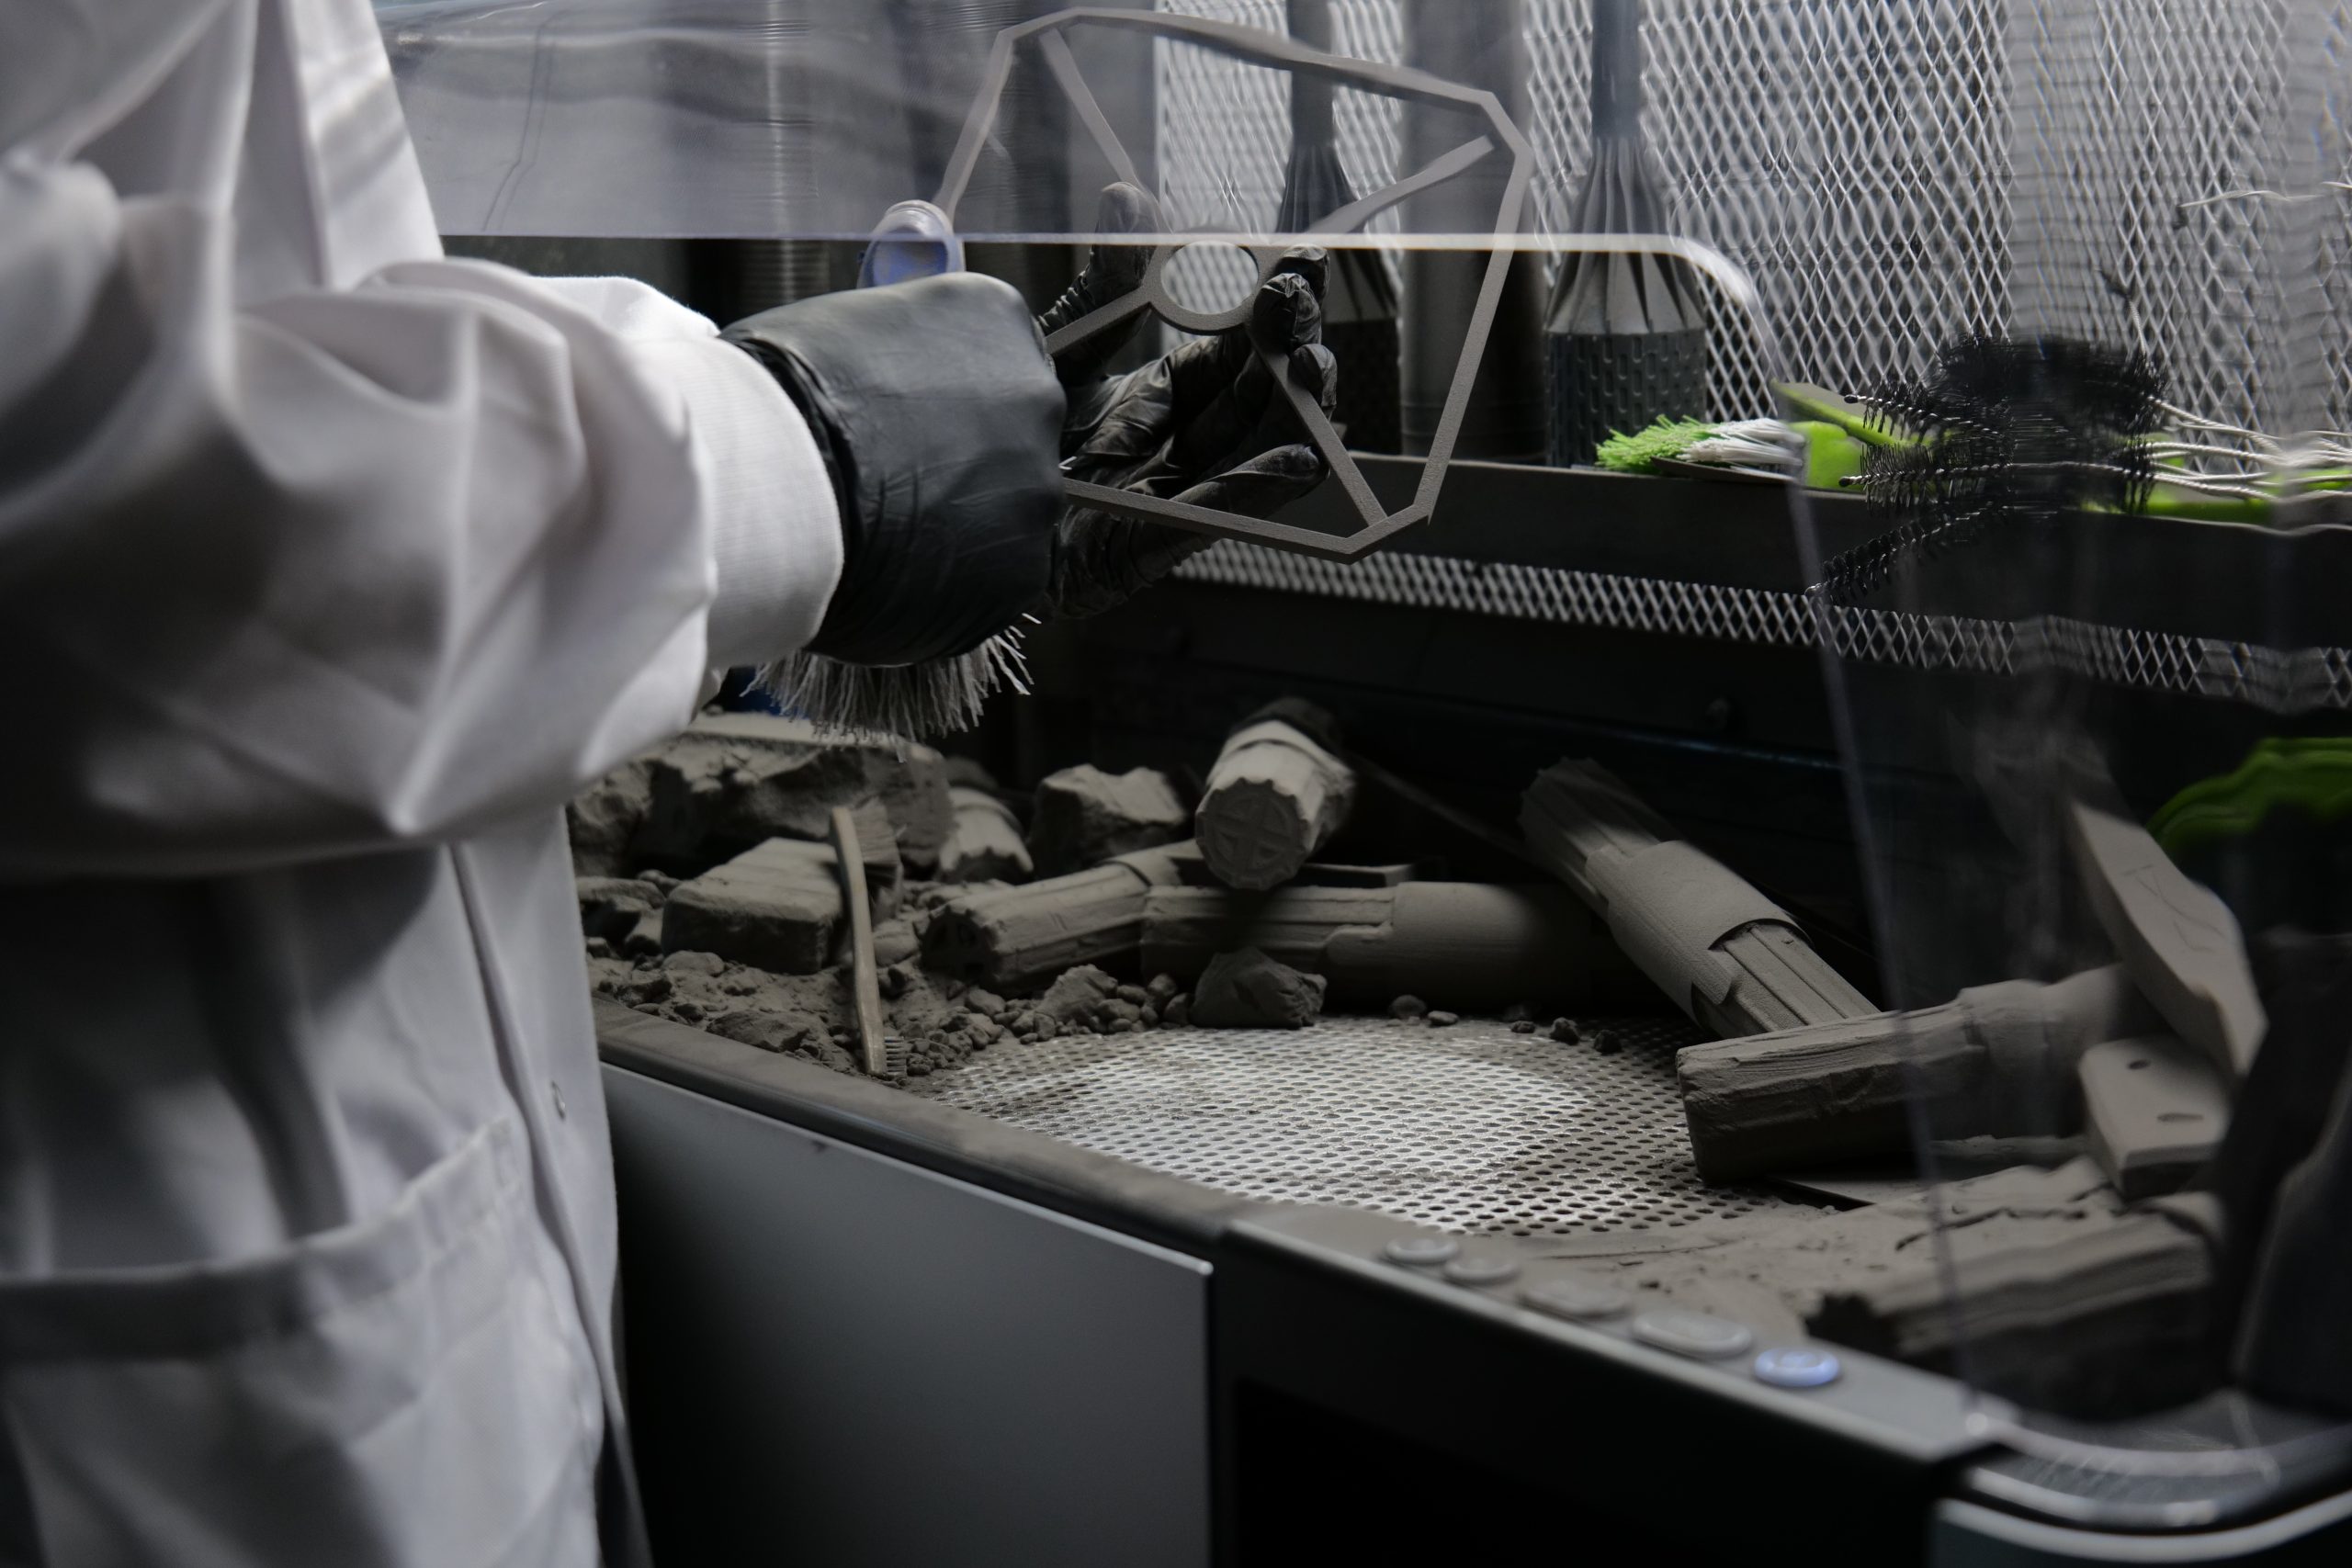
Used in conjunction with the Fuse 1, the Fuse Sift is an automated post-processing system designed to depowder polymer 3D printed parts. It contains all of the tools necessary for unpacking the build, cleaning the parts, and reusing unsintered powder. The workspace, which is guarded by a transparent acrylic shield, is well thought out with all of the individual stations arranged neatly in order. We’ll take a deeper dive into each of these stations and explain how they all work.
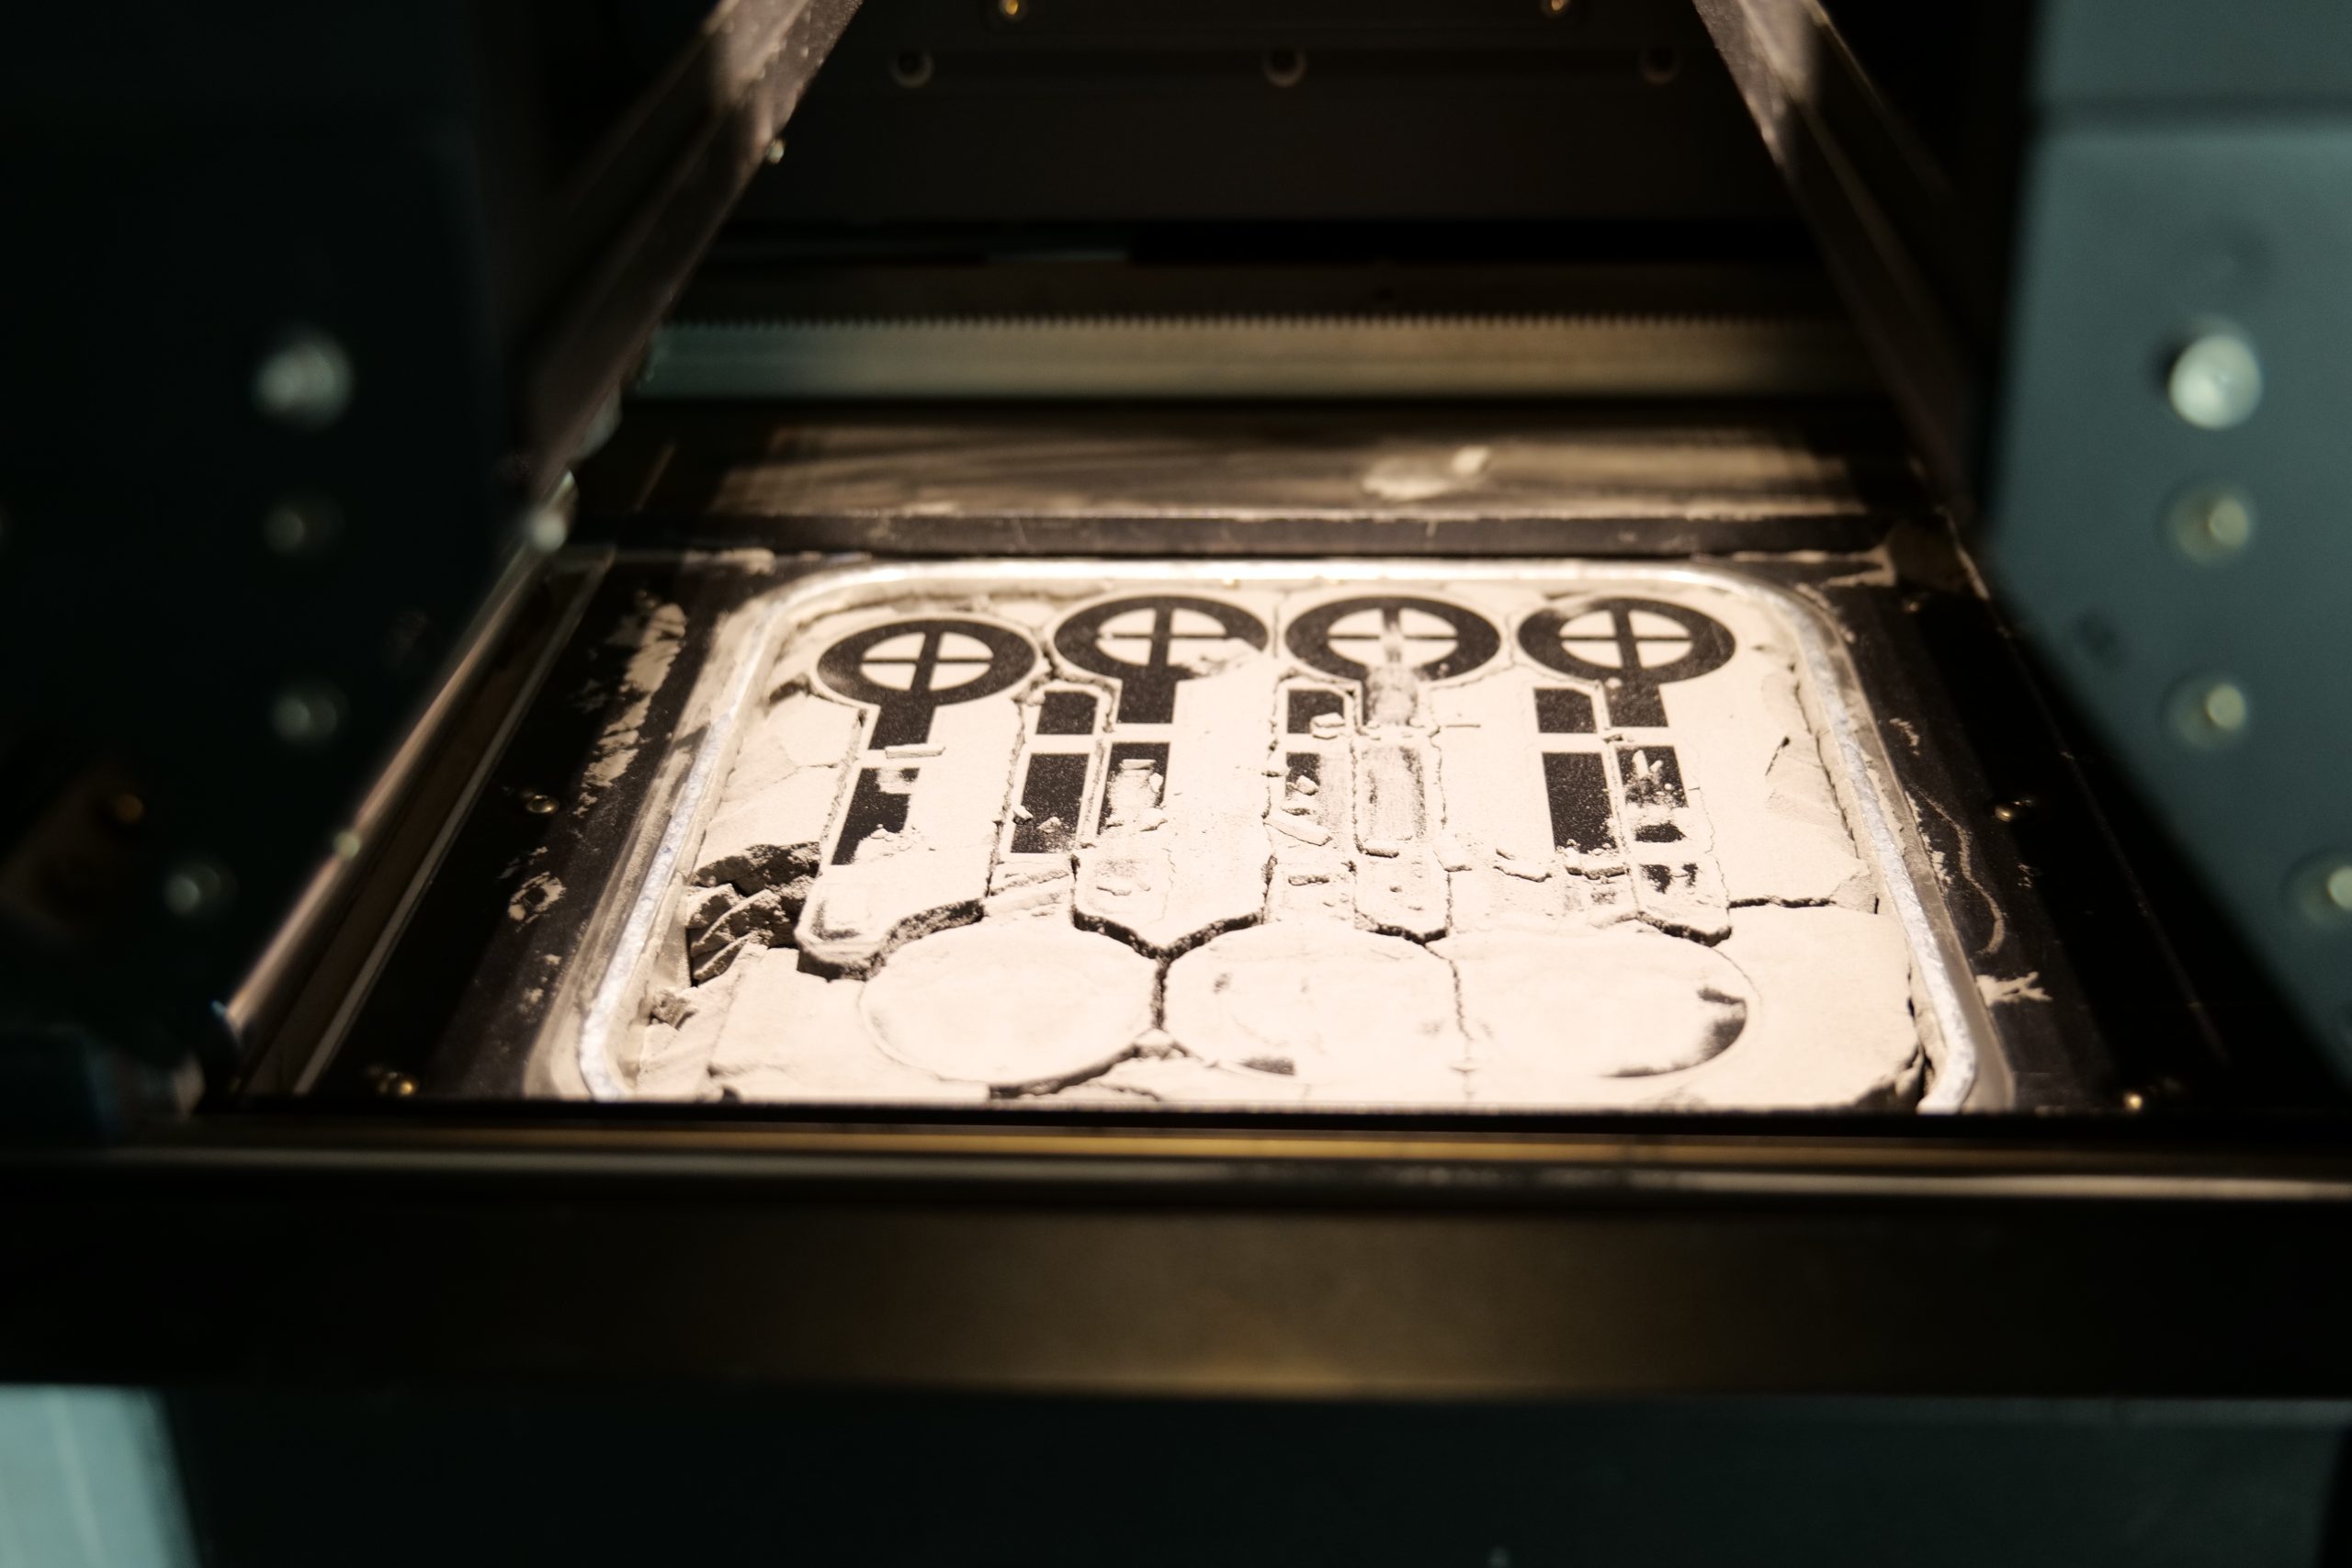
Once the user transfers the Fuse 1’s build chamber to the Fuse Sift, the printed part and the mountain of unfused powder (aka the cake) emerge from the left side of the workspace with the help of an elevator.
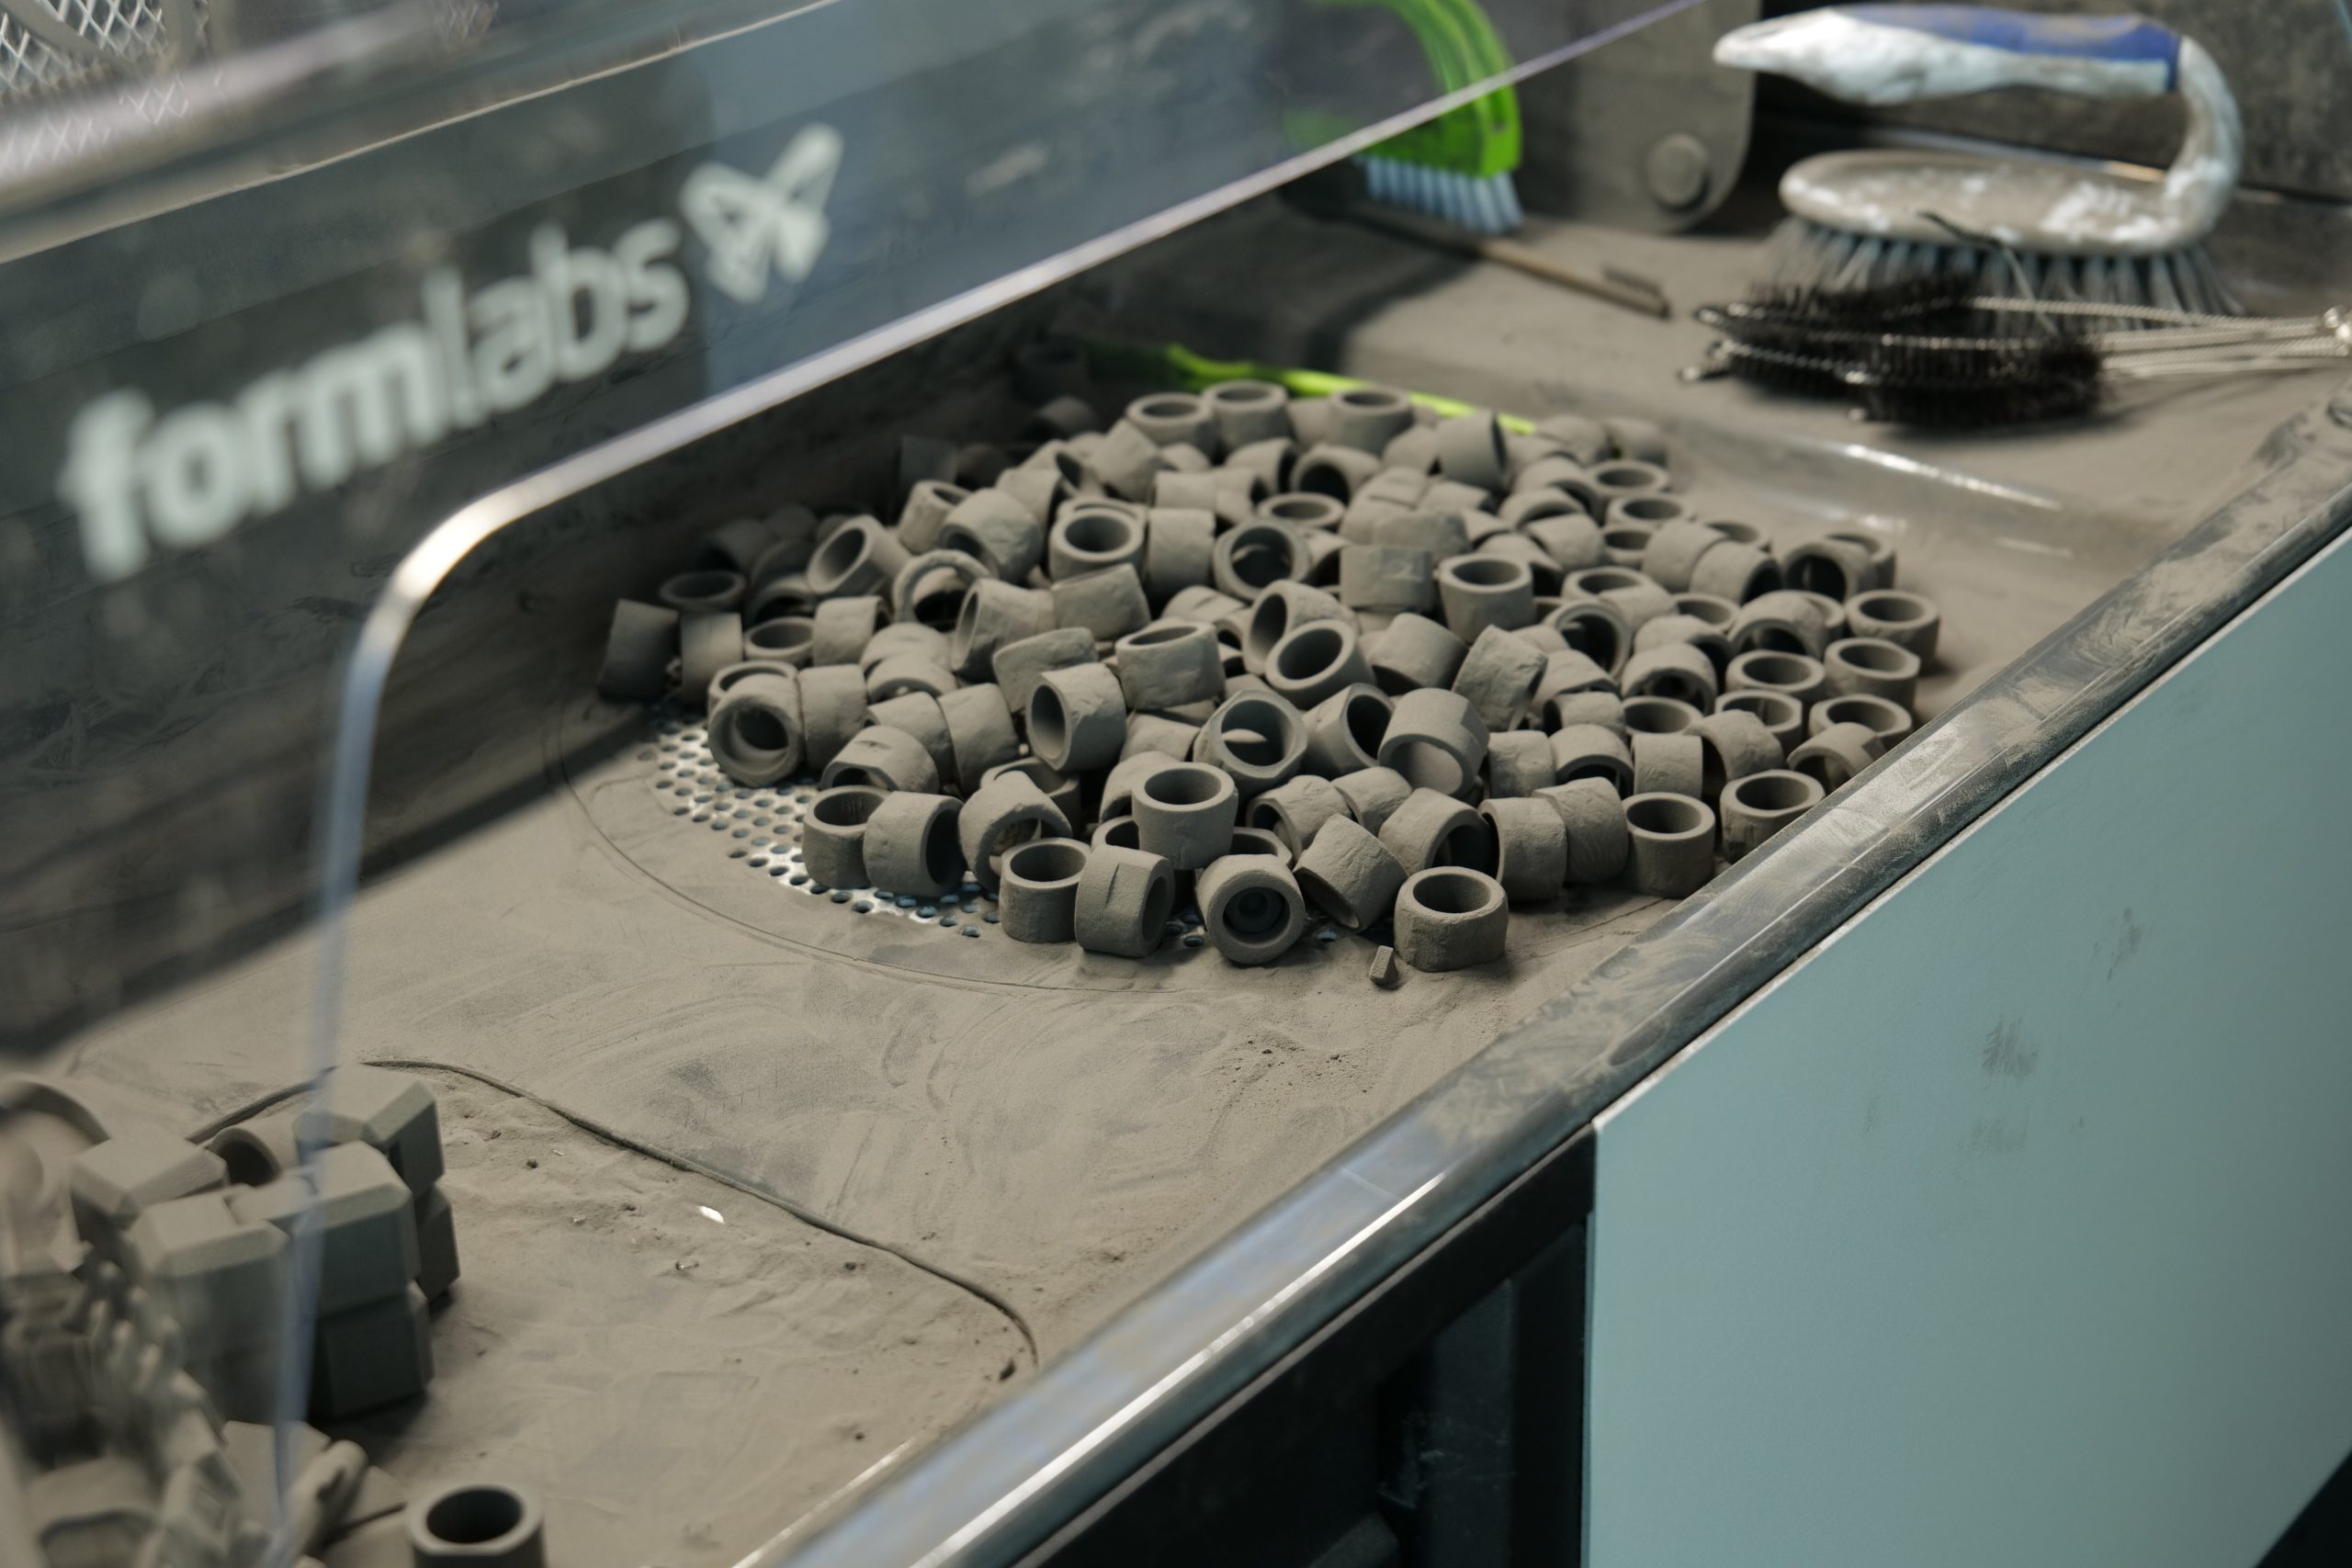
Then the part is moved over to the middle of the workspace where the sieve can be found – this is where the powder removal takes place. The sieve comprises a wide grid of small holes that allow unused powder to pass through, while catching larger lumps of powder that have been heated and fused together. The powder that manages to fall through is stored in a hopper directly below, where it will soon be recycled with fresh powder and reused.
To aid with the powder removal step, users will find it handy to make use of the vacuum cleaner included in the box. It makes quick work of the powder that will inevitably scatter all over the workspace, so be sure to give the Sift (and Fuse 1) a thorough cleaning after every build.
Once the bulk of the powder has been removed from the parts, you may still find that small nooks and crannies will be laden with unfused powder. To remedy this, the Fuse 1 also comes with a variety of smaller hand tools that can help address the more intricate part geometries, including brushes and needle-like spikes.
Finally, on the right side of the workspace is the fresh powder tank. Here, users can fill the Fuse Sift with fresh Nylon powder to be recycled with the used powder previously reclaimed at the sieving station. The tank is fitted with a rubber seal to stop any used powder from accidentally mixing in with the fresh powder prematurely.
To then refill the Fuse 1 3D printer, the user must fill an empty powder cartridge in the cartridge drawer of the Fuse Sift. Currently, Formlabs recommends a material refresh rate of 30% – 50% (this means using 30% fresh PA12 powder and 50% fresh PA11 powder). The Sift comes equipped with a rotation system that can be used to mix filled cartridges until an even powder distribution is achieved. Simply attach the filled cartridge to the rotation system and activate the mechanism for ten minutes via the touchscreen. Once mixed, the homogenous powder cartridge can be used to fill the hopper of the Fuse 1. Easy.
All in all, the Fuse Sift does everything it promises to and works like a charm. Formlabs has very carefully designed the workflow of the post-processing system to be intuitive, making the lives of technicians everywhere as stress-free as possible. Much like the Fuse 1, the Sift’s user interface is expertly crafted for simplicity and elegance, all while maintaining its comprehensiveness. The system as a whole is very efficient and we had a blast using it.
Things to consider when using the Fuse 1
The combination of the Fuse 1 and Fuse Sift makes for a very streamlined end-to-end SLS 3D printing workflow, but there are a few things to keep in mind when using these systems.
Firstly, it’s important to carefully consider the location of both the Fuse 1 and Fuse Sift in the workshop. The powders used in SLS are extremely fine and prone to contamination, so it’s crucial that the work area is free from potential contaminants such as dust or waste from other machines. For example, neither of the systems should be placed next to a sandblasting machine as the sand could very easily taint the Nylon in the powder bed.
Due to the fineness of the powder particles, it’s also recommended to wear adequate PPE at all times when exposed to airborne powder. At a minimum, you should always have a mask when using Sift or a media blaster. The work area should also be well ventilated to ensure an overall safe indoor working environment.
Once the proper safety measures have been put in place, it’s important to appreciate that SLS is a hot process. The Fuse 1 takes about an hour to heat its build chamber up before actually firing up the laser, although this pre-print heating process is automatic. Once a build is complete, you’ll also need to let it cool down before transferring the build chamber over to the Fuse Sift.
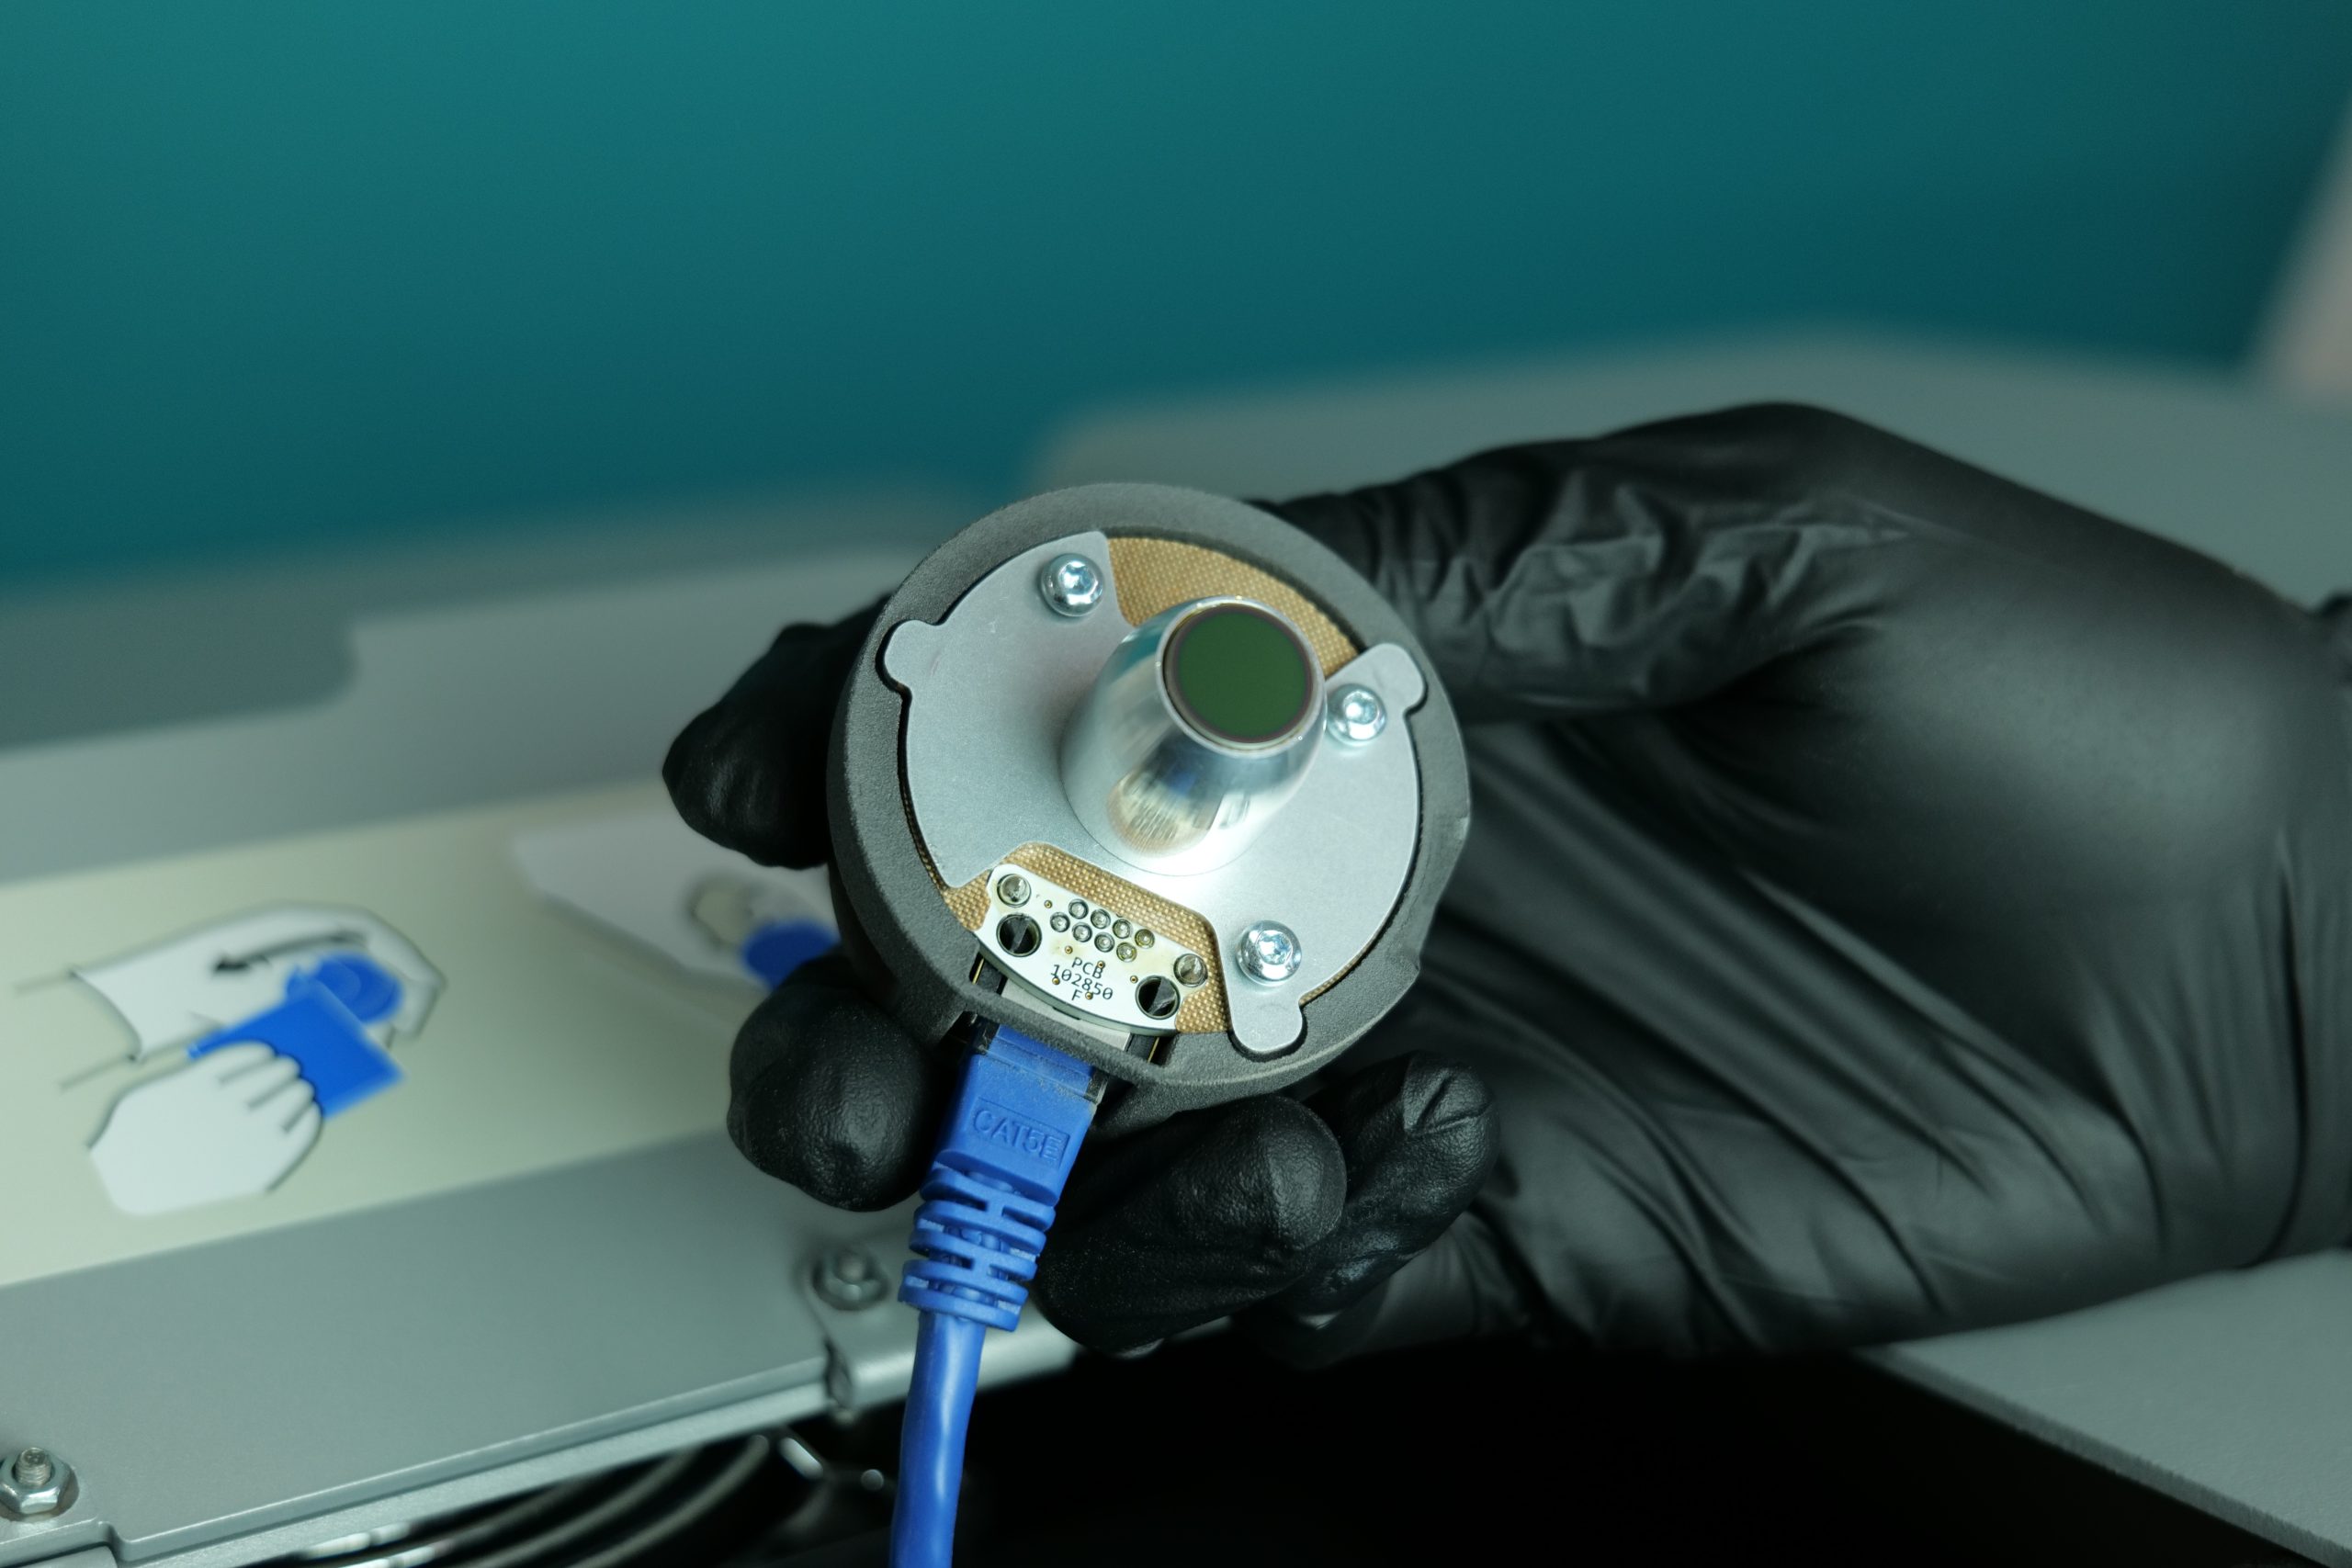
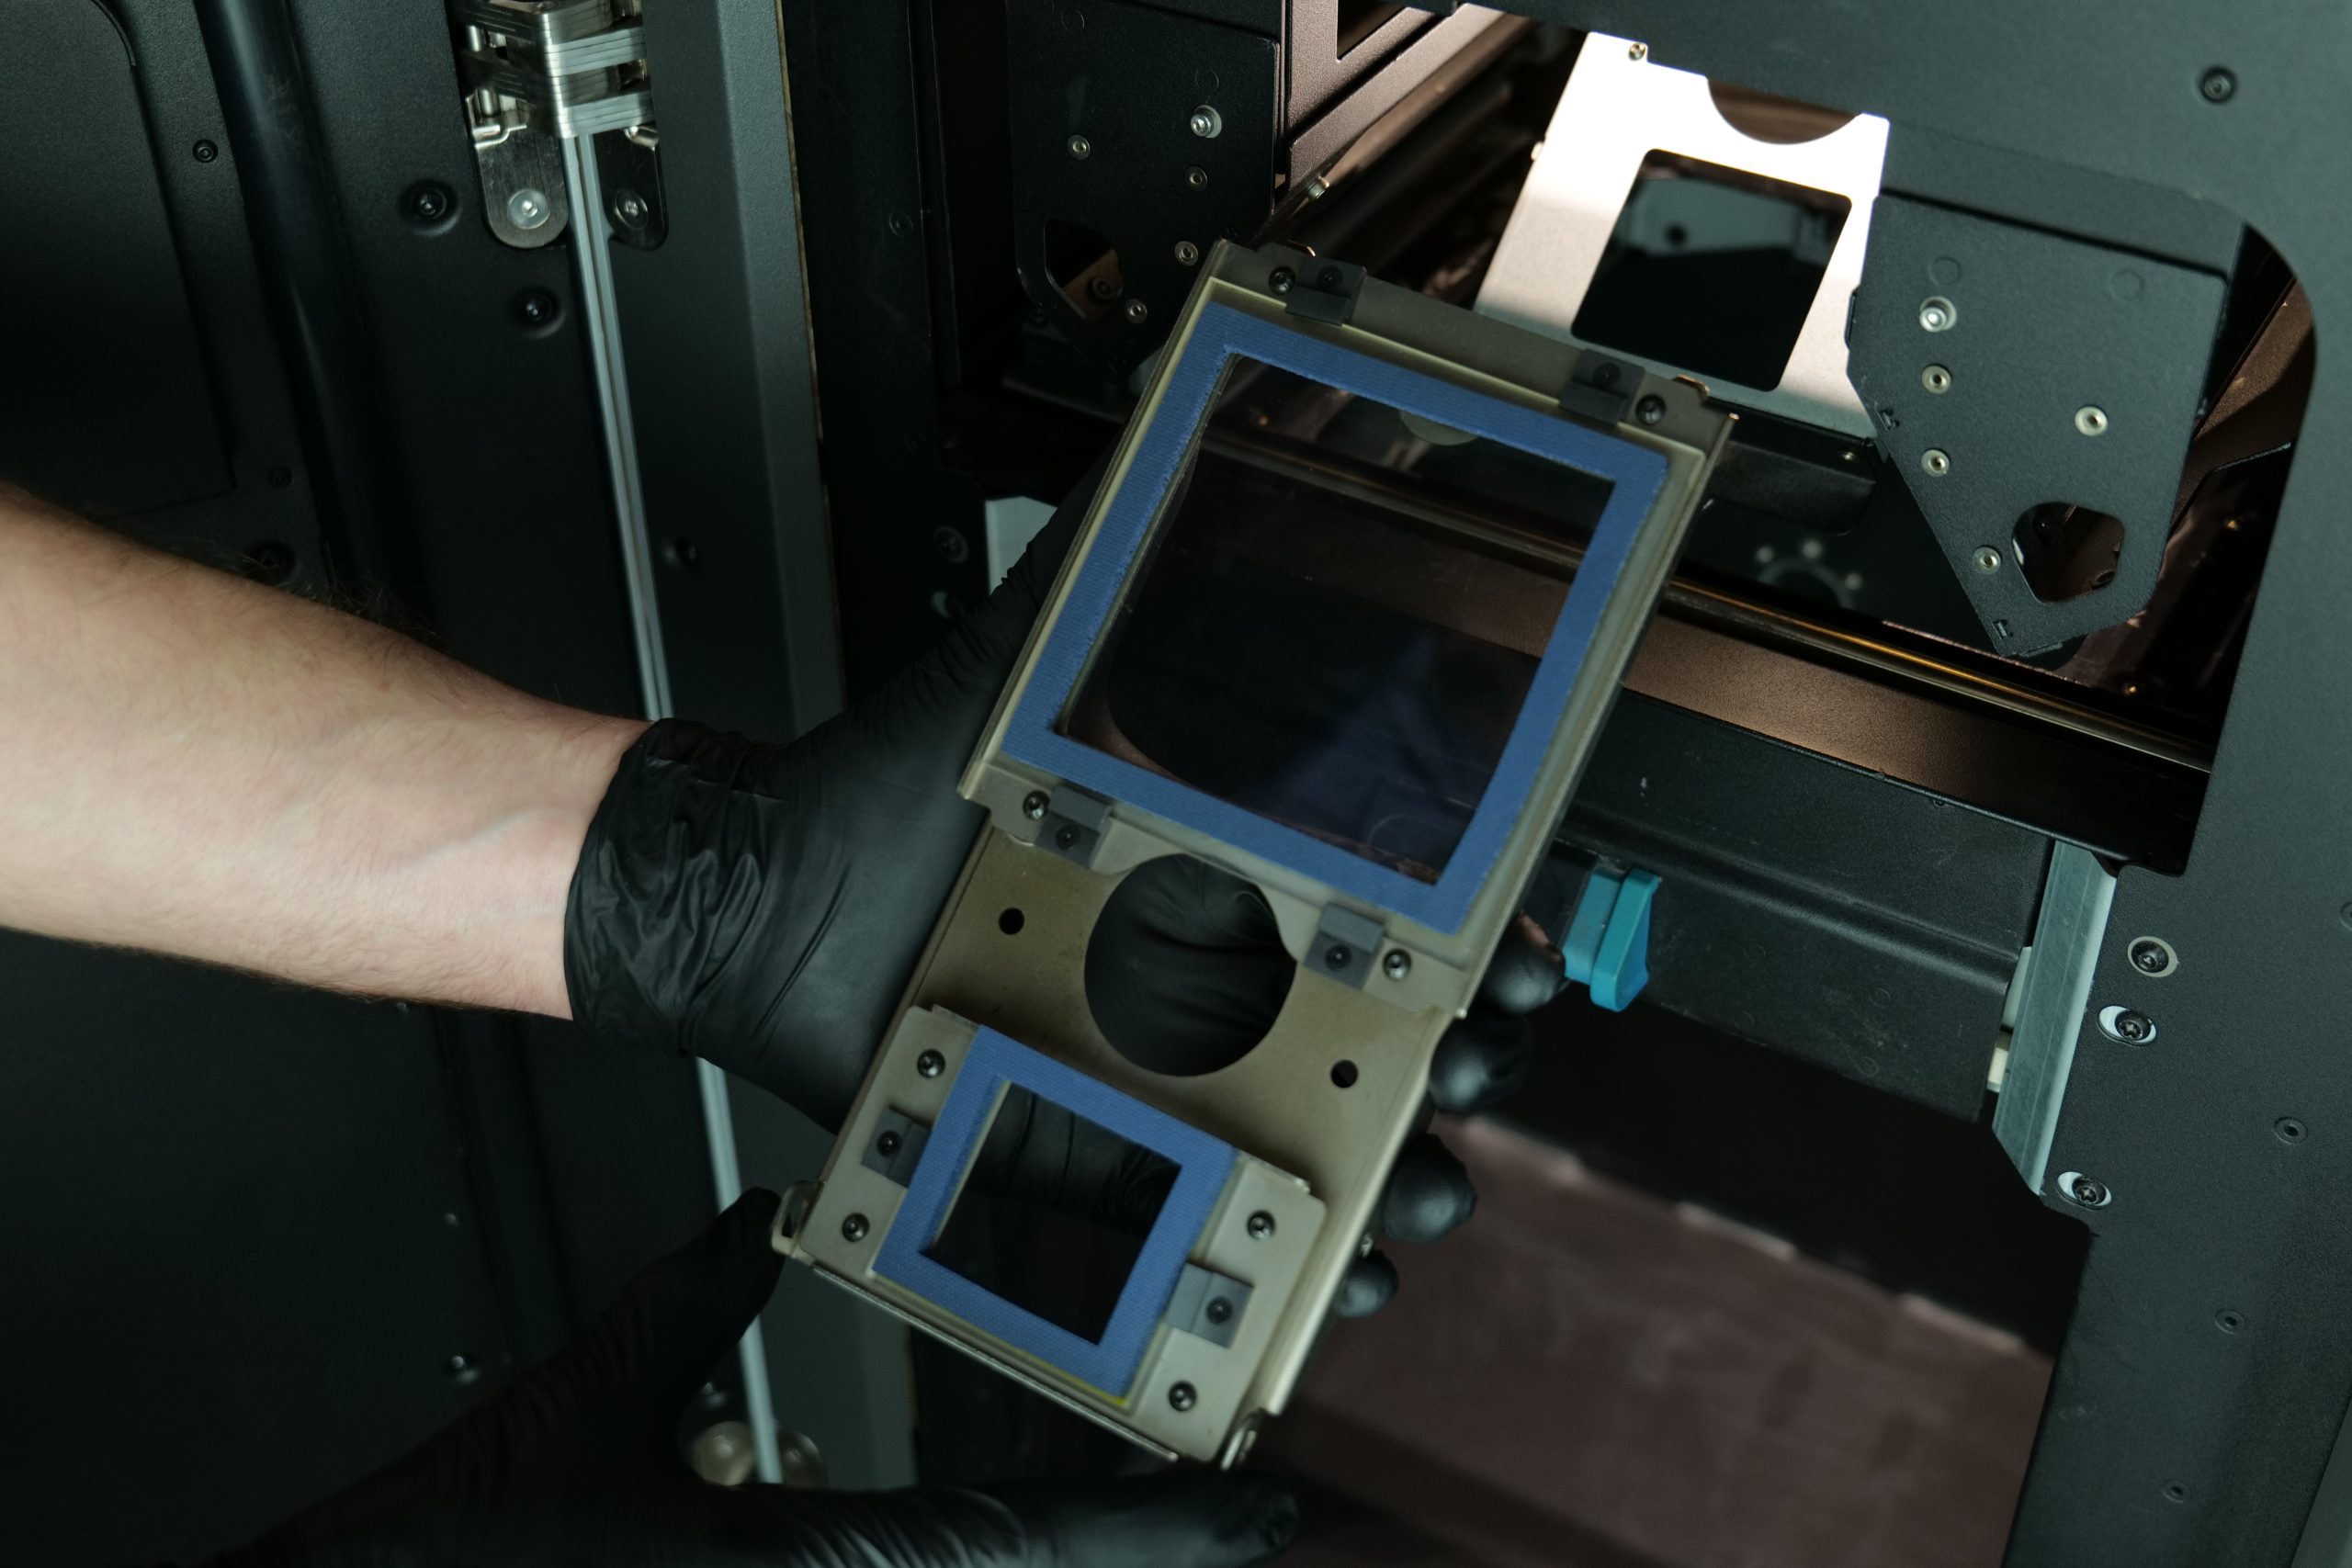
Printer maintenance is an unavoidable part of 3D printing. Most of the issues you’ll run into with the Fuse 1 can be attributed to two of the printer’s key components: the IR sensor and the optical cassette. The IR sensor is what measures the temperature of the powder while the cassette is the element through which the infrared waves and laser beam pass through to reach the powder bed. Keeping these two components clean between builds should be a priority, otherwise you can expect incorrect temperature readings and a deflected laser beam: a recipe for print failures. The standard cleaning process requires a quick wipe with ethanol.
Finally, if you run into a problem you can’t solve yourself, you can always contact Formlabs directly and they’ll be able to look at the log file of your machine to analyze the issue. The company’s customer service is one of the best we’ve ever come across. We’d prefer it if Formlabs also allowed the user to access the log files themselves, but this is ultimately a minor gripe with what is an excellent after-sales service.
PreForm slicing software
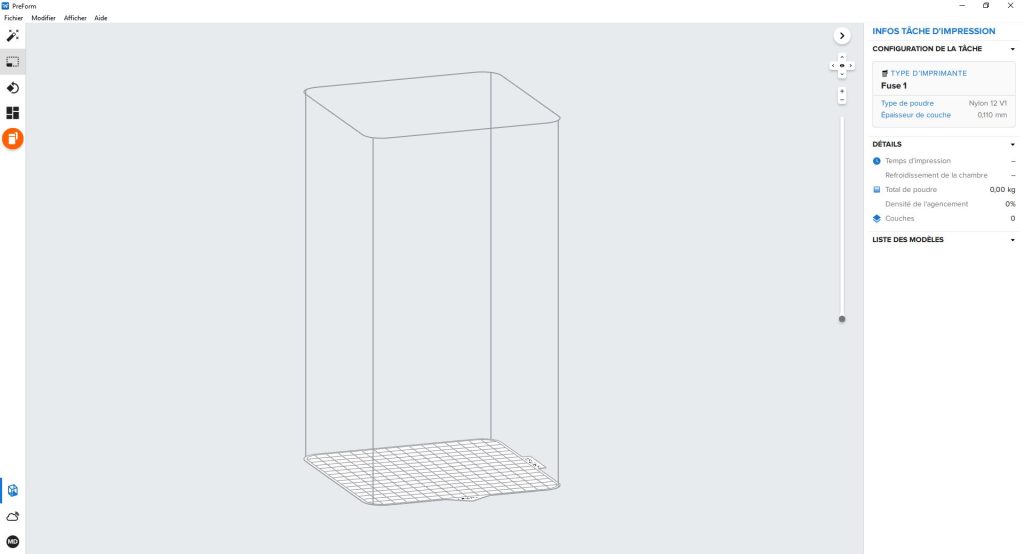
Formlabs provides its own slicing software for use with the Fuse 1 – PreForm. For those that have used Formlabs systems before, this is the same slicing software that complements the company’s SLA 3D printers.
The print preparation program is easy to use with a polished, clutter-free user interface. The left side of the viewport is home to the basic translation, rotation, and rescaling functions that come as standard with all 3D printing slicers, while the right side displays the job info and list of models in the build.
One of the main selling points of PreForm is that it only has one set of predefined process parameters that can’t be modified. While this may sound like a nightmare for the more advanced users out there who enjoy tinkering around in the settings, it means that there’s no room for human error. The parameters that Formlabs has chosen work exceptionally well and result in high-quality prints every time, although it does mean that the system is only compatible with the company’s own Nylon powders.
The slicer offers one-click printing, an intelligent feature that automatically nests the chosen 3D models in the build area to minimize both powder usage and print time. Additionally, the printer will only fill the build chamber up to the highest point of the nested models, meaning there’s no need for excess powder. Users will also find the stacking feature to be particularly useful – especially on an SLS machine – as it helps makes full use of the build volume.
Additionally, users can connect their Fuse 1 printers to the company’s online dashboard platform, which provides useful details about past, queued, and failed builds, the status of the connected printers, and the material usage in each print job. This has proven to be a highly useful workflow overview tool.
On the software performance side, there’s not much to complain about at all. The PreForm slicer is fast, bug-free, and responsive, just how we like it.
Benchmarking the Fuse 1 3D printer
It’s now time for the benchmarking portion of the review, where we knuckle down and evaluate the raw printing performance of the Fuse 1 3D printer.
We kick things off with a circular trajectory test, which is designed to determine the repeatability of the 3D printer in both the X and Y axes. By studying the normal distribution of the concentric circles’ diameters (20mm, 65mm, 100mm), we can say that the printer offers sufficient repeatability when the mean of the difference is under 0.1mm and the standard deviation is under 0.05mm. Our measurement devices are accurate to ±0.015mm.
The Fuse 1 displayed excellent repeatability here, with an average offset of 0.0331mm for the X-axis and 0.0285mm for the Y-axis, resulting in an average of 0.0308 mm for both axes. The average standard deviation also came in at only 0.0395mm, which is a fantastic result. For context, industrial 3D printing systems often boast dimensional accuracies of up to 0.1mm, which qualifies them for high-precision manufacturing in critical industries such as automotive and aerospace.
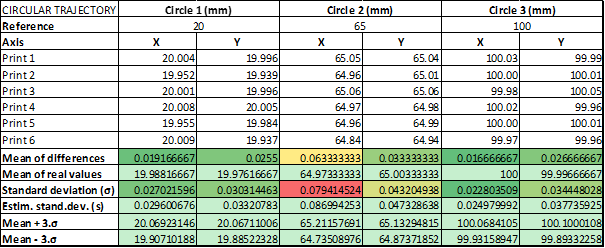
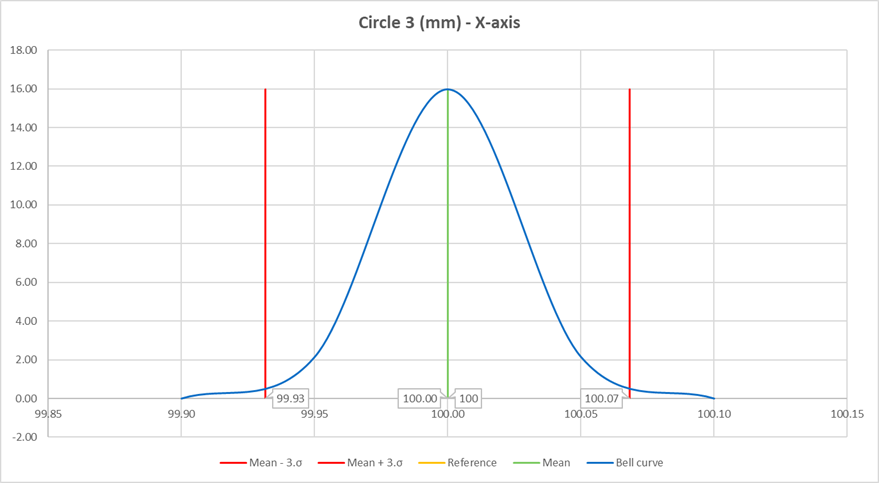
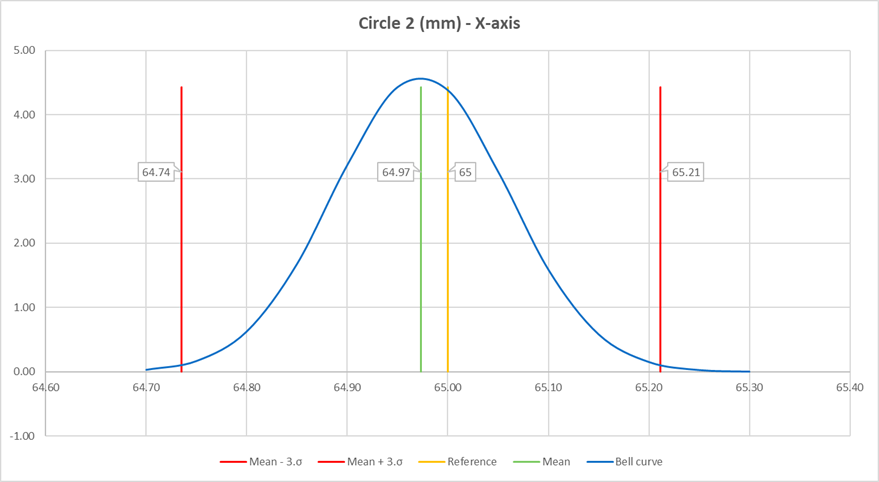
Below you’ll find the bell curves for the best and worst circles in the test – circle three for the X-axis and circle two for the X-axis. In the best case, 99.6% of the 100mm circles manufactured by this 3D printer will be between 99.93mm and 100.07mm. In the worst case, 99.6% of the 65mm circles fabricated by this 3D printer will be between 64.74mm and 65.21mm.
Automotive prototype print tests
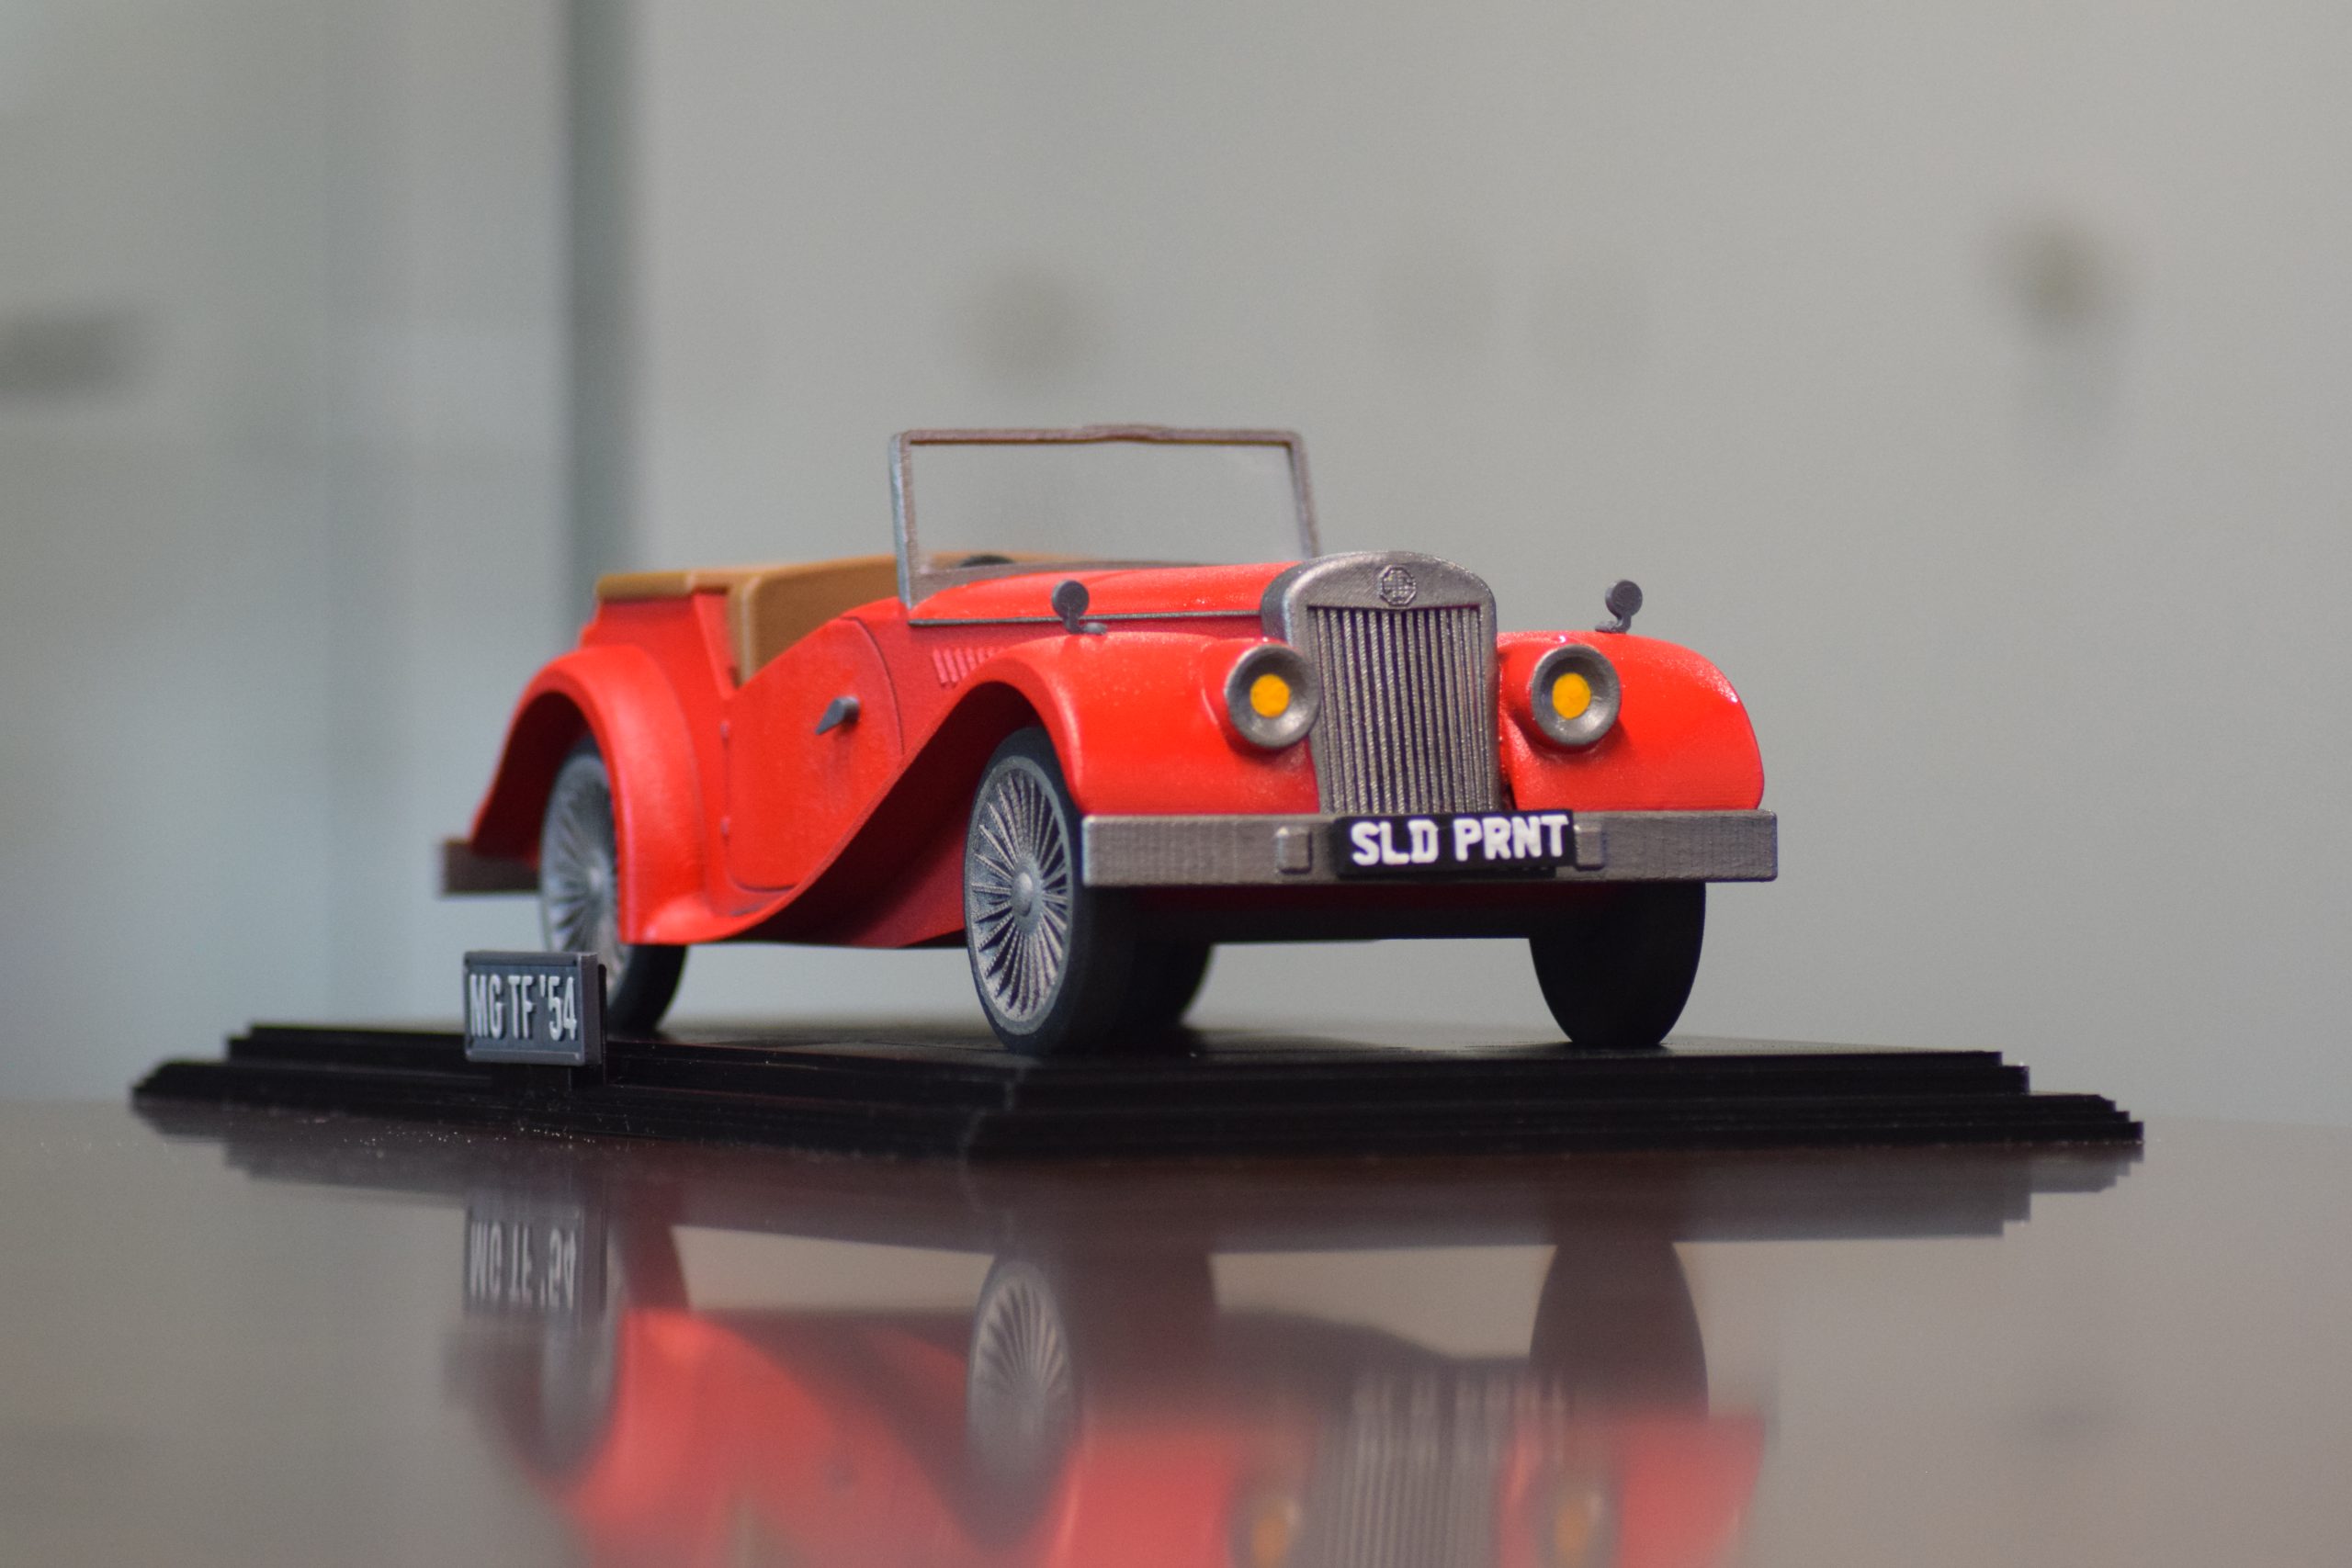
Next up, we tasked the Fuse 1 with 3D printing three different prototype parts to see how the system would fare in a real-world automotive manufacturing environment: a miniature engine block, an exhaust manifold, and a decorative model of a car. All of the models in this section are static, meaning they don’t contain any moving parts.
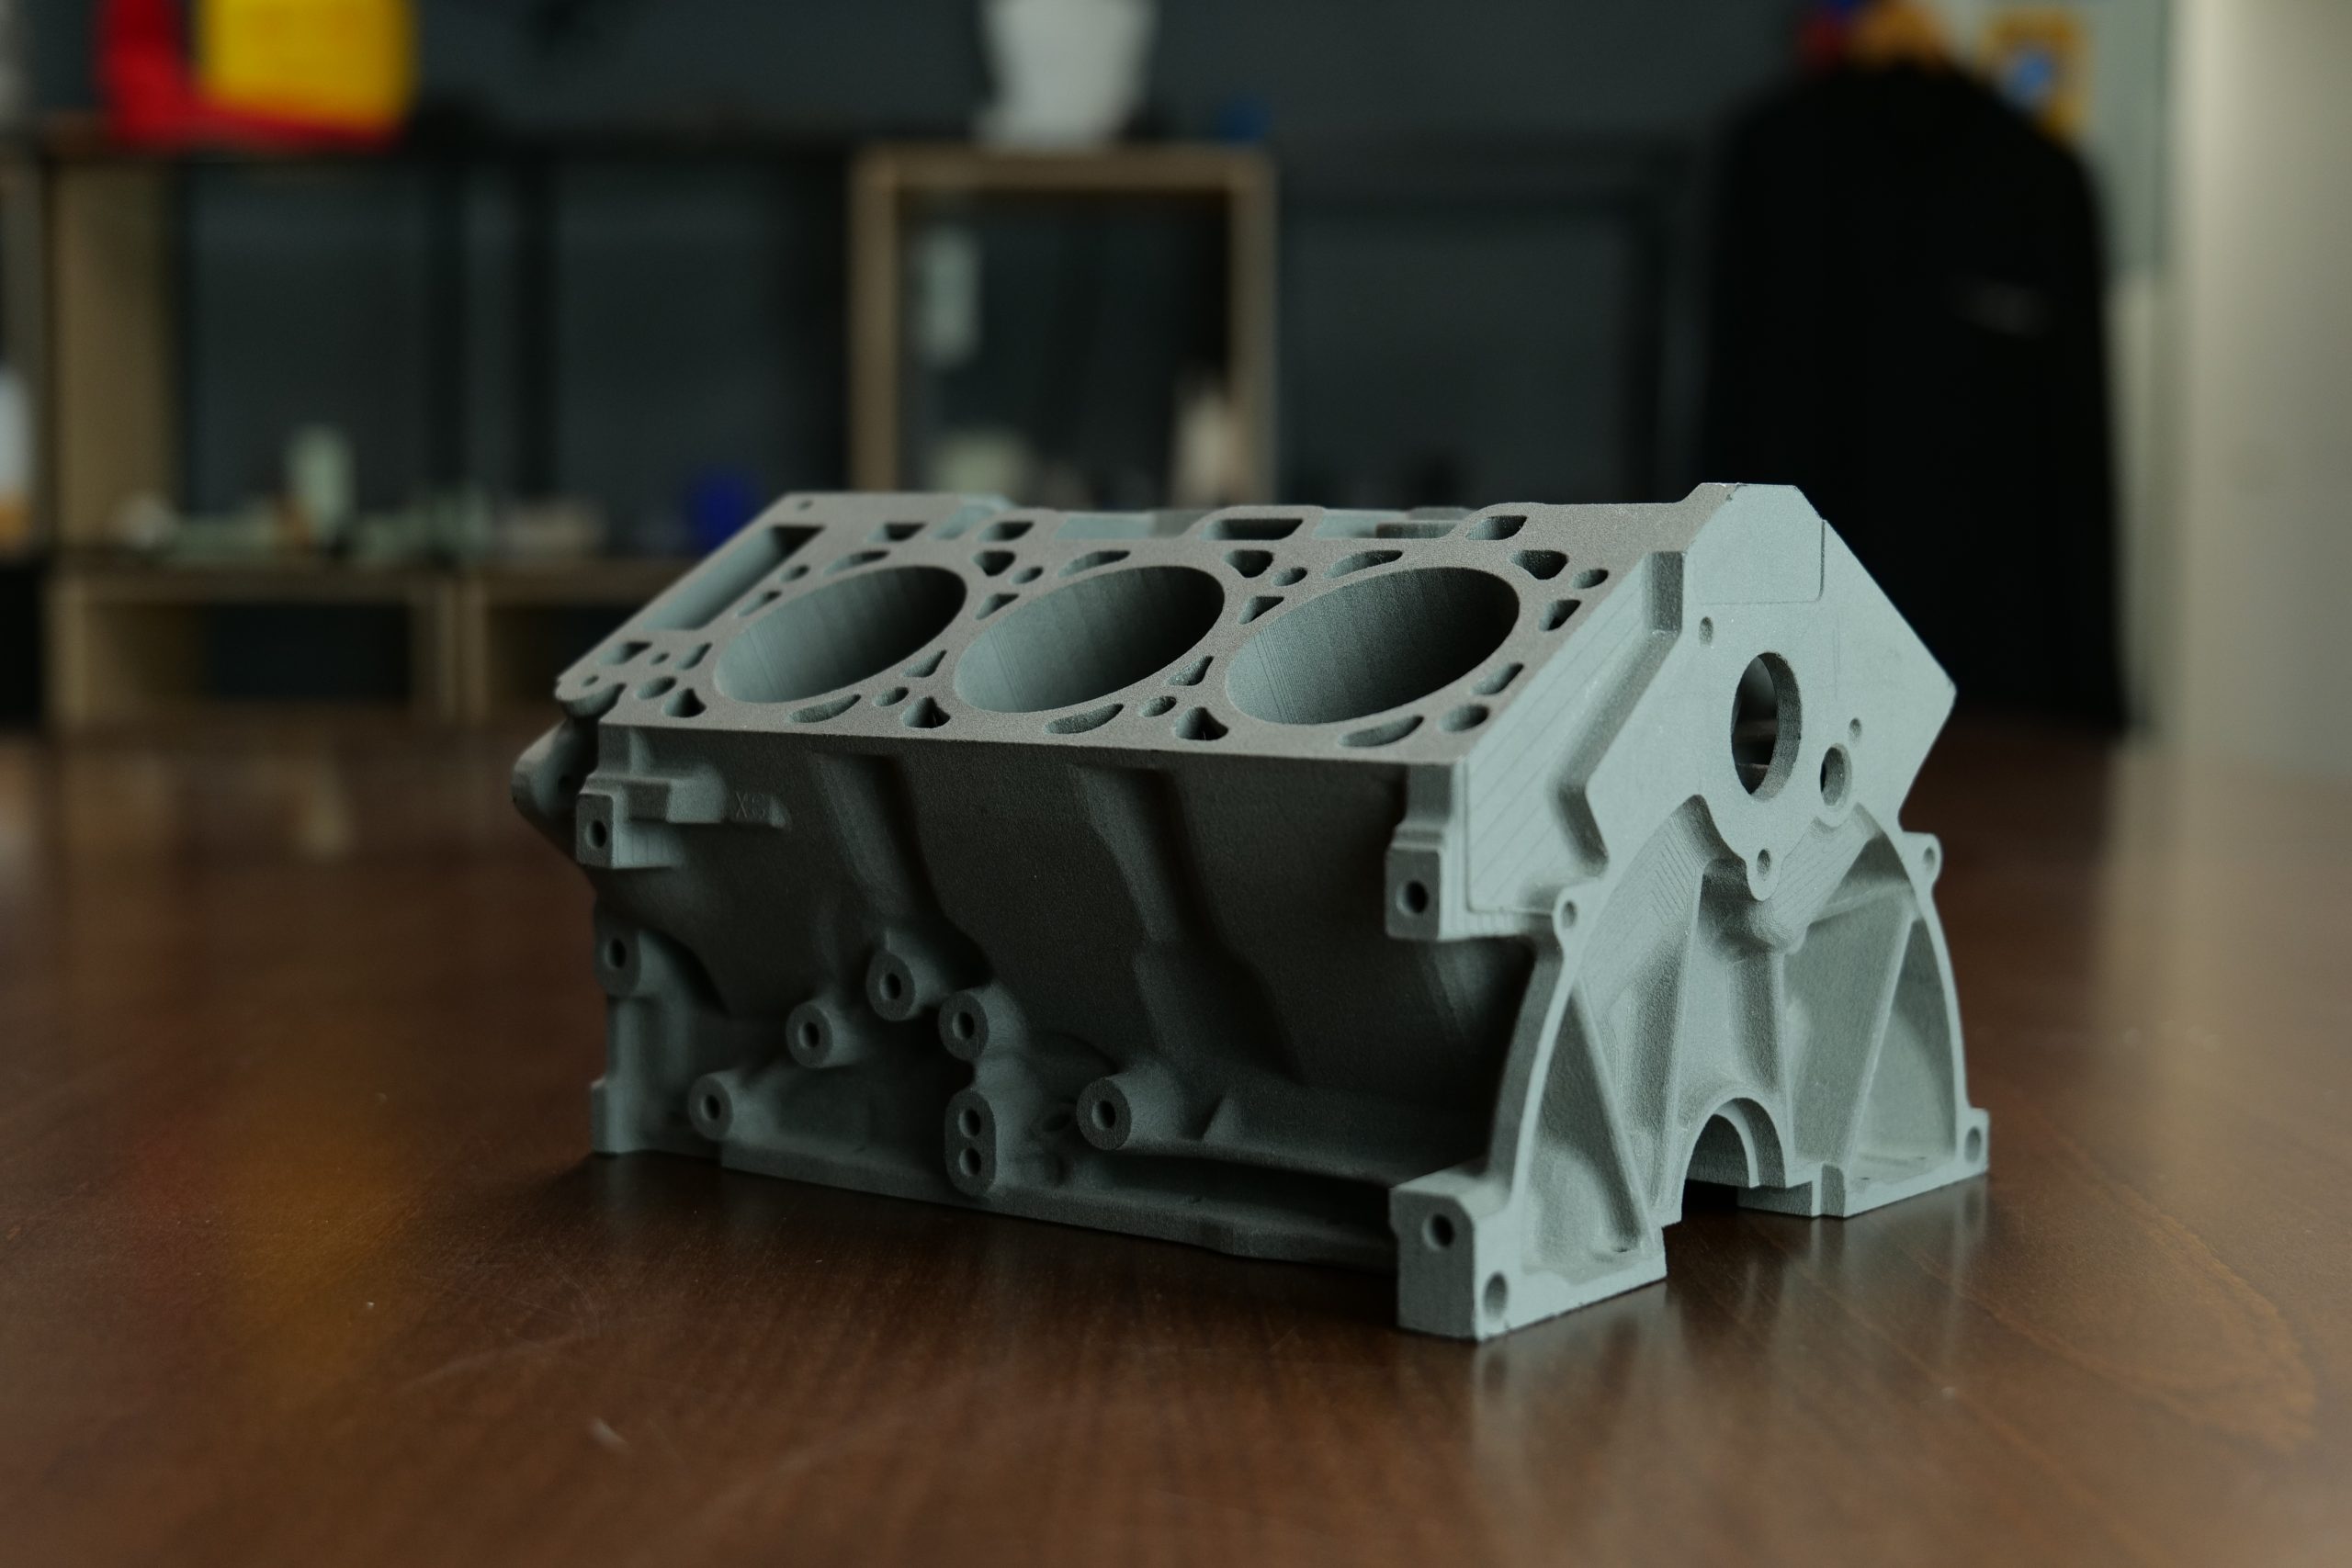
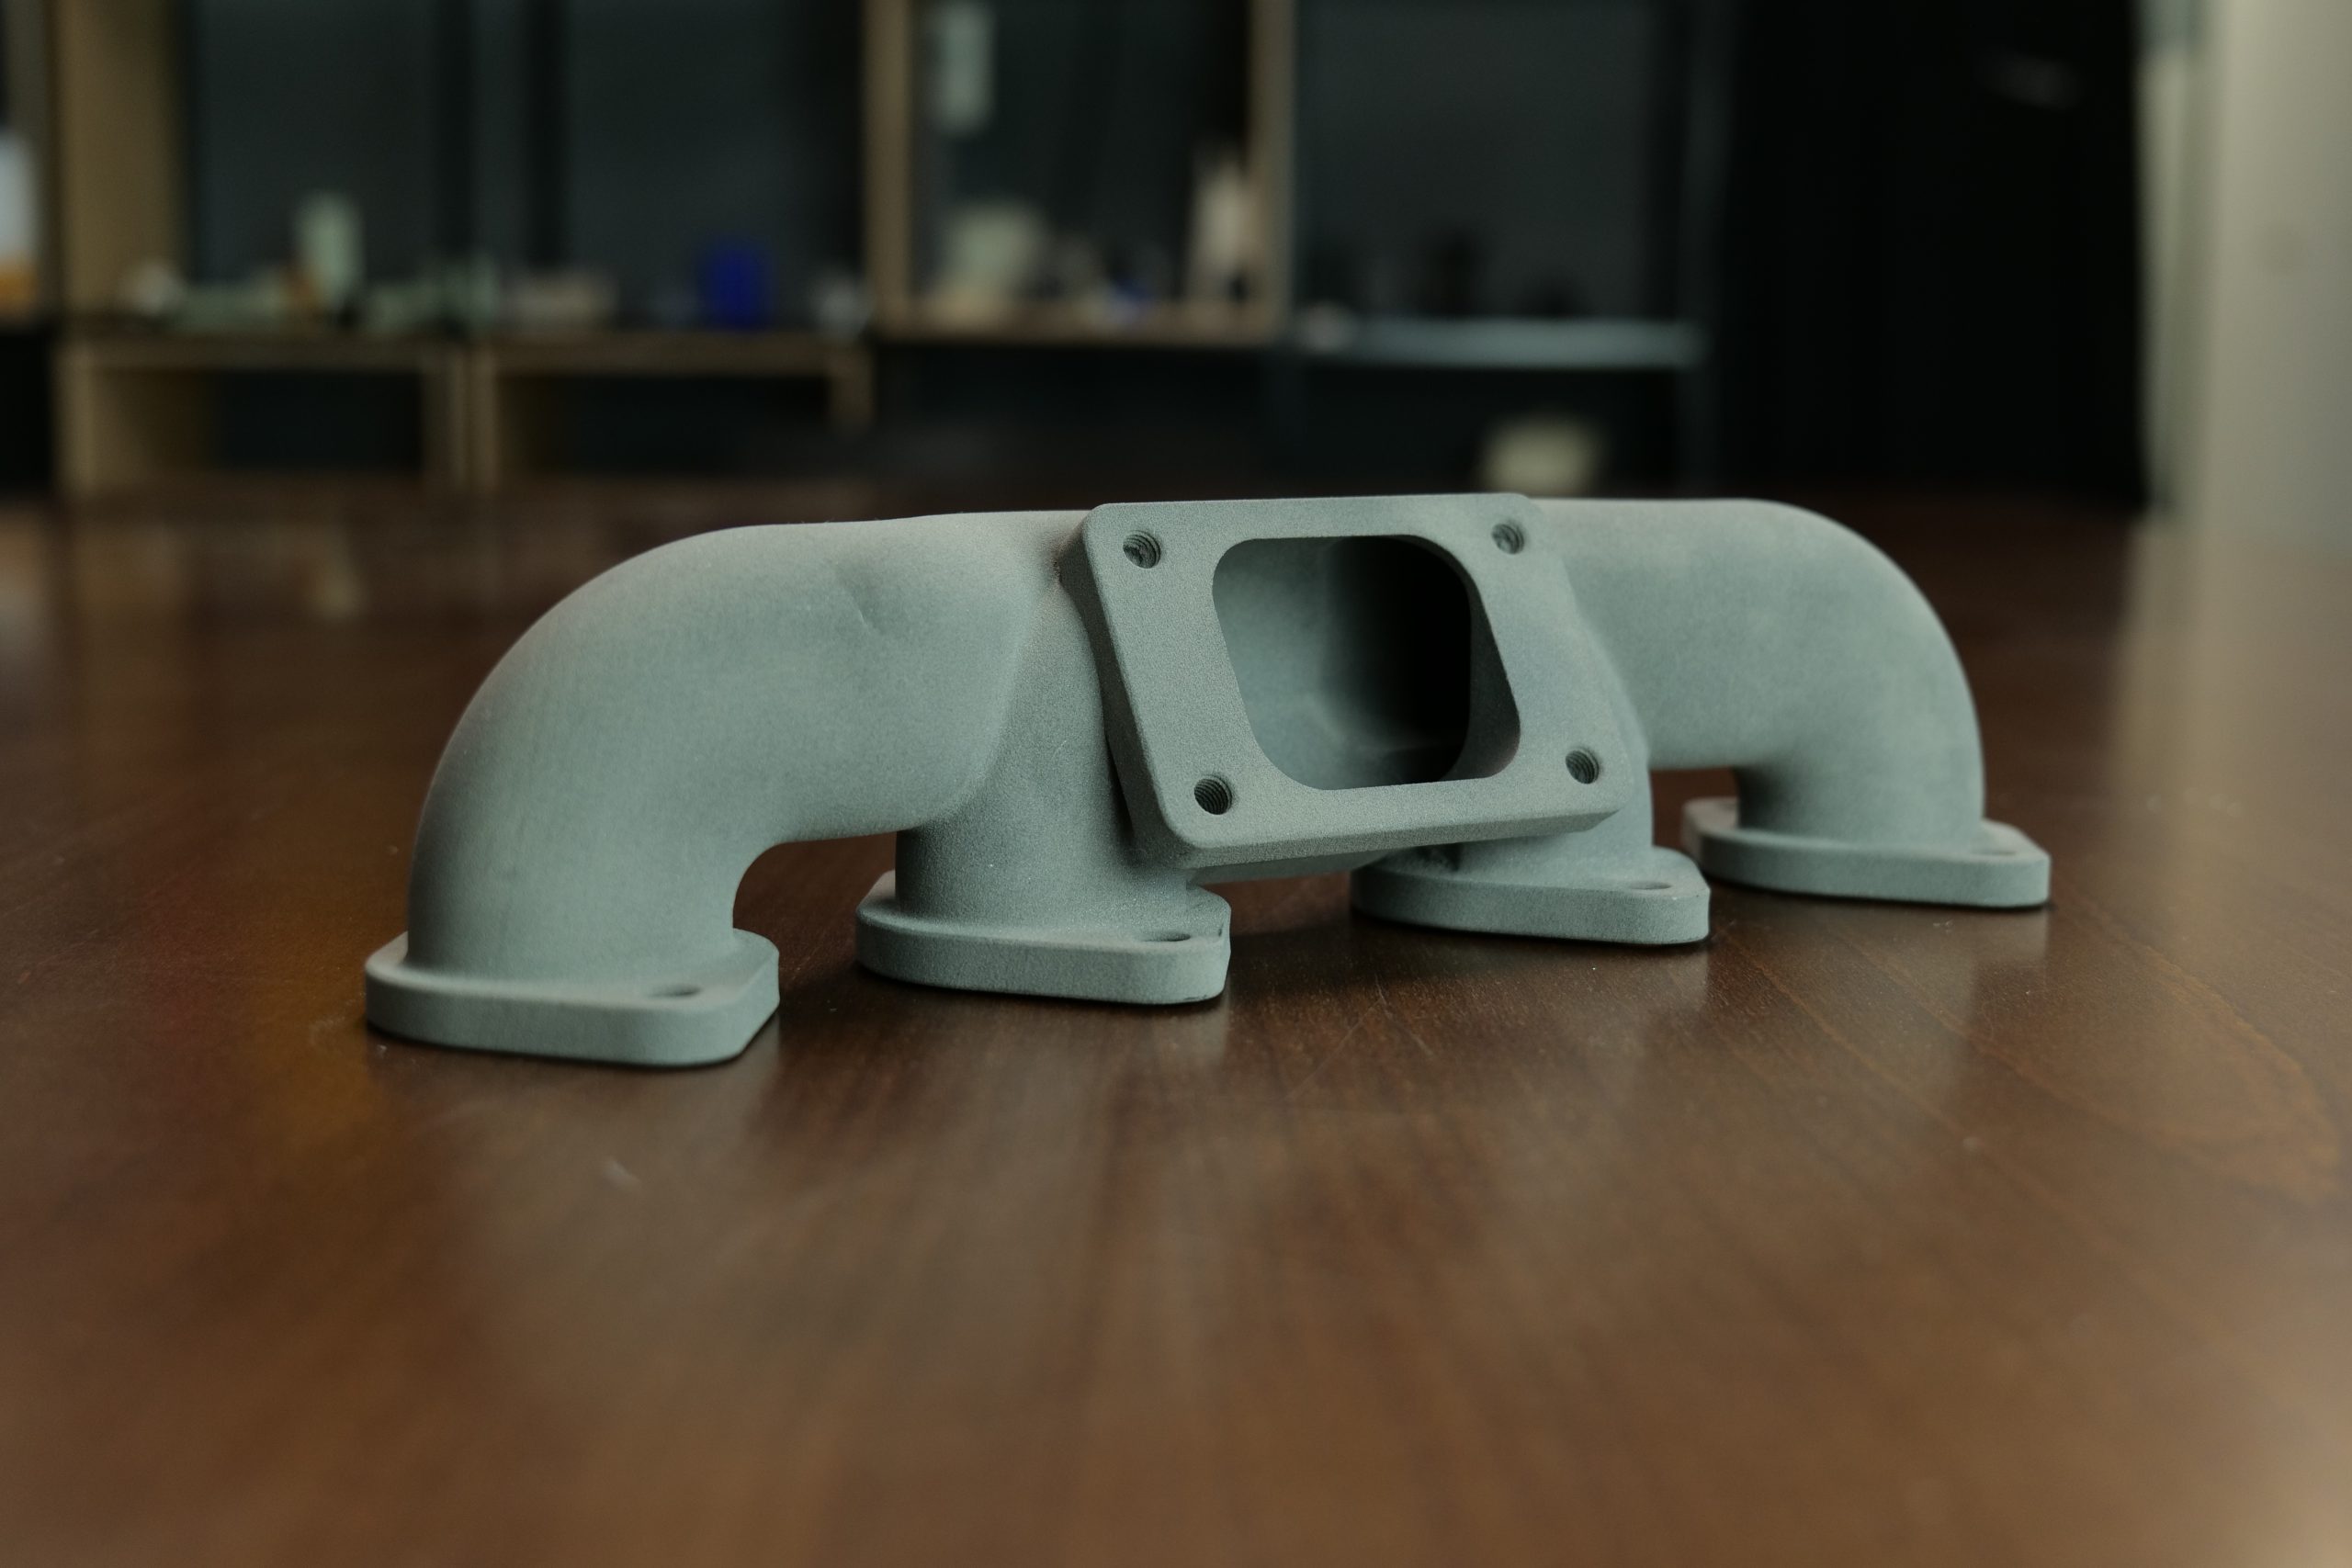
The V6 engine block and exhaust manifold are typically the kinds of parts a carmaker would prototype in the design phase of a new model. In this case, both objects feature internal cavities and a plethora of holes that allow us to judge how the Fuse 1 prints complex geometries without any support structures. Much to our delight, the system held its own admirably here, with both parts printed without any defects. All of the holes were also fabricated successfully with true-to-size diameters and dimensions.
On the other hand, the model car is a 1954 MG TF. It was designed, printed, and painted by Solid Print3D’s Benjamin Keyser. Again, we were very impressed with the performance of the Fuse 1 here as it demonstrated just how effective it was at producing highly-detailed display models.
End-use part print tests
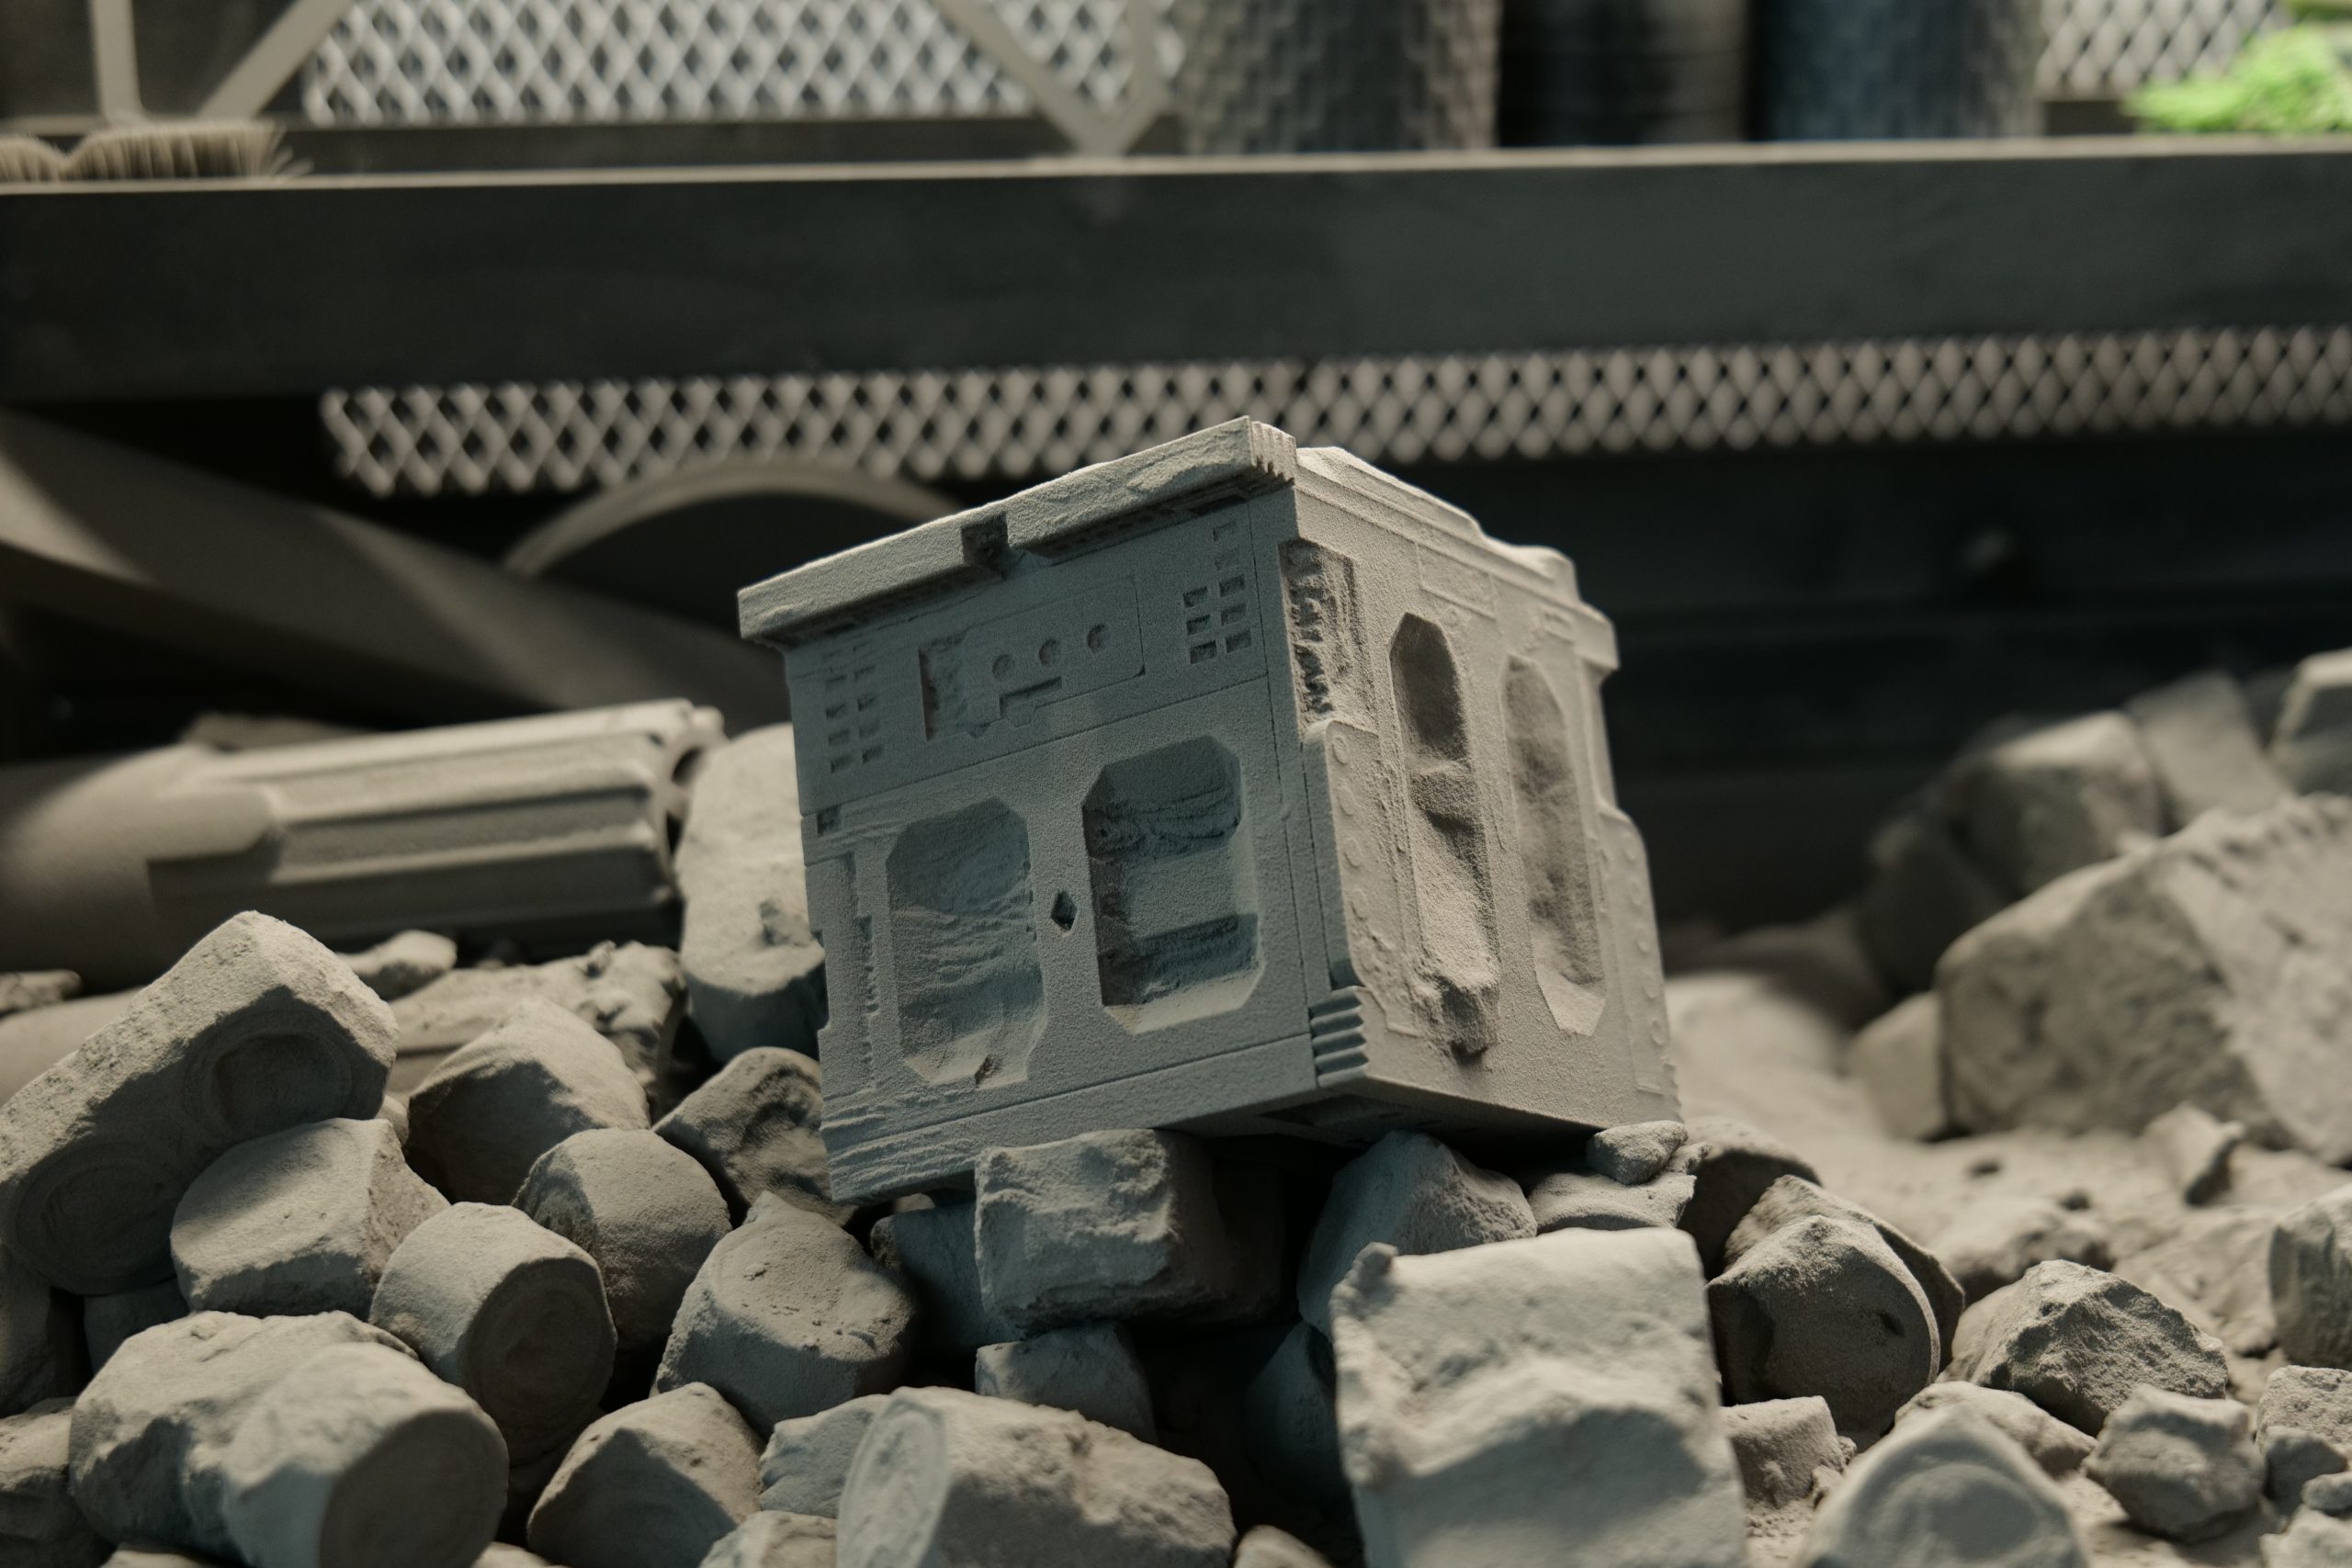
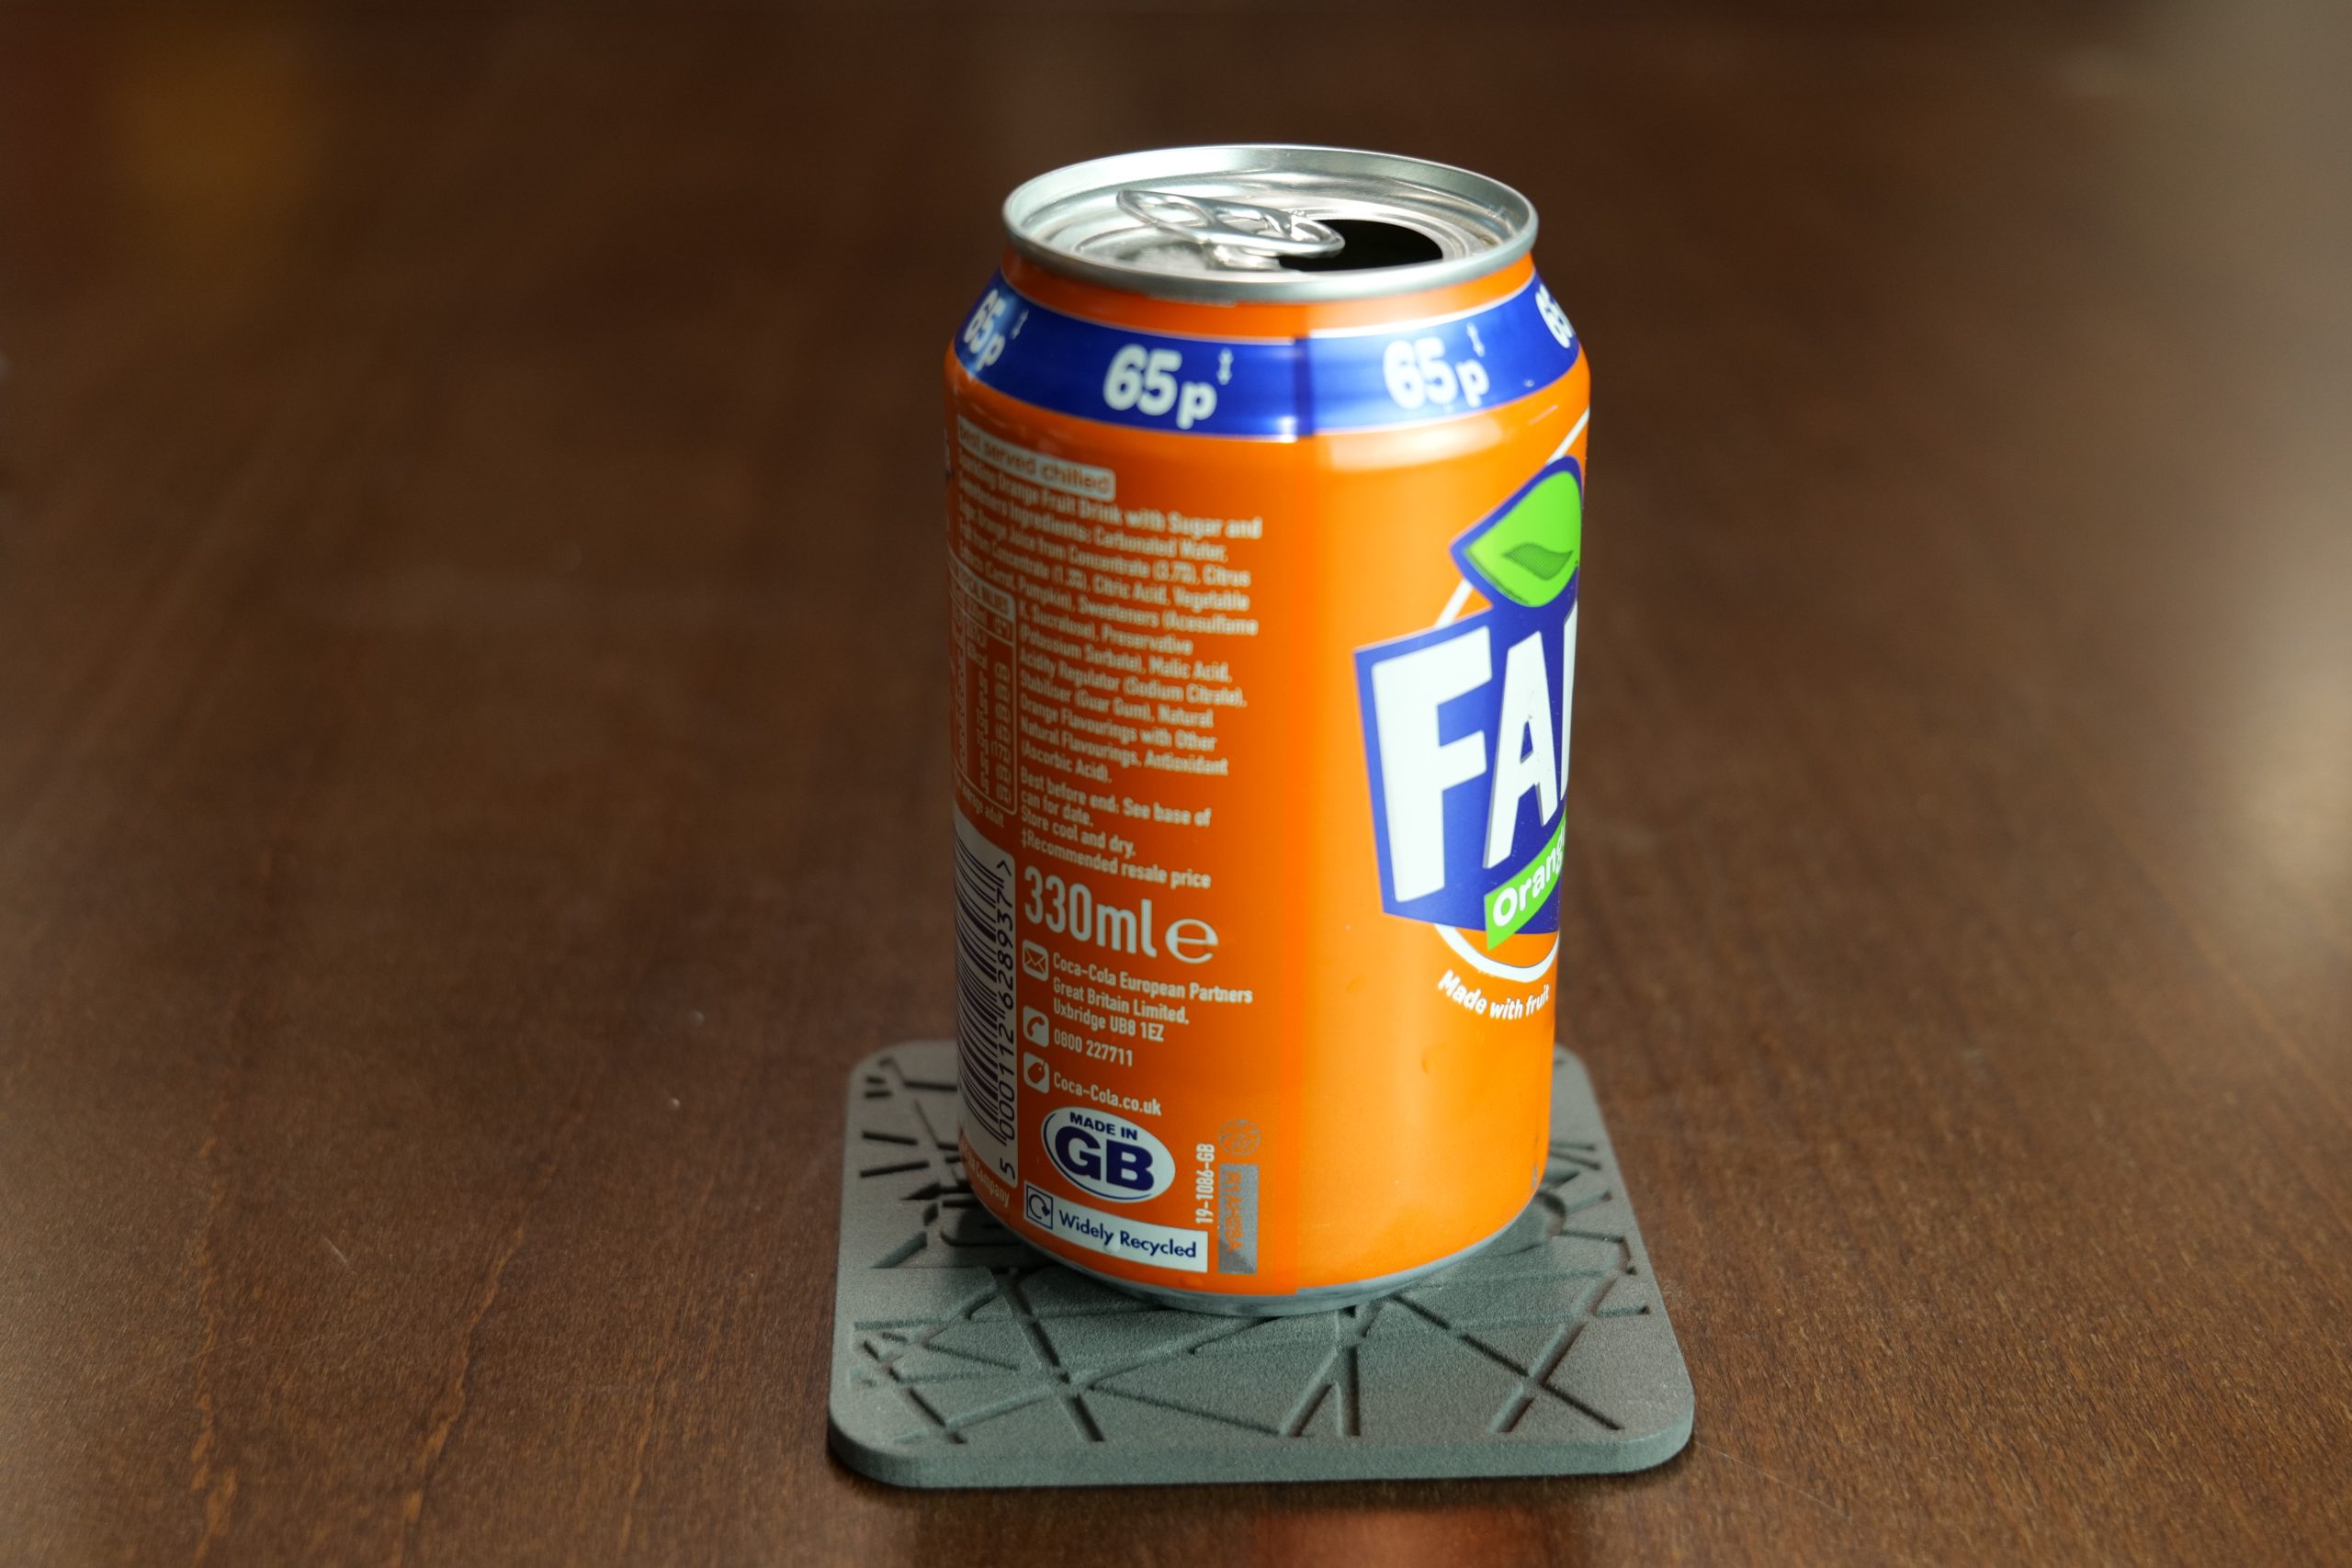
Moving on, we put the Fuse 1 through its paces with two more static print tests, except this time the parts are designed for end-use applications. The first is a PCB housing and the other is a custom structural component designed to join two tubes together.

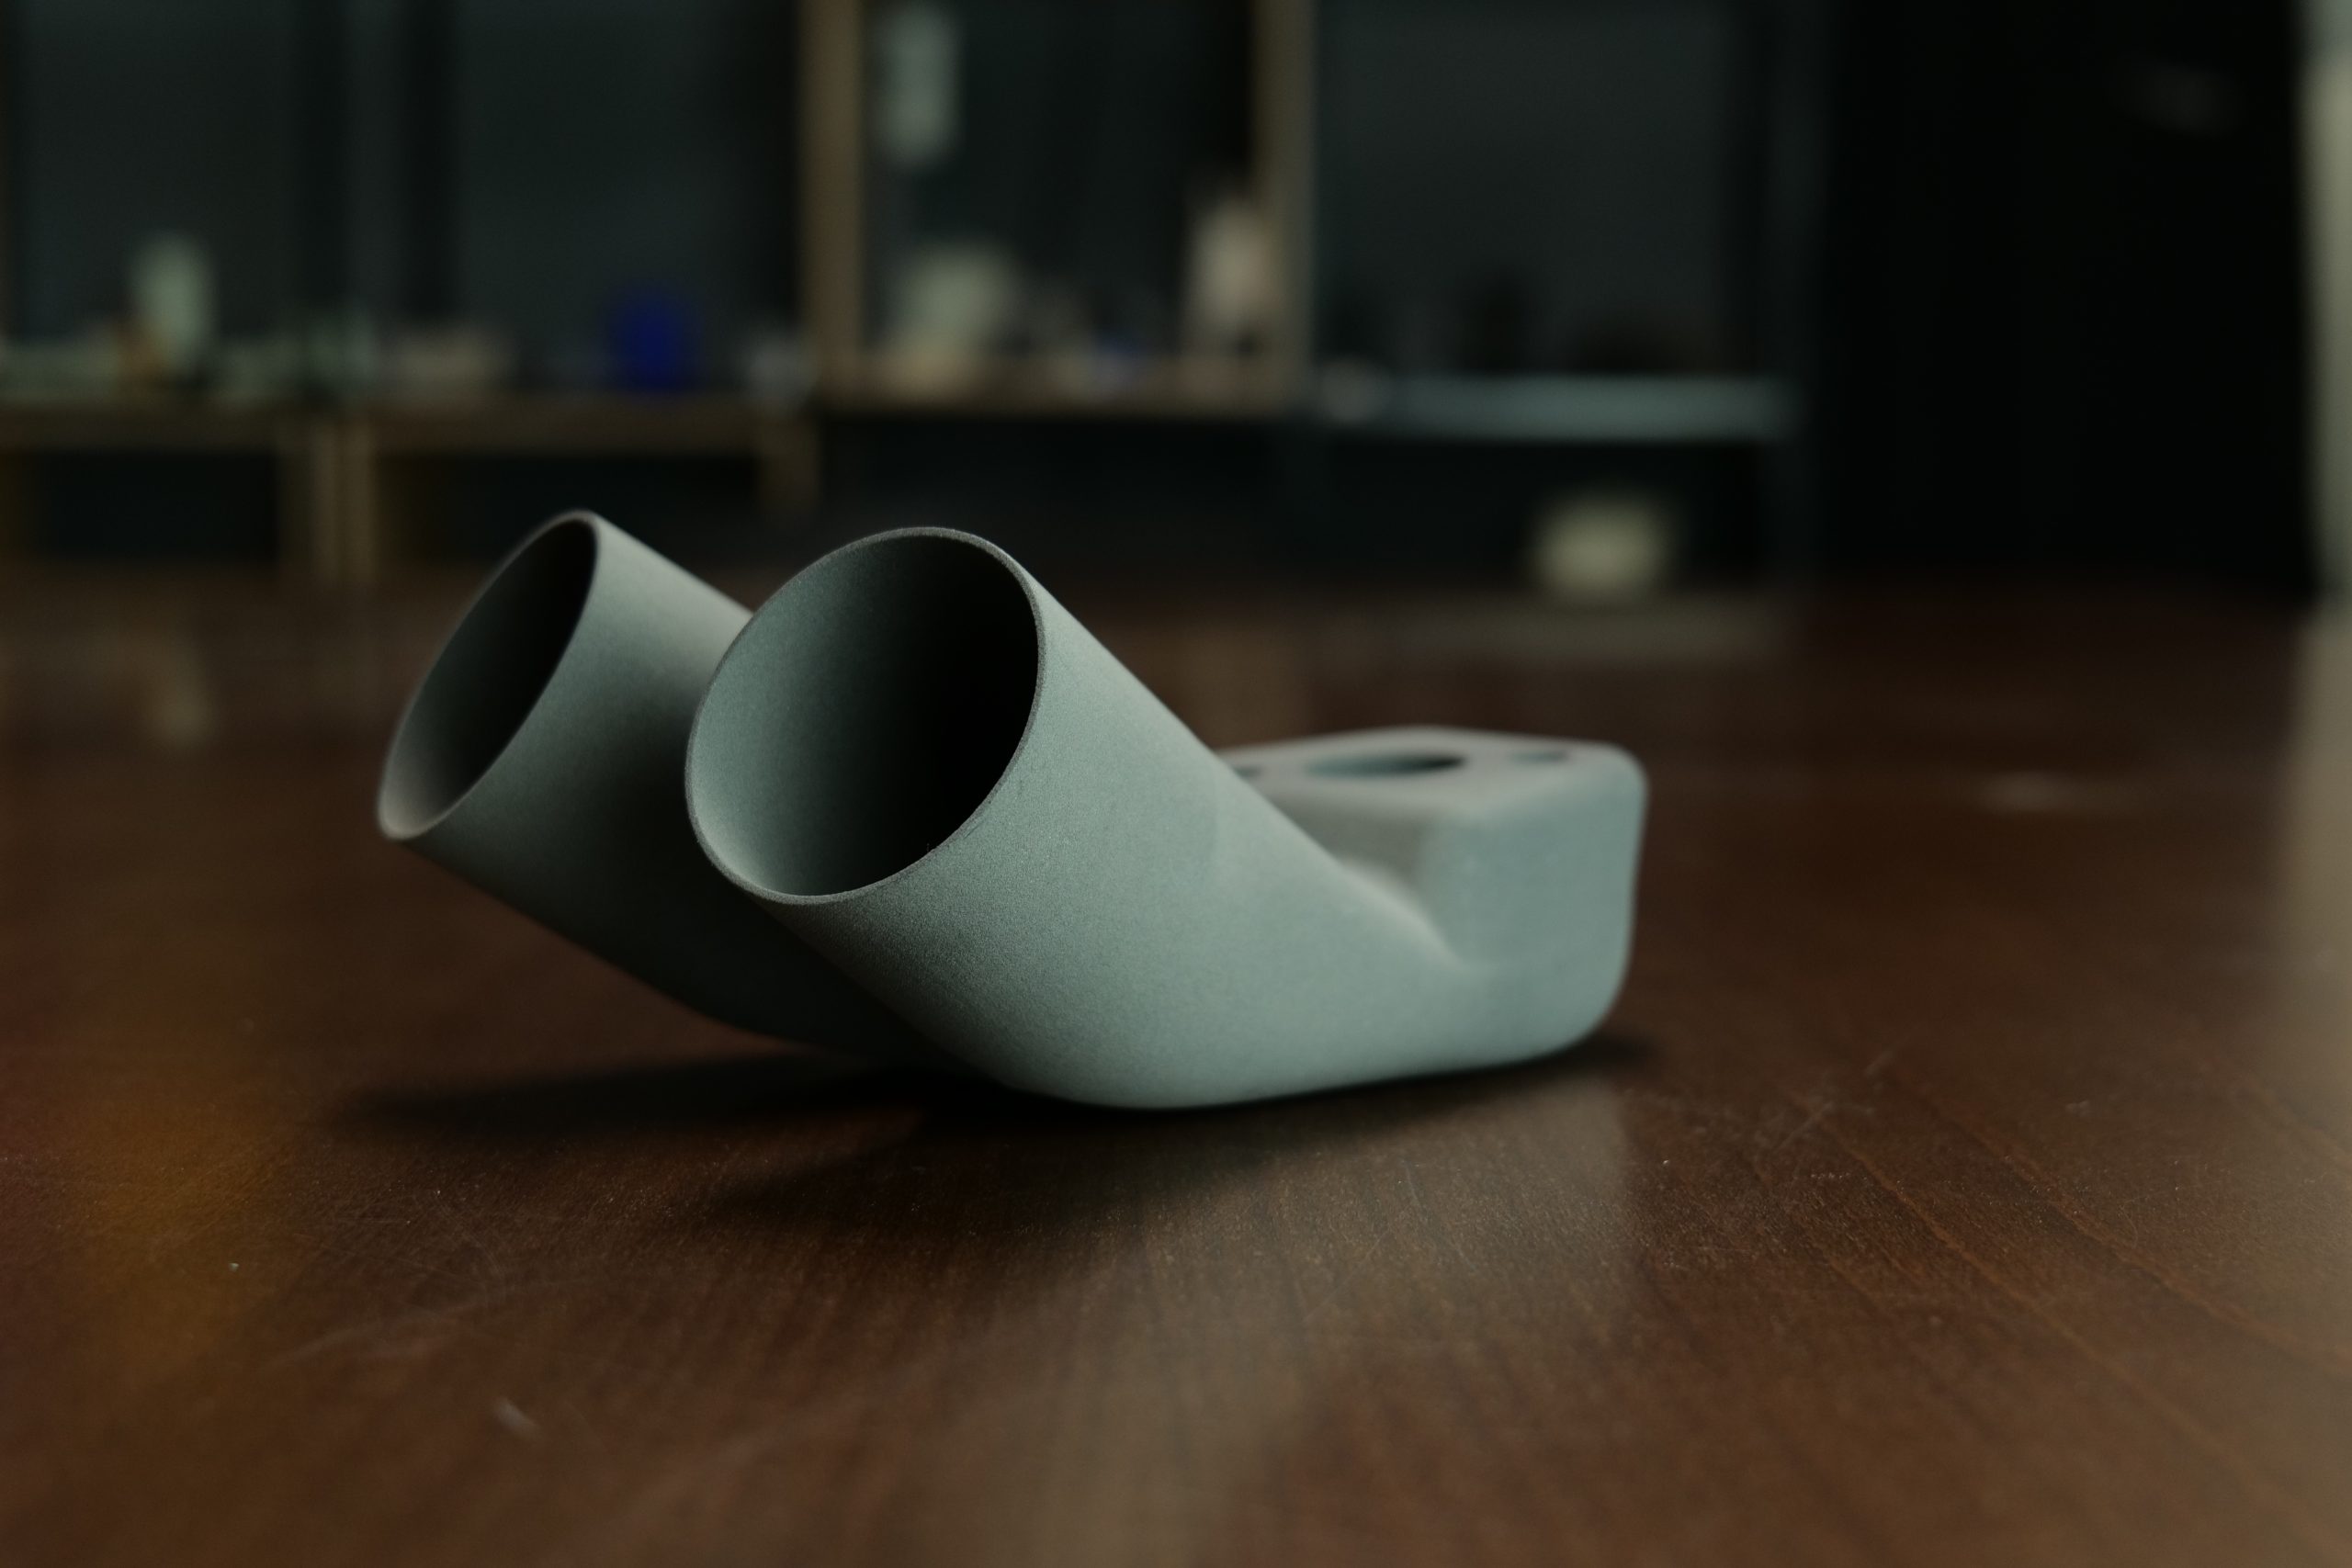
Unsurprisingly, the Fuse 1 delivered once again – both the electronics casing and the joining component were printed virtually flawlessly. The parts proved ready to use straight out of the build chamber, with minimal post-processing required and excellent surface finishes all around. The streamlined printing workflow coupled with the reliable and refined processing parameters of the PreForm slicer make the Fuse 1 an ideal system for short-run functional applications.
Dynamic print tests
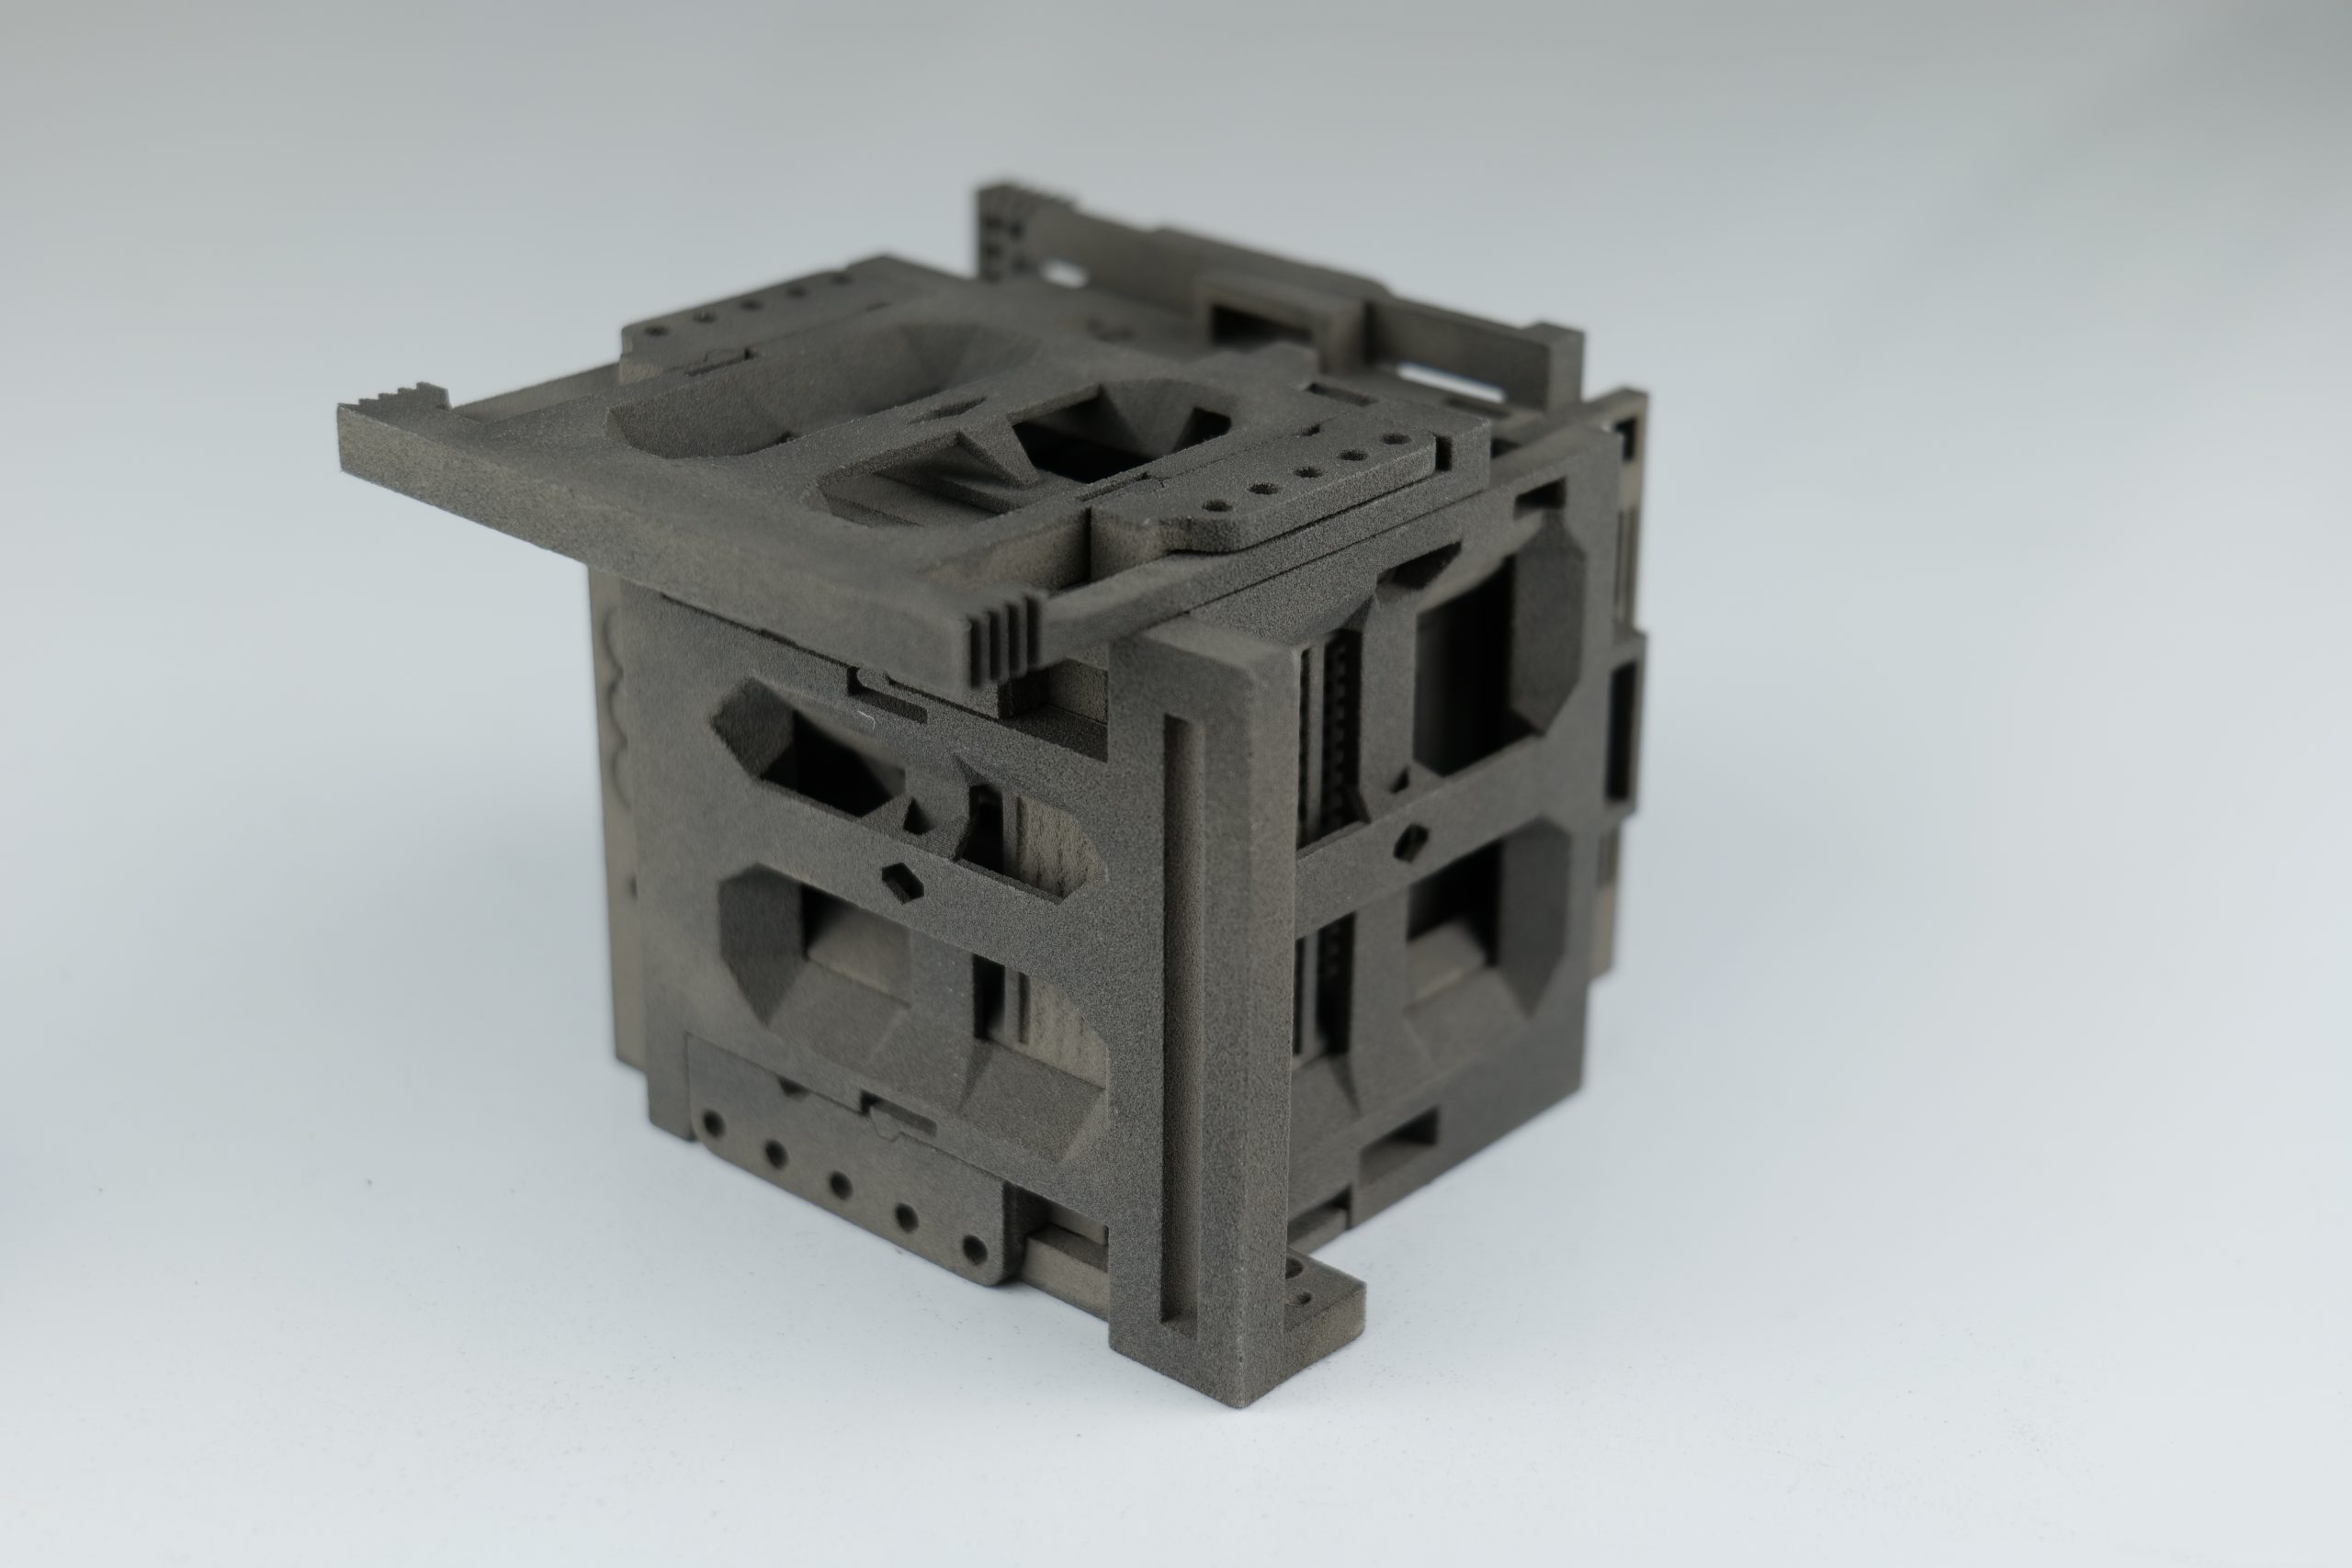
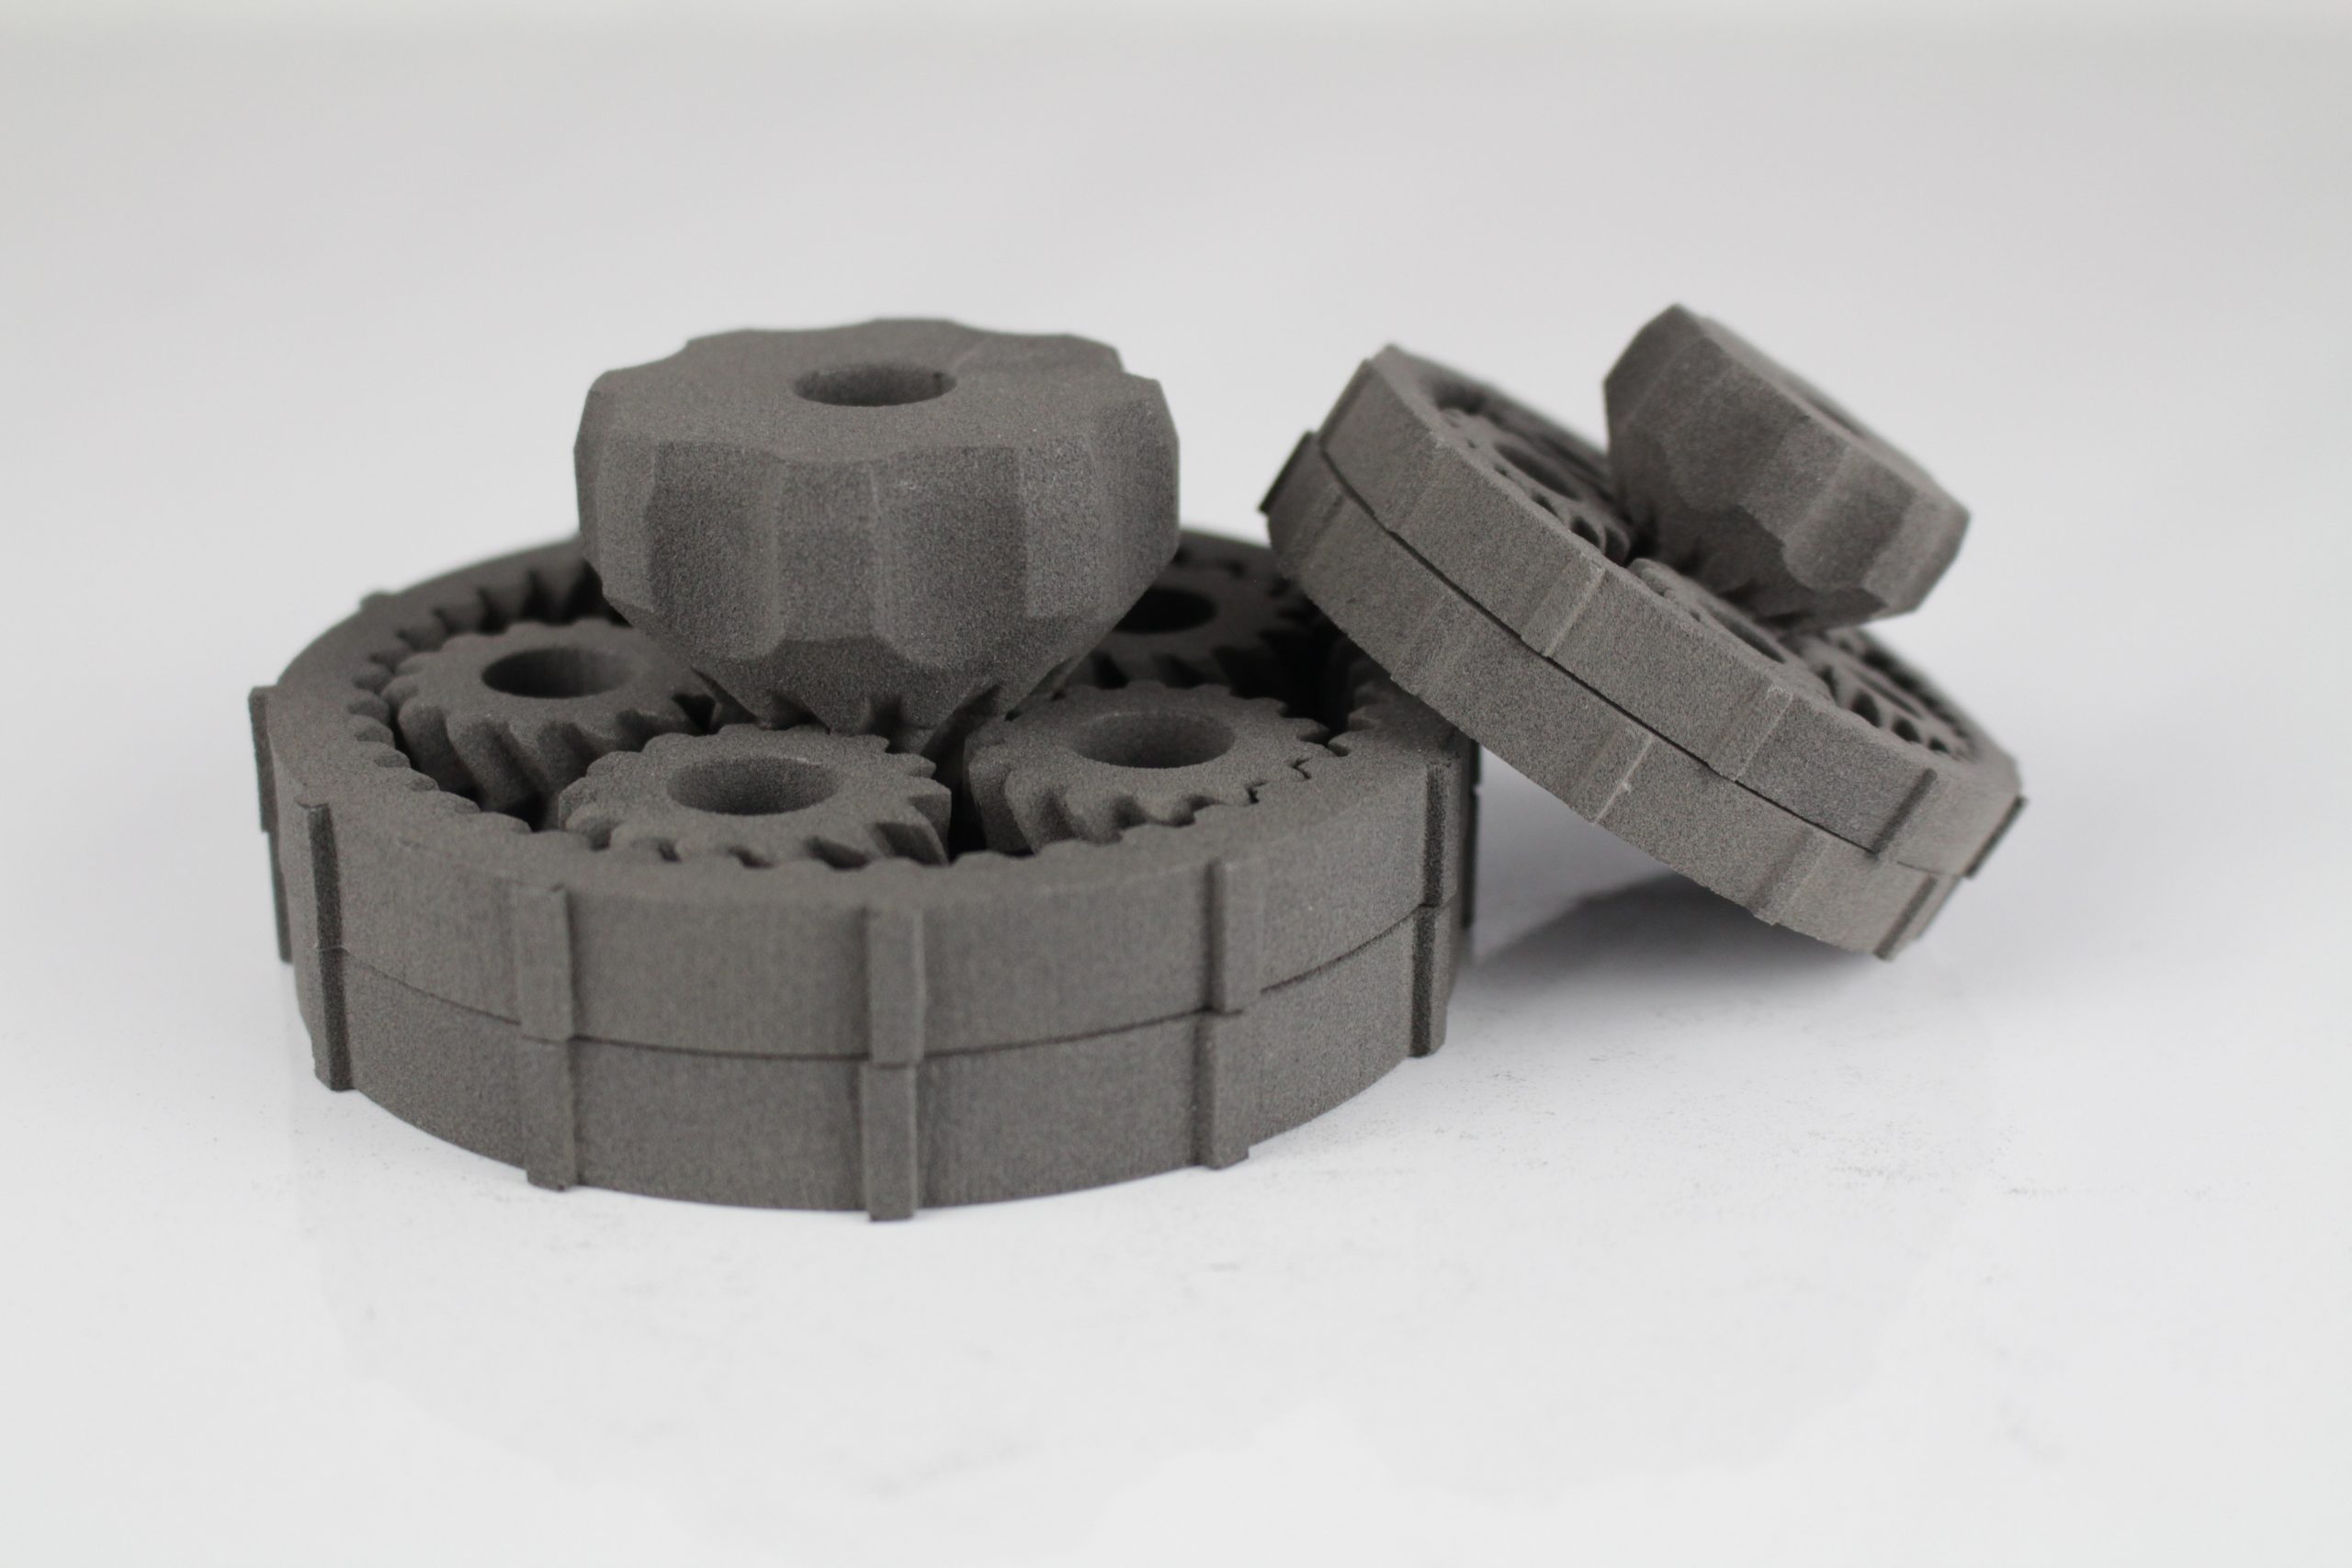
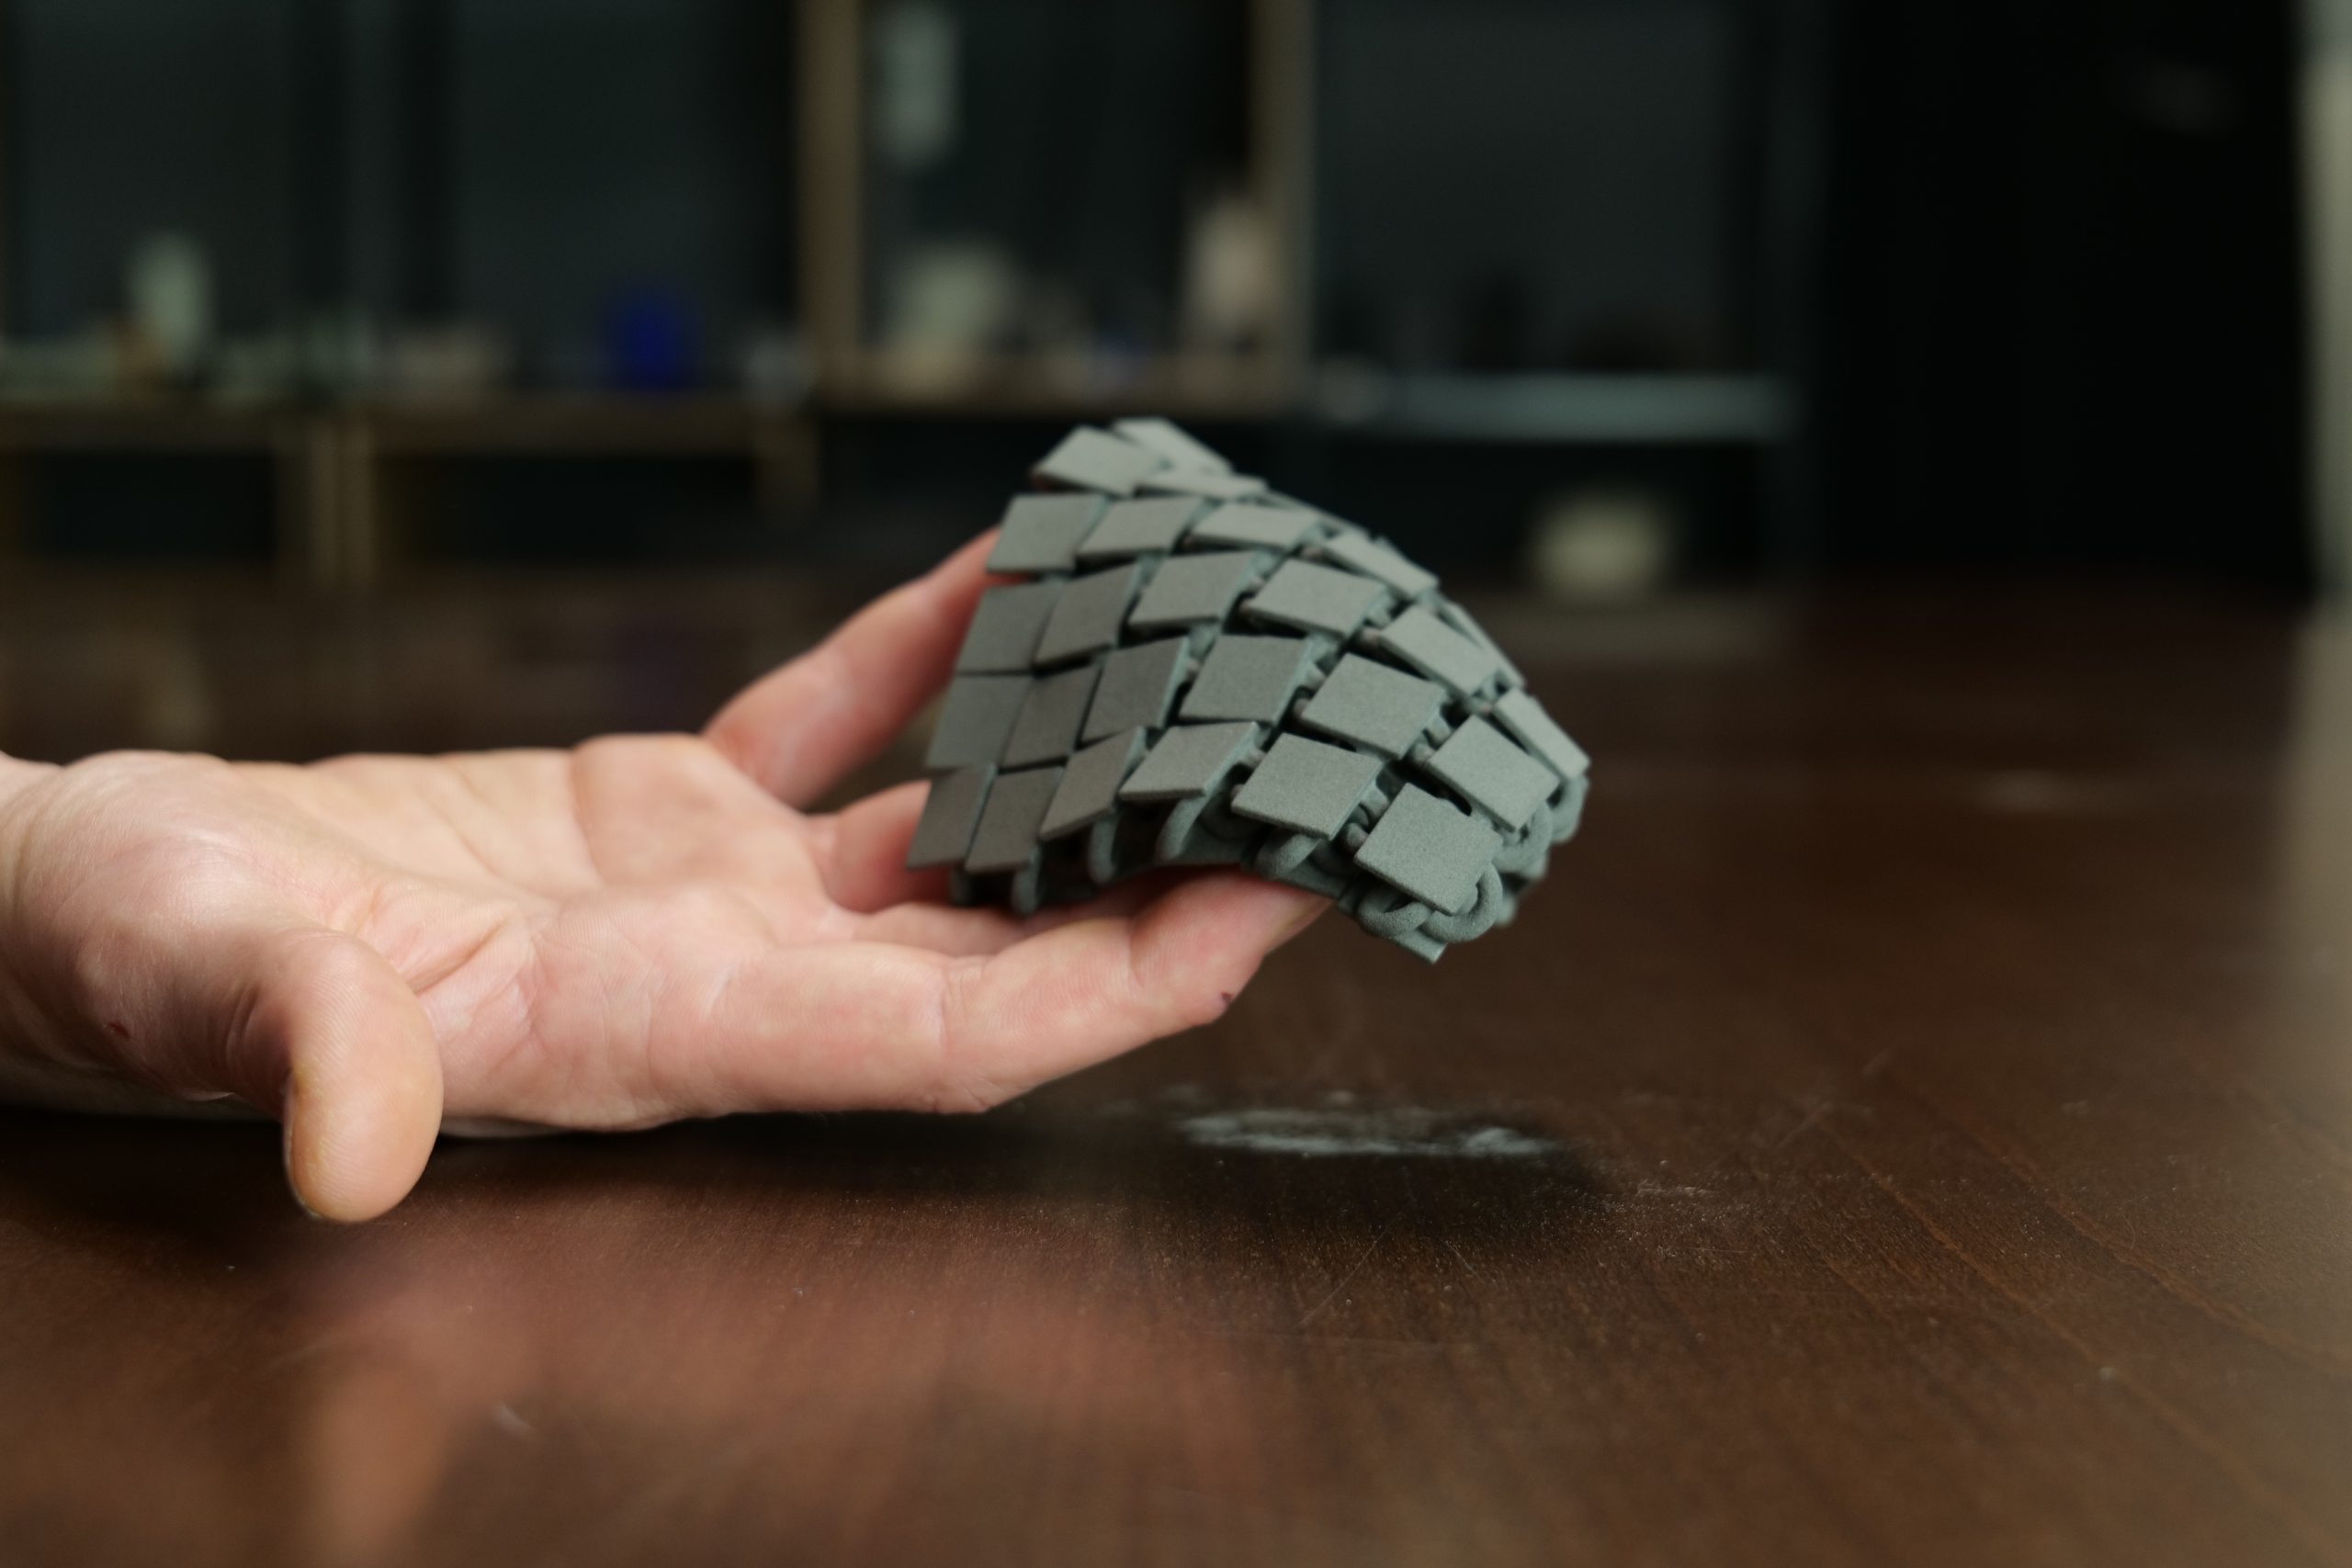
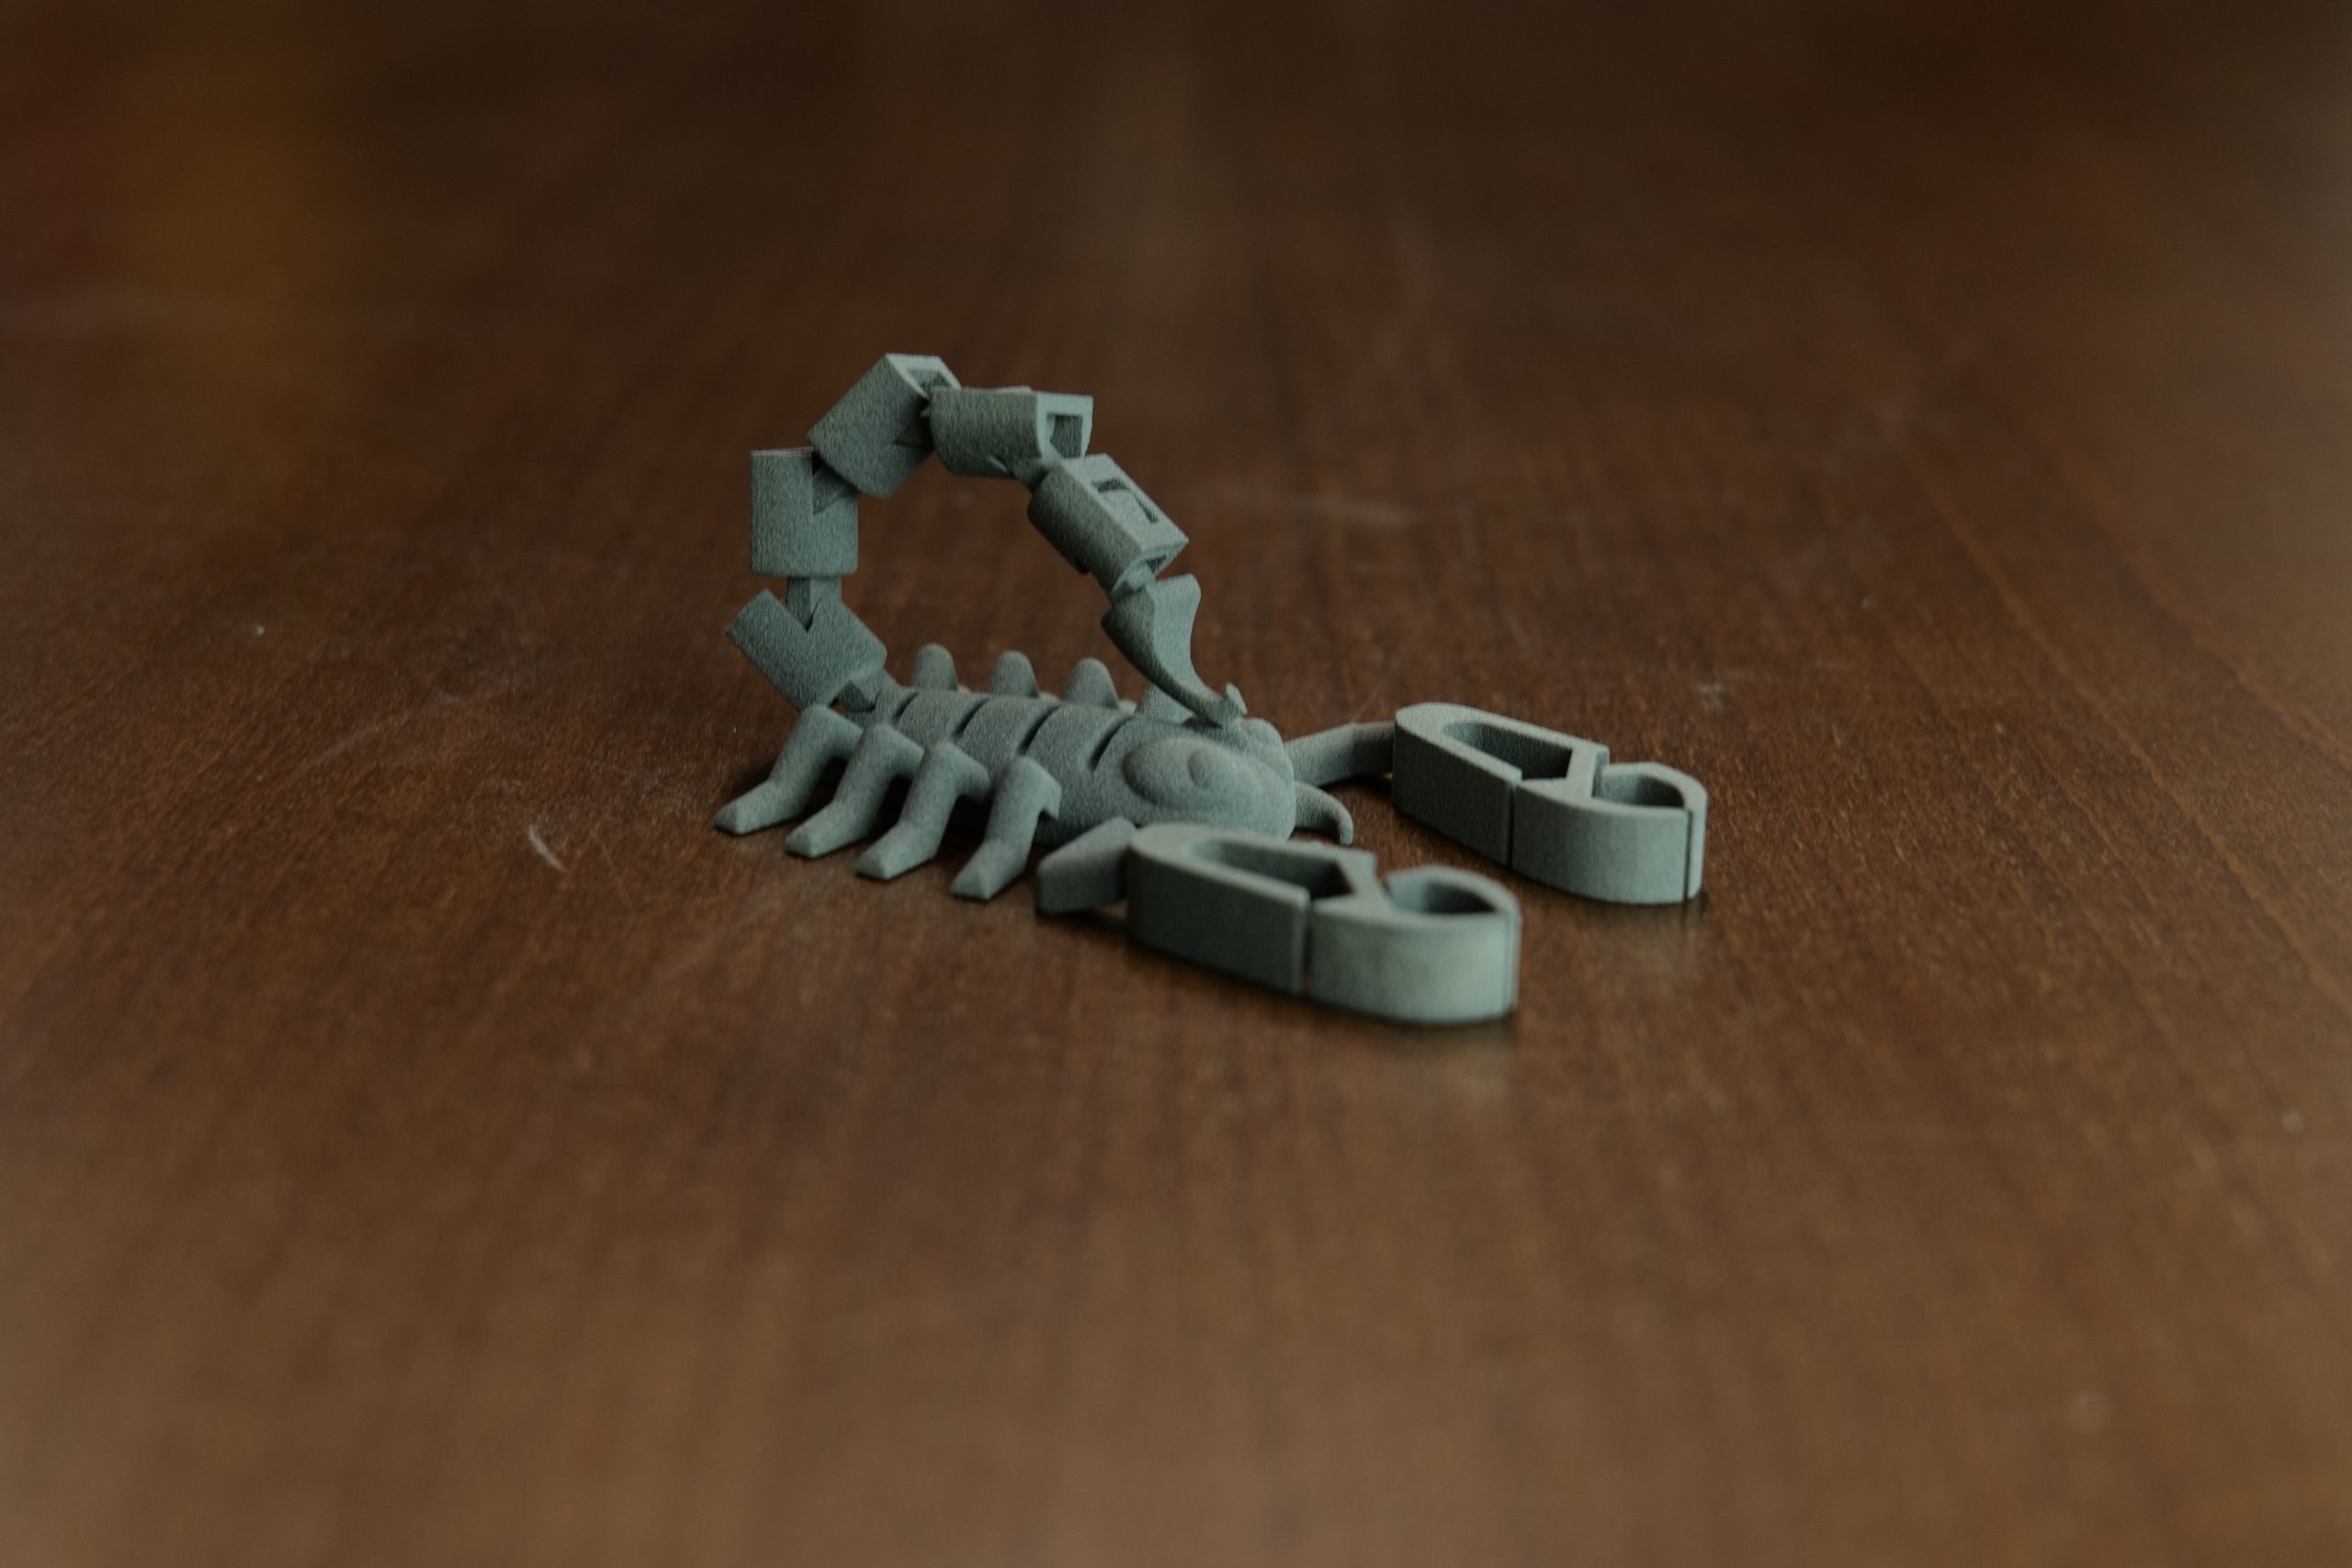
Finally, we tried our hand at a number of dynamic print tests with moving parts – a functional suspension system, a puzzle cube, and a planetary gear system. It’s worth noting here that each of the models was printed-in-place, meaning they were fabricated fully assembled despite technically comprising multiple individual components. Dynamic prints such as these allow us to determine just how tight the tolerances of a 3D printer are, as the overall fluidity of the assemblies can be judged very easily.
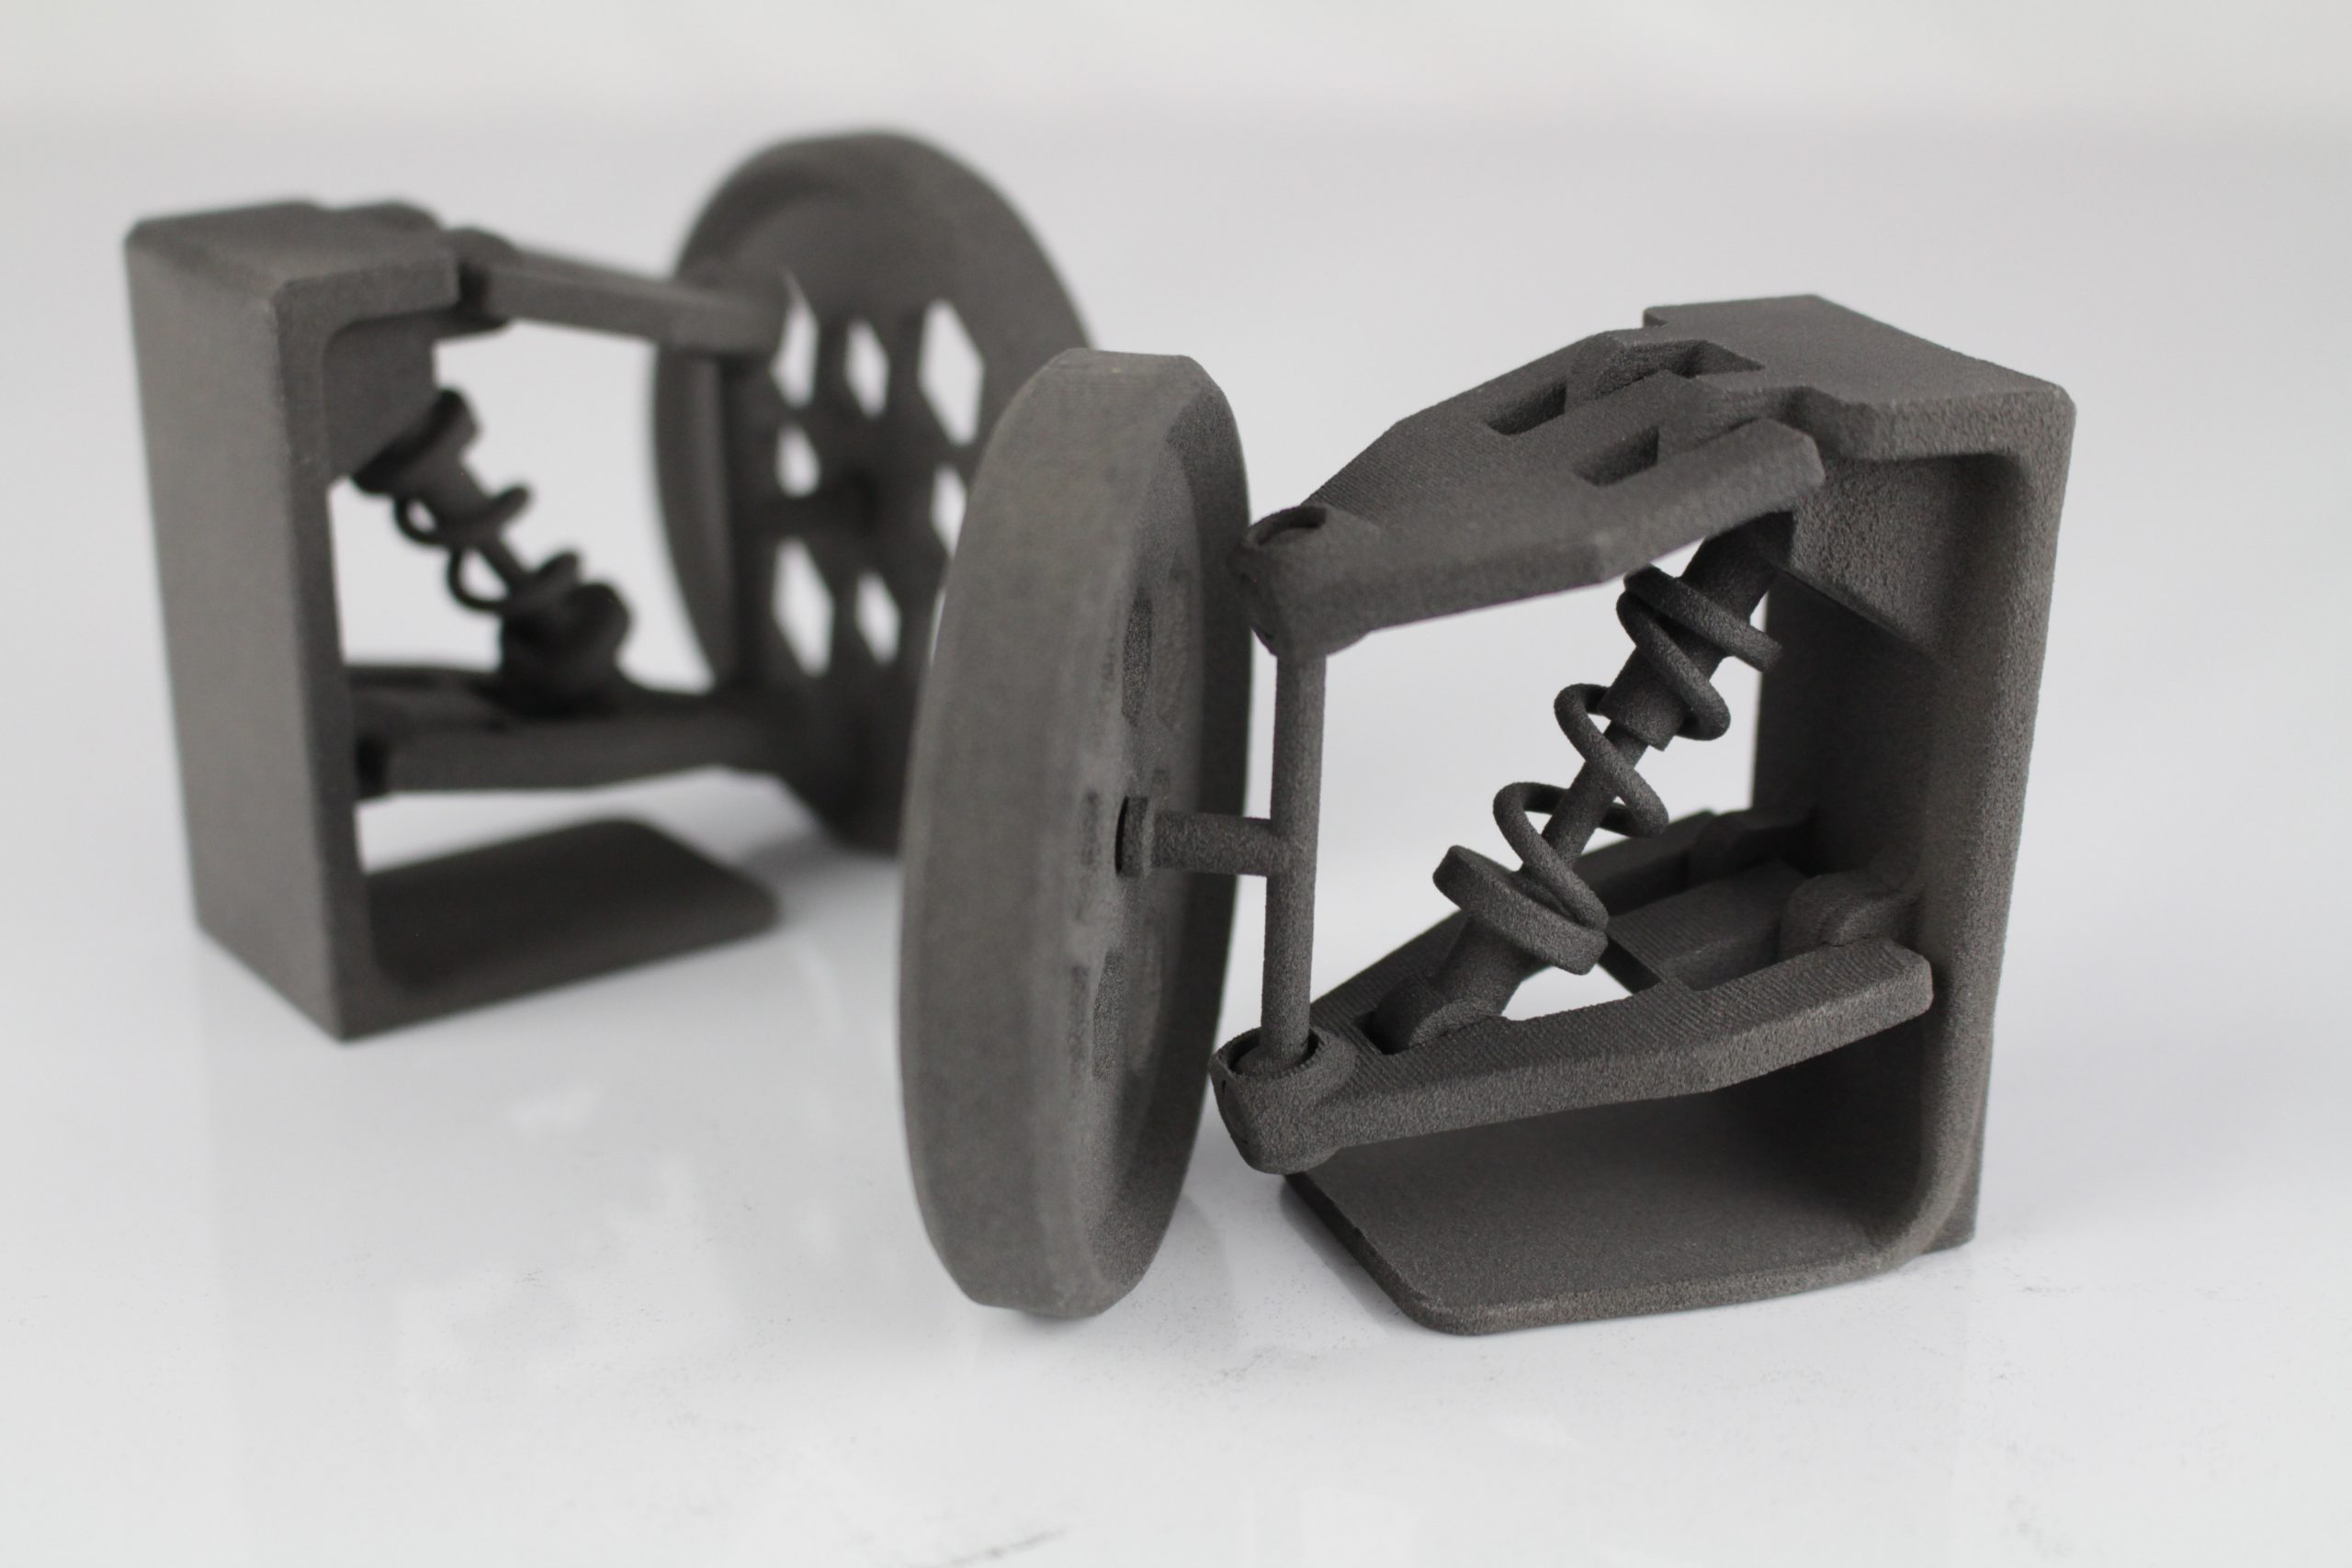
The suspension system came out beautifully to say the least. To achieve the full range of motion, we did have to wiggle around the joints to get all of the loose powder out but once we broke the mechanism in, it performed as intended with the smoothest of movements.
The 3D printed puzzle cube was undoubtedly one of the most spectacular objects we were able to print with the Fuse 1. Due to the intricacy of the model, we did have to disassemble it to remove all of the powder inside but once we ran the exploded assembly through a sandblaster, it turned out just at we’d imagined it. What’s most impressive is that the Fuse 1 managed to print each and every one of the tiny components without accidentally fusing any of them together, despite the extremely tight spacing in the joints and gaps. The success of the puzzle cube is a testament to the precision of the system’s laser and galvanometers.
Similarly, the printer did an excellent job with the planetary gear system. Each of the gears was defect-free, sported clean surfaces, and meshed well with the rest of the assembly. All in all, a very strong finish for the Fuse 1.
The verdict
Bouncing off its market-leading position in the SLA sector, Formlabs has made one hell of an SLS 3D printing debut. The Fuse 1 truly delivers on its promise of an accessible and cost-effective SLS experience, bridging industrial-grade print quality with a nifty, scaled-down footprint. Beyond just a robust set of hardware components, the system offers a highly refined user interface, a digestible learning curve, and one of the best repeatability profiles we’ve ever tested here at 3D Printing Industry.
Then there’s the Fuse Sift. Coupled with the Fuse 1, the post-processing station makes powder removal and recycling as streamlined as can be, resulting in a well-designed, entirely end-to-end SLS 3D printing workflow.
As far as limitations and shortcomings go, we thought the option to leverage third-party 3D printing powders would’ve been great. As it stands, Fuse 1 users are limited to printing Nylon parts but Formlabs is currently working on expanding its powder offering. We’d also argue that the option to fiddle around with the slicing parameters or import custom printing profiles could lend itself to previously unseen innovation.
In the end, the Fuse 1 and Sift are a formidable duo and any criticisms are dwarfed by the sheer value offered by these systems. Formlabs’ carefully crafted package is perfect for those seeking an accessible but comprehensive entry into SLS 3D printing.
Technical specifications
| Build volume | 165 x 165 x 300mm |
| Layer thickness | 110 microns |
| Laser | Ytterbium fiber 10W |
| Laser spot size | 200 microns |
| Material refresh rate | 30% – 50% |
| Hopper capacity | 8.5kg |
| Chamber temperature | 200°C |
| Dimensions | 685 x 645 x 1065mm |
| Weight | 114kg |
| Connectivity | Wi-Fi, ethernet, USB |


Special thanks to Solid Print3D for allowing us to visit their facilities and perform the testing required for this review.
Subscribe to the 3D Printing Industry newsletter for the latest news in additive manufacturing. You can also stay connected by following us on Twitter, liking us on Facebook, and tuning into the 3D Printing Industry YouTube Channel.
Looking for a career in additive manufacturing? Visit 3D Printing Jobs for a selection of roles in the industry.
Featured image shows the Fuse 1 3D printer. Photo by 3D Printing Industry.