The Creator 3 is a desktop sized FFF 3D printer in the professional system range from international OEM Flashforge. Priced at $3,499, the machine is marketed to universities and engineering departments – for use by the more discerning operator rather than consumers. Though at the high-end of the desktop market, the 3D printer is equipped with equally sophisticated features to make investment worthwhile.
The Creator 3 is a dual extrusion system, with printheads that can be controlled in tandem or independently to maximize the use of a 15L build volume. The machine can reach a max nozzle temperature of 300°C, supported by a heated build plate of up to 120 °C, opening extrusion up to more types of filament than the average desktop machine.
On the usability side, the Creator 3 has a 4.5-inch full color touchscreen; is compatible with USB, Wi-Fi, Ethernet and 3D Cloud for object loading; and can resume printing in case of power failure. This package is completed by an in-built filter system, limiting odor and particulates, and an interior camera for in-situ monitoring. As with all Flashforge 3D printers, the Creator 3 is also supported by the company’s proprietary slicer Flashprint.
This review summarizes a comprehensive report compiled by 3D Printing Industry engineers in three months of testing the Creator 3. Here, we assess the capabilities of the core features of the machine and conduct a series of test prints to verify repeatability, retraction, overhang handing, bridging and application to real-world objects.
First impressions of the Flashforge Creator 3 – construction and setup
The Flashforge Creator 3 is a well-constructed machine. A full metal chassis provides good stability, ensuring the quality of 3D printed objects. Clear, plexiglas doors enclose the front and top of the build area, maintaining an optimal, temperate environment, while also facilitating operator access. The 15L build area is impressive, larger than most others on the market, but the overall machine footprint is compact (627 x 485 x 615 mm) making the Creator 3 a comfortable addition to the worktop.
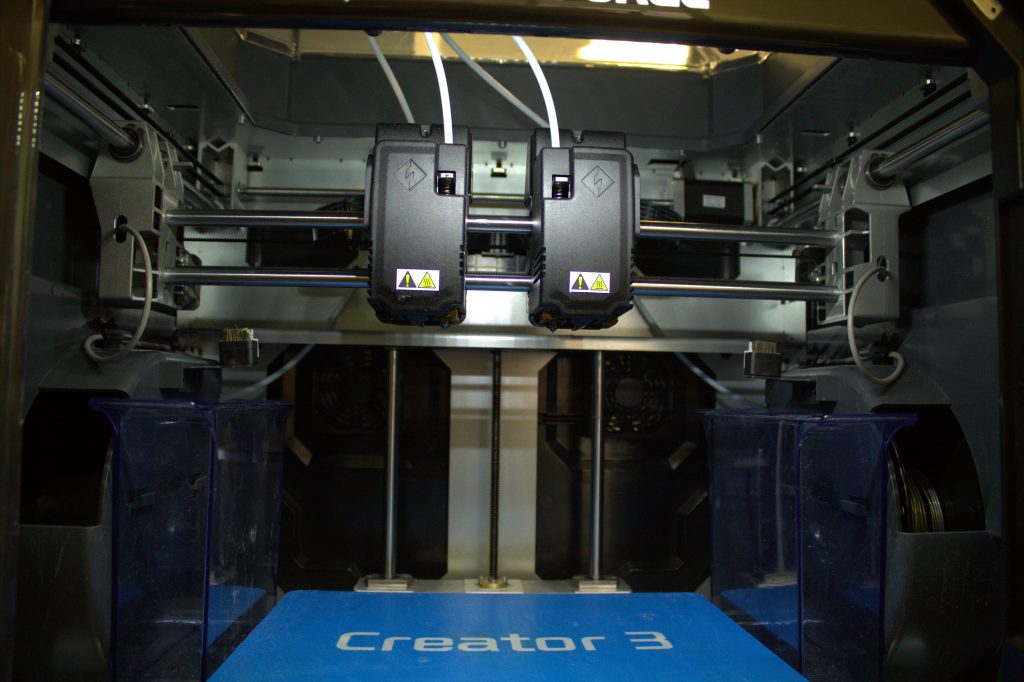
The dual print heads inside the 3D printer are both direct extrusion, making filament loading and removal quick and easy. Generally, dual extrusion capabilities enable much faster print times than a single head, however this is at the expense of calibration, which is more time consuming.
Inside the bed, the Creator 3 also has two metallic brushes for automatic nozzle cleaning, and dual compartments for surplus filament storage. The in-built camera is positioned inside the casing at the front-left of the plate. Positioning of this camera is good and allows a full view of print bed. Set-up can be a little tricky, but once completed the build can be monitored through the supplied Flashcloud program.
With the 4.5-inch full color touchscreen, users can select from multiple operating languages, access print model previews, and manage various settings of the print. Material loading, for example, is very easy to do due to the touchscreen capabilities. Materials in use on the Creator 3 are loaded in enclosed compartments on either side of the machine, and the screen guides the user through the process. Finishing the loading of the filament requires some practice as it requires a manual stop by the user. Similarly, bed calibration is a touchscreen-guided process, prompting the user to turn dials inside the machine by number of degrees. On average, we found that the calibration process could be effectively completed within two minutes. The Creator 3 also completes a bed calibration check before each print, and has a “Calibrate” button for when bugs occur on the Z axis. Both are useful tools, though it would be great to see these capabilities integrated into a closed-loop process, where the 3D printer corrects itself in the event of bugs rather than requiring further user input.
Wi-Fi setup takes a further two minutes to complete, and from this files can be sent directly from the PC to the 3D printer when sliced. For most of the tests detailed throughout this review, the 3D Printing Industry team used a USB stick loaded with the sliced .gx files. Though not as convenient as 3D printing via Wi-Fi, loading files via USB is generally more reliable as it avoids mishap due to unreliable connectivity from the router. All printed objects are prepared using Flashforged Flashprint software.
Using Flashprint
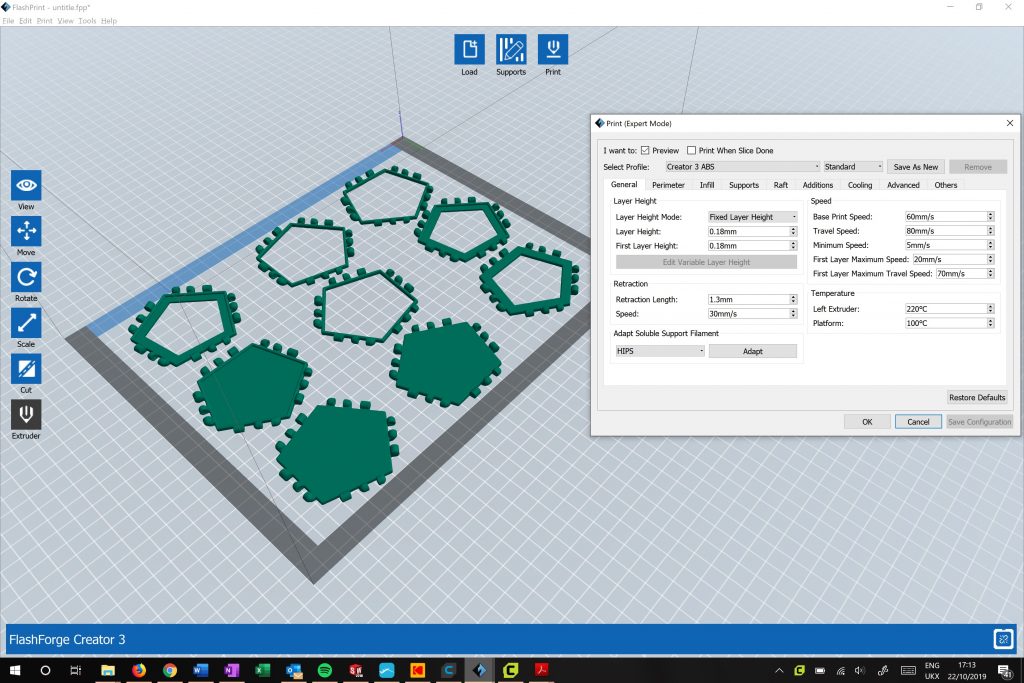
Flashprint is described as a slicer that is easy to use for beginners as well as experienced users. Finding your way around the program is intuitive, as motion controls match those of other slicers, and the menu is laid-out to be easily recognizable. There are buttons on the left hand side of the slicer interface providing quick access to repositioning, rotating, cutting and scaling.
Once loaded and positioned, the user is directed to support options, where they can select from either linear or treelike supports. With fine tuning (if necessary, to overhang threshold, post diameter etc.) the user can then simply generate support placement by clicking the “Auto Supports” button. For more advanced users who are short on time, it is also easy to manually add and remove supports after this step.
Next, in basic print settings, the user is presented with a dialog box for the selection of material type, use of raft, supports, and resolution, e.g. Low and fast, Standard, High and slow, and a wall or brim print. “More Options” can be selected here to open up more advanced settings, including specific print and travel speeds, retraction, temperature, shells and infill.
In our opinion Flashprint is one of the easiest slicers to use on the market. The interface and options were very straightforward for new users and did not go unnoticed by our experienced team. As advanced users, we appreciated access to full slicing settings and features such as dimensional compensation and tree supports. The only downside to Flashprint is the inability to save a .g or .gx file directly to the USB stick for loading into the 3D printer. Instead, the files must be exported, then added to a USB afterwards, adding a seemingly unnecessary step into print preparation.
Benchmarking the Creator 3
As with all 3D printer reviews on 3D Printing Industry a standard set of tests (in PLA), for benchmarking, repeatability, overhang, bridging, use of the build volume, circular trajectory, precision and retraction are performed before a machine is used for more practical applications. With these tests, the team can get a good idea of a 3D printer’s general performance, and how well it handles all common challenges relating to material extrusion/FFF.
The first of these tests is a 3D Benchy model. Trying out the IDED capabilities of the Creator 3, we first attempted to 3D print two Benchys in mirror mode. Though the 3D printer completed these models, both Benchys experienced almost identical failures in layers near the base.
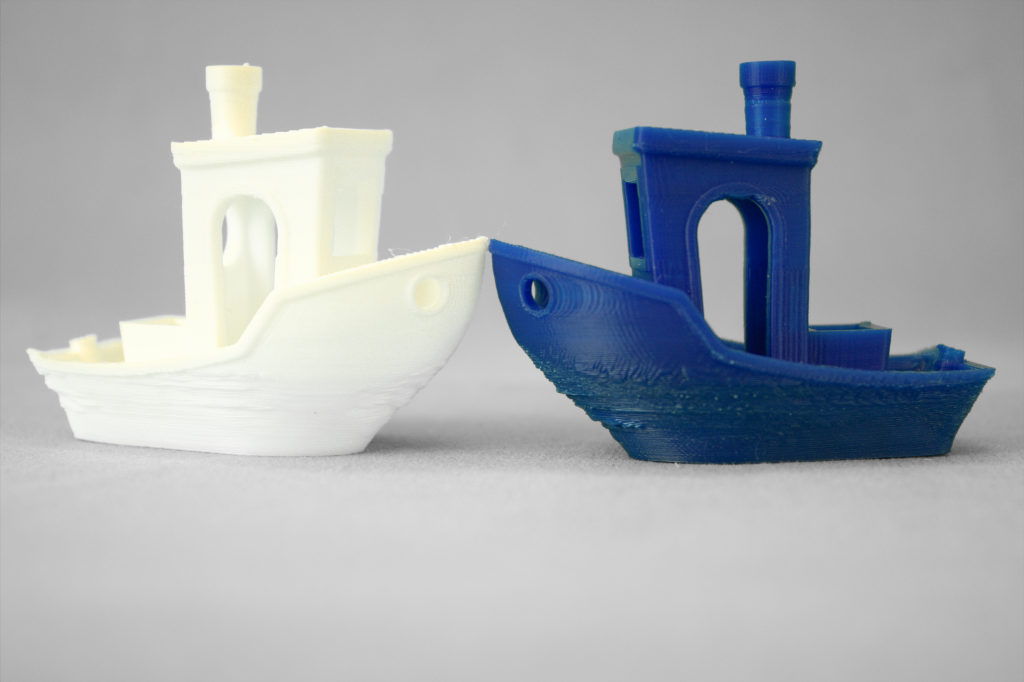
A successful Benchy was afterward simply by decreasing the temperature of the nozzle and the bed. We noted that the PLA profile in the slicer initially set the bed temperature too high for PLA prints causing the warped overhangs. Flashforge have since addressed this issue with an update to the slicer, before and after results can be seen below.
The successful Benchy model on the Creator 3D was of high quality. There was no stringing across the bridges in the part, and the roof is well printed. Some imperfections, for example in the rear window bridge of the model and at the top of other windows, are very common due to the absence of supports. Minor in size, each one can easily be cleaned by hand using grit paper or a scalpel.

Repeatability, circular trajectory, precision and retraction
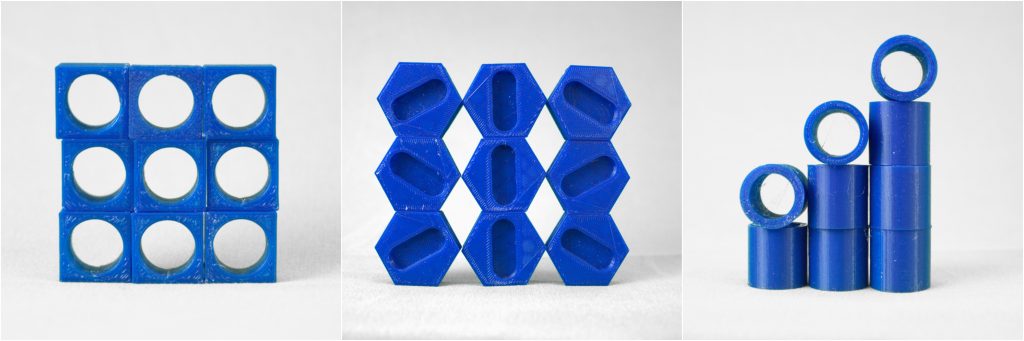
Repeatability tests are carried out across three test artifacts, each 3D printed 9 times. These are: a square with a hole in the middle; a hexagon with a pill shaped cavity; and tubes. In each of the artifacts we are seeking a mean of difference of under 0.1mm between the printed objects and the original reference file.
For the first part, a square with a hole in the middle, it always incredibly difficult to attain an appropriate repeatability rating on a 3D printer with a cartesian setup. This is because the X, Y axes struggle to print perfect circles. As such, the Creator 3 did not achieve the desired mean of difference between the objects and reference model. Otherwise, the printed objects were of very good quality. In the second test, a hexagon with a pill shaped cavity, the Creator 3 performed very well, attaining a mean difference of 0.06mm, well under 0.1 mm, and offsetting some of the concerns created by the square/circle test. In the third and final repeatability test, the 3D printer redeems itself somewhat creating deeper-detailed circular trajectories in the center of the tubes. However, these tubes are more oval in shape than circular, again reflecting the limitations of a cartesian setup.
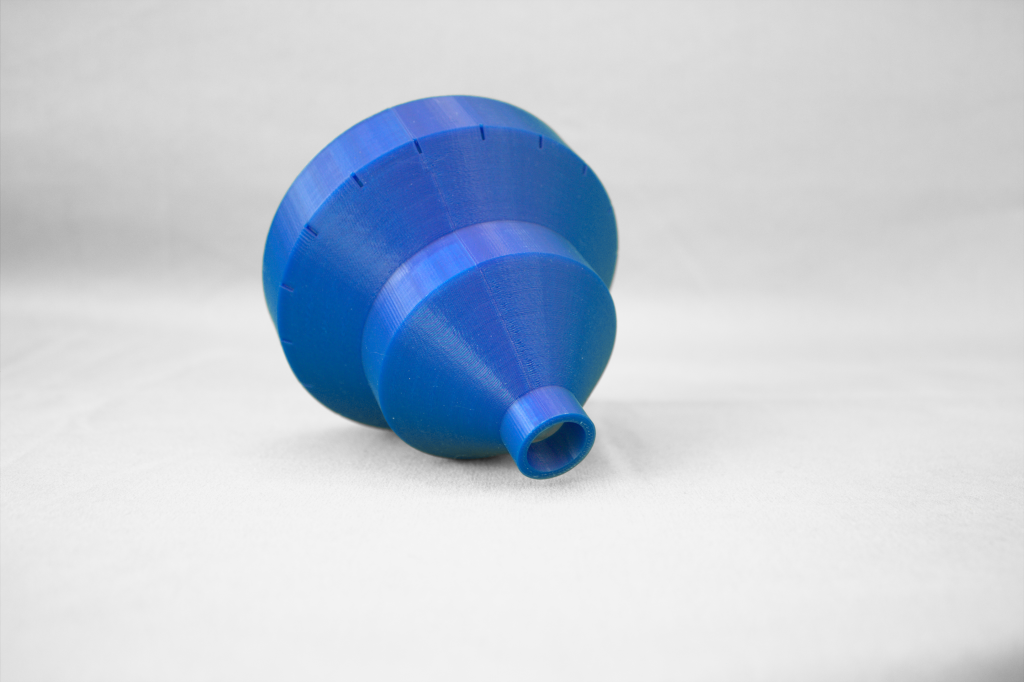
Studying the circular phenomenon further in a part shaped like a funnel, with many circular section, a similar result is achieved. Though again, the overall quality of the object is excellent, with a smooth surface, and no stringing of layer shifting as we have observed in other 3D printers with the same cartesian arrangement.
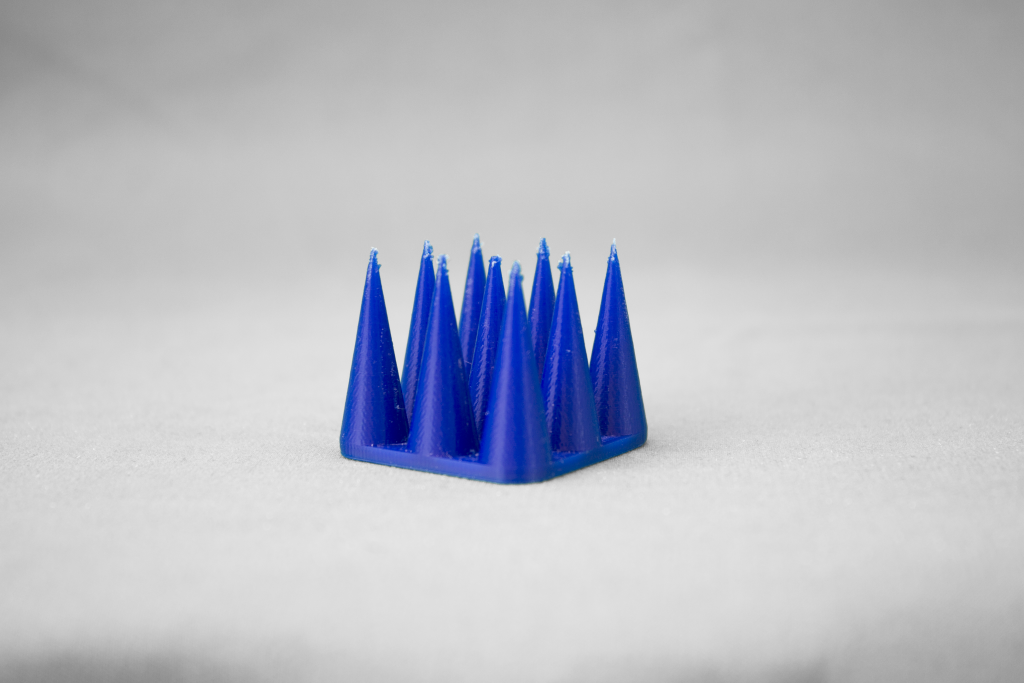
Next we tested the retractraction capabilities of the Creator 3. From the quality of the print, observing only a few defects at the end of the spikes on the model, we can deduce the retraction capability on this printer is perfect.
In one final test for this section, we 3D printed a rectangular frame and a tower to test the printable limits of the Creator 3’s build. The 3D printed tower measured 200 mm tall, reaching the exact limit of the Y axis. The printed rectangle reached the edge of the bed measuring 299.0 x 250.5mm. Both objects were of a good quality.
Real-world 3D printing tests
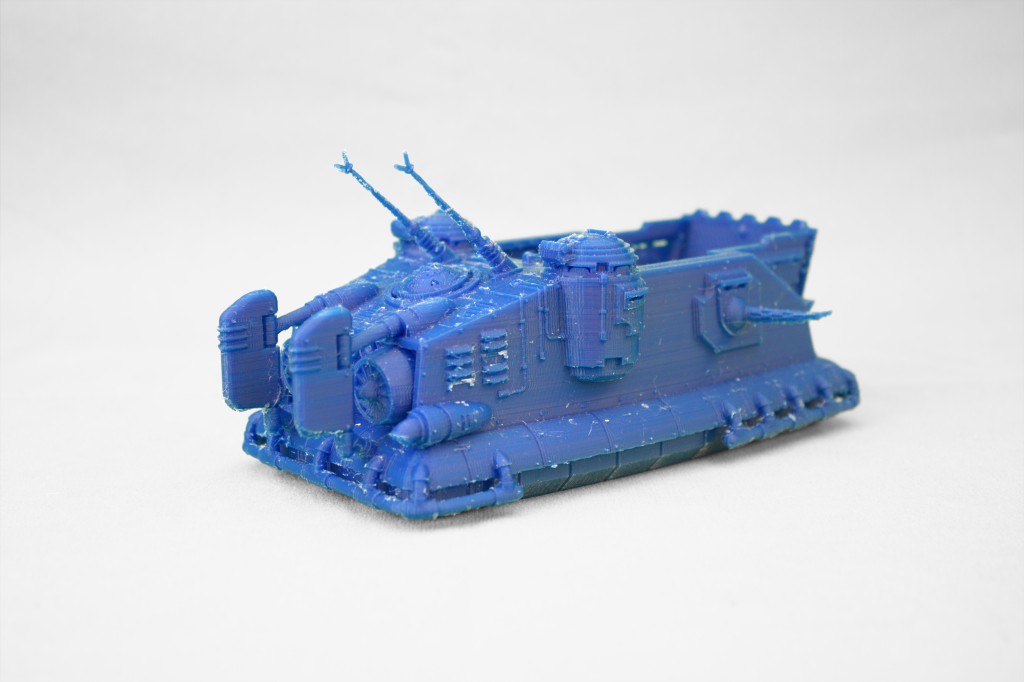
In our “real-world” examples 3D printed on the Creator 3, we first tried a series of objects made using only a single nozzle at a time. The first of these parts was a highly detailed model hovercraft, dimensions 200 x 100 x 80 mm. Made in PLA, and without any support optimization, this was a real test of the quality of an object “as-printed.” As seen in the first photo of this model below, some small defects and stringing occurred on the surface of the model.
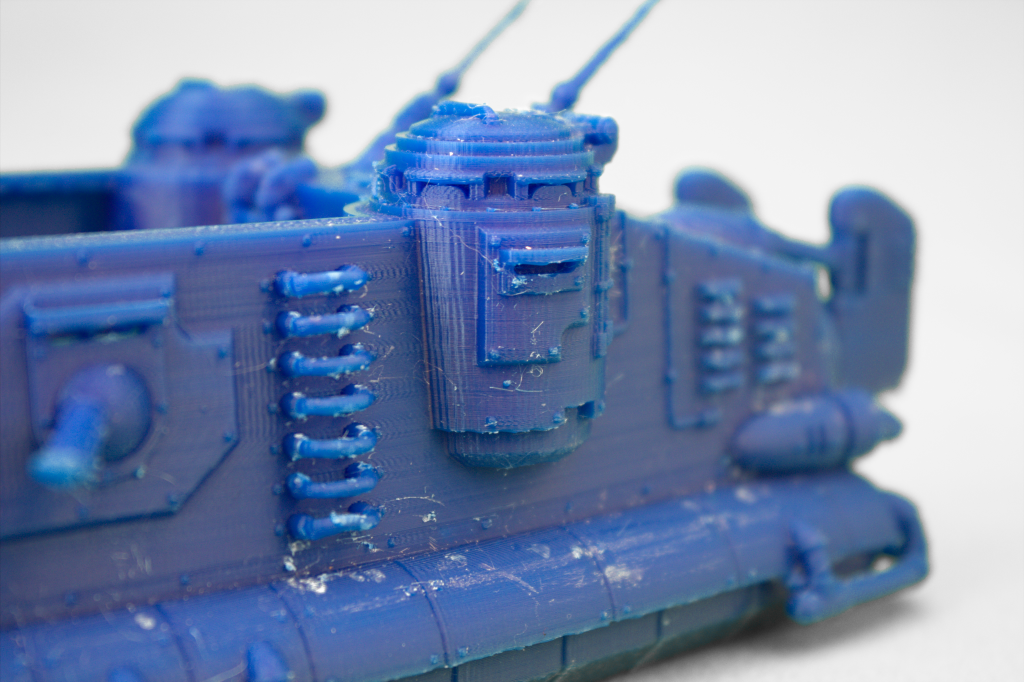
Fortunately, some cleaning with a scalpel, cutter and grit paper, creates a good quality model, still retaining all details and not degrading any more of the object’s surface. If we were to print this model again, a rearrangement of the support structures would help improve quality.
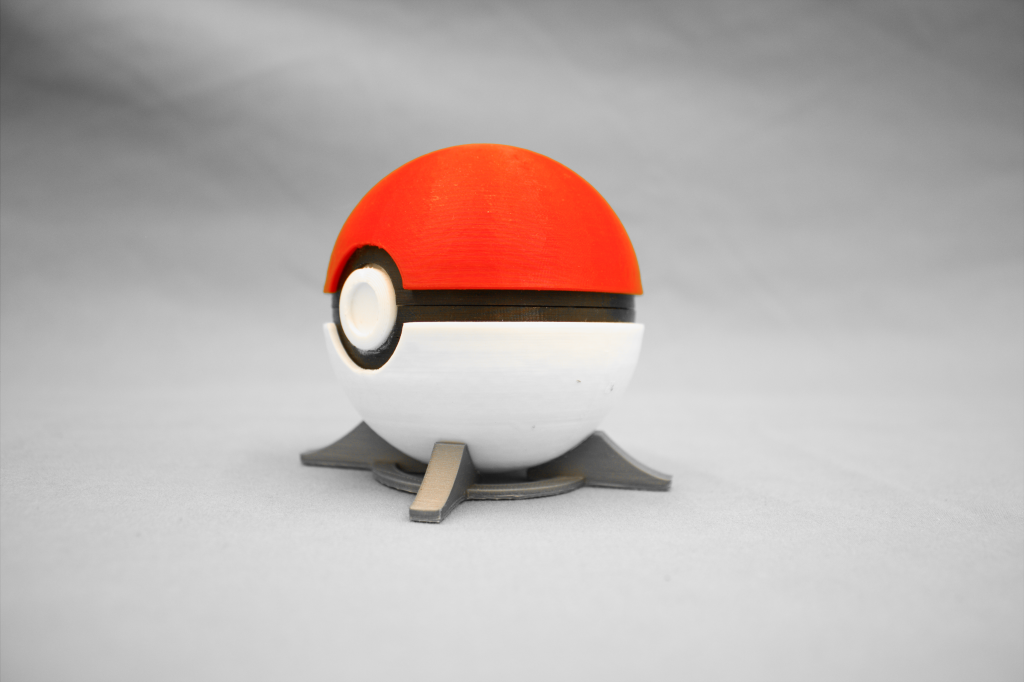
Next, investigating the Creator 3’s ability to work with other materials, in this case PETG, and make an assembly with high tolerances, the team 3D pritned an game cartridge holder in the shape of a Pokeball. The red top is the part made from PLA. All other parts are made from PLA.
The quality of this test object was excellent. All surfaces were smooth and defect-free, with low-visibility between layers. High tolerances enabled the object’s assembly, even when made in multiple materials in different print operations. When assembled, the object was fully functional, and was able to store of up to 8 SD cards or game cartridges.
A further functional test was conducted in a planetary gear test. Again, this had few visual defects which had no bearing on the utility of the object. The object could be assembled and gears could be moved.

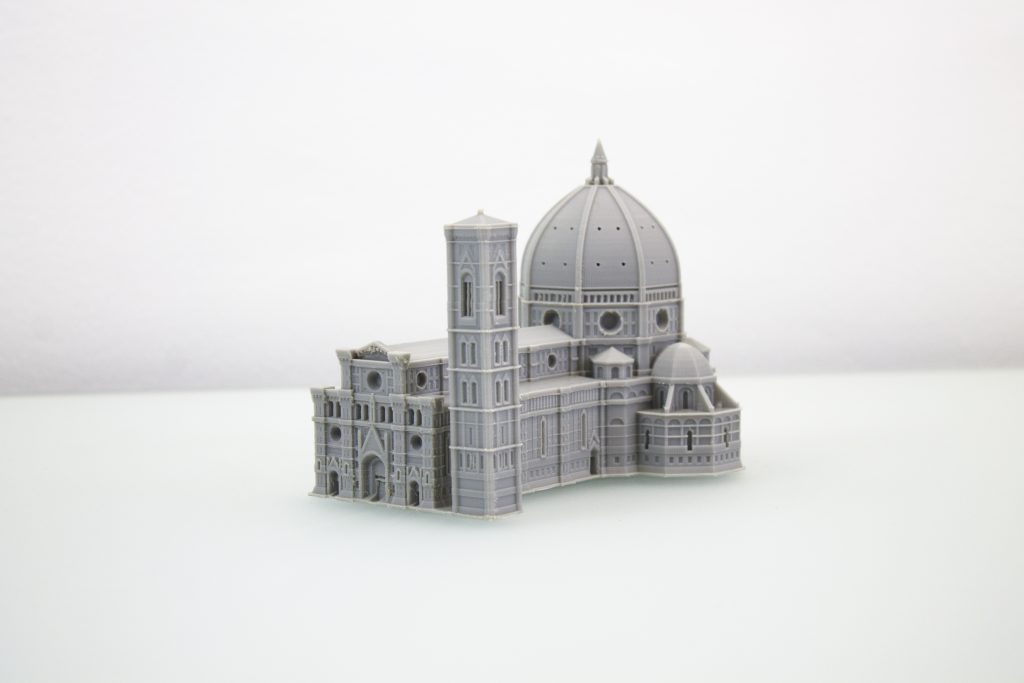
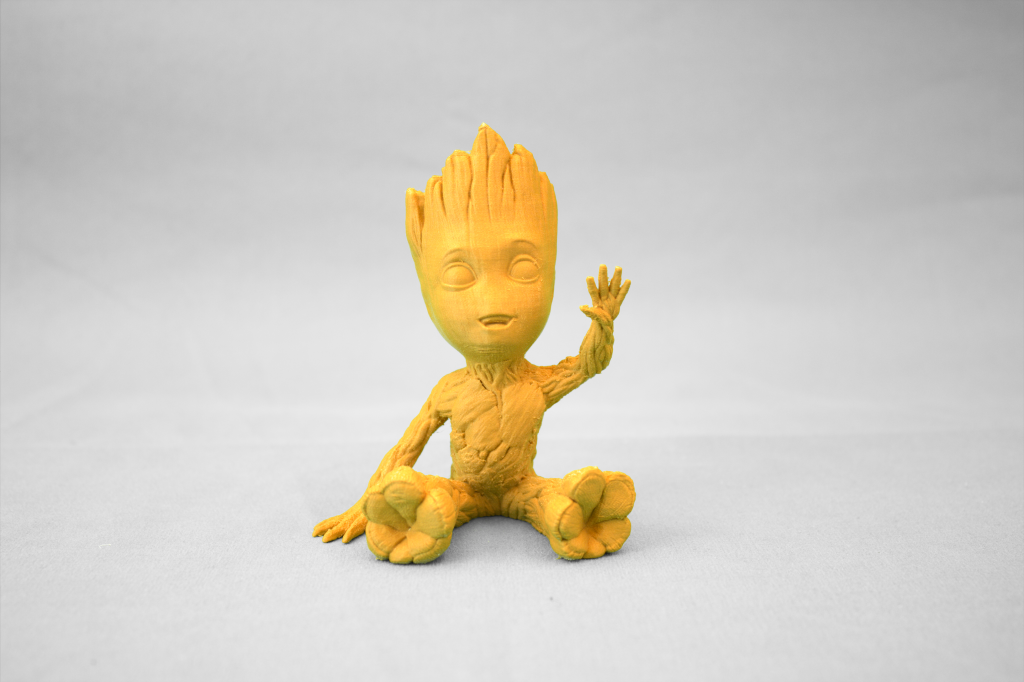
In two further material and accuracy tests, we proved that the Creator 3 is capable of handling ABS and wood-filled PLA. For the former, we tried a scale model of the Florence Cathedral, and the latter was demonstrated in a figurine of Baby Groot from the film Guardians of The Galaxy. Results can be seen below.
Materials more commonly used in an industrial setting (ASA, PC and Nylon) were also successfully 3D printed on the Creator 3.
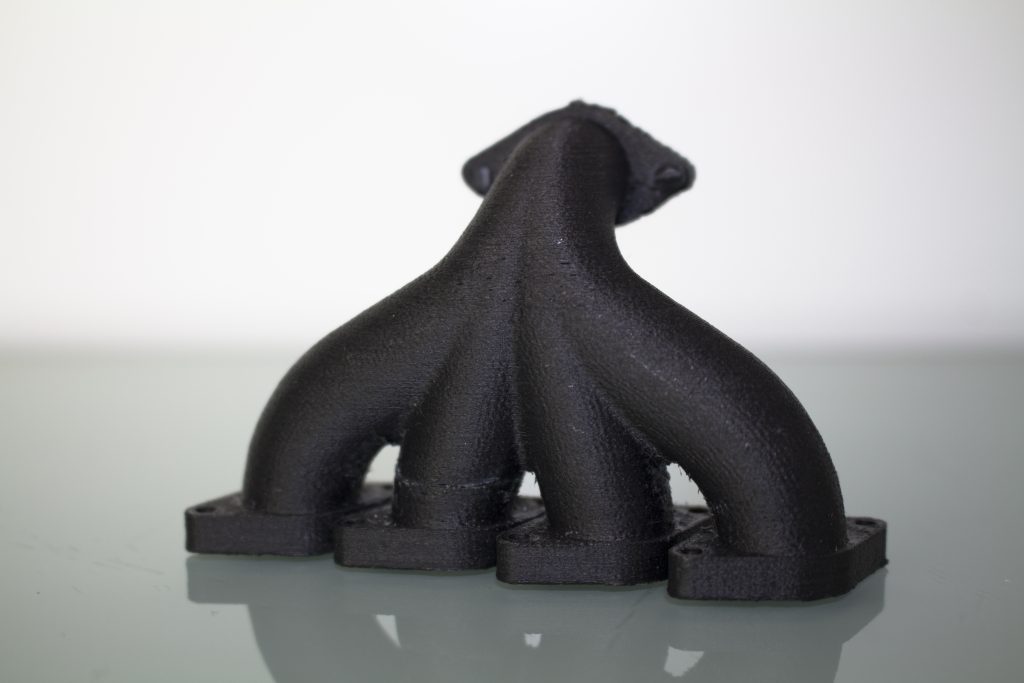
As the Creator 3 has no pre-set configuration for ASA tests in this material took several attempts before achieving an acceptable end result. The final print produced a model that was very stiff but somewhat brittle, which can be observed by one of the four inlets having developed a crack. The ASA produces a reasonable finish with a matted appearance which makes the printed layers more prominent. Minimal post processing is required with little stringing taking place during printing.
The Creator 3 initially struggled to print using Nylon. The pre-set temperature (240˚C) determined in Flashprint was too high for the third party filament that was used, therefore it was reduced until an acceptable print finish was achieved. The bed temperature for Nylon was the same as both ASA and PC too, which was ideal for simultaneous printing of multiple filament types. When printed well, the Nylon model has a slightly glossy finish, though the layers are visible. The final model was strong and demonstrated some flexibility, though the elastic nature also resulted in some stringing.
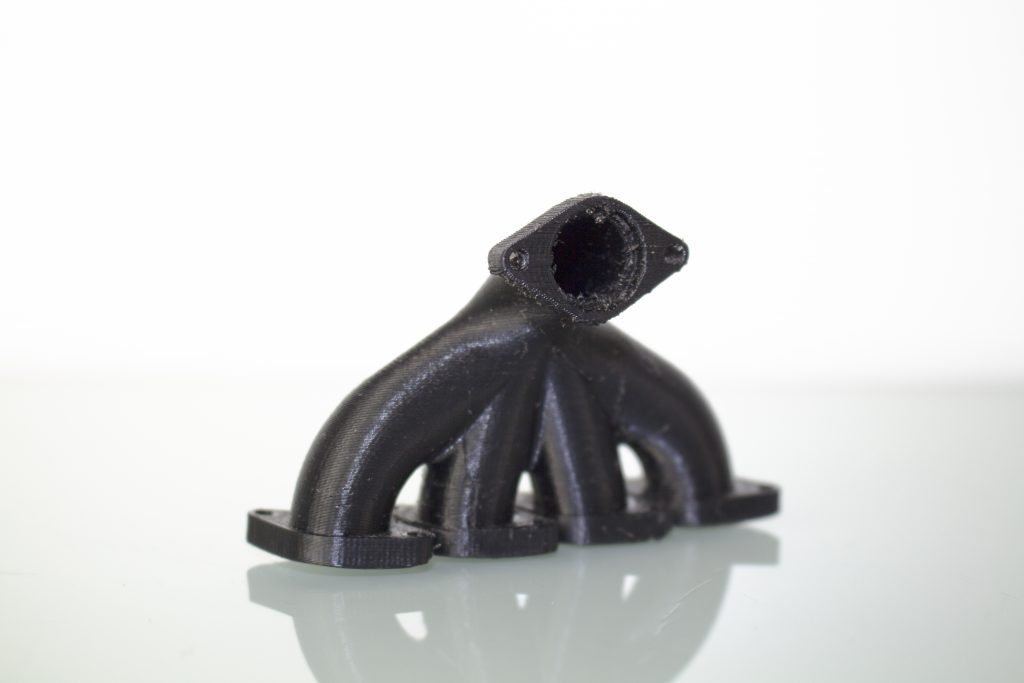
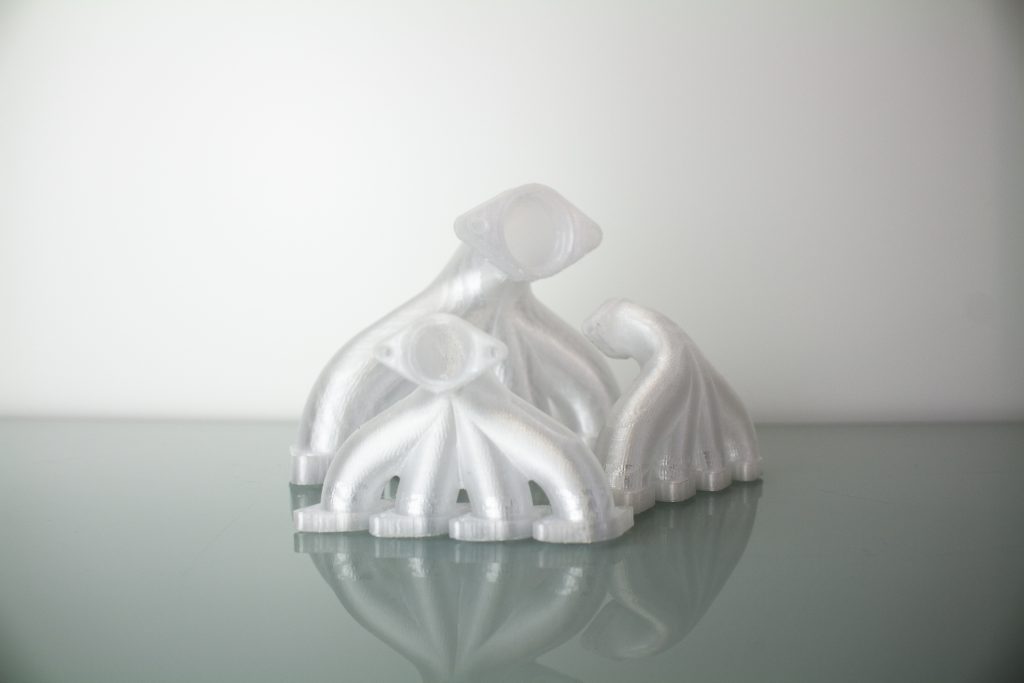
Despite being a tough material PC, compared to ASA and Nylon, was the easiest and most consistent material to print on the Creator 3. Both the material and pre-set PC settings in Flashprint worked well the printer, it also complimented ASA by having the same bed temperature for simultaneous printing using the mirror option. The 3D printed model is comparable to ASA in that it too has reassuring robustness with very little flexibility. The finish of PC manifold is crystal-like in appearance being marginally translucent and lightly reflective. Layers are difficult to immediately discern as a result of the visual appearance of the part.

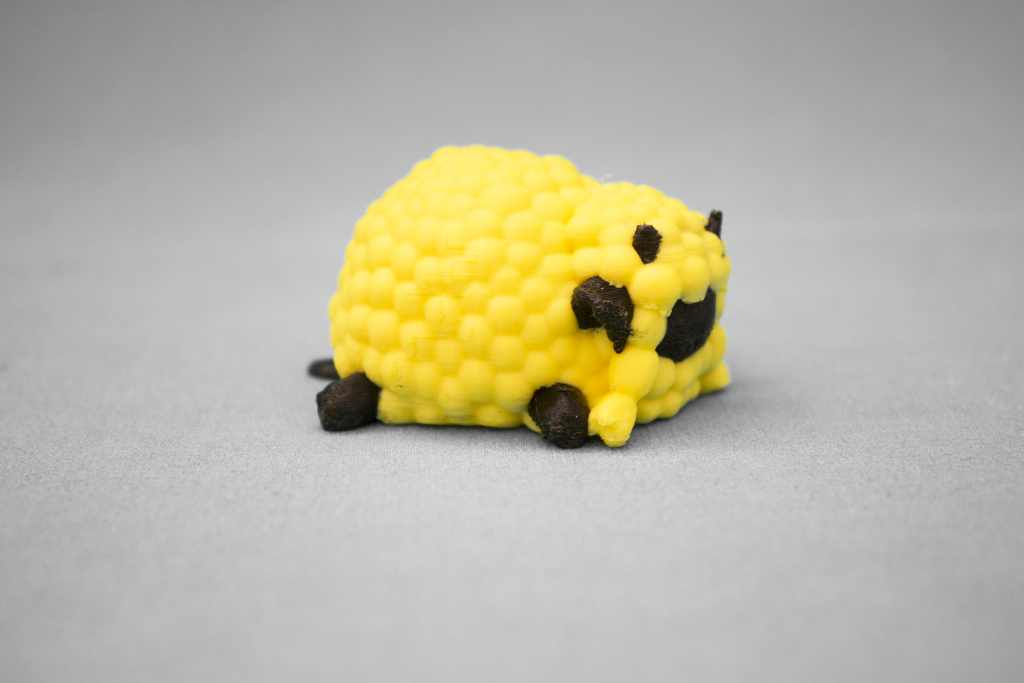
In one final dual extrusion test, this time working on the same object, the team tested the calibration of the two nozzles. A sleeping sheep model exhibited good results, with no visible shift between layers, no stringing, and clear color boundaries. Some minor flaws were observed in the test, but further modification of retraction speed could help to eradicate these blemishes.
Overview – the FlashForge Creator 3
The Creator 3 is a high-end FFF 3D printer worthy of its price tag. The system is well built and capable of producing high quality parts from a variety of different materials (PLA, PLA Wood, Nylon, ASA, ABS, PETG and PC). It success with the likes of ASA, PC and Nylon, the machines is also well suited to processing of the more demanding polymer ranges.
Setup is quick and easy, and touchscreen control is very clear and logically arranged. IDEX capabilities on the machine work very well and provide good opportunities for experimentation with 3D printed projects. Considerations do however need to be made in relation to the two materials used and how they work together in the same environment.
As previously stated, Flashprint is one the best slicers our team has ever used. The basic and expert modes are well organized and despite the number of settings, it is easy to find the ones required. The “save configuration” button is also useful, and slicing rate is faster than other slicers.
As indicated in repeatability testing, the main, and only, real weakness of this 3D printer is when it comes to producing circular objects. Changing settings and modifying the supports improve the quality but it is never enough to complete a spherical object of high quality. As a cartesian system however, the Creator 3 is not alone in this fact. If circular/spherical quality is needed, a delta system may be more suitable.
To get the most out of the Creator 3 we would recommend using a raft on parts when possible. Though it comes at a trade off in the speed of a print, a raft really proves to enhance the overall quality of the object. In the first month of printing, we also recommend using a bed adhesive. After this point, however, adhesive is required less and less.
In the three months of thorough testing we put the Creator 3 through, the machine was always a pleasure to use. Overall, we were impressed by the quality of prints, and would recommend this machine for its intended use by experienced operators, as well as beginners who are looking to unlock the full capabilities offered by a compact FFF system.
The Creator 3 is available for purchase directly from Flashforge at prices starting from $3,499.
For more of the latest news and 3D printer reviews please subscribe to the 3D Printing Industry newsletter, follow us on Twitter and like us on Facebook. Seeking jobs in engineering? Make your profile on 3D Printing Jobs, or advertise to find experts in your area.
Featured image shows the Flashforge Creator 3. Photo by 3D Printing Industry