As with the promise of the automobile allowing us to travel in comfort; the promise of the PC to help us simplify our increasingly complex lives; and the cell phone’s promise of connecting us to loved ones at a moments notice; there is the promise of 3D printing — ‘to allow anyone and everyone to create almost anything they imagine,’ or, in this case, desperately need.
Just over a year ago, I was involved in an accident that resulted in the loss of most of my thumb on my right hand. Our opposable thumbs are something we tend to take for granted, day to day, and only when we are faced with life without something so fundamental do we understand their true value and significance. The injury I sustained would be debilitating — and traumatic — for anyone. But for me, it was intensified, because I am a Sculptor — a creator of art, literally performed by every touch, movement, twist and applied pressure of my hands.
I needed to look at my options to enable me to fulfill my craft and life’s work, and not be limited by what had happened to me. It may come as a bit of a shock to some, it did to me, but the prosthetics available to me commercially in 2013 are based on designs from the 1800’s and implemented in 1960’s silicone materials. And, to make matters worse, these so called “state-of-the-art” (seriously!) prosthetics cost $5,000. Yes, I’ll say it again, $5,000!!! For coloured silicone.
And that’s not all, it got worse. Because it’s silicone, it has a single benefit. It “feels” like a human thumb … to someone else that I may shake hands with … not to me. To me, it feels more like the comical fake red noses that circus clowns wear. Having tested one of these silicone prosthetics, it had zero usability or utility in my life and would not allow me to fulfill my work.
 I had to find something better, and it quickly became evident that I would have to solve my problem myself — and this is exactly where the root promise of 3D printing came in to play — to fulfill a real-life need. Not just a little, but by a significant amount. For some time after the accident, I redirected my creative nature to designing and printing my own thumb, but I had to find the right tools — and the right support. It was not all plain sailing though — anyone involved in 3D Printing knows that these are not fancy electronic screwdrivers. They are indeed 4-axis, real-time computational, repetitive and repeatable machines that use up most of the laws of physics from the moment the “ON” switch is flipped. And that’s the easier part.
To get to that point, however, I needed to wrap my head around 3D CAD, 3D modelling, and Thermal Dynamics — with a little material copolymer physics tossed in. I just about managed it between caffeine drinks. I do have a degree in Applied Design from the University of Minnesota, but this was before the digital age kicked in. So, for me, while I understood the concepts, the hardest part was making the transition form analog 3D to the computer, or 3D CAD.
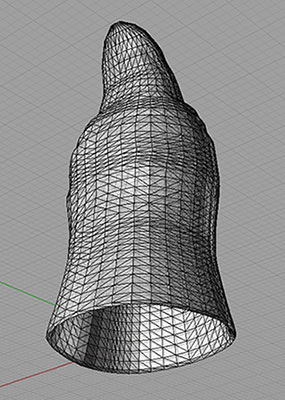
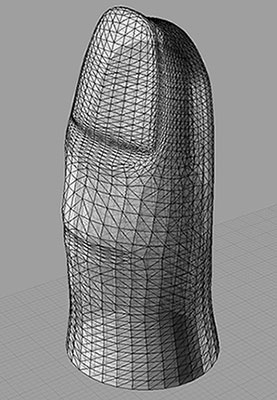
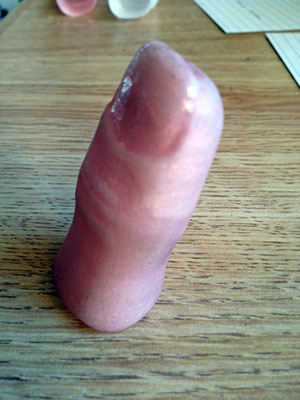
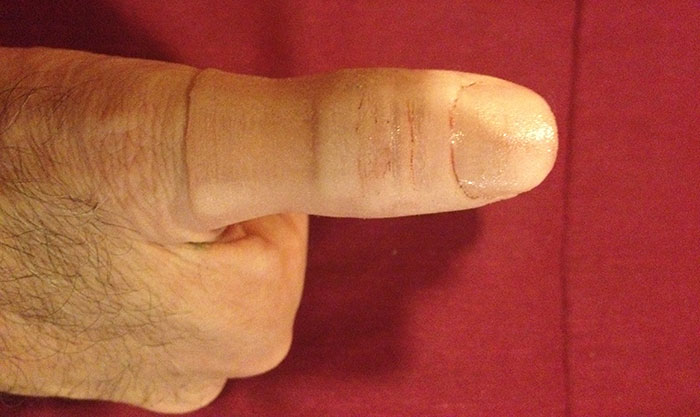
To 3D print my design, I purchased an original MakerBot Replicator (not a 2), which would allow me to print with Nylon. Having seen a new material just released to the 3D Printing community called nylon 618 from taulman3D, I knew this would be a far better material for utility and real life work. I began testing and within a few months, I had printed and was wearing variations of my new prosthetic on a daily basis. Not only that, but I was able to start working productively again as a sculptor. This in time brought forth new ideas for designs to allow me to increase my capabilities — simply by altering a CAD file. And what has truly surprised me is that I have not only overcome the limitations of my lost digit, I have been able to design and print prosthetics that allow me to perform sculpting/forming actions even more easily than I could pre-injury! And I can do every day things again — use a TV remote, pick up things from a table, turn a door key, start a car, button a shirt and all the thing one takes for granted when one has complete thumb function.
The Nylon618 material worked well, but then in October of this year, Sean noted from the 3DPI news website that taulman3D had a limited amount of FDA-compliant nylon 680 available — and asked to sign on as a tester.
Tom Martz from taulman3D picks up the story here:
We had seen Sean’s post on the instructables website and downloaded his stl files from thingiverse last summer and were impressed with his modelling skills. It was obvious that Sean would make an excellent tester as he not only had experience, but a real world need and a true 3D printing solution to a very human problem. We shipped 59 spools of FDA nylon 680 to testers all over the world but Sean was one of three individuals that were not a part of a clinical, medical, development or manufacturing entity to receive a test spool.
We work daily with users all over the world helping them to make the adjustment to printing in nylon from ABS or PLA. Being an extremely high quality nylon processed specifically for 3D printing, it does required a slightly different approach from other polymers. We are always pleased by the many emails we get when users dial in their settings and report such great results. From replacement gears in large industrial lathes to Sean’s prosthetic — it’s amazing what makers out there are doing every day. And Sean defined methods for not only printing his new prosthetic, but as it’s nylon it can be easily dyed. He was therefore also able to define ways of matching skin colour as well as modifying the stiffness slightly to add more capability to his prosthetic.
The other wonderful thing about Sean is that he isn’t satisfied with just solving his own problem. He wants to share his findings with everyone. Then move forward and begin working with doctors and clinics to educate them on the capability and use of 3D printing to solve the many challenges that nylon prosthetics can help with. He believes that there are still challenges to leap over the entrenched old-school set of 1800’s solutions that continue to live on simply due to greed and lack of knowledge about 3D printing. I think we can look for Sean to be a part of a new solution some day.
Sean is providing the following details for his 3D printing of each prosthetic, in a bid to share his success with a much wider audience:
Printer = MakerBot Replicator
Temp = 245c
speed = 35mm
layer hieght = 0.2mm
nozzle = standard makerbot conical nozzle
bed = aluminum with double sided tape and a print surface of 20lb paper attached to the tape
heated bed temp = 110c
rafting only no other support
material = nylon 618 or nylon 680
The printing process is straightforward with a hollow model. Using a solid model requires setting the infill to 0% and the removal of the base. Solid models are easier to adjust and customize because you need only adjust the exterior of the model. I have not used a scanner to generate a model but plan to in the near future, scanning needs fairly high resolution 0.5mm or less.
In post printing one can modify the slippery nature of nylon by mechanically abrading the surface with sand paper. One can also dye the model to closely match one’s skin colour, apply nail polish and even permanent maker tattoos. I recommend immersing models in near boiling water for a few minutes, it softens the material and acts to de-temper (becomes softer) the nylon. My exact process is to put a weighted model in 2-3 cups of water containing dye and then microwaving (1000 watt microwave) for 8 minutes, this achieves both dying and softening.
And continues by sharing his vision of an available to all, reasonable cost, personal prosthetic made from a 3D scan, in a “while-you-wait” setting.
The Nylon 618 works quite well and makes a great prosthesis, but you do have to take humidity precautions to get great prints. I have used 618 prosthetics for nearly a year, the material is great but lacks the FDA’s approval. The Nylon 680 will allow the medical community to produce these types of prostheses for patients.
My overall plan is to devise a camera based fitting procedure and instructions that medical professionals — or indeed anyone — can use. Ideally, anyone in the world who needs a prosthesis can take several pictures of their residuum (remaining digit) and submit it to me/or others for printing, and of course those with health insurance can go to a doctor where they can have the same service provided for them.
Typically, at the moment, one goes to a prosthetics provider where they have their hand cast and a physical model is made offsite by a prosthetic lab. The way I see it, this process will eliminate the need for most of the steps involved in the current process. The use of 3D printing for custom prostheses will also make these prostheses inexpensive (1-10% of the current cost of silicone prostheses). I calculate, based on my process as outlined above, each prosthesis costs around $1.00 in materials and $10-40 for the digital manipulation and surface finishing. At the beginning of my journey, after the accident, my basic silicone/pvc finger and thumb cost more than $5,000 including the doctor visits. The silicone did not wear well either, but after much wear and tear, I have not yet managed to destroy any of my Nylon 618 models — during more than six months of hard use.
I do believe that the significantly reduced cost involved with my prosthetics will mean a revolution in the industry in general, but, more specifically, a new functional solution for people like me, who want to use their hands again for more than jewellery display following digit loss.
For more information on Sean’s designs and efforts: